Notice: Function _load_textdomain_just_in_time was called incorrectly. Translation loading for the wp-ultimate-recipe domain was triggered too early. This is usually an indicator for some code in the plugin or theme running too early. Translations should be loaded at the init action or later. Please see Debugging in WordPress for more information. (This message was added in version 6.7.0.) in /home/maryzahc/public_html/adultfoodallergies.com/wp-includes/functions.php on line 6121
MaryKate – Page 5 – surviving the food allergy apocalypse (archive)

Author: MaryKate

  • Gluten-free Vegan Dressing (aka “stuffing”)

    Gluten-free Vegan Dressing (aka “stuffing”)

    Gluten-free vegan dressing
    Gluten-free vegan dressing

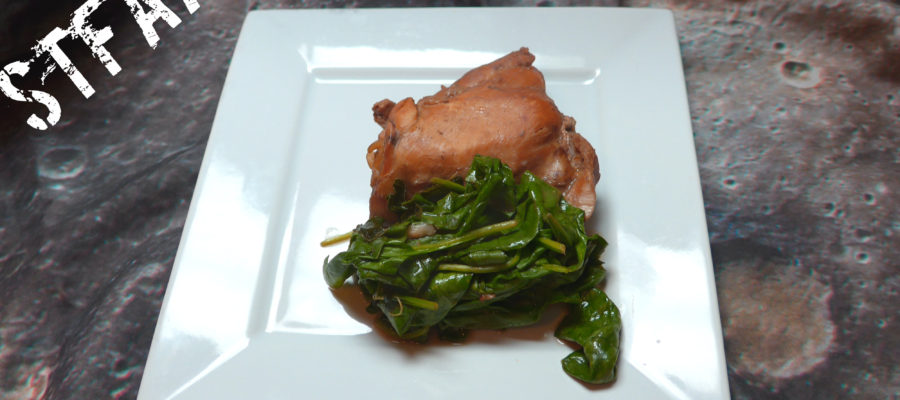
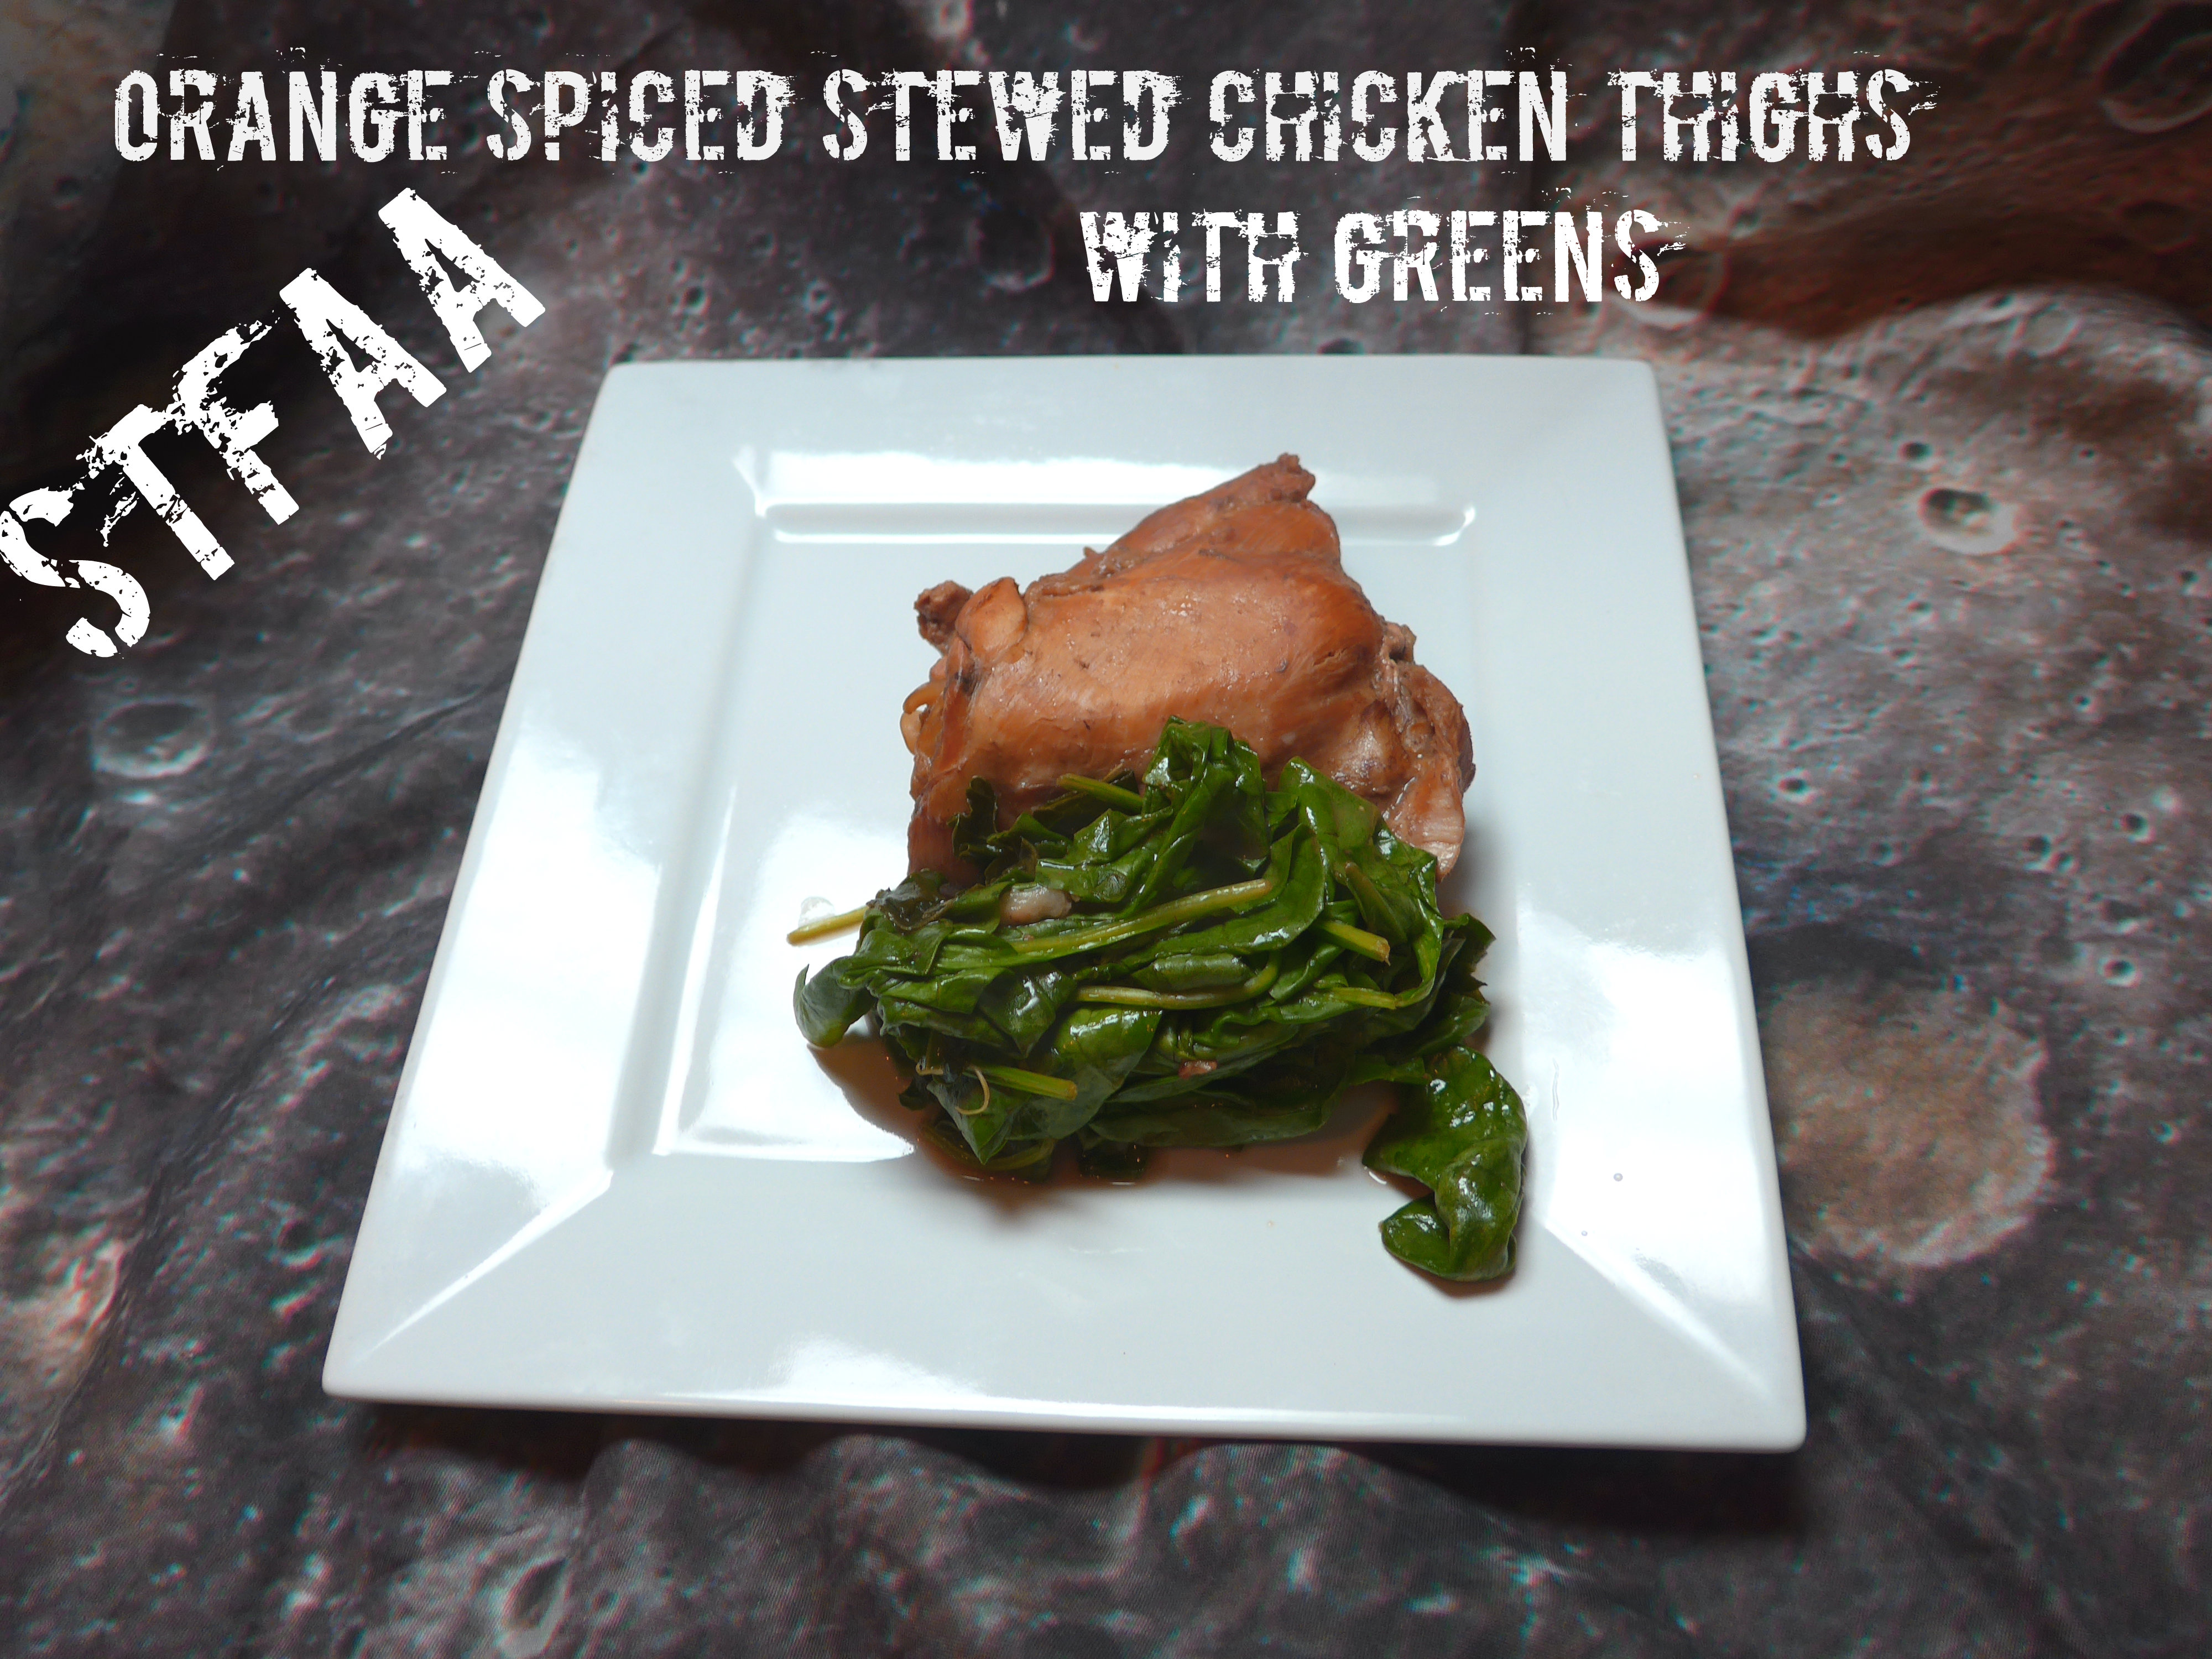
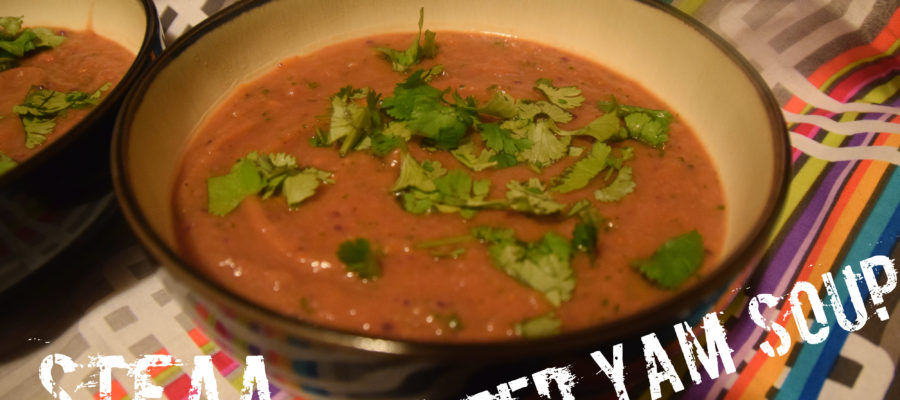
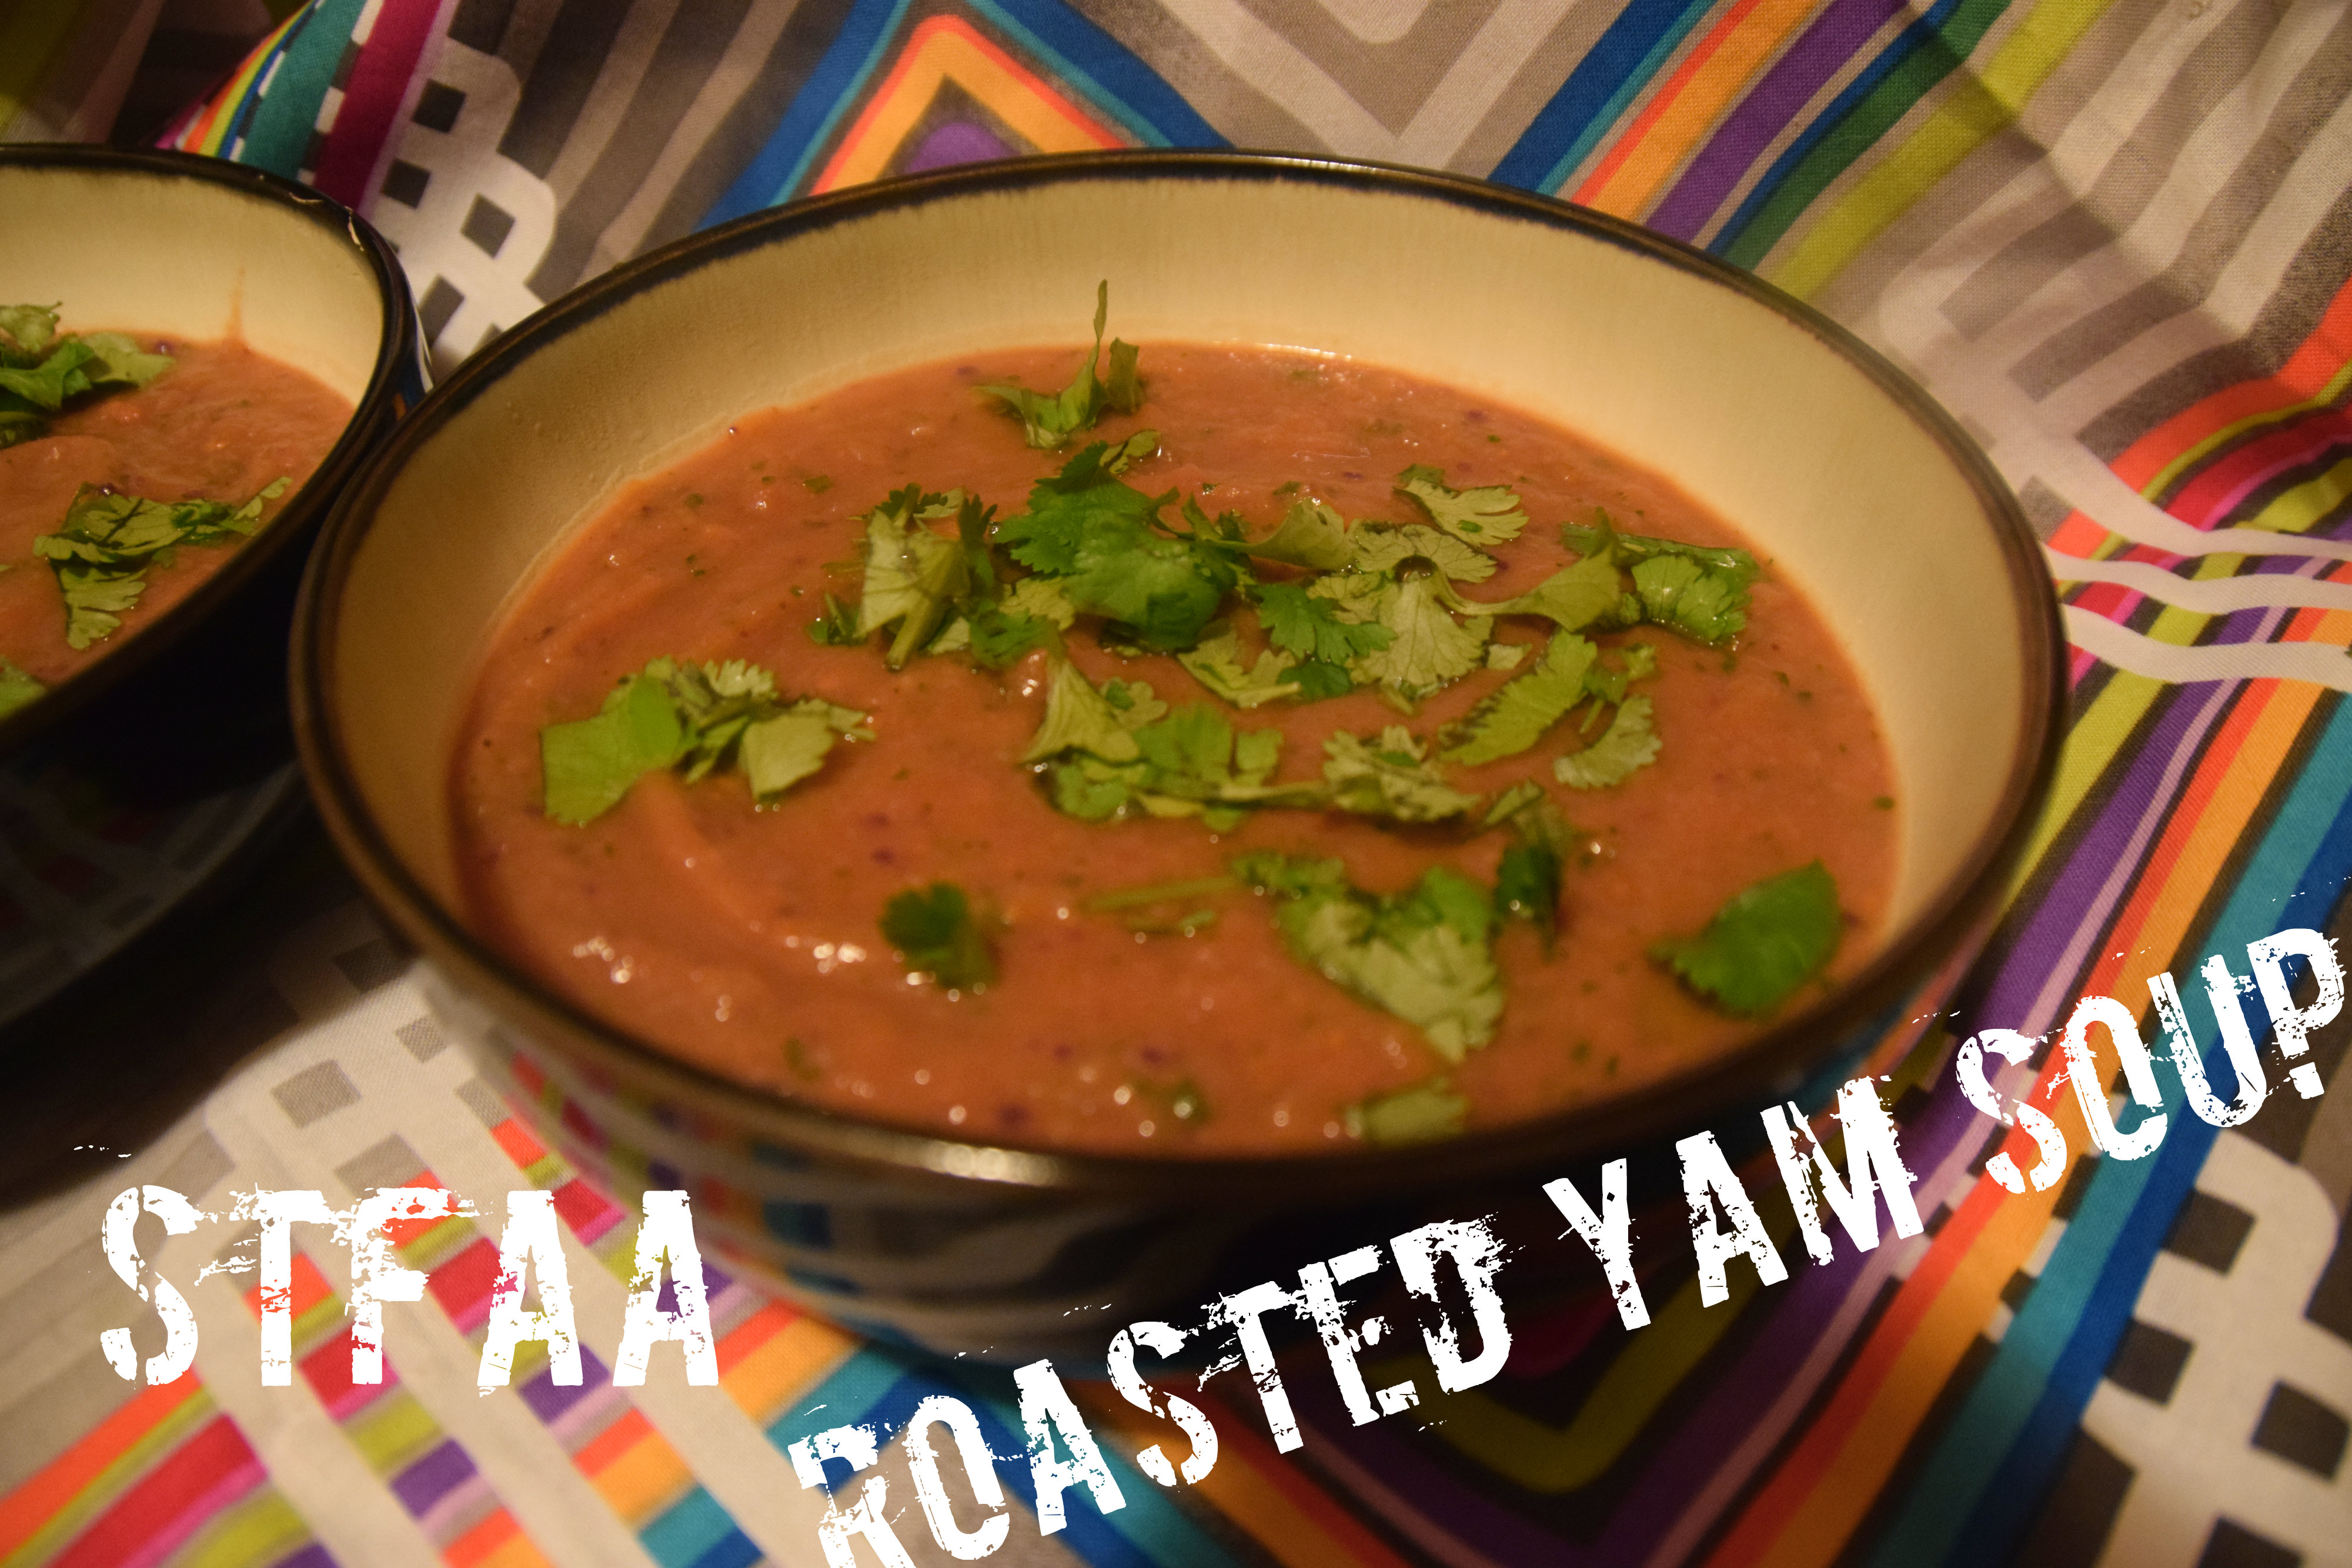
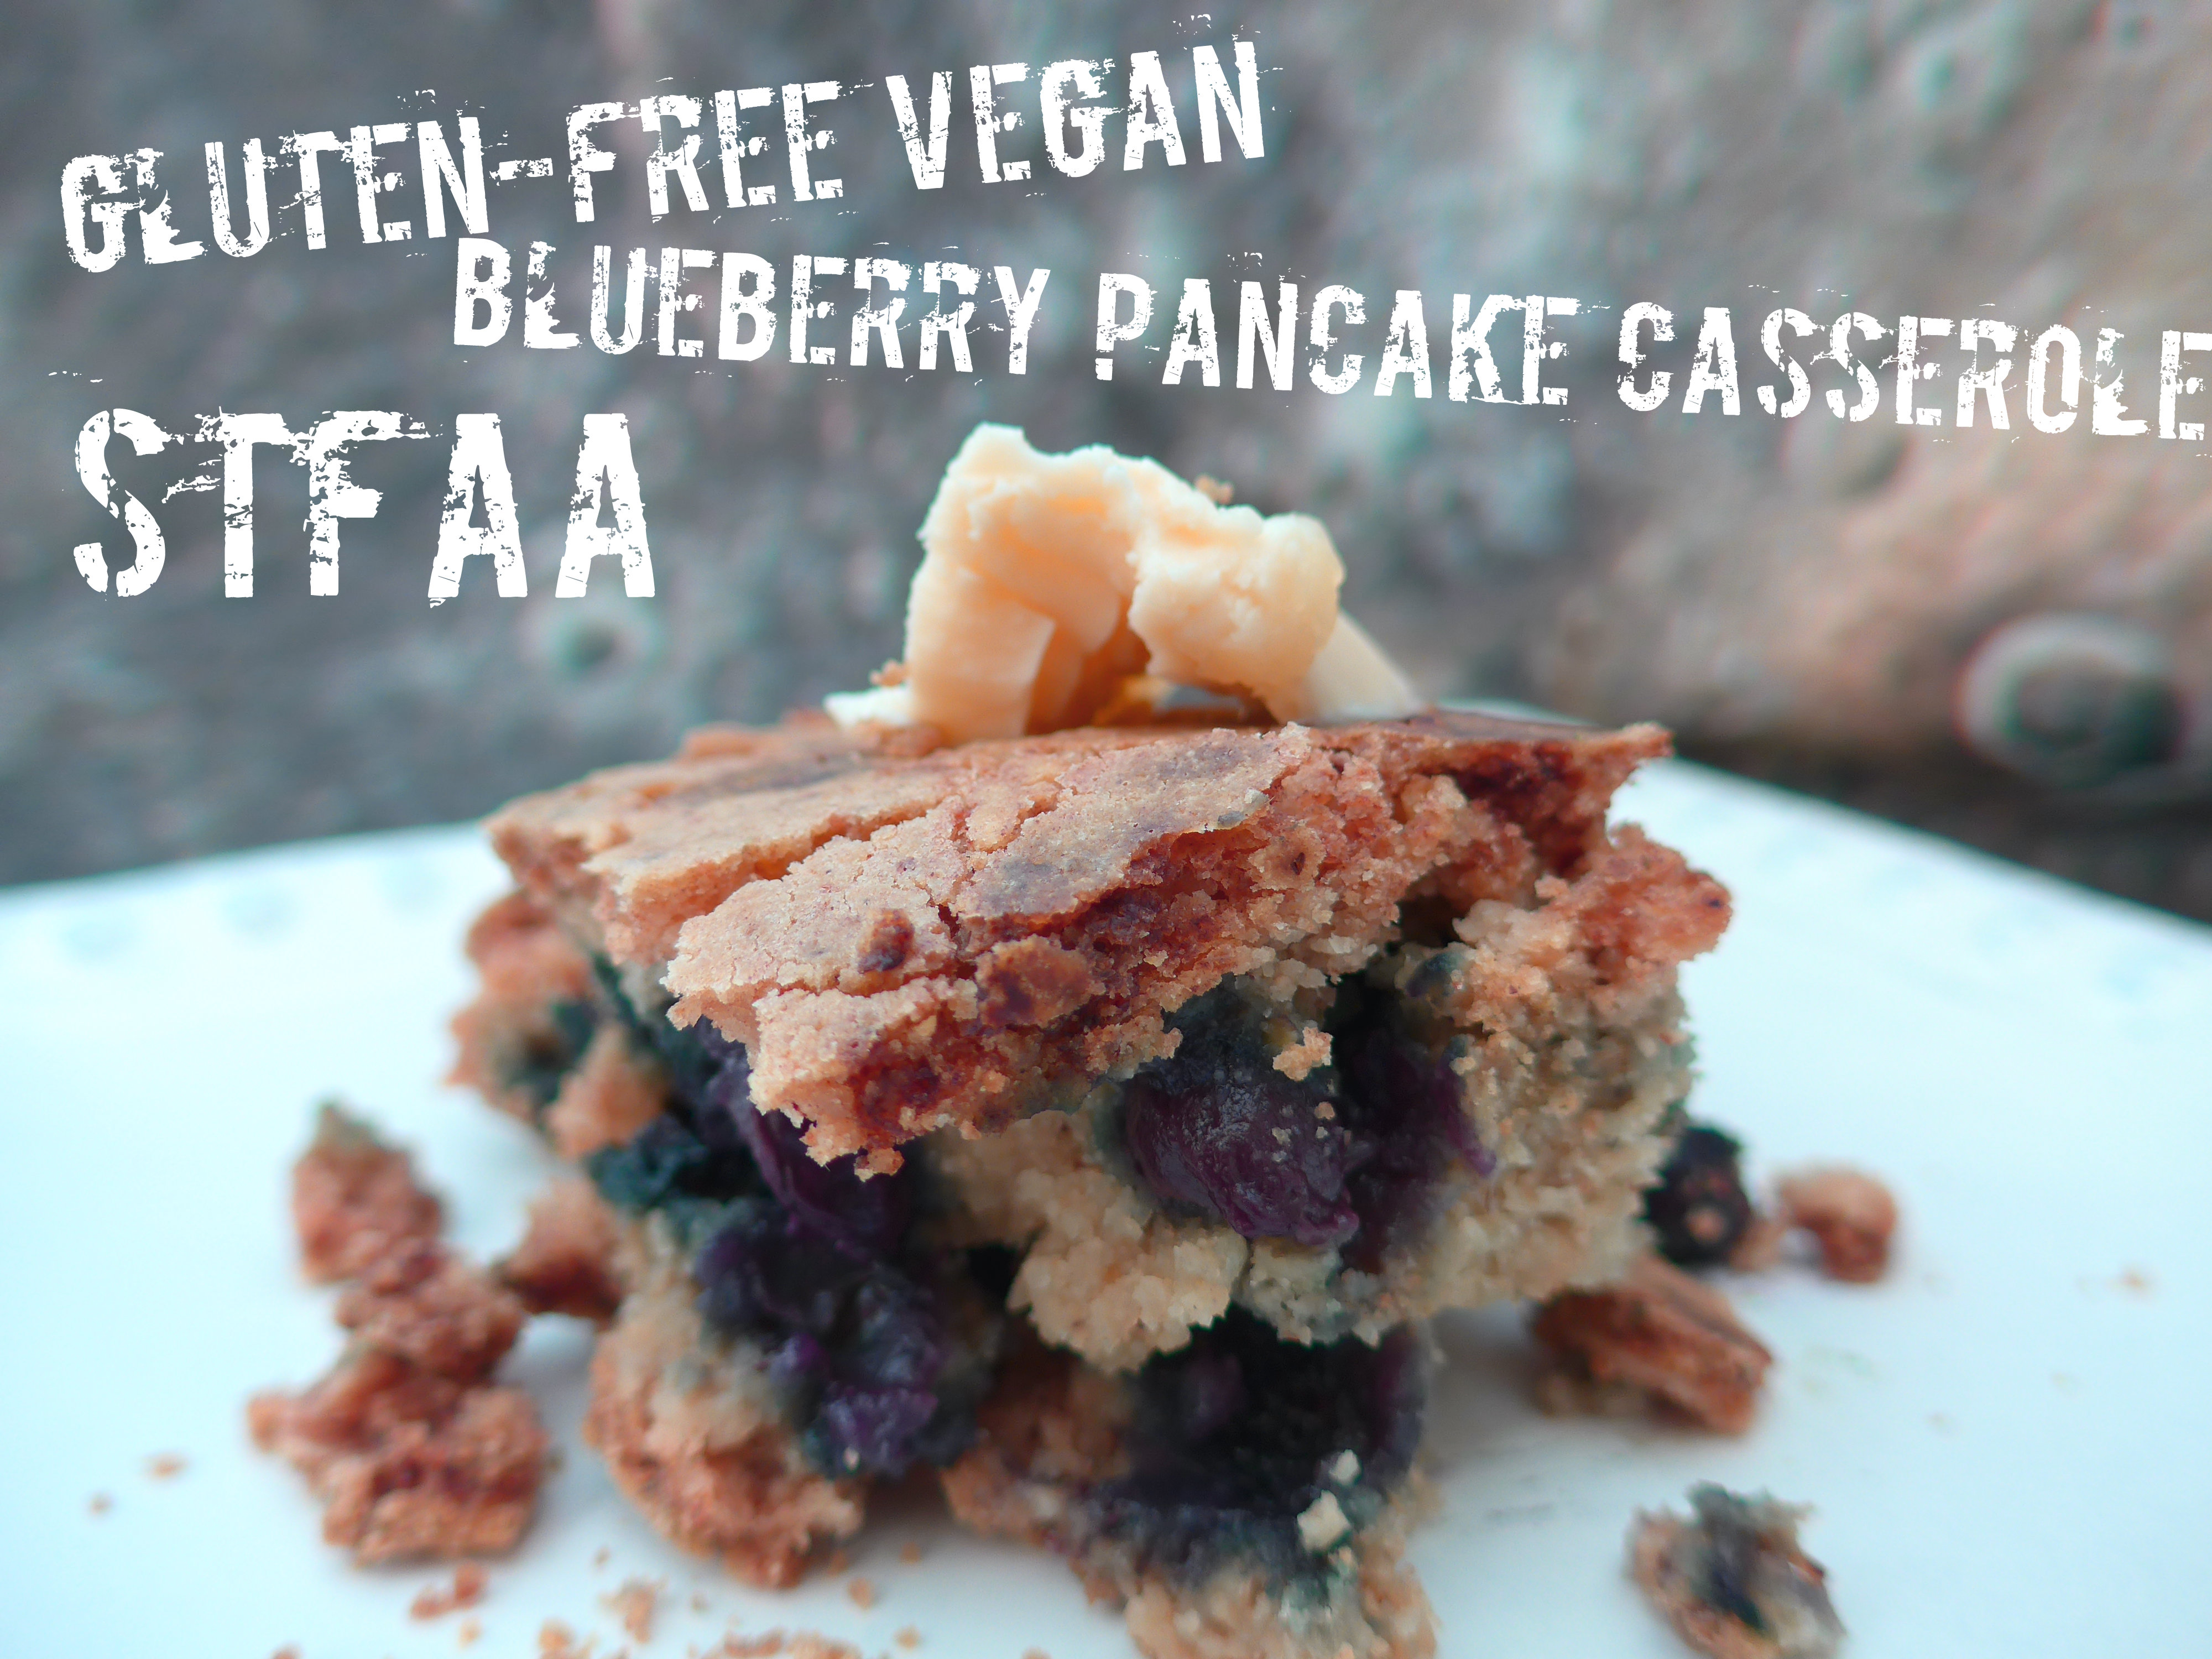
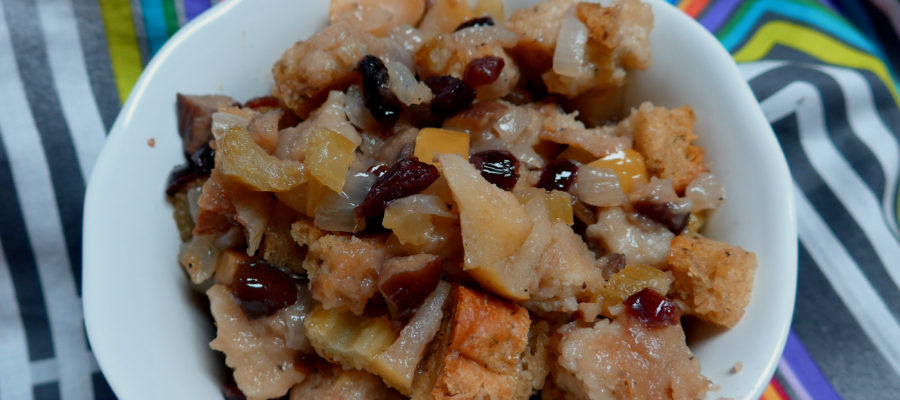
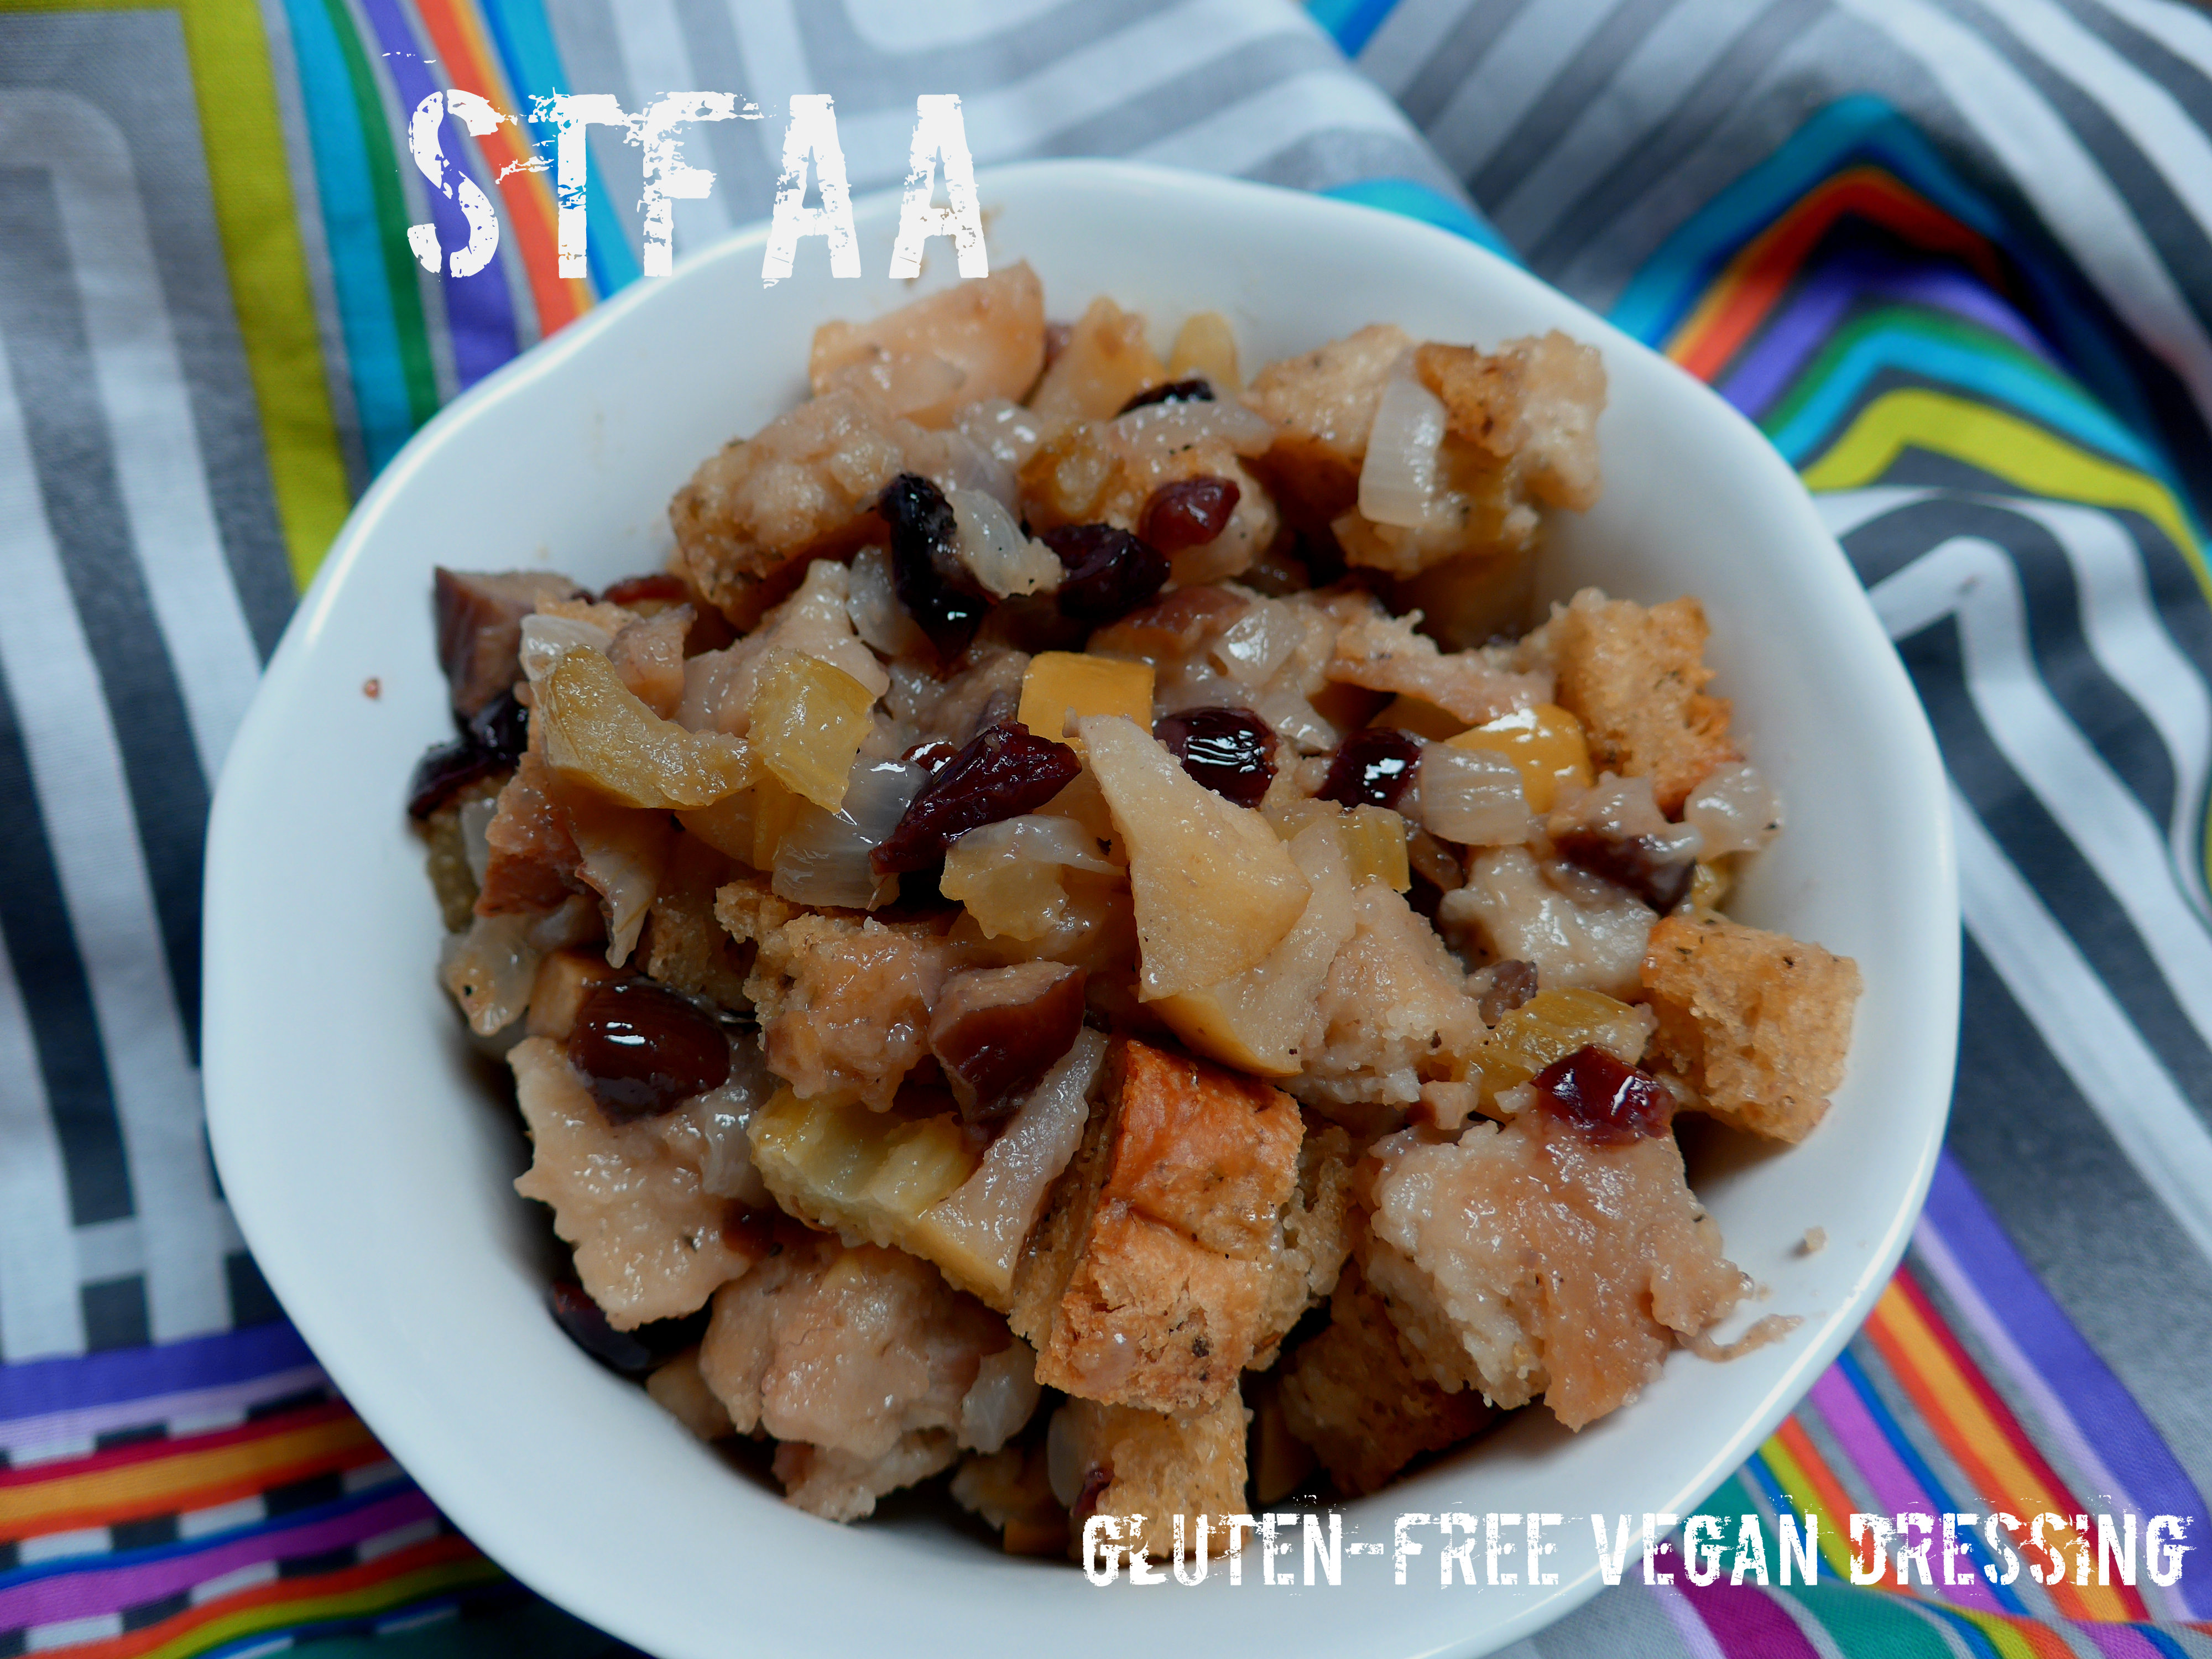
    So years ago, Denise and I posted a poll (which no longer works) as we disagree about whether the bread dish served with large birds is properly called “dressing” or “stuffing.” Denise argues that it’s stuffing. I argue that it’s stuffing IF it is stuffed into something (bird or vegetable, I don’t mind which) and it’s dressing if it isn’t. So, by that logic, this is a dressing. But by other people’s reckoning, this is a stuffing. No matter what you call it, it’s quite tasty and makes a great side dish that reheats well. I realize the timing of this might seem weird — most people think of stuffing/dressing as a Thanksgiving dish. But I was trying to make more space in the freezer and using up gluten-free breads that I didn’t love as toast, plus an excess of certain other ingredients in the house.

    And that’s a key — you will need bread. Whether you make your own gluten-free bread, buy a packaged product, or are lucky enough to have a local bakery that accommodates your allergy needs, you will need bread. The lucky thing is that this is actually a great dish to use up edible but slightly disappointing bread experiments! For the right texture for dressing, bread must be thoroughly dried out and then rehydrated, and gluten-free bread is awesome at drying out, isn’t it? I remember my mom laying out bread slices on a clean towel on top of the dryer about a week before Thanksgiving, but I just threw mine in the oven at 250ºF for about an hour. Keep this in mind — you can either prep ahead and dry your bread out, or you can build in extra time the day you make your dressing. Everything else in this dish is a pantry staple in my house.

    Like our Mini Thanksgiving casserole version of dressing, this one also contains celery and chestnuts, but unlike with that one, you could leave the chestnuts out here and make a nut-free version, if that’s your need. This one also has dried cranberries, which are really awesome, and uses veggie broth to stay vegan. If you like it, I’d suggest mushroom broth for the best flavor.


    Notice: Trying to access array offset on value of type bool in /home/maryzahc/public_html/adultfoodallergies.com/wp-content/plugins/wp-ultimate-recipe/helpers/models/recipe.php on line 254
    Gluten-free Vegan Dressing (aka “stuffing”)
    Print Recipe
    Servings Prep Time
    6 servings 20 minutes
    Cook Time Passive Time
    60 minutes 45 minutes
    Servings Prep Time
    6 servings 20 minutes
    Cook Time Passive Time
    60 minutes 45 minutes
    Gluten-free Vegan Dressing (aka “stuffing”)
    Print Recipe
    Servings Prep Time
    6 servings 20 minutes
    Cook Time Passive Time
    60 minutes 45 minutes
    Servings Prep Time
    6 servings 20 minutes
    Cook Time Passive Time
    60 minutes 45 minutes
    Ingredients
    • 2 cups gluten-free bread cubes dried out. Check for other allergens.
    • 2 Tablespoon fat of choice
    • 1 1/2 cups celery chopped
    • 1 1/2 cups onion chopped
    • 1/2 cup dried cranberries, rehydrated by soaking in hot water 15 minutes
    • 5 oz chestnuts, chopped (optional)
    • 1 whole apple, cored and chopped, peeled if you prefer
    • ~1 cup vegetable broth
    Servings: servings
    Instructions
    1. If you need to dry out your bread crumbs, you have a few options. 1. Set the bread out on a rack and leave it out for a few days. 2. Bake at 250ºF for about an hour, directly on the rack. 3. Toast on low and let cool completely standing up (don’t let it steam against a plate). Choose based on the amount of time you have now. Cut the bread into cubes.
    2. Preheat oven to 350ºF.
    3. In the oil/margarine/fat (I use vegan margarine), cook the onions until translucent. Add the celery, cook for a few minutes. Then add the cranberries, chestnuts, and apple, cooking for 2-3 minutes between each addition.
    4. In a bowl, mix the bread and vegetables. Mix well. Slowly add the broth, stirring, until there is just a tiny bit more than what the dried bread absorbs — maybe a tablespoon or so. Pour into a greased baking dish. You can do this round casserole style (deep) or in a 9×13 pan (shallow), which will change the texture. The deep dish will be more casserole-like and the shallow dish will be more bread-y and crispy.
    5. Cover and bake 30 minutes. Remove the cover and bake another 15 minutes, until top of bread bites are crisp. Serve hot.
    Recipe Notes

    º

    Share this Recipe
     
    Powered byWP Ultimate Recipe
  • Orange Spiced Stewed Chicken Thighs and Greens

    Orange Spiced Stewed Chicken Thighs and Greens

    orange spiced stewed chicken thighs
    orange spiced stewed chicken thighs

    Everything about winter here in Seattle screams “eat hot food with warming spices.” I thought I knew what I was getting into, weather-wise, as I lived in Oregon for three years. You know what Seattle has that Eugene, OR does not? WATER. Puget Sound and multiple lakes. From the hill we live on, we can see the mist rising off the water (and blowing up the hill at us). It is chilly in a very wet way.

    Chicken thighs are cheaper and easier to cook without drying out than chicken breasts. But they can be greasy. So to get around that, these are cooked, cooled, and warmed again to allow for straining off most of the fat. This is either a good make ahead recipe (the night before) or make it in the morning and reheat it for dinner.

    This chicken is based on wanting spice flavors and winter — and I totally understand why citrus is such a good winter flavor, as it’s great and sunny. I mixed these two up to stew chicken thighs, adding greens right at the end to absorb the flavor. I served this with a bit of dressing I’m working on, and I think mashed parsnips would also be a great side. It made for an easy Sunday dinner to start the week off warmly.


    Notice: Trying to access array offset on value of type bool in /home/maryzahc/public_html/adultfoodallergies.com/wp-content/plugins/wp-ultimate-recipe/helpers/models/recipe.php on line 254
    Orange Spiced Stewed Chicken Thighs
    Print Recipe
    This stewed chicken recipe does call for cooking, cooling, and then reheating the meat and sauce after straining or skimming off the fat. Plan accordingly.
    Servings Prep Time
    4 people 15 minutes
    Cook Time Passive Time
    45+25 minutes 2-3 hours
    Servings Prep Time
    4 people 15 minutes
    Cook Time Passive Time
    45+25 minutes 2-3 hours
    Ingredients
    • 2 cups water
    • 1 stick cinnamon
    • 1 whole star anise (or enough pieces to approximate 1)
    • 1 teaspoon whole peppercorns
    • 3 whole cloves
    • 3 whole cardamom pods
    • 2 bags black tea
    • 1 cup orange juice
    • 2 pounds chicken thighs bone in, skin off
    • freshly ground pepper to taste
    • 2 cups mixed cooking greens roughly chopped
    Servings: people
    Instructions
    1. Add water and whole spices to a large pot. Bring to a boil, then add tea bags, turn off heat, and cover. Steep 15 minutes.
    2. Remove tea bags and whole spices. Add orange juice, bring to a boil.
    3. Add chicken thighs, and bring again to a boil. Reduce heat to a simmer. If liquid covers the chicken only part way (likely), cook 15 minutes, covered, then flip chicken and cook for another 15 minutes, covered. Cook a final 15 minutes, uncovered.
    4. Now remove the chicken from the juice and cool all of it for at least a few hours or overnight. This will allow you to remove the excess fat from the cooking liquid. Skim or strain it out.
    5. Bring the cooking liquid back to a boil and then add the chicken thighs. Turning the heat down, simmer for about 15 minutes.
    6. Add the greens (I used spinach and kale here) and cook until the greens are wilted — this will depend on your greens, but 5-15 minutes is a good guess for anything short of collard greens (don’t use collards — they require a different cooking method). Spinach, kale, and chard are all good options.
    Share this Recipe
     
    Powered byWP Ultimate Recipe
  • Roasted Yam Soup

    Roasted Yam Soup

    Roasted Yam Soup
    Roasted Yam Soup

    IMPORTANT CONTENT NOTE: Those of you who hate cilantro, sorry. Please go Google one of the 100,000 other root vegetable soups out there. I know, your condition is genetic, and I’m sorry for you. This soup lives and breathes cilantro, and if you leave it out, there will be no point in making this particular soup recipe. Come again?

    For those of you still here, hi. Welcome to another edition of “MaryKate made soup, and it’s not very pretty, but I swear it tastes good anyway.” I’m your host, MaryKate, and, yes. I made soup. In my first months here in Seattle, I’m exploring new grocery stores and new ingredients, and as it is fall, there are so many root vegetables out. Most of them I know, but I’m seeing so many different things beyond just “sweet potatoes” and “yams.” To be honest, I don’t care which they are — I buy and bake any of them. But recently, I’ve found myself with 1 or 2 each of 4 different kinds of tubers all labeled “yam” with no other identifying information. In order to compare them, I’ve roasted them — and they are different! Starchier, sweeter, more mild. And all the colors! Yam love. Honestly, the most impressive flavor were the boring white ones — a bit sweeter and starchier than regular sweet potatoes, and really tasty.

    Blending these into soup was a great decision. The cilantro lightens the earthy flavor of the tubers and really makes it something different — hearty, but not heavy, and somehow, fresh.

    yams-collage
    Notice: Trying to access array offset on value of type bool in /home/maryzahc/public_html/adultfoodallergies.com/wp-content/plugins/wp-ultimate-recipe/helpers/models/recipe.php on line 254

    Roasted Yam Soup
    Print Recipe
    Servings Prep Time
    6 servings 60 minutes
    Cook Time Passive Time
    60 minutes 30 minutes
    Servings Prep Time
    6 servings 60 minutes
    Cook Time Passive Time
    60 minutes 30 minutes
    Roasted Yam Soup
    Print Recipe
    Servings Prep Time
    6 servings 60 minutes
    Cook Time Passive Time
    60 minutes 30 minutes
    Servings Prep Time
    6 servings 60 minutes
    Cook Time Passive Time
    60 minutes 30 minutes
    Ingredients
    • 3.5 lbs. yams and sweet potatoes Get everything you can find — why not?
    • 1/2 lb. rutabega
    • 1-2 Tablespoons olive oil
    • 1 teaspoon kosher salt
    • 3/4 cup onion
    • 6 cups vegetable stock
    • 1 cup cilantro chopped + more for garnish
    Servings: servings
    Instructions
    1. Preheat oven to 450ºF.
    2. Peel and chop yams, sweet potatoes, rutabega, and onion. Go for about 1/2 inch cubes, but really, just try to get them all about the same size.
    3. Put all chopped vegetables into a bowl. Add the olive oil and salt and stir to coat. Start with the smaller amount of olive oil, but add more if you need it. You don’t want greasy, but you do want everything fully coated.
    4. Bake for 30-45 minutes, until all the vegetables begin to brown. This is where so much flavor is born.
    5. When you have about 15 minutes left of cooking, heat your stock and cilantro in a large soup pot over medium-low heat.
    6. When the roasted vegetables are done and the soup stock is simmering, add the veg to the stock. Stir well, and then puree. A stick blender is the easiest way to do this, but use a blender if that’s what you’ve got. When you have a nice thick puree, heat thoroughly (takes only a few minutes) and stir well.
    7. Serve with an added sprinkle of cilantro for extra flavor.
    Share this Recipe
     
    Powered byWP Ultimate Recipe

  • White Fish, Avocado, and Polenta Stacks

    White Fish, Avocado, and Polenta Stacks

    Fish. It's what's for dinner. And it's before I found my backdrops.
    Fish. It’s what’s for dinner. And it’s before I found my backdrops.

    This is the first official recipe from the West Coast Office of Surviving the Food Allergy Apocalypse, also known as “MaryKate’s kitchen in Seattle.” Also, Jack’s kitchen, and because we’re still unpacking and he gets home from work first, he’s actually done a lot more cooking in this kitchen than I have. But we’ve unpacked most things now, and I feel like I can finally make space to work. It’s a completely different layout with way less cabinet space (less than ideal), but with a large closet that helps some with storage. We still have more stuff than space.

    Seattle has been great so far. We’ve got all new grocery stores to explore, lots of seafood options, new produce (and a shocking lack of hash brown patties without wheat in them. I had no idea I was so spoiled in New Hampshire on that front). And new places to eat — more on that later.

    So we’re in a new city, in new jobs, with new commute patterns. My days are actually longer, as my commute has increased four-fold — and I still can’t complain. In NH, I drove about 7 minutes across town. Now I take a bus about 30 minutes, with about a mile of walking total to and from bus stops. The hill TO the bus stop is… challenging. And an hour is a lot more time commuting. So quick dinners are an absolute necessity, but I’m not eating boring food. For this dinner, I’ve paired spicy poached fish with crispy polenta and creamy avocado for an utterly satisfying meal.

    Okay, I’ve called this a “stack,” but as you can see, it was really more of a pile. I envisioned a stack, but my plating skills, despite years of Top Chef watching, leave much to be desired. This is a really quick but impressive dinner that can take advantage of whatever fish and hot sauce you might have on hand. Poaching fish allows me to add a lot of subtle flavor with less danger of overcooking the fish than when I bake it — it’s right there, and I can watch it.

    If you’re allergic to fish: I’m sorry! This is not your recipe. Neither Denise nor I are allergic to fish, so we do eat it. It’s one of the things I’m enjoying most about west coast living so far.

    If you’re allergic to corn: This we can work with! But, as you know, being corn-allergic, it won’t be as convenient. Make a millet polenta (which is the basis for my Millet and Blueberry Breakfast polenta) and then crispy up cakes of this just as you would the tube of corn polenta. Sorry for the extra steps, but I know you’re used to it. Alternatively, consider serving the fish over a salad.

    Also feel free to adjust the ratios of hot sauce to olive oil on the fish, and the wine to stock in the poaching liquid. Use all hot sauce if you’re Denise! Use no wine if you don’t like it or don’t want to buy it. It will be fine. I’ve used a harissa in this version, because I think harissa is flavorful along with being spicy.

    Cod brushed with harissa
    Cod brushed with harissa

    Notice: Trying to access array offset on value of type bool in /home/maryzahc/public_html/adultfoodallergies.com/wp-content/plugins/wp-ultimate-recipe/helpers/models/recipe.php on line 254
    White Fish, Avocado, and Polenta Stacks
    Print Recipe
    A quick and relatively easy but quite tasty weeknight dinner
    Servings Prep Time
    4 people 20 minutes
    Cook Time Passive Time
    15 minutes 10 minutes
    Servings Prep Time
    4 people 20 minutes
    Cook Time Passive Time
    15 minutes 10 minutes
    Ingredients
    • 2 teaspoons olive oil
    • 1 roll prepared polenta
    • 2 pinches celery salt (about 1/8 teaspoon)
    • 1 handful cilantro stems and all
    • 1/2 cup stock or broth veggie or chicken, your choice
    • 3/4 cup white wine
    • 1 pound white fish I used cod
    • 2 teaspoons hot sauce or chili paste I used harissa
    • 1-2 teaspoons olive oil (no, this is a separate 2 t)
    • 2 whole avocados
    • 1 fresh lemon
    • 1 pinch salt, for each avocado half
    • 4 handsful salad greens of your choice but argula and spinach would be my top choices
    Servings: people
    Instructions
    1. In a heavy skillet, heat about 2 teaspoons of olive oil over medium to medium-high heat. You want to crisp the polenta, not burn it, and you know your stove (and attention span) better than I do. If you really don’t like using fat, you can just use the barest amount necessary to coat the pan, but polenta crisps up better with a little extra oil.
    2. Slice the polenta, and when the oil is hot, place the slices in a single layer in the skillet.
    3. Meanwhile, prepare the fish poaching liquid by adding the celery salt, cilantro, wine, and stock to another skillet, over medium heat.
    4. Cut the fish into serving-sized portions (so more or less match your polenta size).
    5. Mix your hot sauce and olive oil and brush on the fish. If you like it hot, use less olive oil. If you like it mild, I wouldn’t go less than a 1:1 ratio of oli to sauce or you lose the flavor entirely. I think you likely don’t want an actual thin hot sauce like Tabasco here, but anything as thick as ketchup should work.
    6. When the poaching liquid is boiling, add the fish. Watch it. When it starts to turn opaque, flip it. This is my favorite way to cook fish because it is easier to watch what I’m doing and see when the fish is done.
    7. Flip the polenta cakes and crisp on the other side.
    8. Halve and slice the avocados. Squeeze lemon over each set of slices, and give each a pinch of salt. Save some lemon wedges for serving.
    9. Plate up. I stacked the polenta on top of the greens, with the fish and then the avocado on top. And it was good.
    Recipe Notes

    Again, feel free to adjust your ratios:

    To make it spicier, use more chili paste/hot sauce and less olive oil. And vice versa. If you don’t want to use wine, use all broth.

    Share this Recipe
     
    Powered byWP Ultimate Recipe
  • Festive Squash and Cranberry Baked Rice

    Festive Squash and Cranberry Baked Rice

    Festive Squash and Cranberry Baked Rice
    Festive Squash and Cranberry Baked Rice

    So because I’m moving and combining households, I got rid of my rice cooker. THE HORROR. I think I may have mentioned before that I cannot, for the life of me, cook rice on the stovetop. This is why a friend gave me a rice cooker years ago. But I’m now without it for about three weeks until our households are actually combined. I still have rice, though.

    Years ago, I got a pamphlet from (I think) the canola oil council out in North Dakota, and it had a baked rice dish in it. I remember it being greasy, though,  probably because the pamphlet was about oil, not rice. So I looked up “baked rice” on the great wide internet, and I found Alton Brown’s recipe. I used this as the basis for a rice side dish full of fall flavors — butternut squash is earthy and a bit sweet, brown jasmine rice is worth hunting down, as it’s nutty but smoother than “regular” brown rice, and cranberries are fruity and tart and bright.

    I’ll apologize for the photos, as everything is in disarray right now. Denise and I have recipes for you through September, but we’re going to take a few weeks off in October to regroup as the blog goes bi-coastal.


    Notice: Trying to access array offset on value of type bool in /home/maryzahc/public_html/adultfoodallergies.com/wp-content/plugins/wp-ultimate-recipe/helpers/models/recipe.php on line 254
    Festive Squash and Cranberry Baked Rice
    Print Recipe
    Servings Prep Time
    6 servings 5 minutes
    Cook Time Passive Time
    45 minutes 45 minutes
    Servings Prep Time
    6 servings 5 minutes
    Cook Time Passive Time
    45 minutes 45 minutes
    Festive Squash and Cranberry Baked Rice
    Print Recipe
    Servings Prep Time
    6 servings 5 minutes
    Cook Time Passive Time
    45 minutes 45 minutes
    Servings Prep Time
    6 servings 5 minutes
    Cook Time Passive Time
    45 minutes 45 minutes
    Ingredients
    • 1 cup brown jasmine rice
    • 1 3/4 cup boiling water
    • 1 Tablespoon olive oil or vegan margarine
    • 1/2 teaspoon salt
    • 1/2 cup cranberries
    • 1 1/2 cups butternut squash chunks
    • 1-2 Tablespoons nuts optional
    Servings: servings
    Instructions
    1. Preheat oven to 375℉
    2. Add all the ingredients except water and nuts (optional!) to an oven-safe casserole dish. My cranberries are always frozen, but this is fine — just pick out any mushy ones.
    3. Bring water to a boil and pour over rice and other stuff.
    4. Cover tightly. This is easiest with a glass or glass-topped casserole dish as you can check it without letting the steam out, but if you don’t have one, foil works, too.
    5. Bake for about 45 minutes. The water should be completely absorbed. Remove from the oven, remove the lid, and fluff the rice with a fork so that the underside doesn’t over-steam.
    6. Top with nuts, if using, and serve.
    Recipe Notes

    **You can substitute white rice in this dish, but decrease the water to 1:1 (1 cup, in this case) and decrease the cooking time to 30 minutes. I like the brown jasmine rice, in particular, as it has the nuttiness of regular brown rice without the more fibrous texture, and the flavor compliments the squash.

    Share this Recipe
     
    Powered byWP Ultimate Recipe


  • Gluten-free Vegan Blueberry Pancake Casserole

    Gluten-free Vegan Blueberry Pancake Casserole

    Blueberry Pancake Casserole
    Don’t forget the maple syrup!

    This is a recipe re-make. As I posted on Friday, I do use existing recipes as starting points for creating allergy-friendly dishes sometimes. I read this blueberry pancake casserole recipe on The Kitchn and could not. stop. thinking. about. it. Drooling.

    I love pancakes, but after I’ve made the second one, I’m ready to eat and be done cooking. Casserole seemed the perfect fix. But the recipe. It’s probably great, but it was mostly made up my things that make me ill. All-purpose (wheat) flour. Eggs. Buttermilk. Whole Milk. More flour. Butter. It did seem like a lot of things to fix.

    After a few experiments, let me say that it’s possible. Also, for some wonderful reason, this casserole actually tastes better re-heated. So you can absolutely make it the night before — I encourage you to.

    To be clear: This is not an original recipe. This is a heavily-modified version of this recipe at The Kitchn. I really wanted to eat this pancake casserole, so I figured out how to make it safe for me. Maybe you can do the same. I have not listed this as a tree nut-free recipe, as I used almond milk in every test, and I used creamed coconut in at least one version as a replacement for vegan margarine (weird sub, I know, but it worked). I have not noticed substantially different outcomes using different non-dairy milks, and if you can use soy milk, I have a feeling it will work well in this recipe. But if you try something different, please tell me how it works!

    Pancake 1


    Notice: Trying to access array offset on value of type bool in /home/maryzahc/public_html/adultfoodallergies.com/wp-content/plugins/wp-ultimate-recipe/helpers/models/recipe.php on line 254
    Gluten-free Vegan Blueberry Pancake Casserole
    Print Recipe
    Servings Prep Time
    8 servings 15 minutes
    Cook Time Passive Time
    45 minutes 55 minutes
    Servings Prep Time
    8 servings 15 minutes
    Cook Time Passive Time
    45 minutes 55 minutes
    Gluten-free Vegan Blueberry Pancake Casserole
    Print Recipe
    Servings Prep Time
    8 servings 15 minutes
    Cook Time Passive Time
    45 minutes 55 minutes
    Servings Prep Time
    8 servings 15 minutes
    Cook Time Passive Time
    45 minutes 55 minutes
    Ingredients
    • 2 Tablespoons ground flax seeds or ground chia seeds
    • 6 Tablespoons water
    • 2 1/2 cups gluten-free flour blend divided — 2 c and 1/2 cup
    • 1 teaspoon baking powder
    • 1 teaspoon baking soda
    • 1 teaspoon cinnamon
    • 2 Tablespoons sugar
    • 1/2 teaspoon kosher salt
    • 2 1/2 cups non-dairy milk (I usually use almond)
    • 2 Tablespoons lemon juice
    • 4 Tablespoons vegan margarine or creamed coconut (I know this seems like an odd alternative, but it works)
    • 1 1/2 cups blueberries (works okay with fresh or frozen — do not defrost)
    Servings: servings
    Instructions
    1. Grease a 13×9 baking dish. Pre-heat oven to 350°F.
    2. In a small bowl, mix the chia or flax seeds with the 6T water. Set aside.
    3. In a separate small bowl, whisk together the 1/2 cup GF flour, the baking soda, the baking powder, and the cinnamon.
    4. In a large bowl, mix 2 cups of gluten-free flour, sugar, salt, non-dairy milk, lemon juice, and the flax or chia “gel.” When well mixed, fold in the second flour mix.
    5. Pour into the prepared pan, and then sprinkle the blueberries over the top.
    6. Bake for about 45 minutes, until the top is dry. This casserole doesn’t pass the touch test (where the “cake” springs back if you poke it lightly) or the toothpick test (the blueberries mess it up, especially if they were frozen), but it should looke baked and done. Let it rest 10-15 minutes before cutting into it if you plan to eat right now. Otherwise, let it cool completely and cover it. Then re-heat for 10 minutes (if at room temp) or 20 minutes (if it was in the refrigerator) at 300°F in the morning.
    7. Serve with vegan margarine, if desired, and maple syrup (really not optional, as maple syrup is the point of pancakes).
    Share this Recipe
     
    Powered byWP Ultimate Recipe
  • Meatballs with Mushrooms, Onions and Spaghetti Squash

    Meatballs with Mushrooms, Onions and Spaghetti Squash

    Meatballs and Squash
    Meatballs and Squash

    I’m not sure if you’re ready for hot food, but I really am. In order to get ready for work after a week of vacation, I needed something hearty but not heavy. Spaghetti squash seemed to fit the bill with some meatballs and mushrooms and onions. It seems I reach over and over again for mushrooms and caramelized onions every time I need comfort food or hearty food — do you have go-to ingredients that help you face the world? Because mine are apparently mushrooms (which Denise hates) and onions. They’re so earthy and grounded.

    Spaghetti squash is weird, and while I don’t think it’s actually a substitute for pasta, it is a good vehicle for some thinner sauces. Putting the squash in the pan to soak up the meatball fats and the onion oil means you lose none of the flavors. It’s possible that this dish is even paleo-friendly, but I won’t claim to know the rules behind that diet. If you want a little less fat in the sauce, drain the pan after sauteing the meatballs or scoop up the onions, mushrooms, and meatballs with a slotted spoon and put them on the squash.

    This dish will fortify you and make you ready to face the rest of summer.


    Notice: Trying to access array offset on value of type bool in /home/maryzahc/public_html/adultfoodallergies.com/wp-content/plugins/wp-ultimate-recipe/helpers/models/recipe.php on line 254
    Meatballs with Mushrooms, Onions, and Spaghetti Squash
    Print Recipe
    An earthy but not too heavy dish to make you ready to face anything.
    Servings Prep Time
    4 people 15 minutes
    Cook Time
    90 minutes
    Servings Prep Time
    4 people 15 minutes
    Cook Time
    90 minutes
    Ingredients
    • 1 medium spaghetti squash football-sized
    • 2 Tablespoons olive oil
    • 1 large sweet onion quartered and sliced thin
    • 1/2 teaspoon kosher salt divided into two 1/4t servings
    • 1 8 oz. package mushrooms broken into pieces
    • 1/2 pound ground beef (I prefer 85/15 mix)
    • 1/2 pound ground pork
    • 1 teaspoon oregano
    • 1 1/2 teaspoon basil
    • 2 Tablespoons fine bread crumbs or starch-based gluten-free flour
    • fresh ground pepper, to taste
    • 1 Tablespoon water
    Servings: people
    Instructions
    1. Pre-heat oven to 400°F. Poke a hole in a spaghetti squash and throw it in the oven, on the rack. Bake for an hour. (You can also slice it in half and bake it for 30-45 minutes. I prefer the lazier approach. Learn more from the link in the notes.)
    2. Heat the olive oil in a skillet over medium-low heat (cast iron is best for making great caramelized onion). When it’s hot, add the onions and 1/4 teaspoon salt. Stir well, to coat all the onion with oil, and then cook, stirring occasionally, for about 45 minutes.
    3. Meanwhile, make the meatballs by mixing the beef, pork, oregano, basil, and bread crumbs or starchy gluten-free flour. Because they will be more tender if you work the meat less, I break up the meats first, sprinkle the seasonings over, and then lightly mix before forming ping-pong ball-sized meatballs. I get about 14 meatballs from a pound of meat.
    4. Your squash is likely done now. Take it out and let it cool. As soon as you can, slice it in half to let it cool more.
    5. When the onions are beginning to get a pretty caramel brown, push them all to the sides and add the meatballs. You might need to do this in two batches to have enough room to stir.
    6. When the meatballs are browned on most sides, add the mushrooms, the second 1/4 teaspoon of salt, pepper, and the water. Stir well (but gently — the meatballs are still delicate) and cover for about 5 minutes. When the mushrooms have started to cook, stir again, and cover for another 5 minutes.
    7. Taste and adjust seasonings if necessary.
    8. Scoop out the seeds and pulp. Then scoop out the squash and stir it in to the skillet. You will be able to see when it’s soaked up the sauce, and then it’s ready to serve.
    Recipe Notes

    If you’ve never cooked spaghetti squash before, check out this lesson from The Kitchn.  You can also check out Denise’s Meatball Sub Meatballs recipe, if you like a more substantial meatball. Mine is a streamlined version for a quick meal.

    Share this Recipe
     
    Powered byWP Ultimate Recipe
  • Cold Roasted Vegetable Sauce

    Cold Roasted Vegetable Sauce

    Cold Roasted Vegetable Sauce, over quinoa pasta, with broccoli and a bit of mushroom
    Cold Roasted Vegetable Sauce, over quinoa pasta, with broccoli and a bit of mushroom

    It has been hot this summer. Hotter than normal, longer than normal, and I am frankly rather sick of hearing the AC drone on. I want to cook food! I want to want to eat hot food. But I don’t. It’s hot. So what I’ve been doing is heating the kitchen way up one day, cooking a bunch of food, and remixing it all week. So several pans of roasted veg, a big pot of grains, a bunch of spinach, and a few proteins. But I have gotten SO BORED with it.

    This week, I decided to mix it up and make a pasta salad with the roasted vegetables used as the sauce. It turned out rather well. You could add beans or meat for protein, and if you wanted extra greens, mix them in or serve them over top. Also, this is absolutely more of a recipe concept than a recipe, so use whatever vegetables you have around.

    I generally roast my vegetables at 425ºF on big sheet pans. I toss everything in a bit of olive oil and dust it with salt.  Size varies greatly, so if I don’t have a full pan of something, I try to group things that will cook in about the same amount of time. In less than an hour, I can do 3 or 4 pans, and it’s a ton of vegetables. I almost always throw a sweet potato in the mix, and I always, always, always roast onions because I love them and they add good base flavors to any dish.

    A slightly depleted batch of roasted veg for the week
    A slightly depleted batch of roasted veg for the week

    This recipe used about 1 sweet potato, about 1/2 of an onion, 4 skinnier carrots, and about half a package of mushroom caps (4 oz). I did not want to blend the broccoli in, but I chopped it up instead, maybe a cup of it. Serve over any pasta or grain of your choice, with added protein if that’s what you’re up for. The sauce isn’t pretty, but it tastes great.


    Notice: Trying to access array offset on value of type bool in /home/maryzahc/public_html/adultfoodallergies.com/wp-content/plugins/wp-ultimate-recipe/helpers/models/recipe.php on line 254
    Cold Roasted Vegetable Sauce
    Print Recipe
    Servings Prep Time
    3 meal-sized servings 10 minutes
    Servings Prep Time
    3 meal-sized servings 10 minutes
    Cold Roasted Vegetable Sauce
    Print Recipe
    Servings Prep Time
    3 meal-sized servings 10 minutes
    Servings Prep Time
    3 meal-sized servings 10 minutes
    Ingredients
    • 1 cup sweet potato, roasted
    • 1/2 cup onion roasted
    • 4 carrots small, roasted
    • 1/2-3/4 cup mushroom caps, roasted
    • 1/2 cup water
    • 1/4 cup olive oil
    Servings: meal-sized servings
    Instructions
    1. If you need to roast your vegetables, do so — see the post above for how I do it. Cool them.
    2. Add all vegetables and water to blender, gently puree, stirring as needed. When you need more liquid, add the olive oil. Blend until smooth. Taste and adjust seasonings. If you want a thinner sauce, add more water until you get the consistency where you want it.
    3. Serve over whatever sounds good — pasta or grains would be my suggestion (as that’s all I’ve tried). Add other vegetables to the mix as desired.
    Share this Recipe
     
    Powered byWP Ultimate Recipe