Notice: Function _load_textdomain_just_in_time was called incorrectly. Translation loading for the wp-ultimate-recipe domain was triggered too early. This is usually an indicator for some code in the plugin or theme running too early. Translations should be loaded at the init action or later. Please see Debugging in WordPress for more information. (This message was added in version 6.7.0.) in /home/maryzahc/public_html/adultfoodallergies.com/wp-includes/functions.php on line 6131 MaryKate – Page 17 – surviving the food allergy apocalypse (archive)
When I was in graduate school, we had a lot of parties. I’m a nerdy sort, so these weren’t “trash can punch” kind of parties, but beer and wine and mostly lots of food kind of parties. And they were always potluck, because no one had any money. Certain things became favorites, so people never had to much thing about what to bring — they were requested. This was definitely one of the group favorites, and I’ve held on to the recipe. Goes well with bread, tortilla chips, crackers, even veggies, and the leftovers make a great, if chunky, sandwich spread. Plus, it looks impressive and gourmet but is incredibly easy.
This version replaces the mayo and cheese to give you a really tasty, vegan and allergen-free version that will also please the people you know who can eat everything.
Tiffany’s Artichoke Dip
Tiffany’s Artichoke Dip
Preheat oven to 350F.
Grease casserole dish.
16 oz. of canned or jarred artichoke hearts, drained and chopped
1 small can of chopped green chiles or jalapenos
1 cup of Earth Balance Mindful Mayo, original
3 Tablespoons of nutritional yeast
3 Tablespoons of garbanzo bean flour
Mix all ingredients together in the casserole dish, smooth out evenly. Bake 20-25 minutes, serve warm.
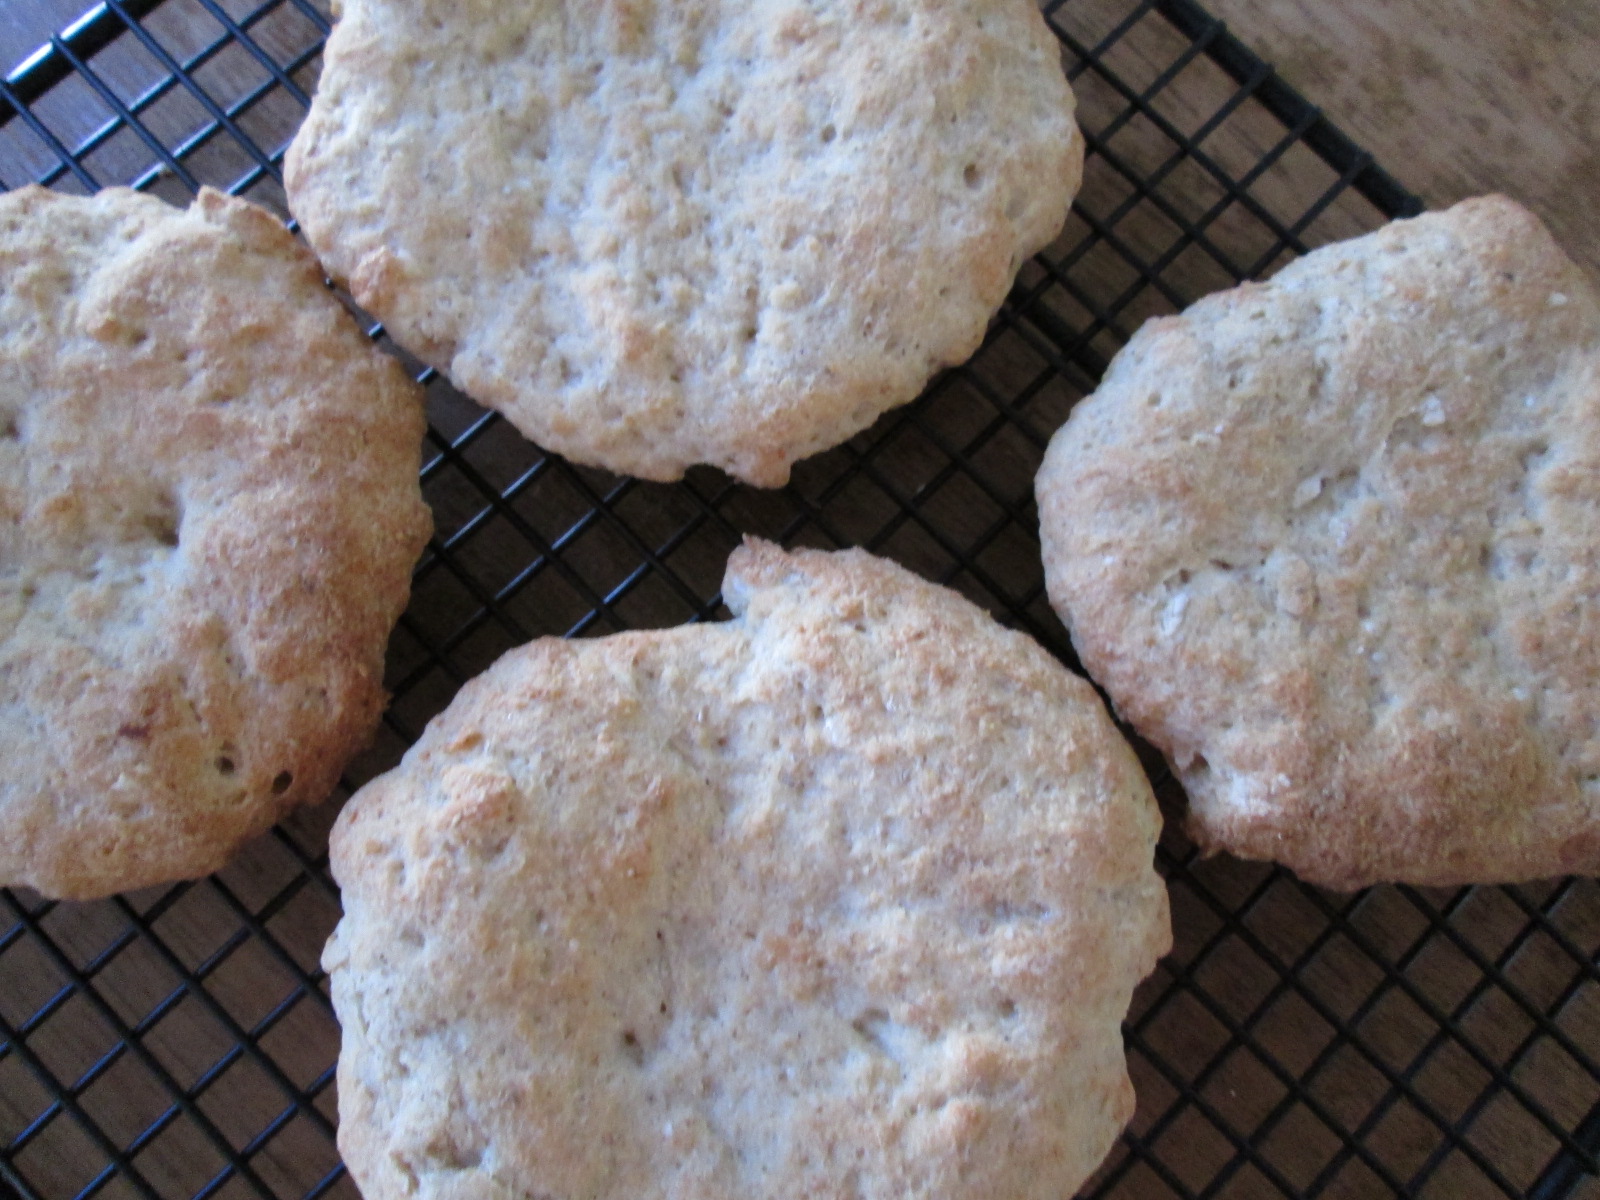
I was trying to make pita bread. Which, this really isn’t. Mainly in that it’s not as dry as pita bread (which is kind of weird, because you can usually count on gluten-free bread being drier than wheat bread), nor as puffy, and without the cavity in the middle. And they’re smaller — given the structural integrity issues that gluten-freeness can cause, I’d suggest staying on the smaller side.
So basically these are nothing like pita bread. Sorry for the misdirection there. They are small sandwich round bread things which are tasty, allergen-free, and seem to please the few non-allergenic people I’ve fed them to (i.e. my neighbors). So you should try them!
Gluten-free Bread Round Things
You’re going to make three mixes and then mix them all together. With me?
First, mix:
2 Tablespoons active dry yeast
2 teaspoons sugar
1 cup + 2 Tablespoons warm — not hot — rice milk
Second, in a separate bowl, mix:
1/4 cup rice milk
2 Tablespoons ground chia seeds
4 teaspoons apple cider vinegar
Third, in a large mixing bowl or the bowl of your stand mixer, mix:
1 cup sorghum flour
1 cup tapioca starch
2 Tablespoons rice milk powder
4 teaspoons xanthan gum
1 teaspoon salt
2 Tablespoons olive oil
yeast mixture (should be foamy!)
chia mixture (should be gelled somewhat)
Mix until you have a pretty solid dough, reasonably thick and pulling away from the sides of the bowl. The nice thing (“nice”) about gluten-free baking is that you really can’t overmix things. There’s no gluten to get tough. I let my mixer go and make up the dishwater while it’s working, so maybe 5 minutes or so.
With well-oiled hands, scoop out 1/4 cup of dough and shape into a smooth ball. Press out to form the round — aiming for 1/8 — 1/4 inch or so in thickness, but all about the same (thickness is more important than exact size for cooking time). Place the round on a parchment covered baking sheet. Repeat until you’ve used all the dough.
Place into a COLD OVEN and turn the oven on to 400F. The timing from here on out will depend on how fast your oven heats up — mine takes almost 20 minutes to reach 400F. Check these out at about 20 minutes, but it will likely take 35-45 minutes for them to fully bake, depending on the thickness of your rounds.
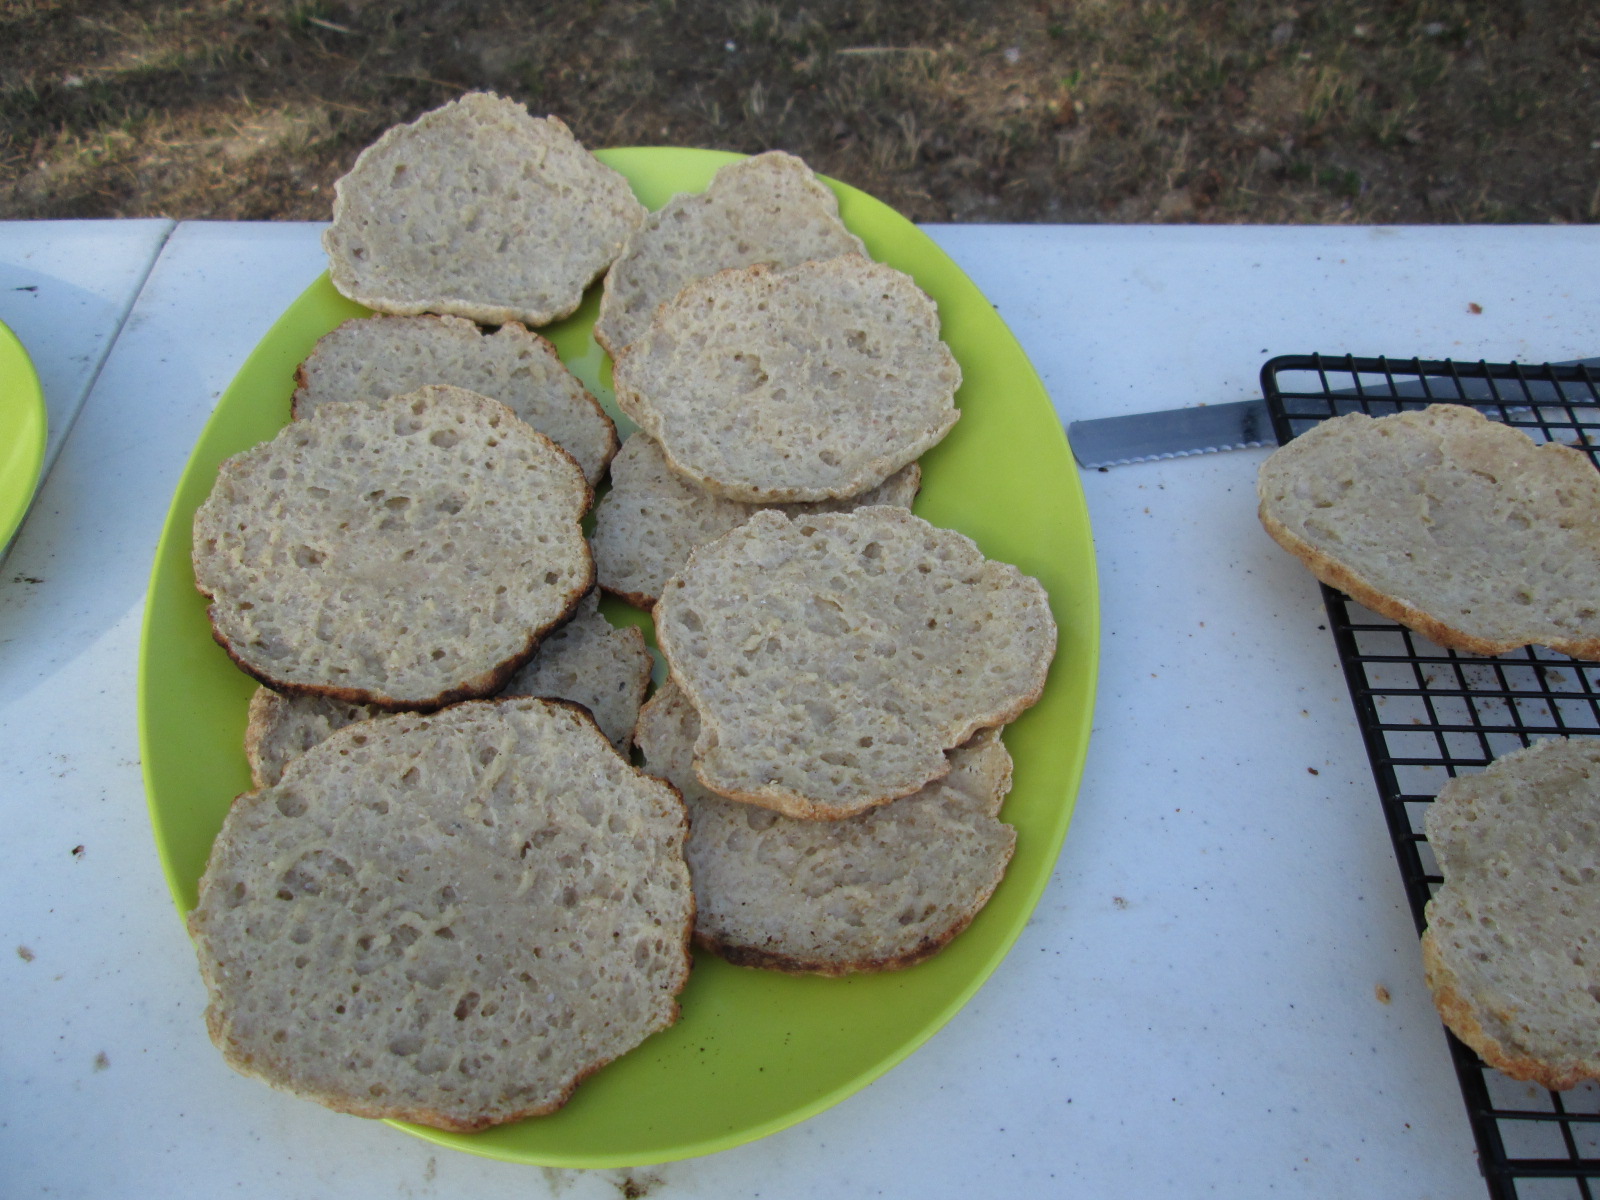
Now the one thing that you’re missing are the toasted bubbled bits that a real pita bread has — if you want these, throw the pita on a grill or into a hot skillet, a few minutes on each side. This is not necessary, but does add flavor and visual texture.
When the bread rounds are completely cooled, you will be able to slice them, but carefully! Don’t expect to make pita pockets, but honestly these hold up better than most gluten-free bread for sandwiches (or at least the ones that are also egg and dairy free), so give it a try.
Hey, it’s our second burger post! I really hope you’re finding some options or getting some ideas about what to bring to barbeques this summer — or what to serve at your own.
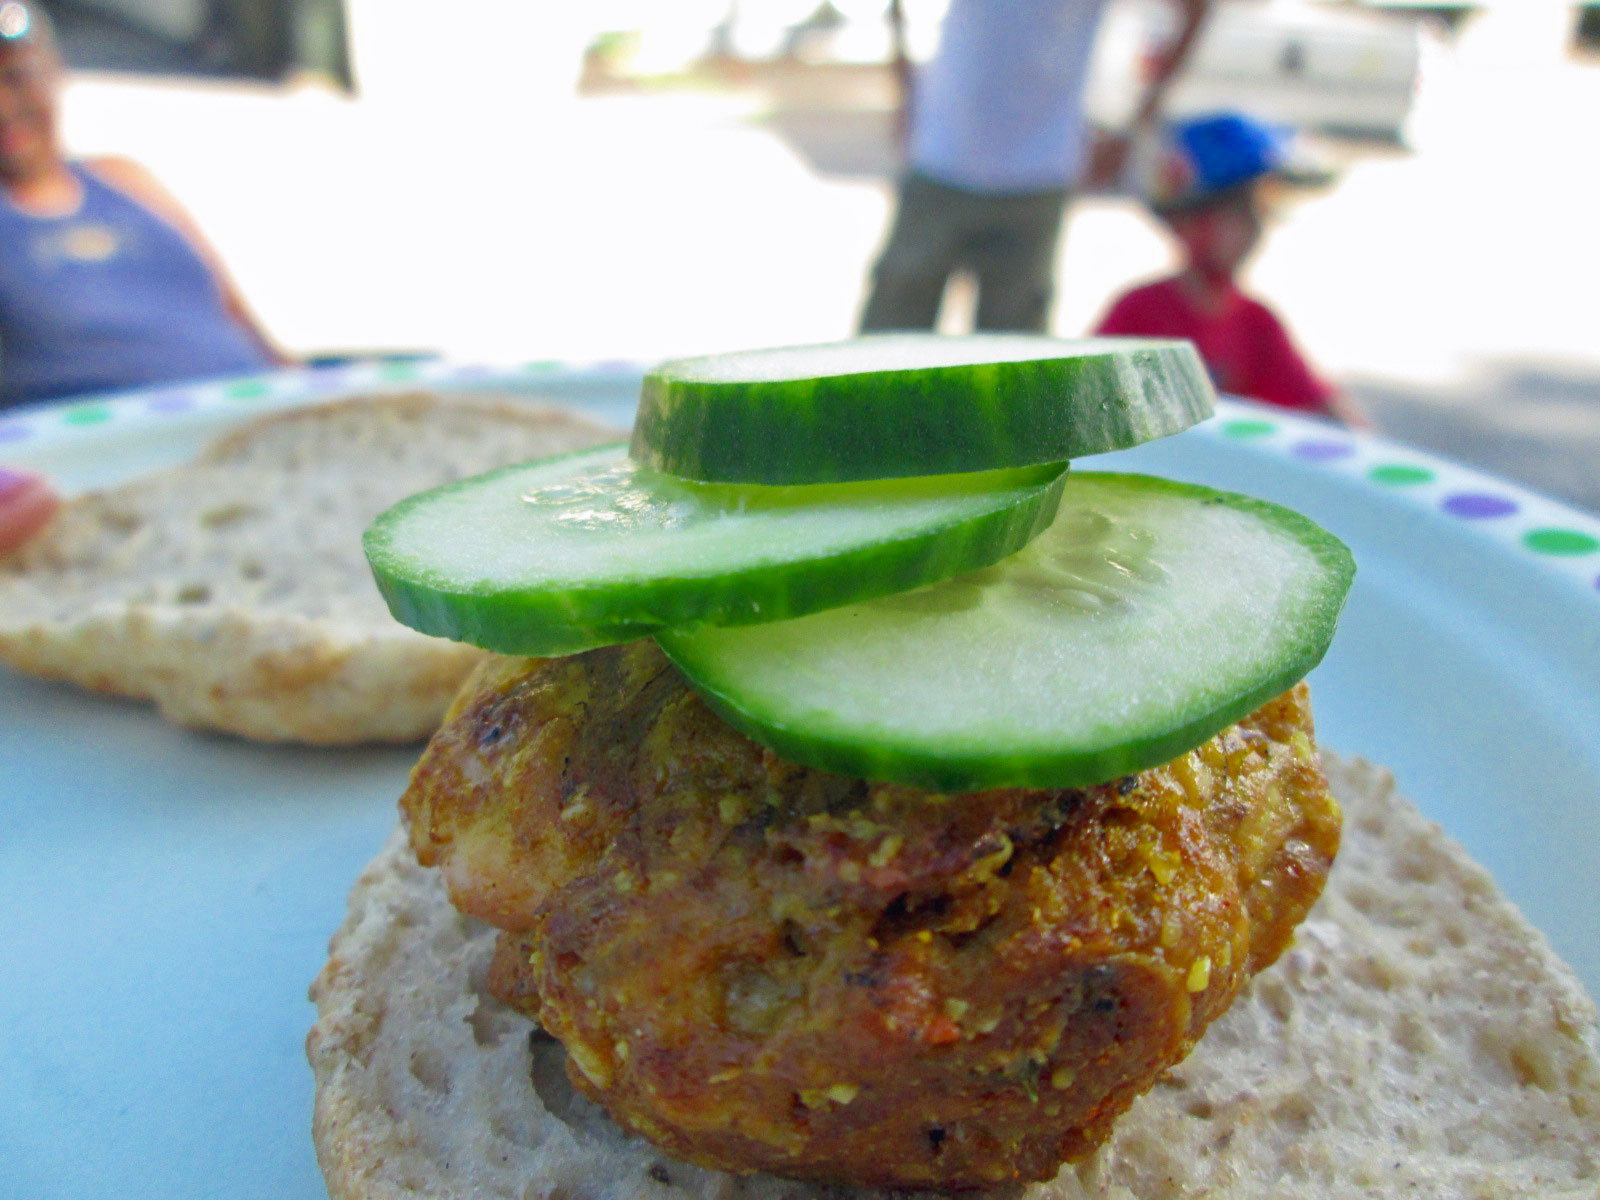
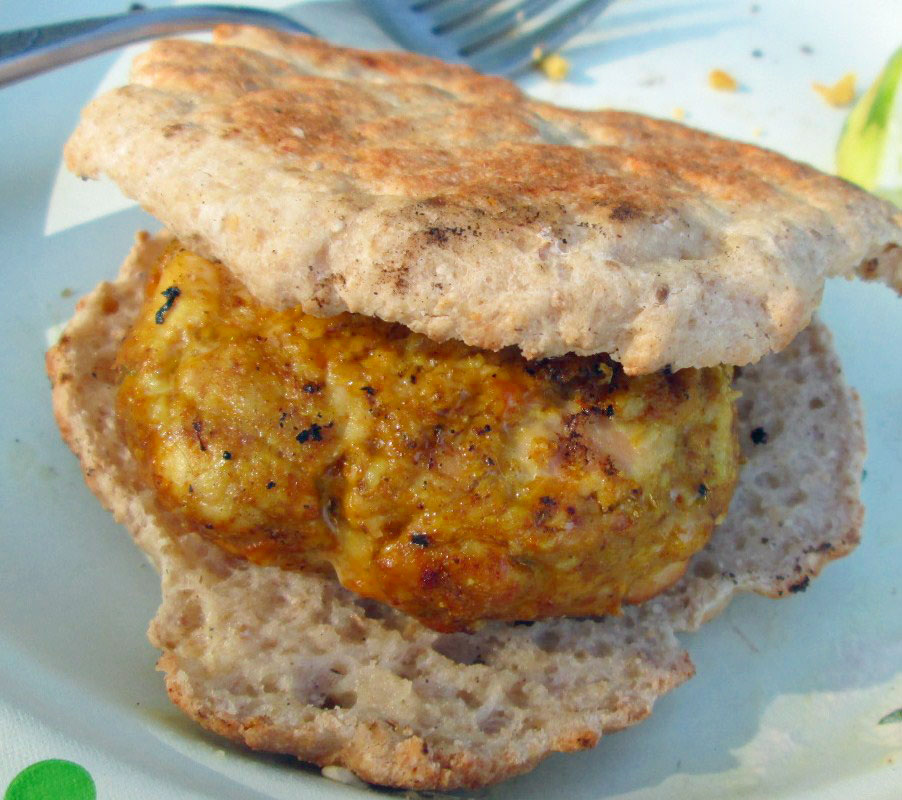
For some reason when Denise and I were discussing burgers, I was somewhat fixated on Indian spices. I love Indian food, but there are so many allergen pitfalls when ordering out that I’m finding it easier to make my own at home — and easier now that I can run some of my cooking choices by my Indian neighbor. He approved the spice mix I’m going to give you below, so it must be good, right?
You can buy tandoori spices. Tandoori chicken is a reasonably classic Indian dish, named for the clay oven in which chicken is baked after being marinated in yogurt and spices. By briefly marinating and then grinding the chicken, adding some cashew nuts for creaminess, we can skip the yogurt part, and in this case, a grill stands in for the fancy pointy-topped oven. By making your own spice, you can more carefully control the flavor of the burger, but if you’re not up to it, not interested, or in any way disinclined, seek it out pre-blended.
Mmmm, burger
Tandoori Chicken Burgers
Tandoori Spice — makes enough for 2-3 recipes of burgers
1 Tablespoon ground fenugreek
1 Tablespoon ground coriander
2 teaspoons onion powder
1-1/2 teaspoon cumin
1-1/2 teaspoon turmeric
1-1/2 teaspoon garlic powder
1 teaspoon cinnamon
1 teaspoon celery salt
1 teaspoon paprika (regular, not smoked)
1 teaspoon ground ginger
1/2 teaspoon freshly ground black pepper
1/2 teaspoon freshly ground nutmeg (you can buy this ground, but it’s worth it to grind your own)
1/4 teaspoon ground cloves
1/4 to 3/4 teaspoon cayenne, depending on your desire for heat, as well as spice
For Burgers:
1 lb. boneless, skinless chicken thighs
1/2 cup lemon or lime juice
1/2 cup rice wine vinegar
1/4 cup cashew pieces
zest of one lime (organic if you can get it)
2- 3 Tablespoons tandoori spice
lime wedges, for serving
First, marinate chicken thighs in the citrus juice and vinegar for about 30 minutes — if the marinade doesn’t quite cover the chicken, add water to cover.
Lay the chicken out on paper towels to drain and dry.
In your food processor, grind the cashews to a fine consistency. I find that I need to pulse my food processor, as just turning it on tends to make nut butter instead. Remove the nuts to a mixing bowl.
Grind the chicken in the food processor, then add it to the mixing bowl.
Add the lime zest and seasoning, and mix all the ingredients well. You can try using a spoon, but you really need to mix with your hands to get everything well-incorporated. Mix until you think it’s well-blended, then mix a little more. A note on the seasoning range — if you’re a lover of Indian food, or spices, or both, go all in with the 3 T measurement. If your company is a little more mixed (children, unadventurous eaters) ease them into the fun with the lower amount of spice.
Now shape the patties and lay them out on a parchment or plastic wrap covered platter and refrigerate for an hour or overnight. This recipe should make 4 regular burgers or 8 slider-sized burgers.
Grill until the interior temperature of the burger reaches approximately 160F. Serve with sliced cucumbers on a bun of your choice.
You know, if you have a good list of allergies, as Denise and I both do, breakfast can be one of the worst meals. If you eat meat, bacon is usually safe, though sausage might or might not be. Take out eggs, gluten for pancakes and waffles… well, you get the picture. I miss going out for breakfast. And as much as I love them, I’m actually getting bored of cereal and hash browns for breakfast.
So why not polenta? I have eaten leftover corn polenta for breakfast (the kind that comes in a nice tube at the grocery store), and it’s great as a savory breakfast, but I started thinking of the millet polenta in Vegan with a Vengeance — that was the first polenta I ever made and the first time I’d eaten millet. We used to buy it for the parakeets we had growing up, and I still sort of think of it as bird food. But it’s really tasty!
This recipe easily doubles into a 9×11 pan, but for one breakfast or one person who doesn’t want to eat it for 9 days, do this in an 8×8 pan. My favorite part is that all the work is done ahead of time, with maybe 10 minutes of work in the morning — and most of those are what some recipes call “inactive” time. I am not a morning person.
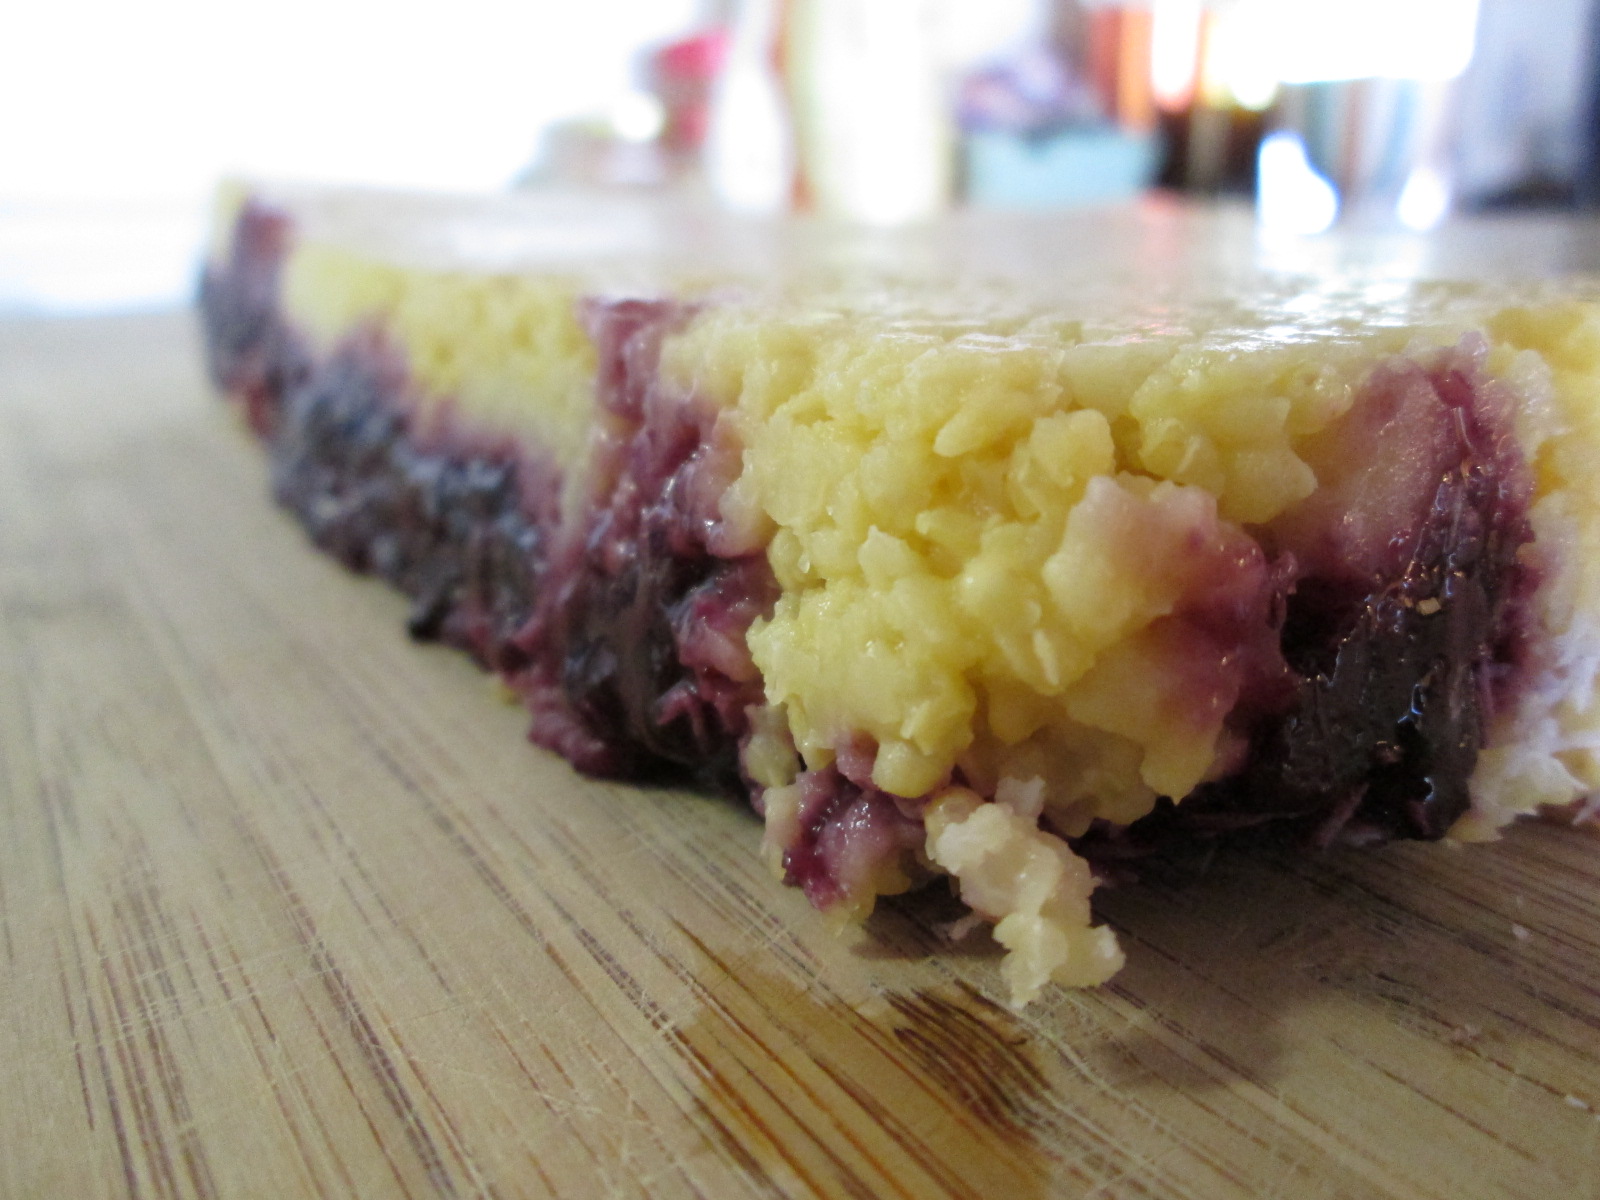
Millet polenta with blueberries and maple syrup
Breakfast Polenta
Make-ahead preparation:
In a sauce pan, mix
1 cup millet, rinsed
1 1/2 cups orange juice
1 1/2 cups water
1 Tablespoon oil, shortening, or Earth Balance (use coconut oil if you can)
1 or 2 cinnamon sticks
Bring this mixture to a boil, turn it down, and let it simmer for 30-35 minutes.
In a separate small pan, heat
1/2 cup frozen blueberries
1 Tablespoon orange juice
1/4 cup unsweetened shredded coconut (optional)
When the blueberries are soft, mash them with a fork or potato masher, just until you have a rough jelly.
Into a greased 8×8 pan, put half the millet mixture in the pan, smooth down, spread the blueberry mix on top, and then add the second half of millet mix and smooth it out.
Allow it to cool at room temperature and then refrigerate.
Morning preparation:
You will need
1 teaspoon to 1 Tablespoon of coconut oil, Earth Balance, or other oil of your choosing (just enough to coat the bottom of your skillet)
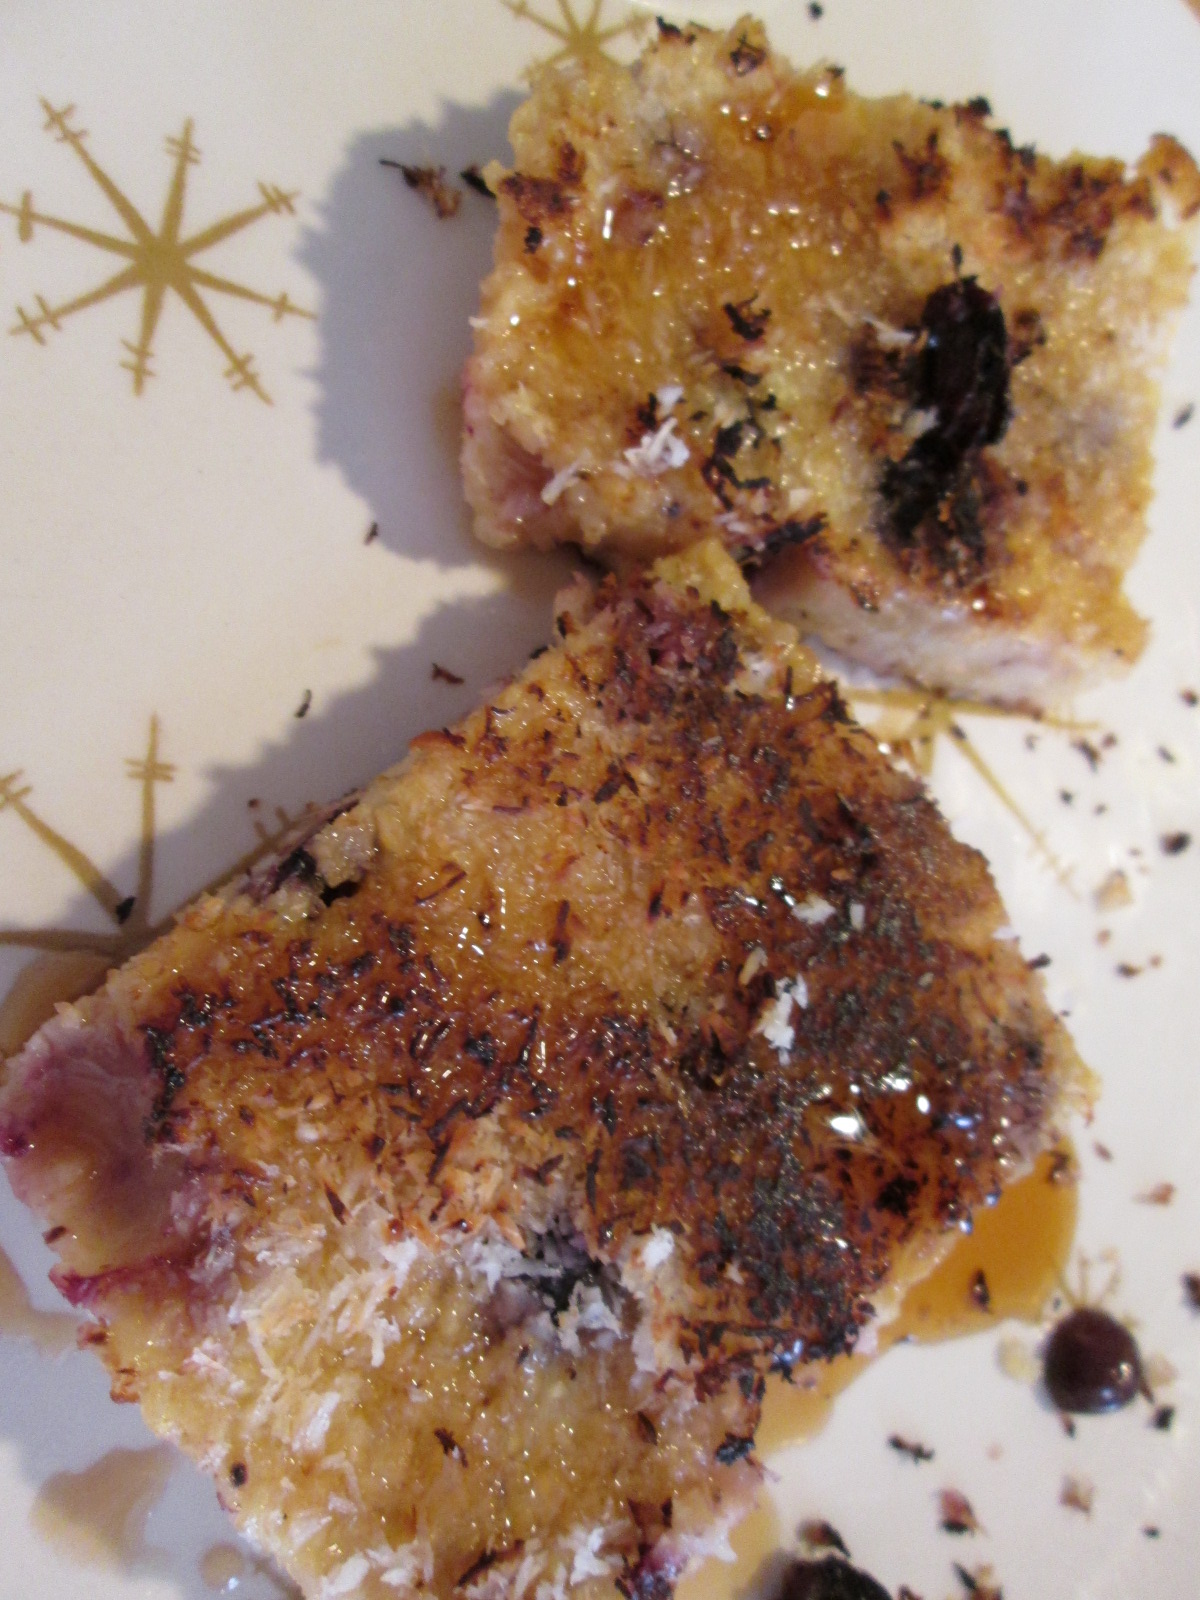
In the morning, heat a skillet over medium heat. Add your oil — this isn’t absolutely necessary, but it will promote a good browning, which really makes the polenta to me. Pan fry on both sides, 5-7 minutes per side.
Plate and drizzle with maple syrup. Pour it on slowly to allow it to soak in. Oh, and get the real stuff — you’re worth it.
What do you eat for breakfast? Do you rely on the same standards, over and over, or do you mix it up?
Since we’ve focused this month on recipes inspired by cuisine from the continent of Asia (I know, we never said there was a theme, but there was. We’re wily like that.), I thought tea would make another good subject for another research-based (some might say “nerdy”) post. Tea is the second most popular drink in the world. In the world, people — second only to water. I know I’m part of that statistic. I was only an occasional tea drinker until graduate school. You know what’s colder than a New England winter? A Pacific Northwest winter. I know, the thermometer says it’s warmer, but it’s wet and sinks into your bones. So you drink hot beverages — coffee, hot chocolate, and TEA.
And why not? Tea, at its root, is an easy drink to make — pour hot water over some leaves. It works with a variety of leaves, in fact, giving us tea (leaves from the camellia sinesis plant) and tisanes, which are commonly called “herbal teas” in the US.
The Miracle of Green Tea
I would guess that most people drink tea because they like the taste — and there are so many varieties that I imagine nearly anyone can find something that they enjoy. But tea has been used for centuries as part of Traditional Chinese Medicine, and Western medicine is now studying the potential health benefits of tea. One meta-study (review of all the other studies to gather the data in a single place for analysis) assembled the following list of tea’s benefits:
Recent human studies suggest that green tea may contribute to a reduction in the risk of cardiovascular disease and some forms of cancer, as well as to the promotion of oral health and other physiological functions such as anti-hypertensive effect, body weight control, antibacterial and antivirasic activity, solar ultraviolet protection, bone mineral density increase, anti-fibrotic properties, and neuroprotective power.
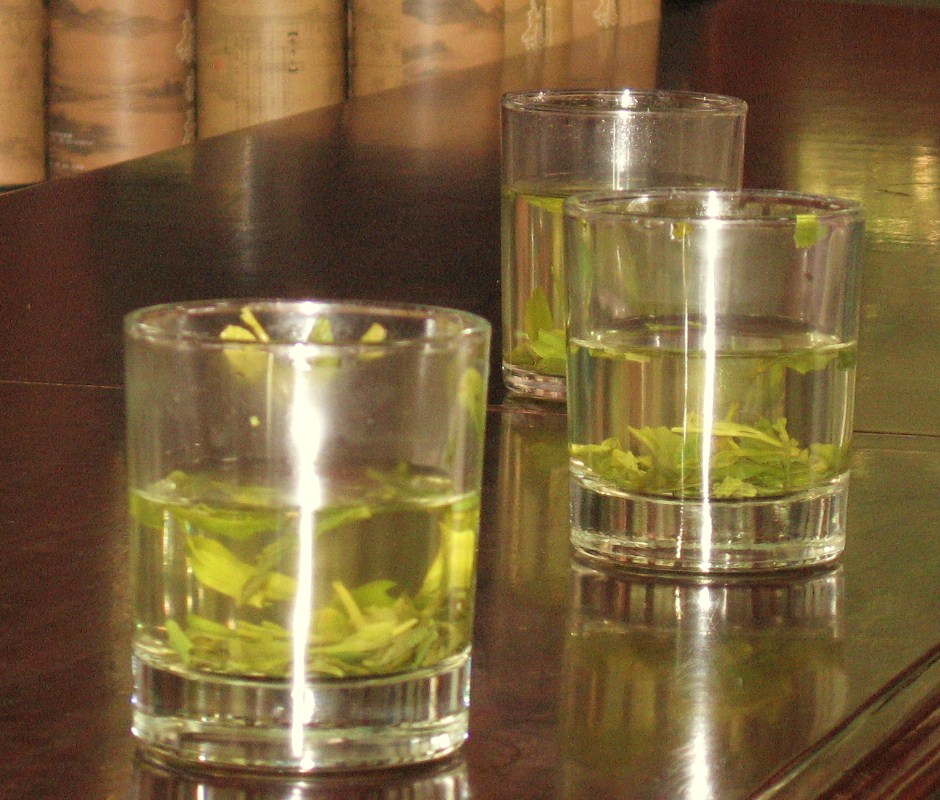
But what IS tea? Tea is the leaves or leaf buds of the camellia sinesis plant, which, left to its own devices becomes a tree, but is generally kept pruned to about waist-height for ease of harvesting. Tea is harvested by hand, with the leaves being picked every few weeks. The earliest harvests are generally the most prized, and different seasons produce different teas.
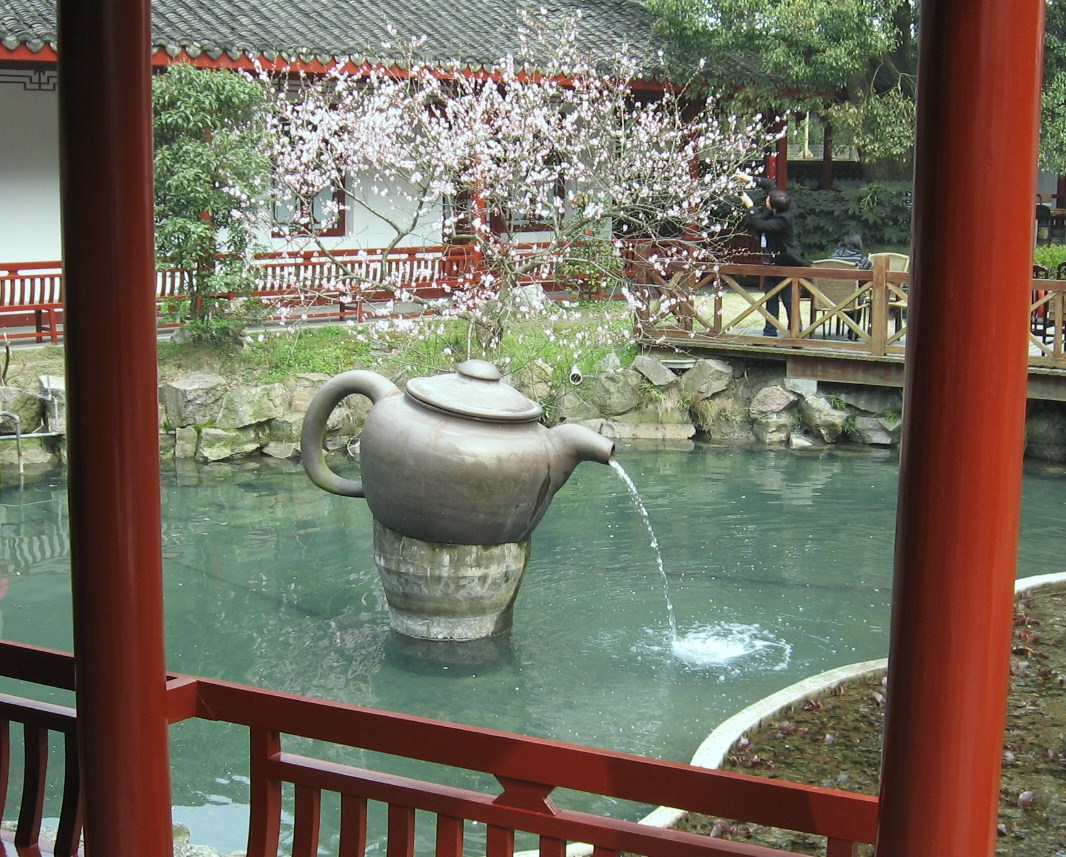
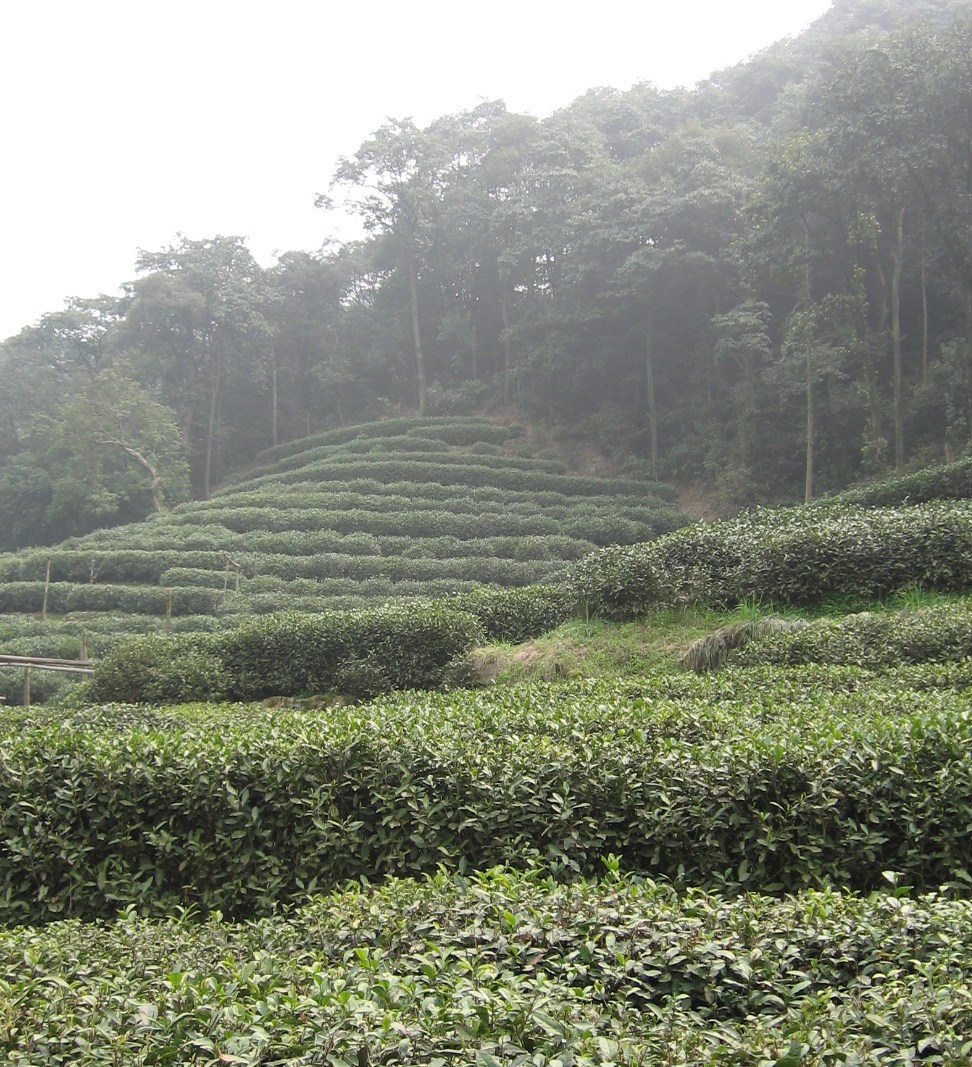
In 2009, I took a trip to China, and we visited a tea plantation near Suzhou, site of all the photos I’ve punched into this post. At the plantation, we were ushered into a lovely building, with a courtyard teapot fountain (top photo) and a tea tasting room that looked out over the bushes. All the tea here is picked by hand and processed (dried) on site. They produced 4 grades of tea, and the top two (Empress and Grade A) are never exported. Quality tea leaves like these can be re-used up to 5 times, so about all day.
Chinese Tea Plantation, near Suzhou
Tea is native to China, and the Chinese drink their tea green — unoxidized. Tea was oxidized and compressed for trade, but the Chinese traders considered this an inferior version of the drink. Tea hit a cultural high point during the Tang Dynasty (618-907 CE), when it was used for social ceremonies as well as in Buddhist ceremonies. Lu Yu wrote what may be the first tea manifesto, in which tea appreciation, using Taoist and Buddhist principles, could enhance one’s life — help you live your philosophy, and enjoy the moment. To this end, specialized tea wares, including ceramics, began to be developed Japanese Buddhist monks studying in China at this time discovered tea and its ceremonies, which they brought back to Japan.
As Japan’s tea culture flourished, the Manchu or Qing Dynasty in China changed the ethnicity and dominant traditions of the ruling classes. The Manchu were the primary market for the “inferior” oxidized teas that earlier Chinese dynasties traded at the borders — the precursor to what we know as black tea. They drank their tea dark, strong and with milk — fermented mare’s milk. This is the tea culture that the British Empire first encountered, and explains the popularity of black tea with milk as tea spread to Europe.
Boston Tea Clipper — click image for original site
Tea spread first to Europe, and then to England, which is how it becomes part of the story of the US. The first sale of tea in London was in 1658, and tea became a fixture of British life when Charles II married Portuguese Princess Catherine of Braganza, a tea drinker. Chinese tea was traded through the Dutch, who had a monopoly on tea, and even when the Chinese began to trade directly with British merchants, it wasn’t enough. Tea was popular everywhere, including in the British colonies, including the one Denise and I both live in now.
The 1773 Boston Tea Party, besides being an important historical landmark event, seems to be a high point for high school history, given how well it is remembered (I vaguely remember a re-enactment class, and I grew up in the South. If you ever get a chance, go to the Old South Meeting House re-enactment in Boston — it’s worth the trip.) The really short version? The colonists were tired of being taxed by the British, and began to boycott their imports. The Dutch were more than happy to sell their tea without a tax, so to undercut them, the British decided to empty some warehouses of tea at low cost to the colonists. The colonists? Didn’t take the bait. They asked the governor to send the three ships back to England without unloading. When the governor refused, the Sons of Liberty, dressed as Native Americans, boarded the ships and dumped the tea overboard.
Tea bushes, near Suzhou, China
Tea was also the beginning (and end result) of another war — the Opium Wars of 1839-1842 in which British traders tried to make back the money they paid the Chinese for tea by importing Indian opium into China. China lost, and badly, not only paying for the war, but giving Hong Kong to the British. Remember when Hong Kong was “repatriated,” if that’s the right term? In 1997? All over TEA.
Tea Tasting Room. Please ignore the blurred faces– none of these people asked to be on the internets.
As part of the great sales pitch at the tea tasting room in Suzhou, we were given tea to taste, but also demonstrations of green tea’s detoxifying power — but wait, it also absorbs fat! And this dirt in the water! According to my journal notes, green tea steam can be a great eye moisturizer (I had forgotten all this, but allergy season is a great time to test it out), and green tea bags can be used to absorb fat in a soup stock (I never tried this either, but there’s no time like the present).
Fresh tea leaves contain about 4% caffeine, and scientists have speculated that it may be a chemical defense system for the plant. Tea also contains flavinoids, vitamins, and polysaccharides, as well as amino acids. One of these amino acids is L-Theanine, an amino acid that naturopaths say stress depletes in your body, but which provides a calm, alert, and focused mental state. I want a calm, alert, and focused mental state, don’t you? That may be why I drink so much tea.
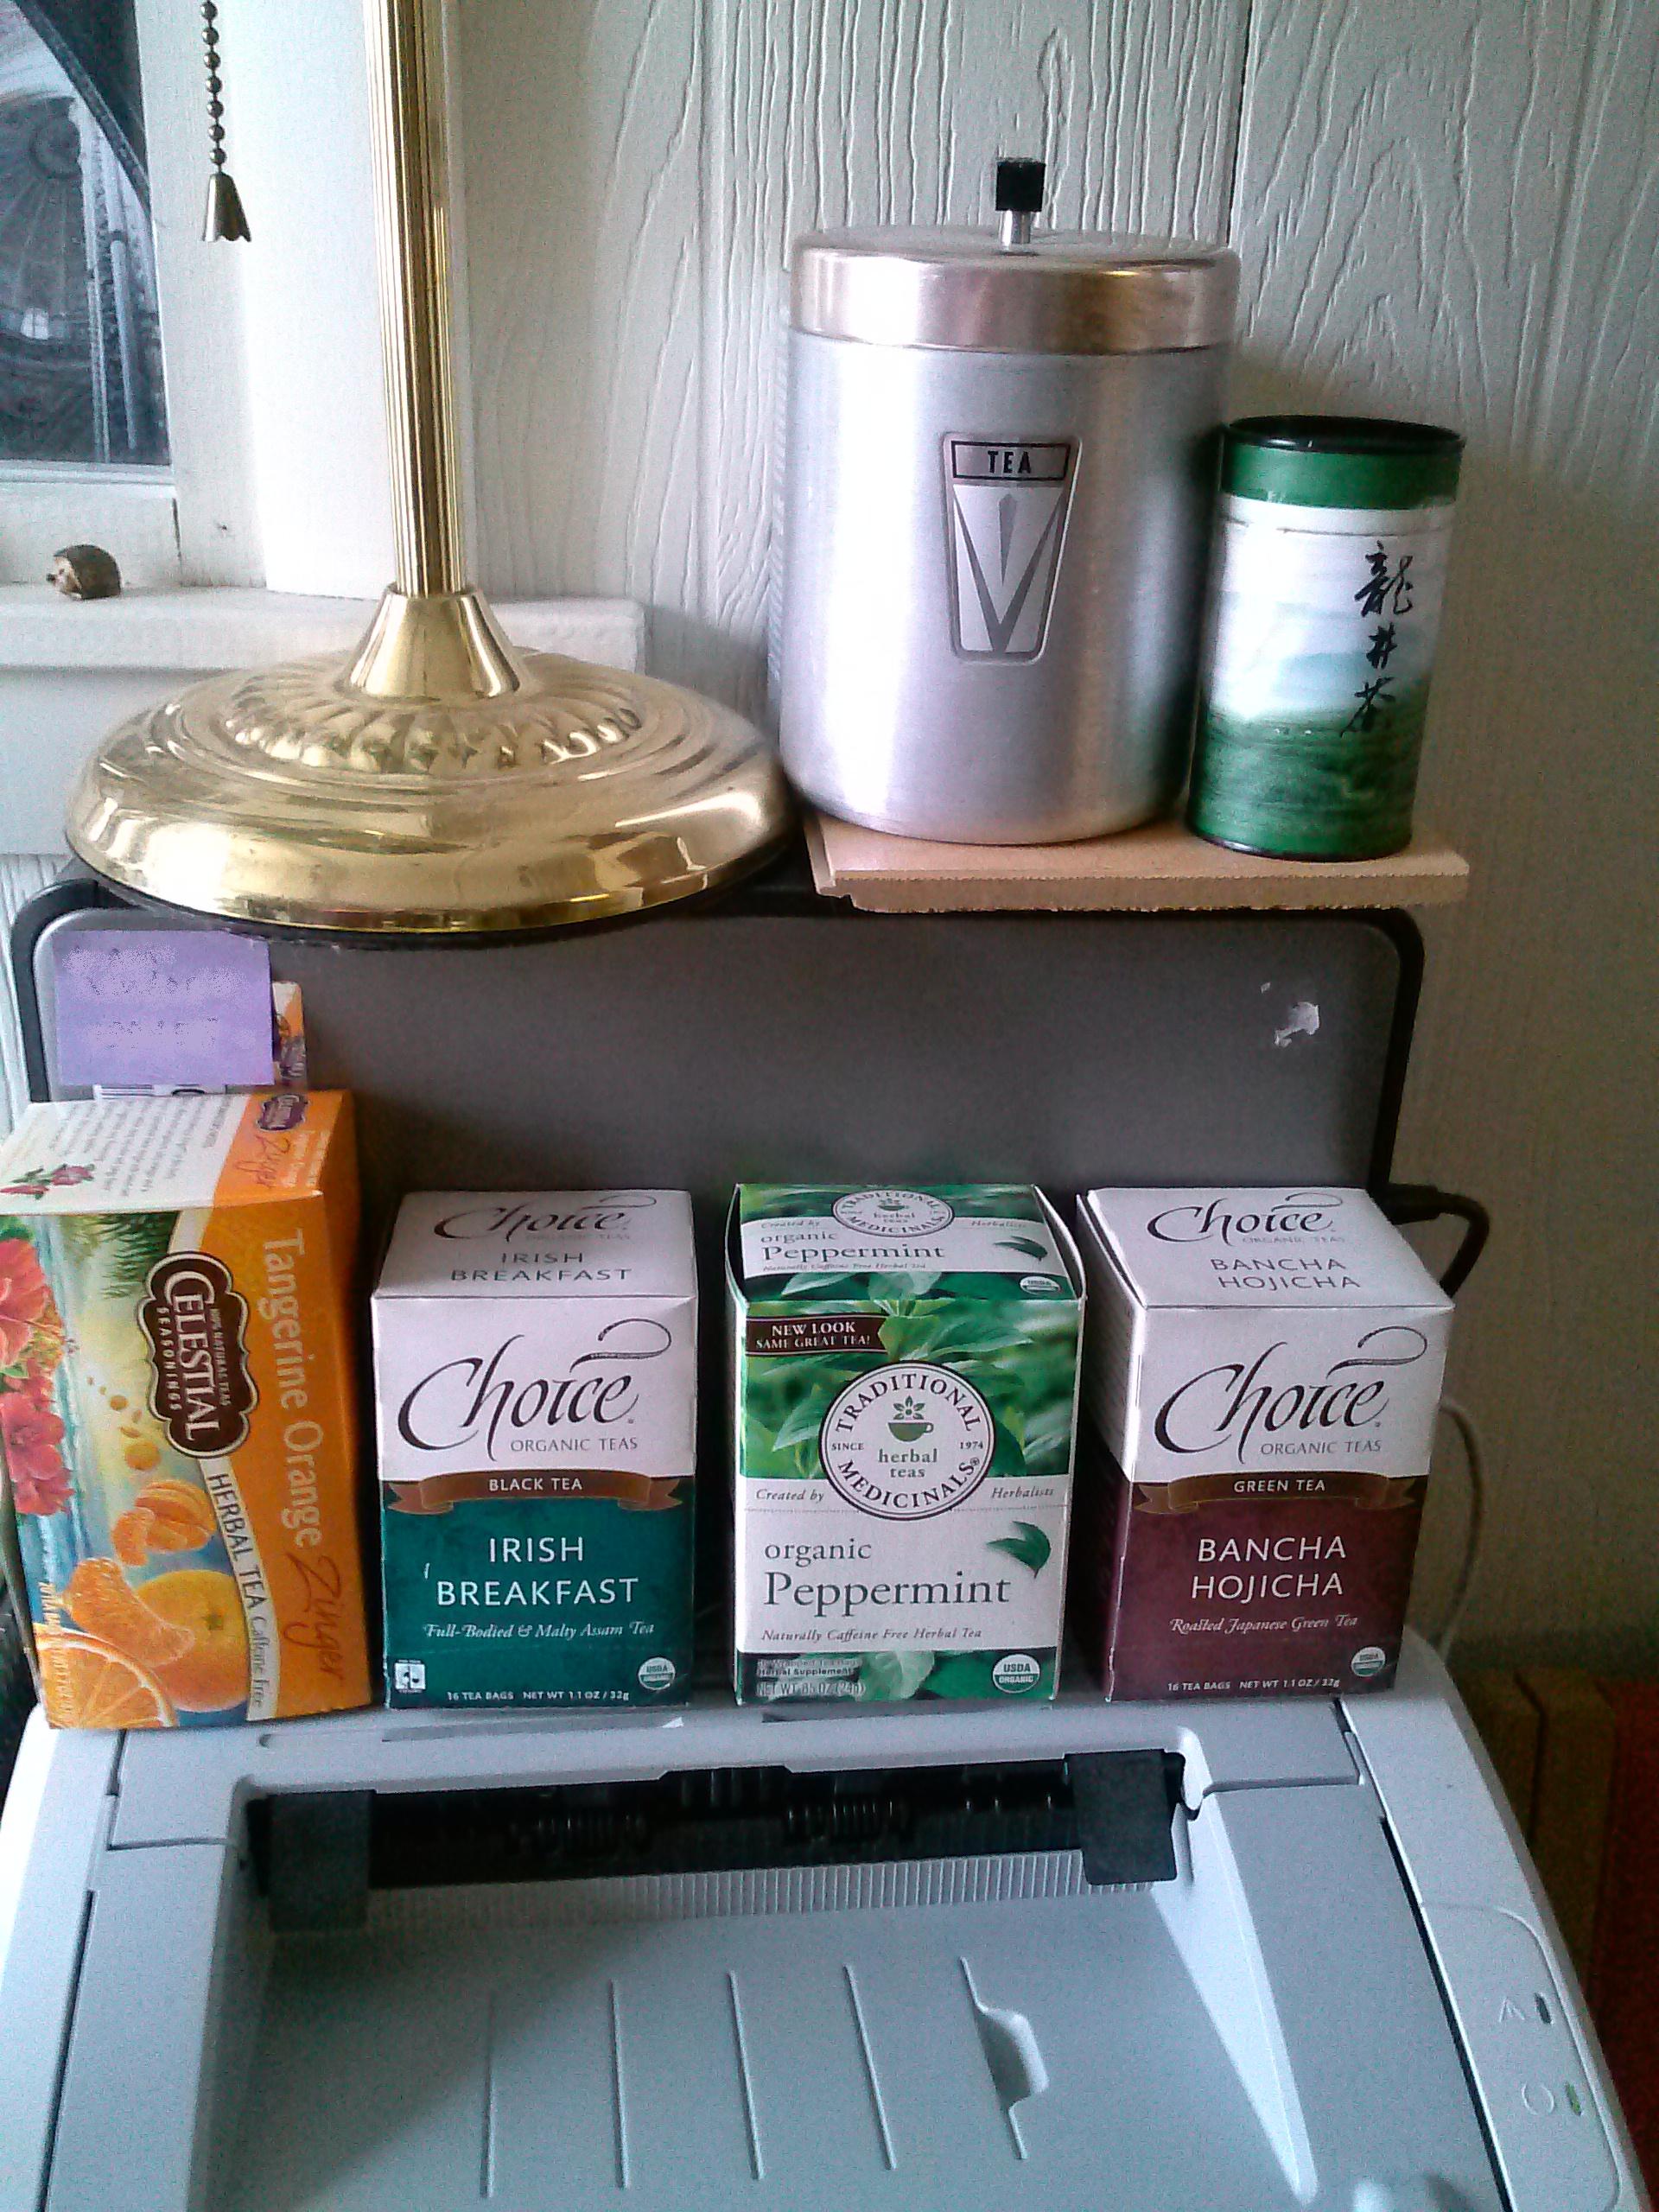
Office Tea Stash (does not include additional plain black tea and a few others in the closet)
Given all this, what teas do I drink? I admit that, lovely as loose tea is, it’s not my go-to tea method. I usually have tea bags in my purse (always) or carry-on bag (when flying). The photo above is just my collection of teas at work, where they take up valuable real estate on the printer. The small green canister up there was the last bit of tea from my trip to China, and the aluminum canister holds all the many assorted teas and tisanes I’ve collected over time. The boxes include two tisanes — a Celestial Seasonings Tangerine Zinger and a peppermint, which is great for all the digestive fun that can come with food allergies and intolerances. The two teas are Irish Breakfast and Bancha Hojicha. Bancha hojicha is a toasted/roasted Japanese green tea better known in my office as “magic tea,” as it was introduced to me as a hangover cure (my hangover was from benedryl, sadly, but you know what? It works, so it IS magic). I did look up Irish Breakfast tea versus English Breakfast tea — both are black tea blends, they are just different blends. The internet consensus seems to be that IB is stronger than EB, possibly with higher concentrations of Assam tea (Indian tea).
Starting with Lu Yu, there have been many theories and philosophies on how to make the best, most perfect, most enlightening cup of tea. There is an actual international standard for making tea for tasting — ISO 3103. (Wikipedia link –the official ISO is a pay-to-read site). Green tea should be steeped in water just under boiling, not quite boiling, as it can become bitter — this seems to be even more true with the lesser quality leaves that tend to be found in mass produced green tea bags. At home, I admit, I like the ritual of my tea kettle, but I rarely make a pot of tea. At work, I use the hot water spigot, and it’s even less ritualistic, but I’m in it for the taste.
So. Tea. Do you drink it? What do you love? What did I miss that you still want to know? Please ask. I probably read about it and just couldn’t fit it in.
Disclaimer: This is not an original recipe. But it’s the best curry I’ve ever made at home, and as such, I want to share it with all of you today. With full credit to the author and cookbook, of course.
The Chickpea and Spinach Curry comes from one of my all-time favorite cookbooks, Isa Chandra Moskowitz’s Vegan with a Vengeance. This is the first cookbook I purchased after my first intolerance-related diagnosis — lactose intolerance. While I ate a strictly vegan diet for a while, and don’t at the moment, I still love vegan cookbooks. They correlate with my preferred way of eating — heavy on the vegetables — and a good vegan cookbook relies mostly on whole foods, not processed foods. In a completely non-compensated way, I can highly and heartily endorse this whole cookbook (though, honestly, if you’re brand new to vegan cooking, consider starting with Veganomicon, as it’s got more basic information in it and a broader range of recipes). Most vegan cookbook authors are very aware of ingredients and a great place to learn to cook without — no matter what you’re cooking without.
And it’s a big hit at potlucks — with vegans and omnivores alike. The recipe below is kind of huge. If it’s just for me, I made a half-recipe.
So, without further ado:
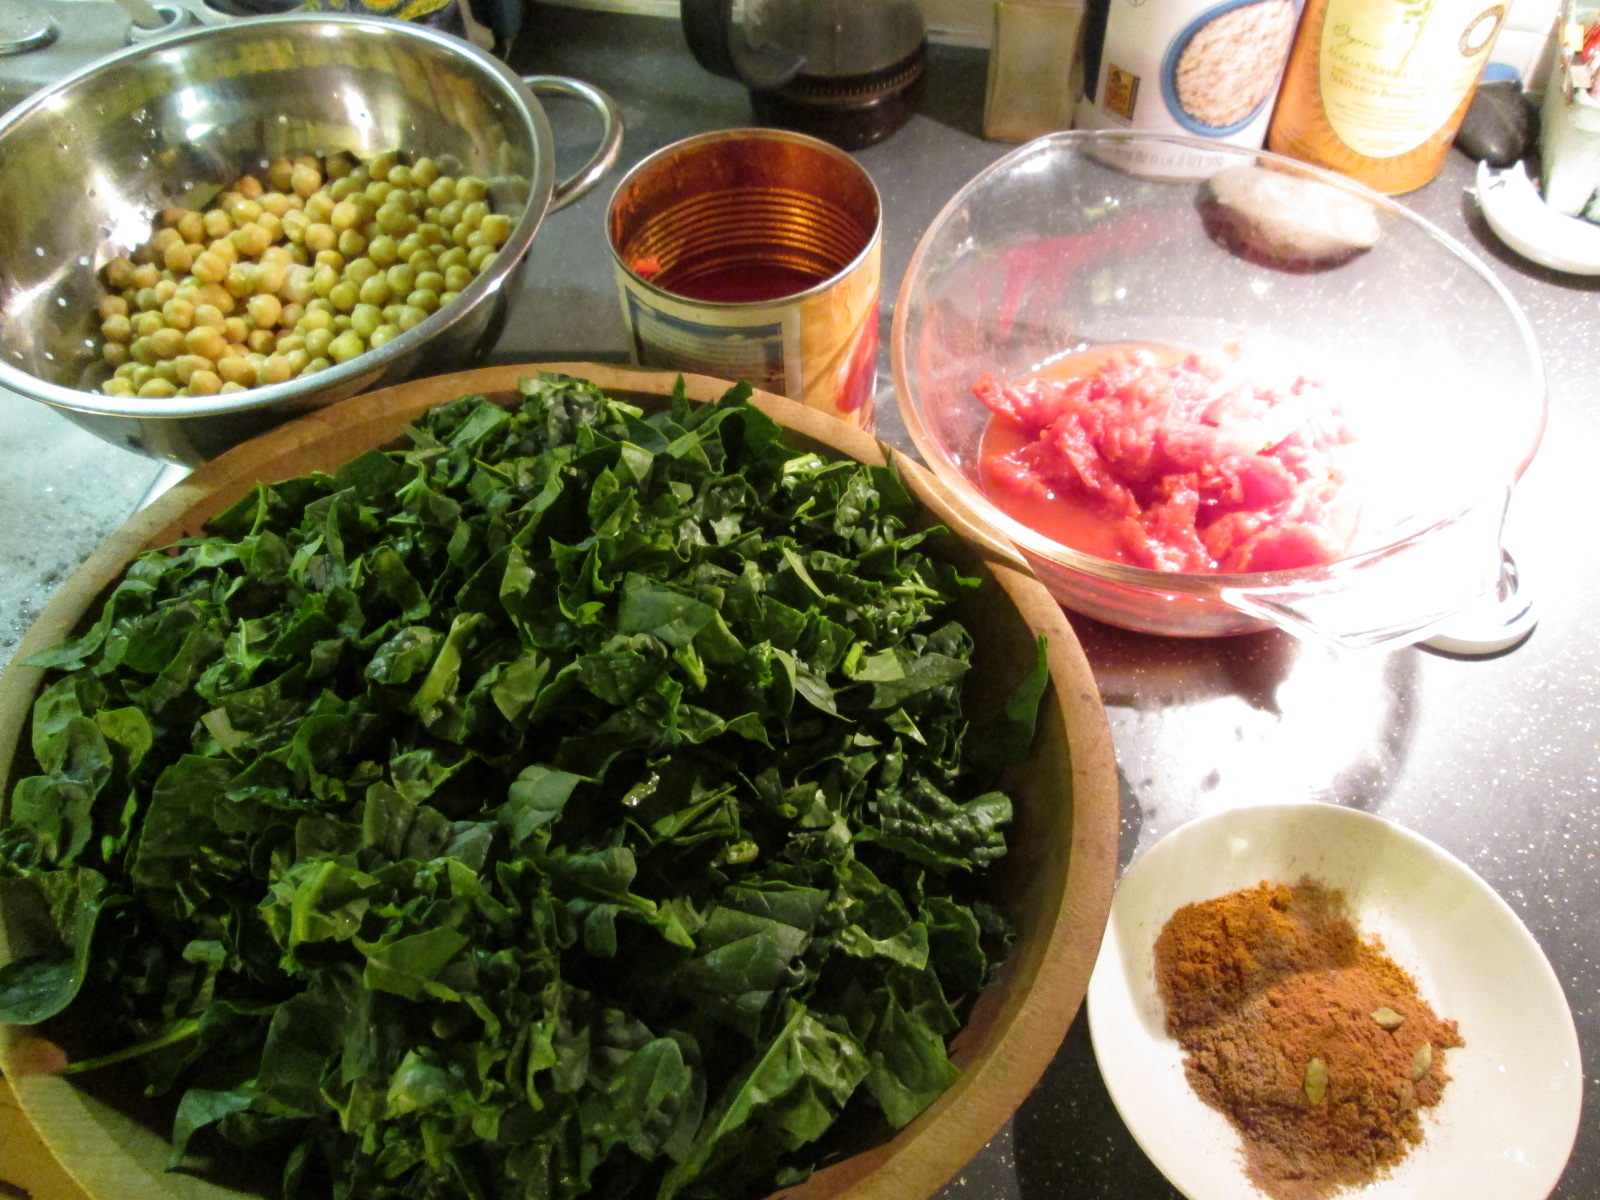
Mise en place
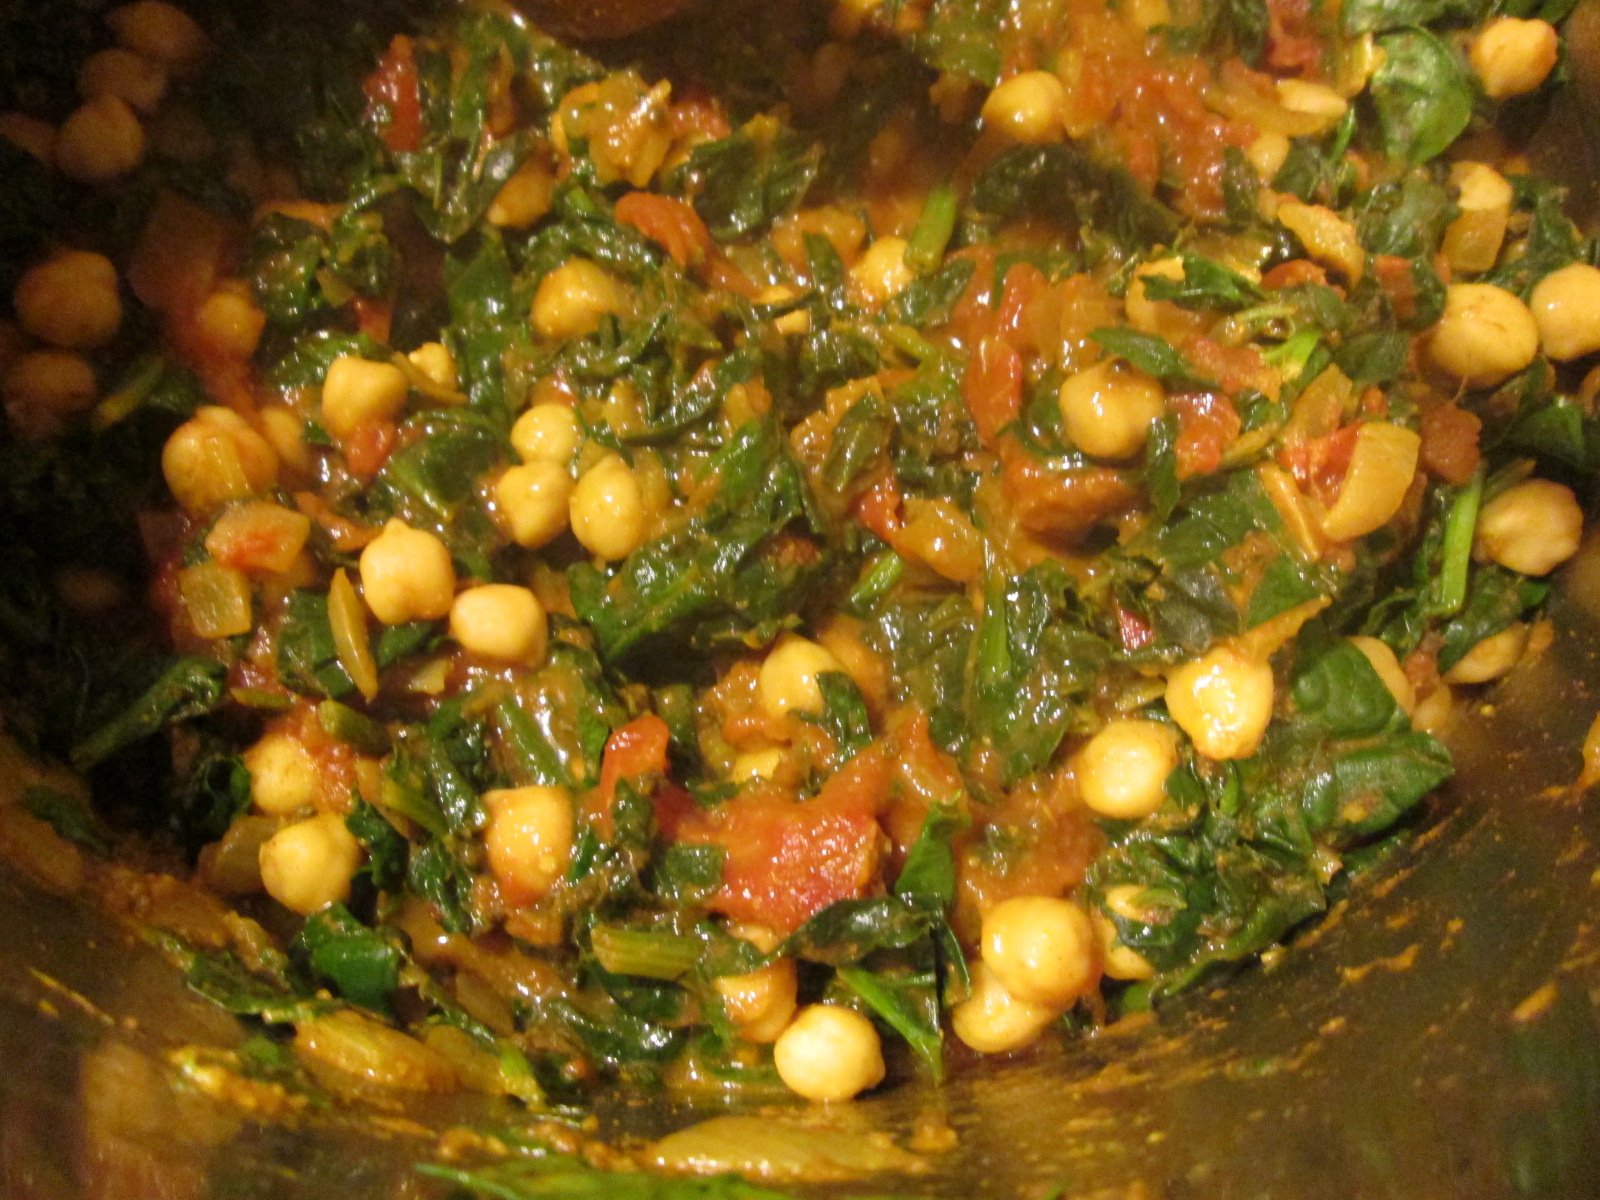
Chickpea and Spinach Curry, from Vegan with Vengeance by Isa Chandra Moskowitz
Preheat a pot over medium heat. A good Dutch oven would work, if you have one, or a large sauce pan, but to minimize the mess I generally make with cooking (and because I don’t have a Dutch oven), I use my stock pot. When the pot is hot, add
3 Tablespoons oil (not olive, vegetable, as this is kind of hot for olive oil)
2 teaspoons mustard seeds
Cover the pot and let the seeds pop for about a minute. They do pop, like popcorn. It’s cool.
Turn the heat up to medium-high. Add the following:
1 large onion, chopped (about 2 cups)
Sautee until it starts to brown — 5-10 minutes, depending on your heat level.
1/4 cup of juice drained from can of diced tomatoes
14 oz can of diced tomatoes, with juice drained and reserved*
Rinse and drain, then chop
10 cups of spinach, chopped. Yes this seems like a TON, but it really will all incorporate perfectly. Add this in handsful, stirring each addition until wilted.
When all the spinach is wilted, add:
2 cans of chickpeas (15 oz. each), rinsed and drained (4 cups if you cook your own)
Stir, cover and turn heat to low. If you’re planning to make rice, start it now. Let the stew simmer for 10 minutes.
Uncover, stir, taste. Adjust the seasonings if necessary (I’ve only ever needed a tiny pinch of salt), and let simmer for another 10 minutes, until its all thickened and wonderous. Enjoy it over rice.
*The single asterisk represents minor alterations I’ve made to the original recipe.
**Curry powder is amazing, but it’s a blend of ground spice, so quality can vary widely. To get a good curry, the spices must be fresh when they’re combined and reasonably fresh when you use it. And your curry dish will only be as good as your curry spice is. As you might already know, both of us believe the post-apocalypse relies heavily on Penzey’s Spices, based in Wisconsin. They have a variety of curries; if you’re new to curry, try the sweet curry. Curry is NOT inherently spicy hot, so don’t be scared if you don’t like spicy. If you do like spicy, try the hot curry.
So that’s the best curry I know how to make. Let us know what you think.
Oil Cans, photo by Ian Britton (creative commons license)
About a year ago, after a lot of reading about it, I thought I’d try this “oil cleansing” thing that the internet was chittering on about. Honestly, it seemed a little counter-intuitive, smearing oil over the grease on my face to clean it off. I have had oily skin since I was about 11, which is when the acne started.
I’ve tried all sorts of cleansers and acne systems, most of them harsh and annoying, with the side effects being as bad as the breakouts and just as hard to cover up. Nothing’s ever been a miracle solution. Since my skin was oily, I was a big fan of stripping all the oil off, using stripping cleanser followed by really harsh astringents, and ending up with tight, dry, itchy skin that was oil slicked in about an hour. Eventually I came around to moisturizer, which did calm my skin down a bit. The oil cleansing, though, replaces all of that. Adjusting the formula based on the seasons has mostly eliminated the need for moisturizers, too, though I still use them occasionally. If you do find you need a moisturizer, Denise posted a coconut-derivative-free lotion a while back.
I use the oil cleanser in the evening to remove the makeup and daily grime, and in the morning just splash water on my face and then put on makeup like normal. It is WAY cheaper than the rather expensive cleanser I was buying before and more effective to boot, so I am a solid convert. I even had a test phase — last spring, I didn’t pack the oil for a trip, and by day 3, I was breaking out again. Now I have a travel container.
I started with all the information on the oil cleansing method on the Crunchy Betty website, and have started tweaking my own recipes from that information. I’d suggest you do the same, but here are my recipes for a starting point. I’ve done everything as ratios, but I would suggest starting with a small batch (maybe making 1 part a teaspoon) to see how it works for you, so that you can tweak the next one if you don’t love it. Give it a week or two for each tweak, to see how it shakes out.
Oil Cleansing for Winter, for Oily Skin
2.5 parts castor oil
1 part avocado oil
1 part grapeseed oil
I did this with 15 mL castor, 6 mL each of avocado and grapeseed, 5 drops of thyme essential oil (for acne) and 2 drops of super-strength vitamin E oil to soothe. This mix will last me close to a month of use.
Oil Cleansing for Summer, for Oily Skin
1 part castor oil
1 part grapeseed oil
You will need a small bottle for your oil mix, as well as a stack of cotton washcloths. I have found that some makeup stains the cloths — mascara and lipstick, in particular — but rather than bleach the cloths, I use them only for face washing and just wash them on hot. I have two small bottles, one glass with a dropper and one plastic with a small spout that allows me to dole the oil out in drops. This does take longer than a quick foaming face wash, but I then spend less time with concealers in the morning.
Here’s the short version of the technique — but really, read the Crunchy Betty post. It’s good.
A few drops at a time, pour oil onto clean fingertips and apply to face. (I do about 3 or 4 drops at a time, until I’ve covered my whole face.)
Massage into face. I know the post says 2 minutes. I probably don’t do it that long most nights.
Using hot water and a washcloth, briefly steam your oiled up face, and then massage the oil off with the cloth.
Pat dry or let air dry.
Enjoy how not oily your skin is in the morning.
(Oh, and a bonus tip: I admit, I got this years ago from seventeen magazine — instead of using zit cream, try lemon juice. Just a dab on a breakout. It’s cheaper, more effective, and tastes great in iced tea. Just like the creams, it will not magically make a zit disappear. But it will make it go away in less than half the time.)
Have you tried oil cleansing? How did it work for you?
For the many years where the only allergen I needed to avoid was dairy, Asian restaurants of most types were a saving grace. With the exception of Indian cuisine, which uses cream and butter, most cuisines of the Asian continent use little to no dairy.
Now that there are more allergens in my arsenal, it’s not quite as simple. But what is reasonably simple is learning to adapt recipes at home. I like that stir fry is an excellent way to incorporate a lot of vegetables into one dish, with meat as a flavoring rather than the focus — and you can make a vegan version by either substituting tofu or seitan for the meat. This marinade should work well for either, but I have not tried it since I can’t eat either anymore.
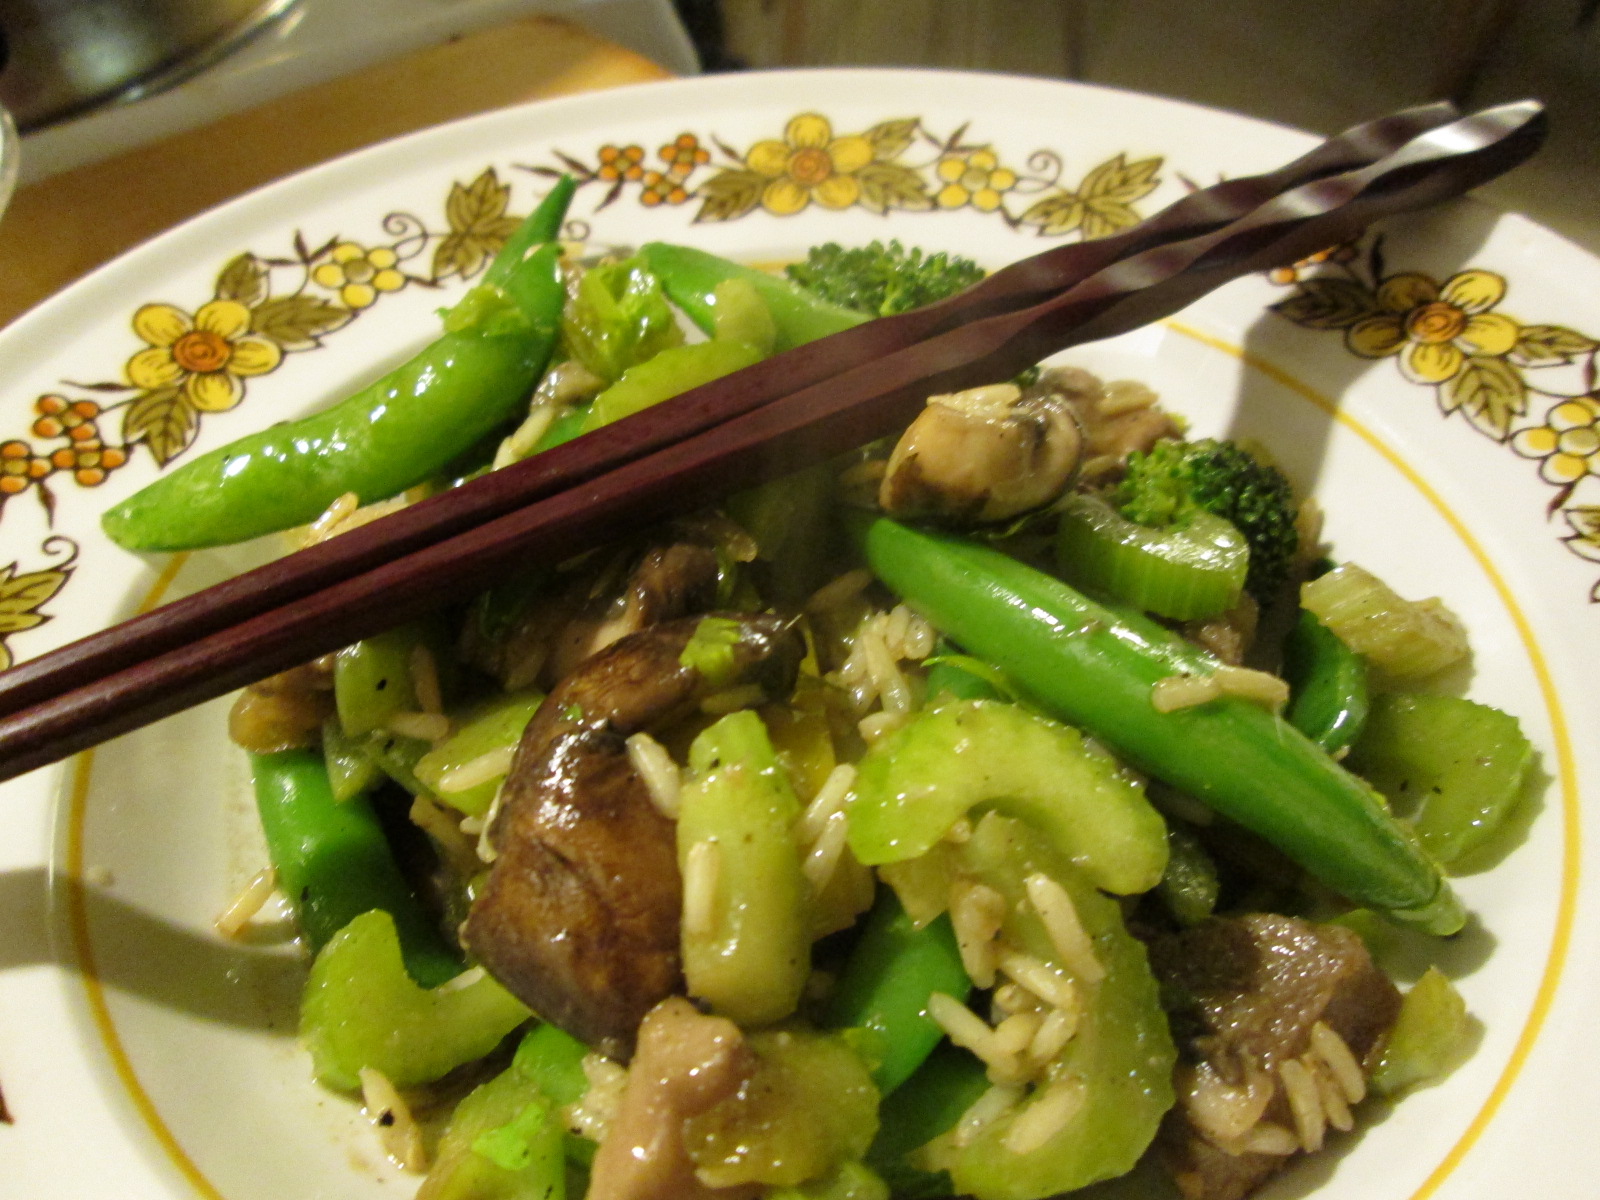
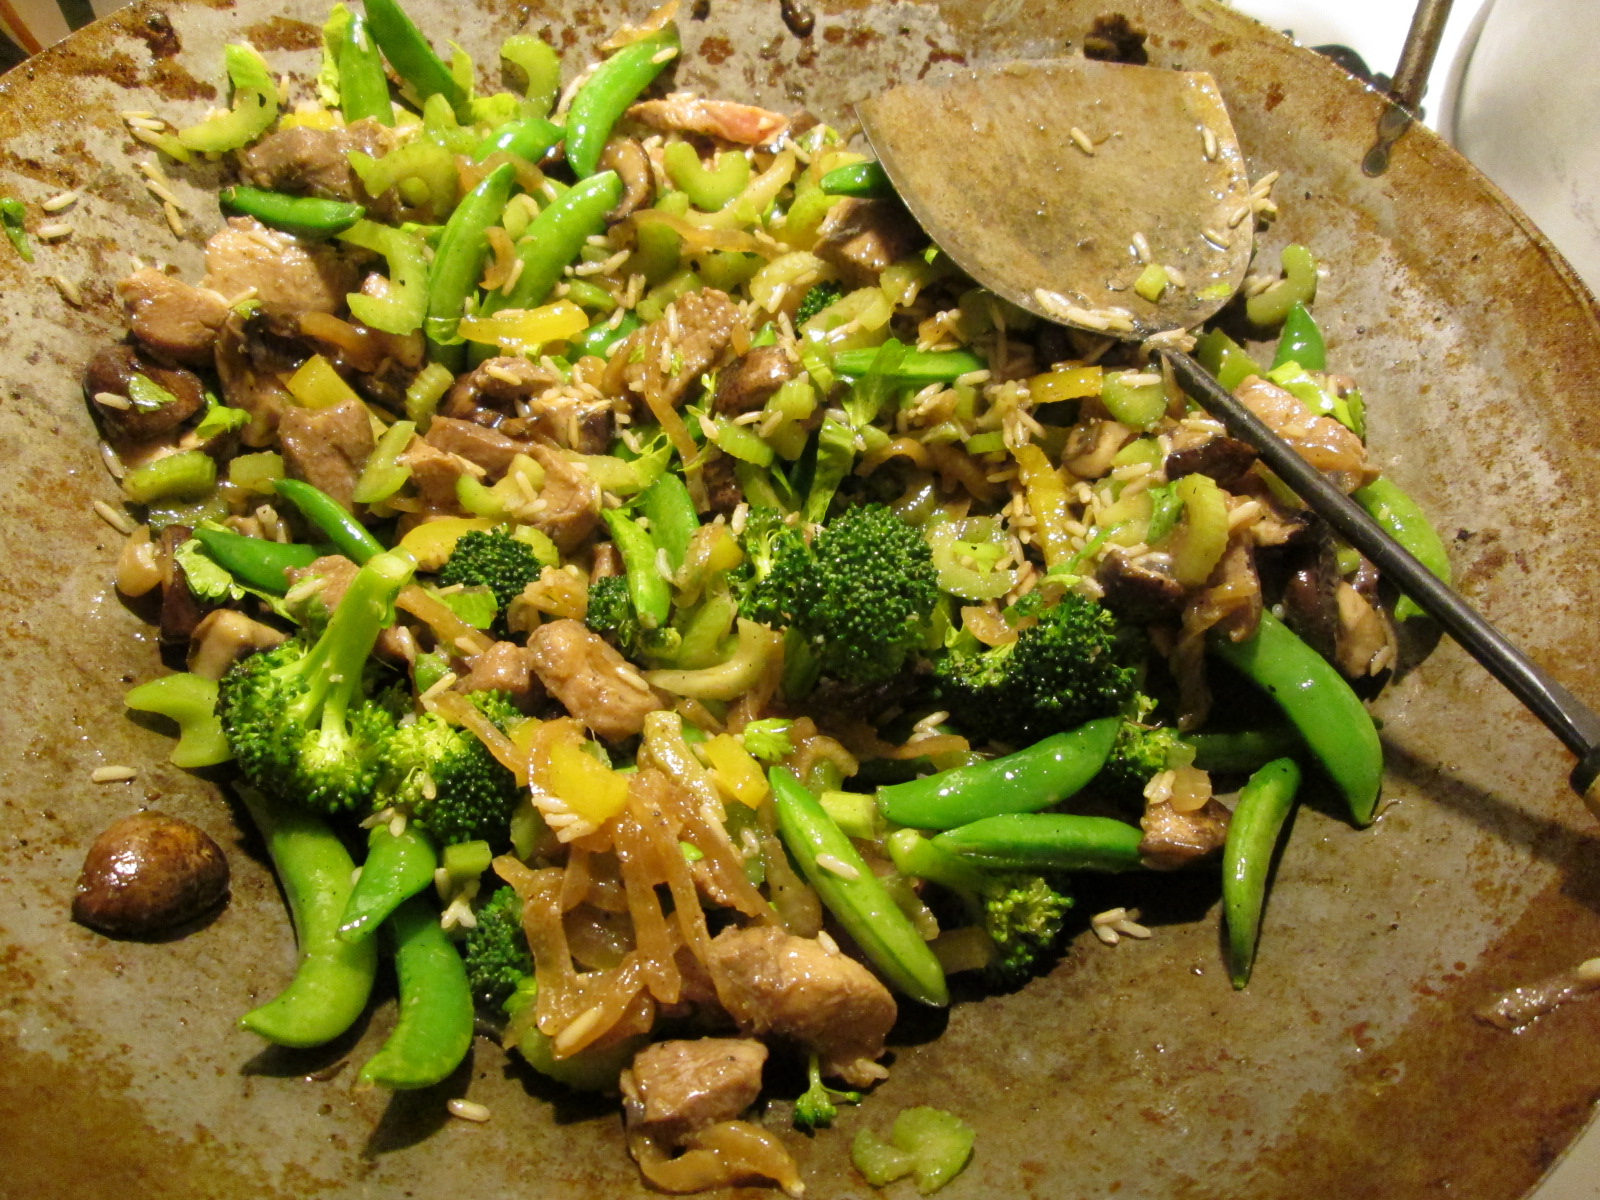
Year of the Snake Stir Fry
For marinade:
1 teaspoon toasted sesame oil
1 1/4 teaspoon crushed garlic (2-3 cloves)
1 Tablespoon, rounded, crushed or grated ginger
2 Tablespoons gluten-free tamari (soy sauce)
3 Tablespoons rice wine vinegar
4 Tablespoons mirin (Japanese cooking wine) or dry cooking sherry
Add
1/2 to 3/4 of a pound of thin cut pork sirloin, cut into bite-sized chunks
1 cup thinly sliced onions.
Marinate overnight.
Get rice cooking. I can’t give you a recipe or time — read your package or your rice cooker directions. I am generally hopeless at cooking rice. My Chinese ancestors would be less than best pleased.
Stir fry with
1/4 cup yellow bell pepper, sliced thin
1 cup celery, chopped
1 cup broccoli florets
1 cup of sugar snap peas, whole
1 cup of mushroom pieces, broken instead of sliced
1/4 cup of celery leaves, chopped
This makes a lot of stir fry. I tend to stir fry the ingredients in rounds, each ingredient separately — meat first, and then through the veggies. Strain the marinade out — you want to fry the meat, not boil it — and discard. Stir fry until cooked through, and then remove from pan. Cook the peppers. Remove. I stir fry in canola oil, and use it sparingly adding a tiny bit with each ingredient.
Stir Fry Flavor Meld
When all your food is cooked, dump it all back in the wok, turn the burner off, and give it a few minutes to meld.
Serve over rice. Or, you know, dump some rice in to flavor meld, too.