Notice: Function _load_textdomain_just_in_time was called incorrectly. Translation loading for the wp-ultimate-recipe domain was triggered too early. This is usually an indicator for some code in the plugin or theme running too early. Translations should be loaded at the init action or later. Please see Debugging in WordPress for more information. (This message was added in version 6.7.0.) in /home/maryzahc/public_html/adultfoodallergies.com/wp-includes/functions.php on line 6131 MaryKate – Page 19 – surviving the food allergy apocalypse (archive)
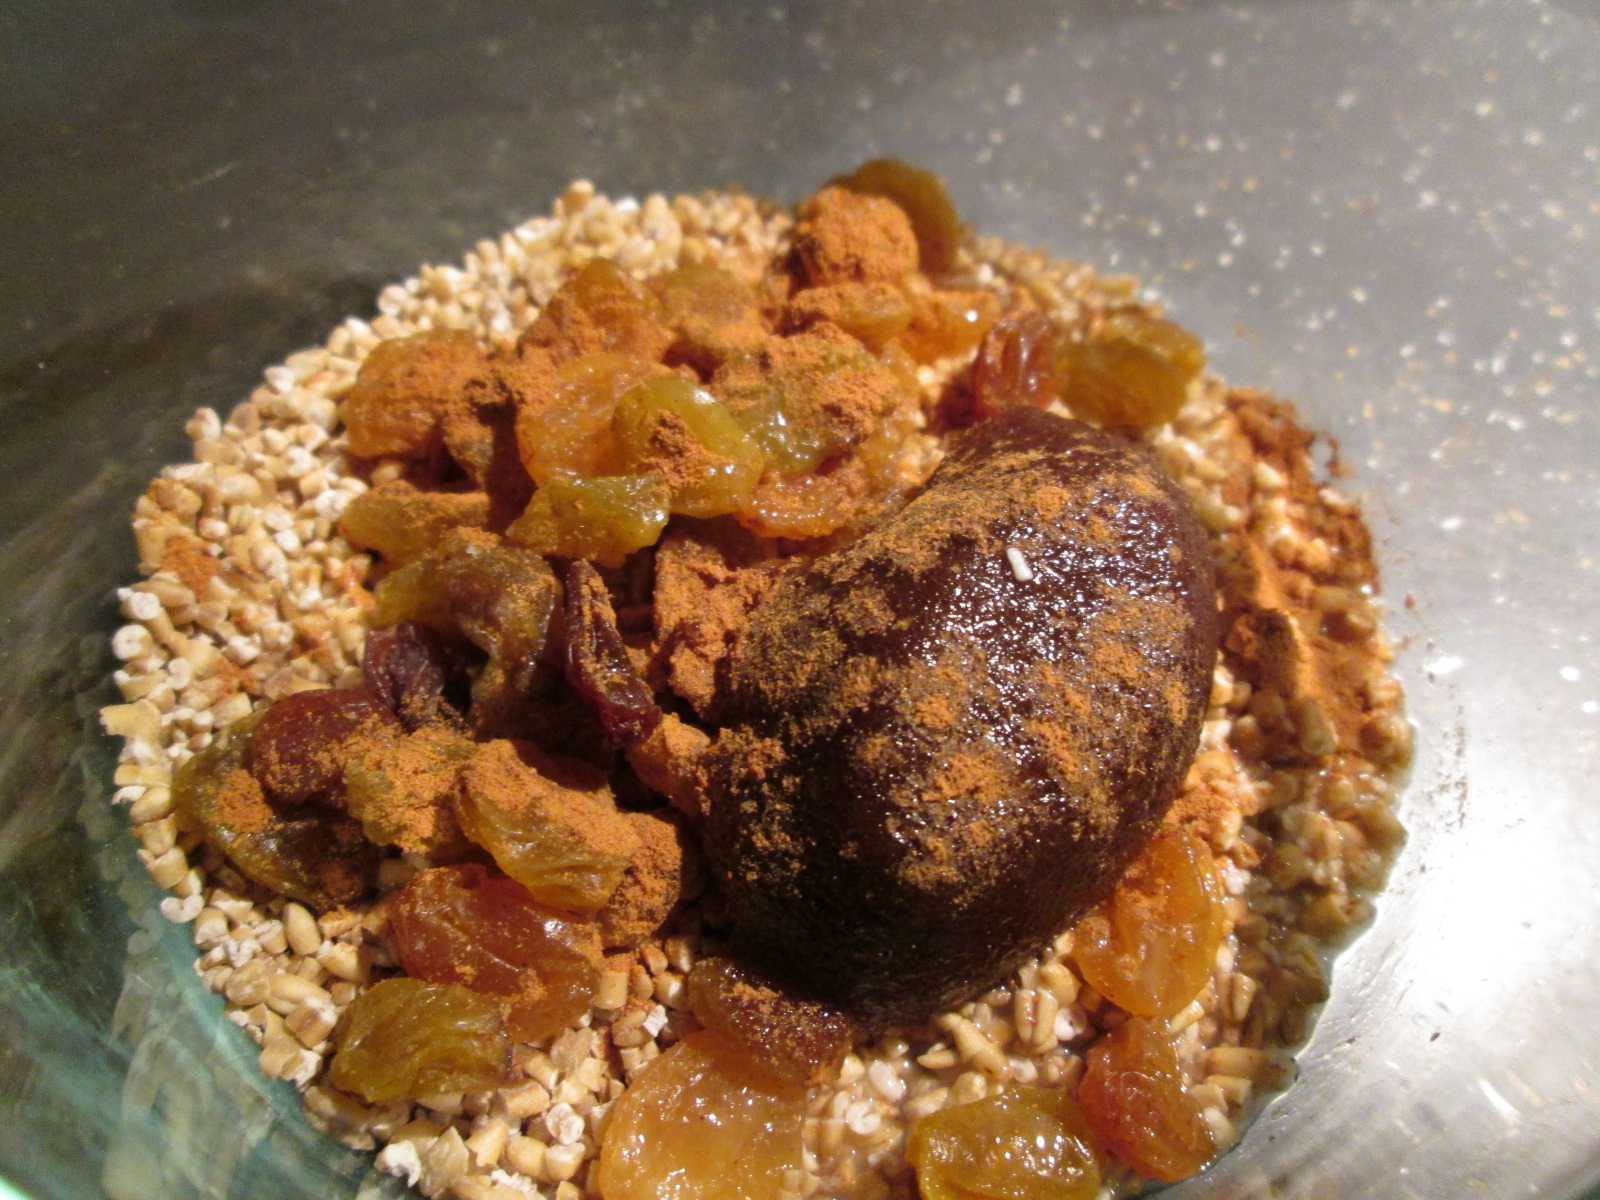
Oh, oatmeal, you’re not pretty, but you are oh so good.
Breakfast is, as people love to say, the most important meal of the day. It also takes place before I’m fully awake. Basically, I feel way more awesome each day if I eat breakfast. But if breakfast isn’t stupid easy — I’m talking pretty much fireproof — I put it off, start work, and wonder why I’m falling asleep cranky at 10 am.
So oatmeal is a great breakfast. But making it from scratch is more than I’m capable of in the mornings. And instant oatmeal is good in a pinch, but rather lacking overall. The solution is overnight oatmeal.
This is more of a concept than a recipe, but I’ll give you my favorite options and some other ideas.
Basic Overnight Oatmeal
Mix equal parts regular (not instant) oats and non-dairy milk in saucepan or spill-proof, microwave-safe travel container. Then add another 1-2 Tablespoons of non-dairy milk — more if you like thin oatmeal, less if you like it thick. Put in fridge overnight. In morning, heat up. Eat.
It may take you a little testing to figure out how much oatmeal you need for a good breakfast. For me, 1/3 cup oatmeal works pretty well, so long as I add some nuts and fruit. Here are a few of my favorite recipes:
Perfect Oatmeal
1/3 cup steel-cut oats
1/2 cup almond milk
1/4 teaspoon good cinnamon*
1 teaspoon maple sugar or maple syrup
1 Tablespoon almond flour or ground almonds
2 Tablespoons dried cherries (you could chop these, but I leave them whole)
Mix all ingredients in a leak-proof container, throw in bag on the way out the door, and microwave at work. 2-3 minutes on high works for most microwaves. Perfect.
*A note on cinnamon — there are actually a ton of varieties of cinnamon. If you’ve never experimented with them, oatmeal is a PERFECT canvas. My personal favorite for this is China Tung Hing cinnamon.
Pumpkin Spice Oatmeal
1/2 cup oats, not instant
1 1/2 Tablespoons canned pumpkin
2 teaspoons rice protein powder or ground nuts
1 Tablespoon dried cranberries
2 teaspoons cinnamon
1 Tablespoon mini allergen-free chocolate chips (optional)
1 teaspoon ground flax (optional)
1 teaspoon unsweetened coconut
1/2 cup + 2 Tablespoons non-dairy milk
To this one, I add a palmful of walnuts right before heating.
Oatmeal Raisin Cookie Oatmeal
Oatmeal Raisin Cookie Oatmeal
1/3 cup steel cut oatmeal
1 Tablespoon dark brown sugar
1/4 teaspoon cinnamon
2 Tablespoons golden raisins
2/3 cup rice milk
This one takes a little longer to cook in the morning, because of the steel-cut oats, but the texture is great.
The possibilities are endless, honestly. Let us know what you come up with.
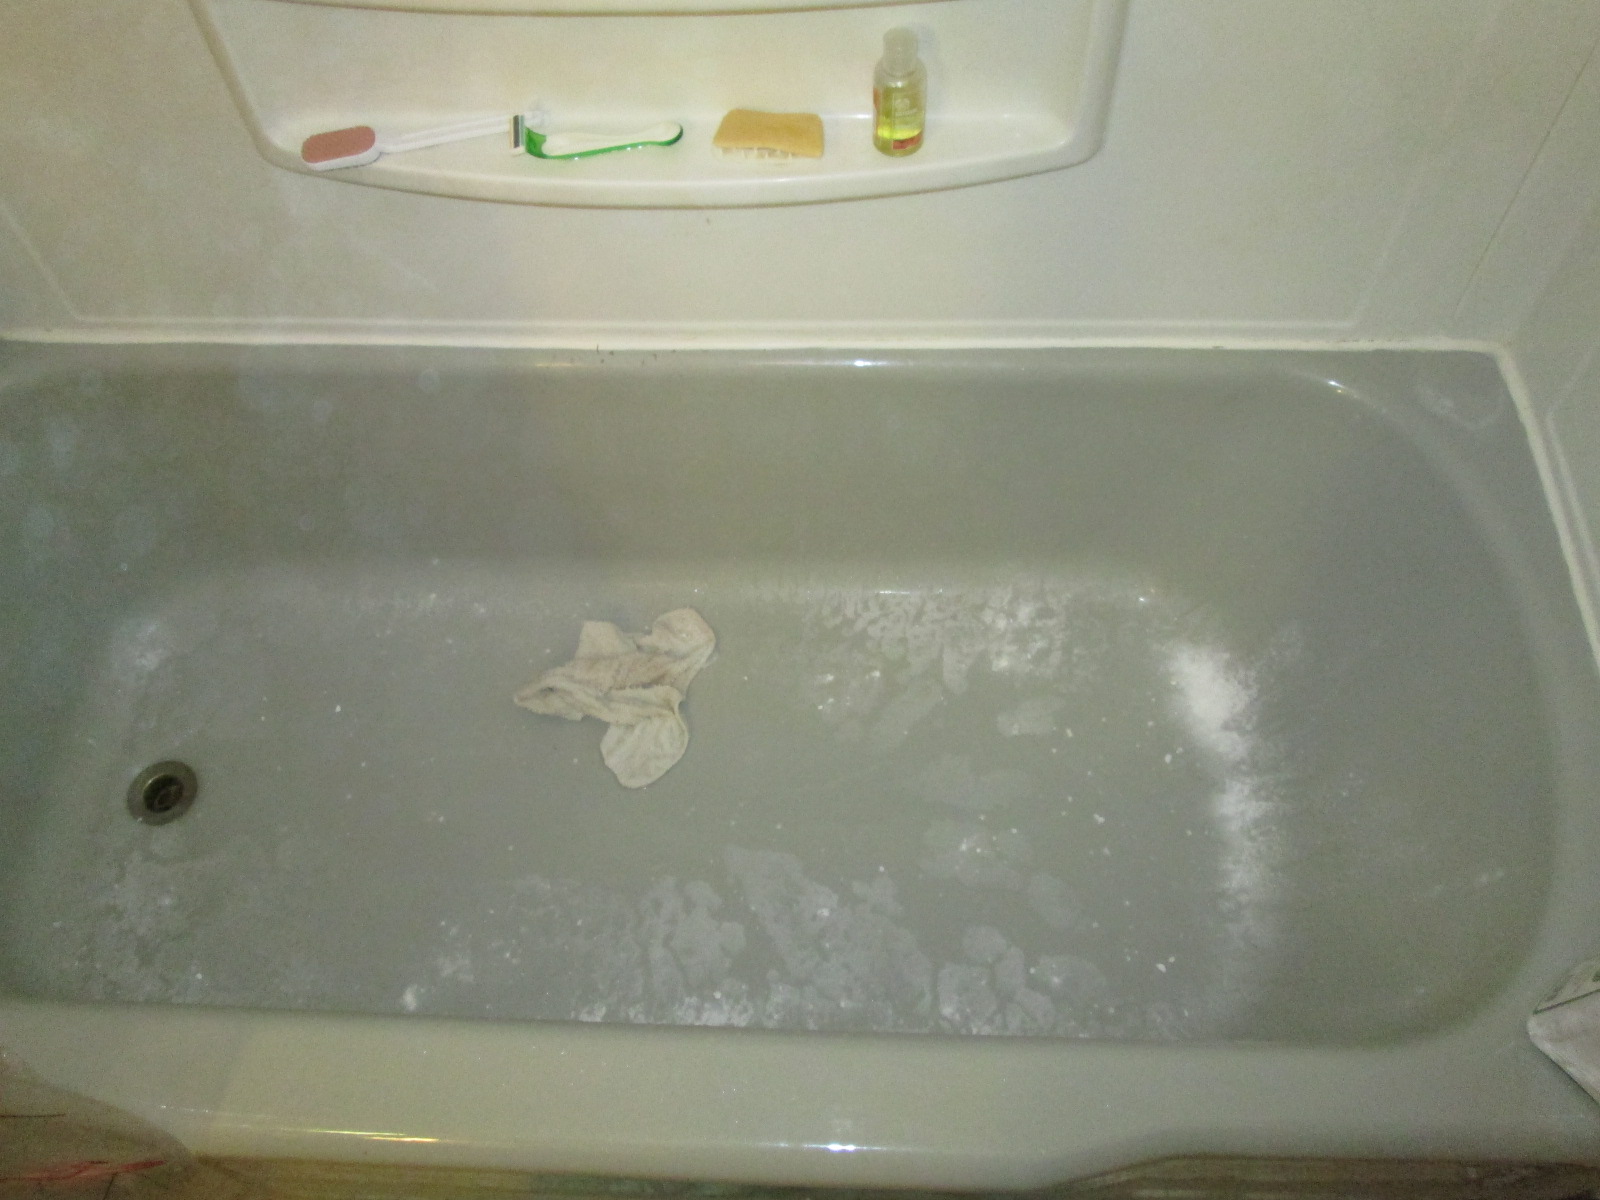
Here, look at this pretty photo of Star Island’s research center, as my bathtub isn’t that exciting.
Why not start the cleaning series with the deep cleaning of scrubbing? This is a method more than a recipe, and works on bathtubs as well as kitchen and bathroom sinks.
Now if you do some searching online, you will find lots of recipes to make scrubs for this purpose. I’ve tried a few, but I’ve found my method to be just as effective, and more importantly, a little easier.
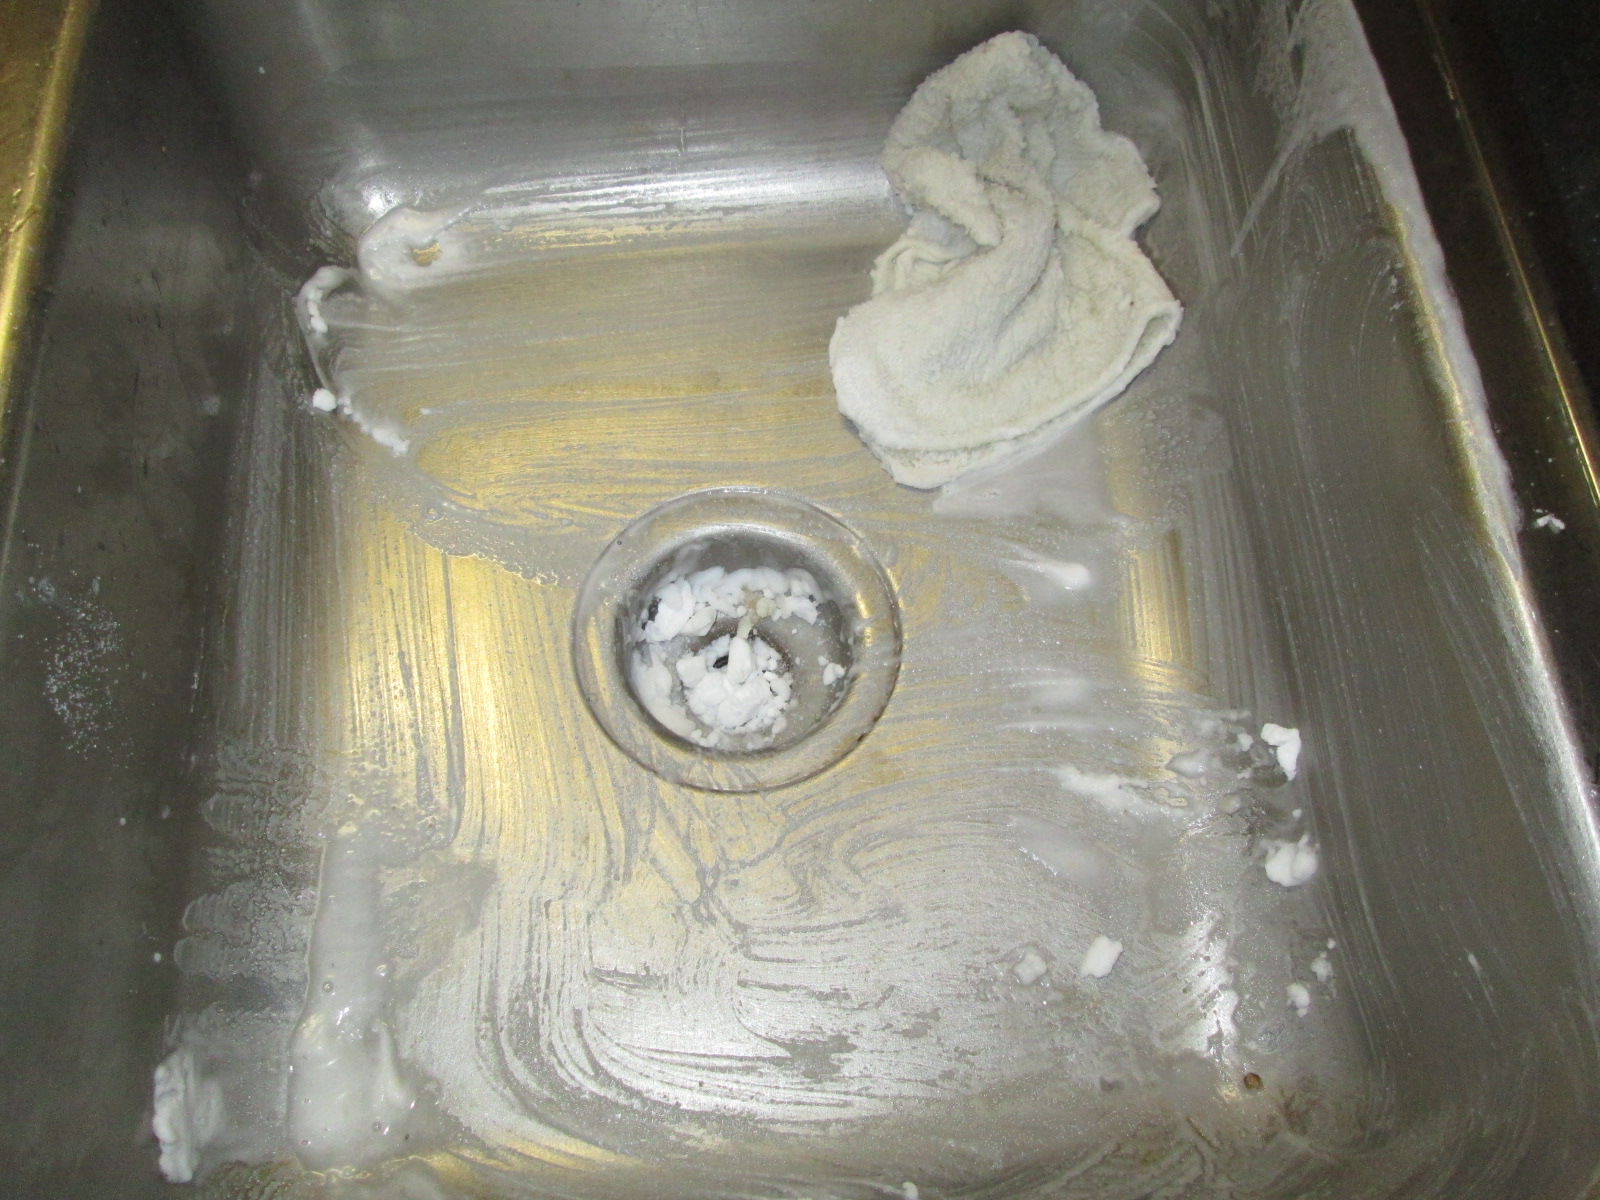
Sinks and Tubs
You need the following:
a cleaning cloth or sponge (I prefer terrycloth washrags)
baking soda
castille or other liquid soap, scented with essential oils if you like
water
a dirty sink or bathtub
Wet the bathtub. I do this by turning the shower on for a minute.
lightly sprinkled tub
Sprinkle the tub with baking soda. I have a large plastic container once used for a massive quantity of Italian Seasoning that I got from a recycling bin. It’s perfect for this.
baking soda sprinkler
Wet your cloth, and add a tablespoon or so of castille soap.
Scrub.
sink being scrubbed
Rinse.
It really is that easy. This make take a bit more rinsing than your commercial cleansers do, but any residue left on your sink or tub is non-toxic. If you have kids who use your bathtub or pets who like to lick the water out of the tub, you don’t need to worry.
Toilets
This method also works for toilets, just using your toilet brush instead of your cloth. Here, I do add a few drops of essential oil for freshening up, but it’s not necessary.
Alternately, sprinkle your toilet bowl with baking soda and add about a cup of white vinegar. Let it foam, then scrub with your toilet brush.
Now, I am aware that this cleaning method doesn’t likely have the germ and microbe killing powers of, say, bleach. But I don’t feel the need to fully disinfect the toilet — I don’t eat out of it — and cleaning it will get rid of most of the bacteria.
Drains
Now, since I have everything out anyway, I usually treat the drains at this time, too. This will not remove a clog in your drain, but it will keep things moving along in a reasonable manner.
For sinks, dump about 1/4 cup of baking soda down the drain. Then slowly pour a cup or so of white vinegar down after it. I usually don’t measure the vinegar — I just pour slowly until it stops foaming in a satisfying manner. Don’t use the sink/drain for 30 minutes or so, to let the vinegar/baking soda volcano do its work throughout. (To be honest, I don’t know if this is necessary or even useful, but it sounds like a good idea and I use it as an excuse to take a break from cleaning.)
For extra drain clog-monster banishing power, follow this with a pot or kettle full of boiling water.
For the skeptics, I do not have a garbage disposal, so bits of food do go directly down my kitchen drain. I do this treatment every 3 to 4 months. In 5 years, I have never needed a chemical drain cleaner on my kitchen sink, which is good, because have you read the warnings on those? They’re scary.
So this is a very simple and cheap way of cleaning that is also allergen-friendly and environmentally-friendly. Got any tips you’d like to share?
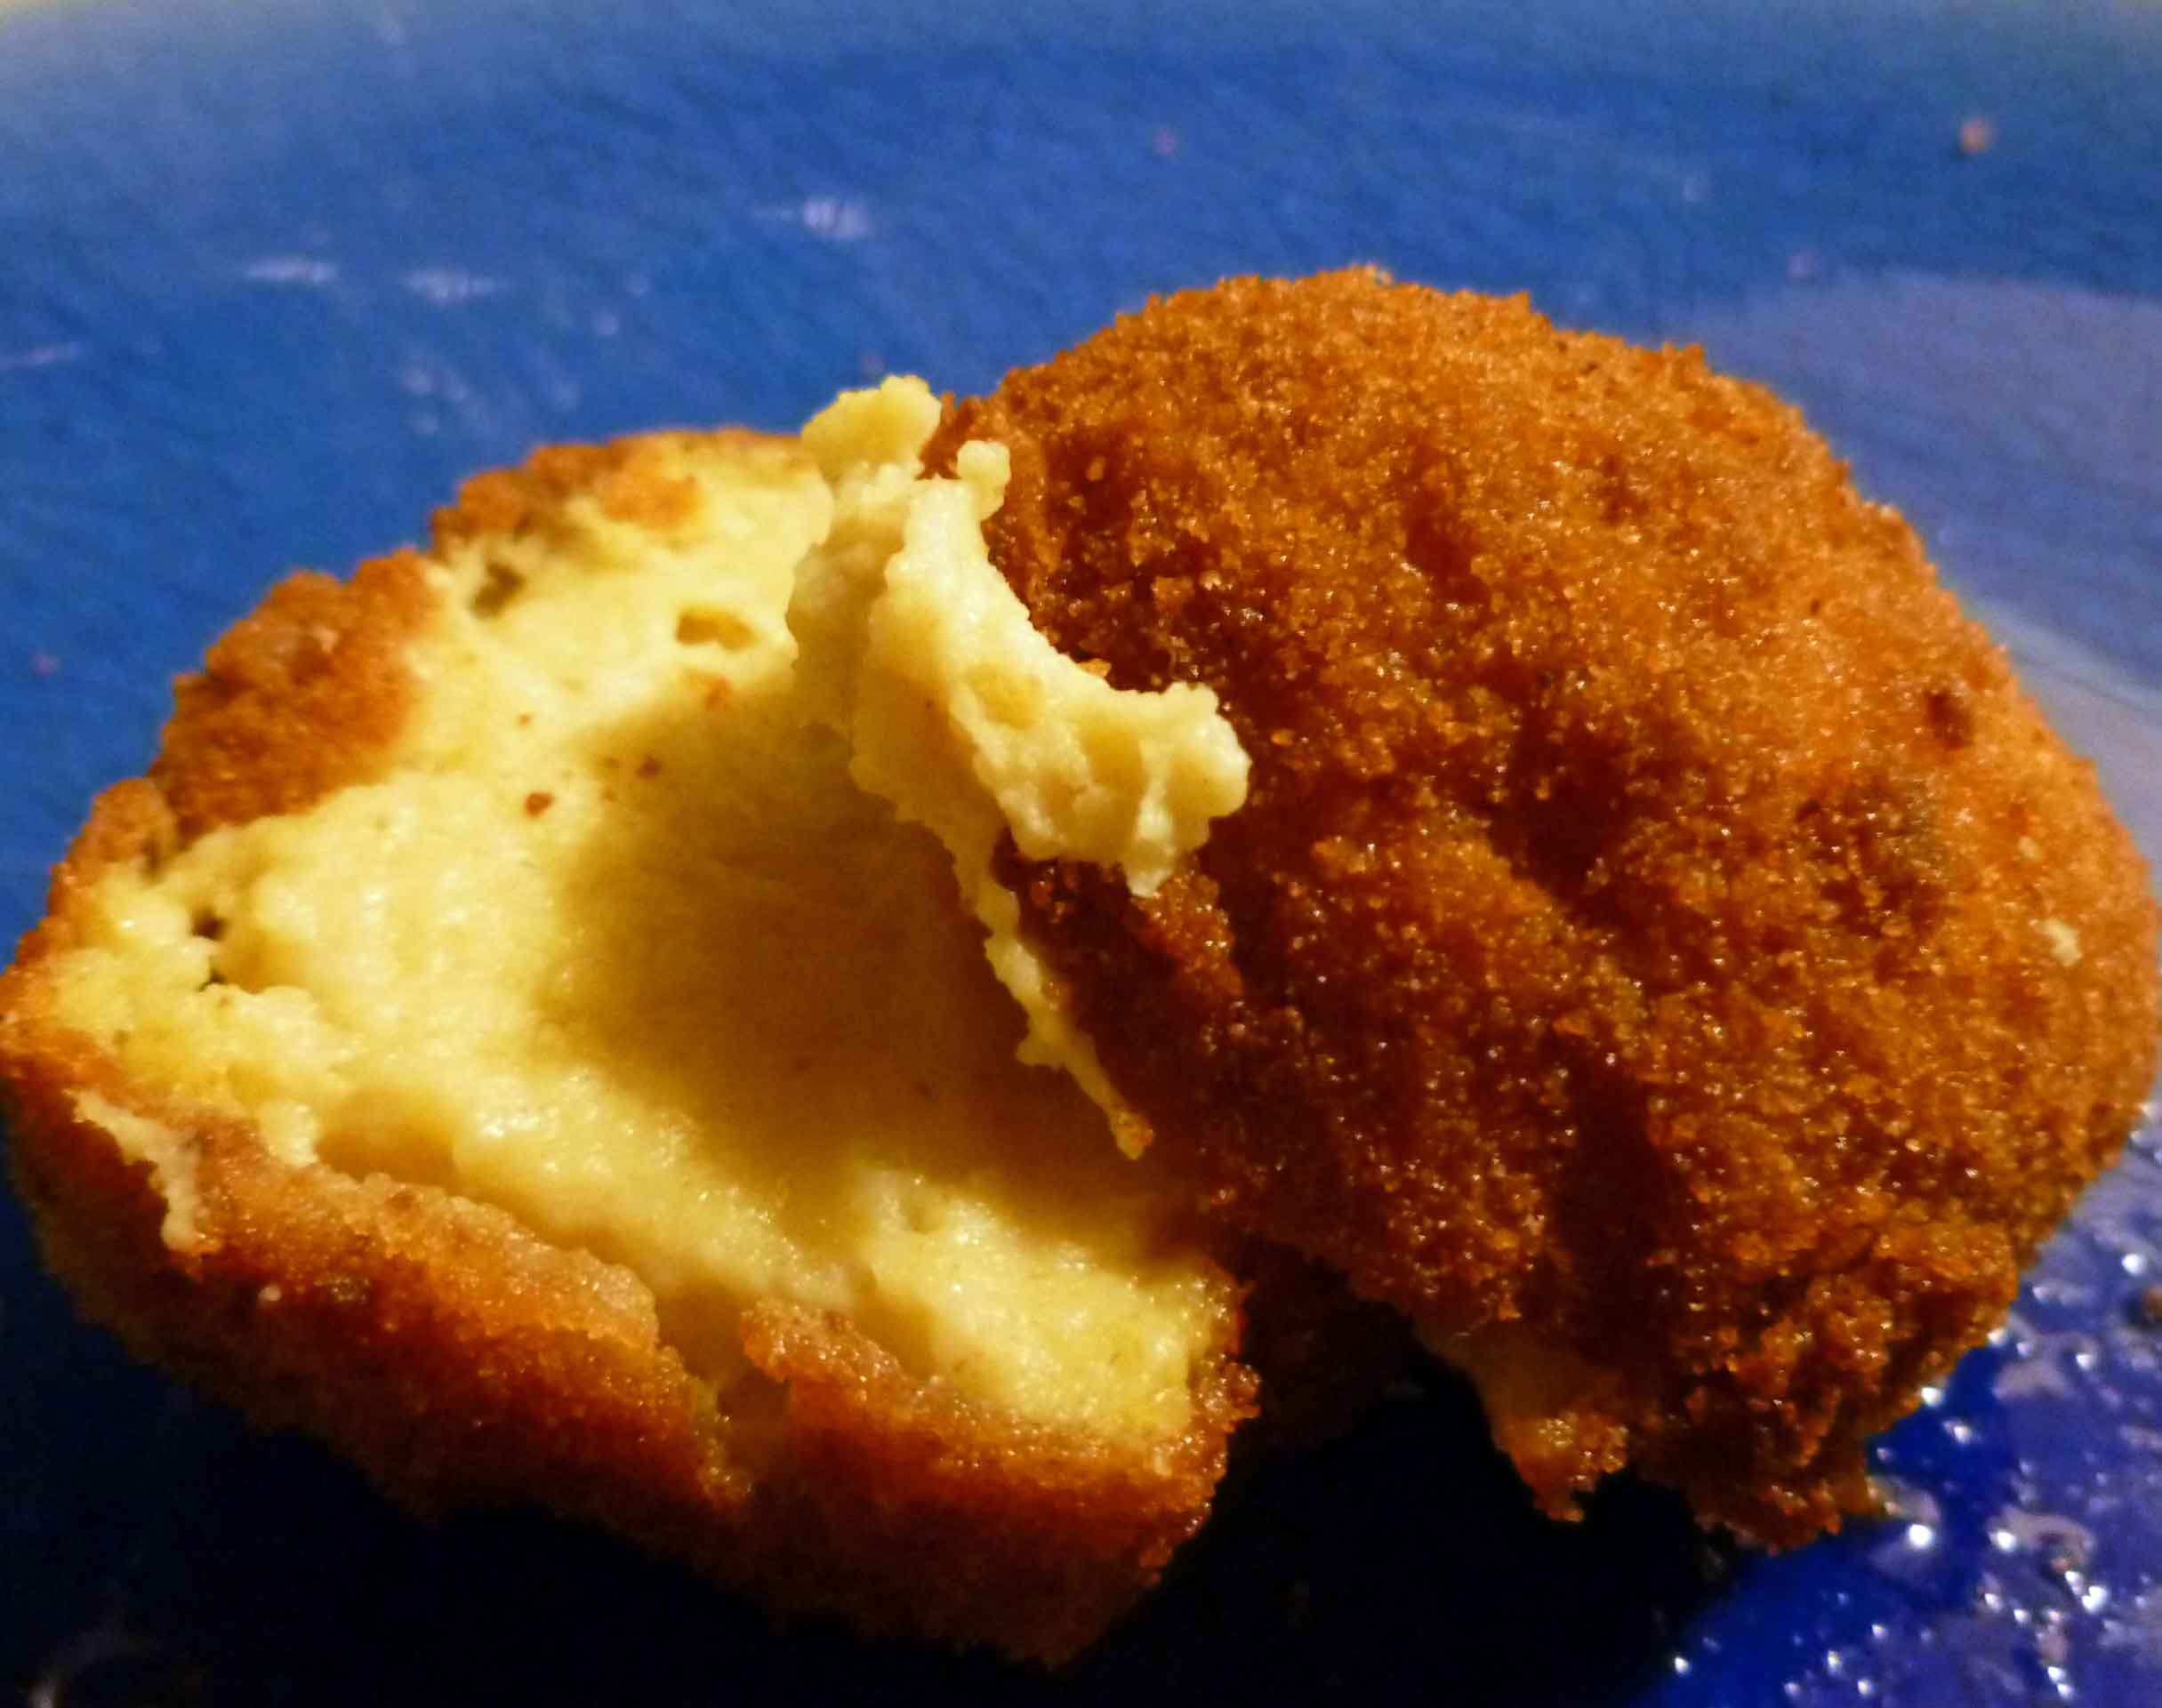
When Denise and I sat down to discuss things we needed to learn to make, things we could not longer eat “normal” versions of, one of the things that popped to the top of the list was what my college roommate called “bar food” — fried foods that tasted great and had little or no nutritional value. I can still have french fries, which are my favorite of the genre, but Denise missed mozzarella sticks (to the point that I had dreams about them – D).
As anyone who is vegan, allergic to milk, lactose-intolerant knows, cheese is one of the harder flavors to replicate without actual dairy products. Many have tried, but the majority of “non-dairy” cheeses on the market actually contain some dairy, and therefore aren’t suitable for anyone vegan or with allergies. There is nothing on the market that really would work for a fried cheese product.
But we do have the wonder of Joanne Stepaniak’s The Uncheese Cookbook, which has an amazing variety of cheesy flavors (including the basis for the nacho cheese used in the Happy Layers Nacho Dip). We figured that if we made the mozzarella recipe, made sure it was structurally sound enough to batter and fry, and then figured out a breading, we’d be set. Easy, right?
Not exactly. We had no problems with the cheez, though we made three or four recipes before determining which worked best, and tried several different “egg wash” and breading options, too, before determining which worked best. But even our less perfect attempts were edible, and we’ve shared these with regular omnivorous eaters, and while they wouldn’t mistake them for mozzarella sticks, they did enjoy them. This recipe was our first resounding success, and it’s kept us going for a while.
This is NOT an every day recipe! And frankly, given that it’s fried “cheez,” it really shouldn’t be anyway. There is preparation involved, and then deep frying, but they taste good at room temperature and could easily be re-warmed or kept warm in a low oven.
Before we get started, you will need the proper equipment. You decide how much you can fudge this stuff, but remember you’ll be playing with oil.
For making cheez:
2 qt. saucepan
whisk
silicone ice cube trays or molds with a capacity of about 1 Tablespoon each (cubes are approximately 1 inch square)
plastic wrap
freezer space so they can set
For the frying:
pot deep enough to accommodate about 3 inches of oil and the frying thermometer, a thick stainless steel or a enameled dutch oven would be best. You also want a pot that’s tall enough that the edge is 2 or more inches above the oil level. It’s safer and there’s less splatter all around. The pot we used was 5 inches tall and about 8 inches across. We do not recommend using anything with Teflon or nonstick coatings. Of course, if you have an actual deep fryer appliance, use that.
For recapturing the oil for re-use (with proper care, you can use this oil at least 6 times)
Mason jars
coffee filters
funnel
Ingredients, all in one list:
2 cups rice milk
½ cup nutritional yeast flakes
7 Tablespoons oat flour (if you can’t get gluten free certified oat flour, grind gluten free certified rolled oats in a blender, food processor or coffee grinder until you have flour)
¼ cup tahini
¼ cup cornstarch
4 Tablespoons lemon juice
1 Tablespoon onion powder
1 teaspoon kosher salt
2 Tablespoons Ener-G egg replacer powder
1/2 cup warm rice milk
one loaf of white rice bread, turned into bread crumbs, or about 1 1/2 cups of bread crumbs
a large jug of canola oil, for frying
marinara or tomato sauce for dipping (optional)
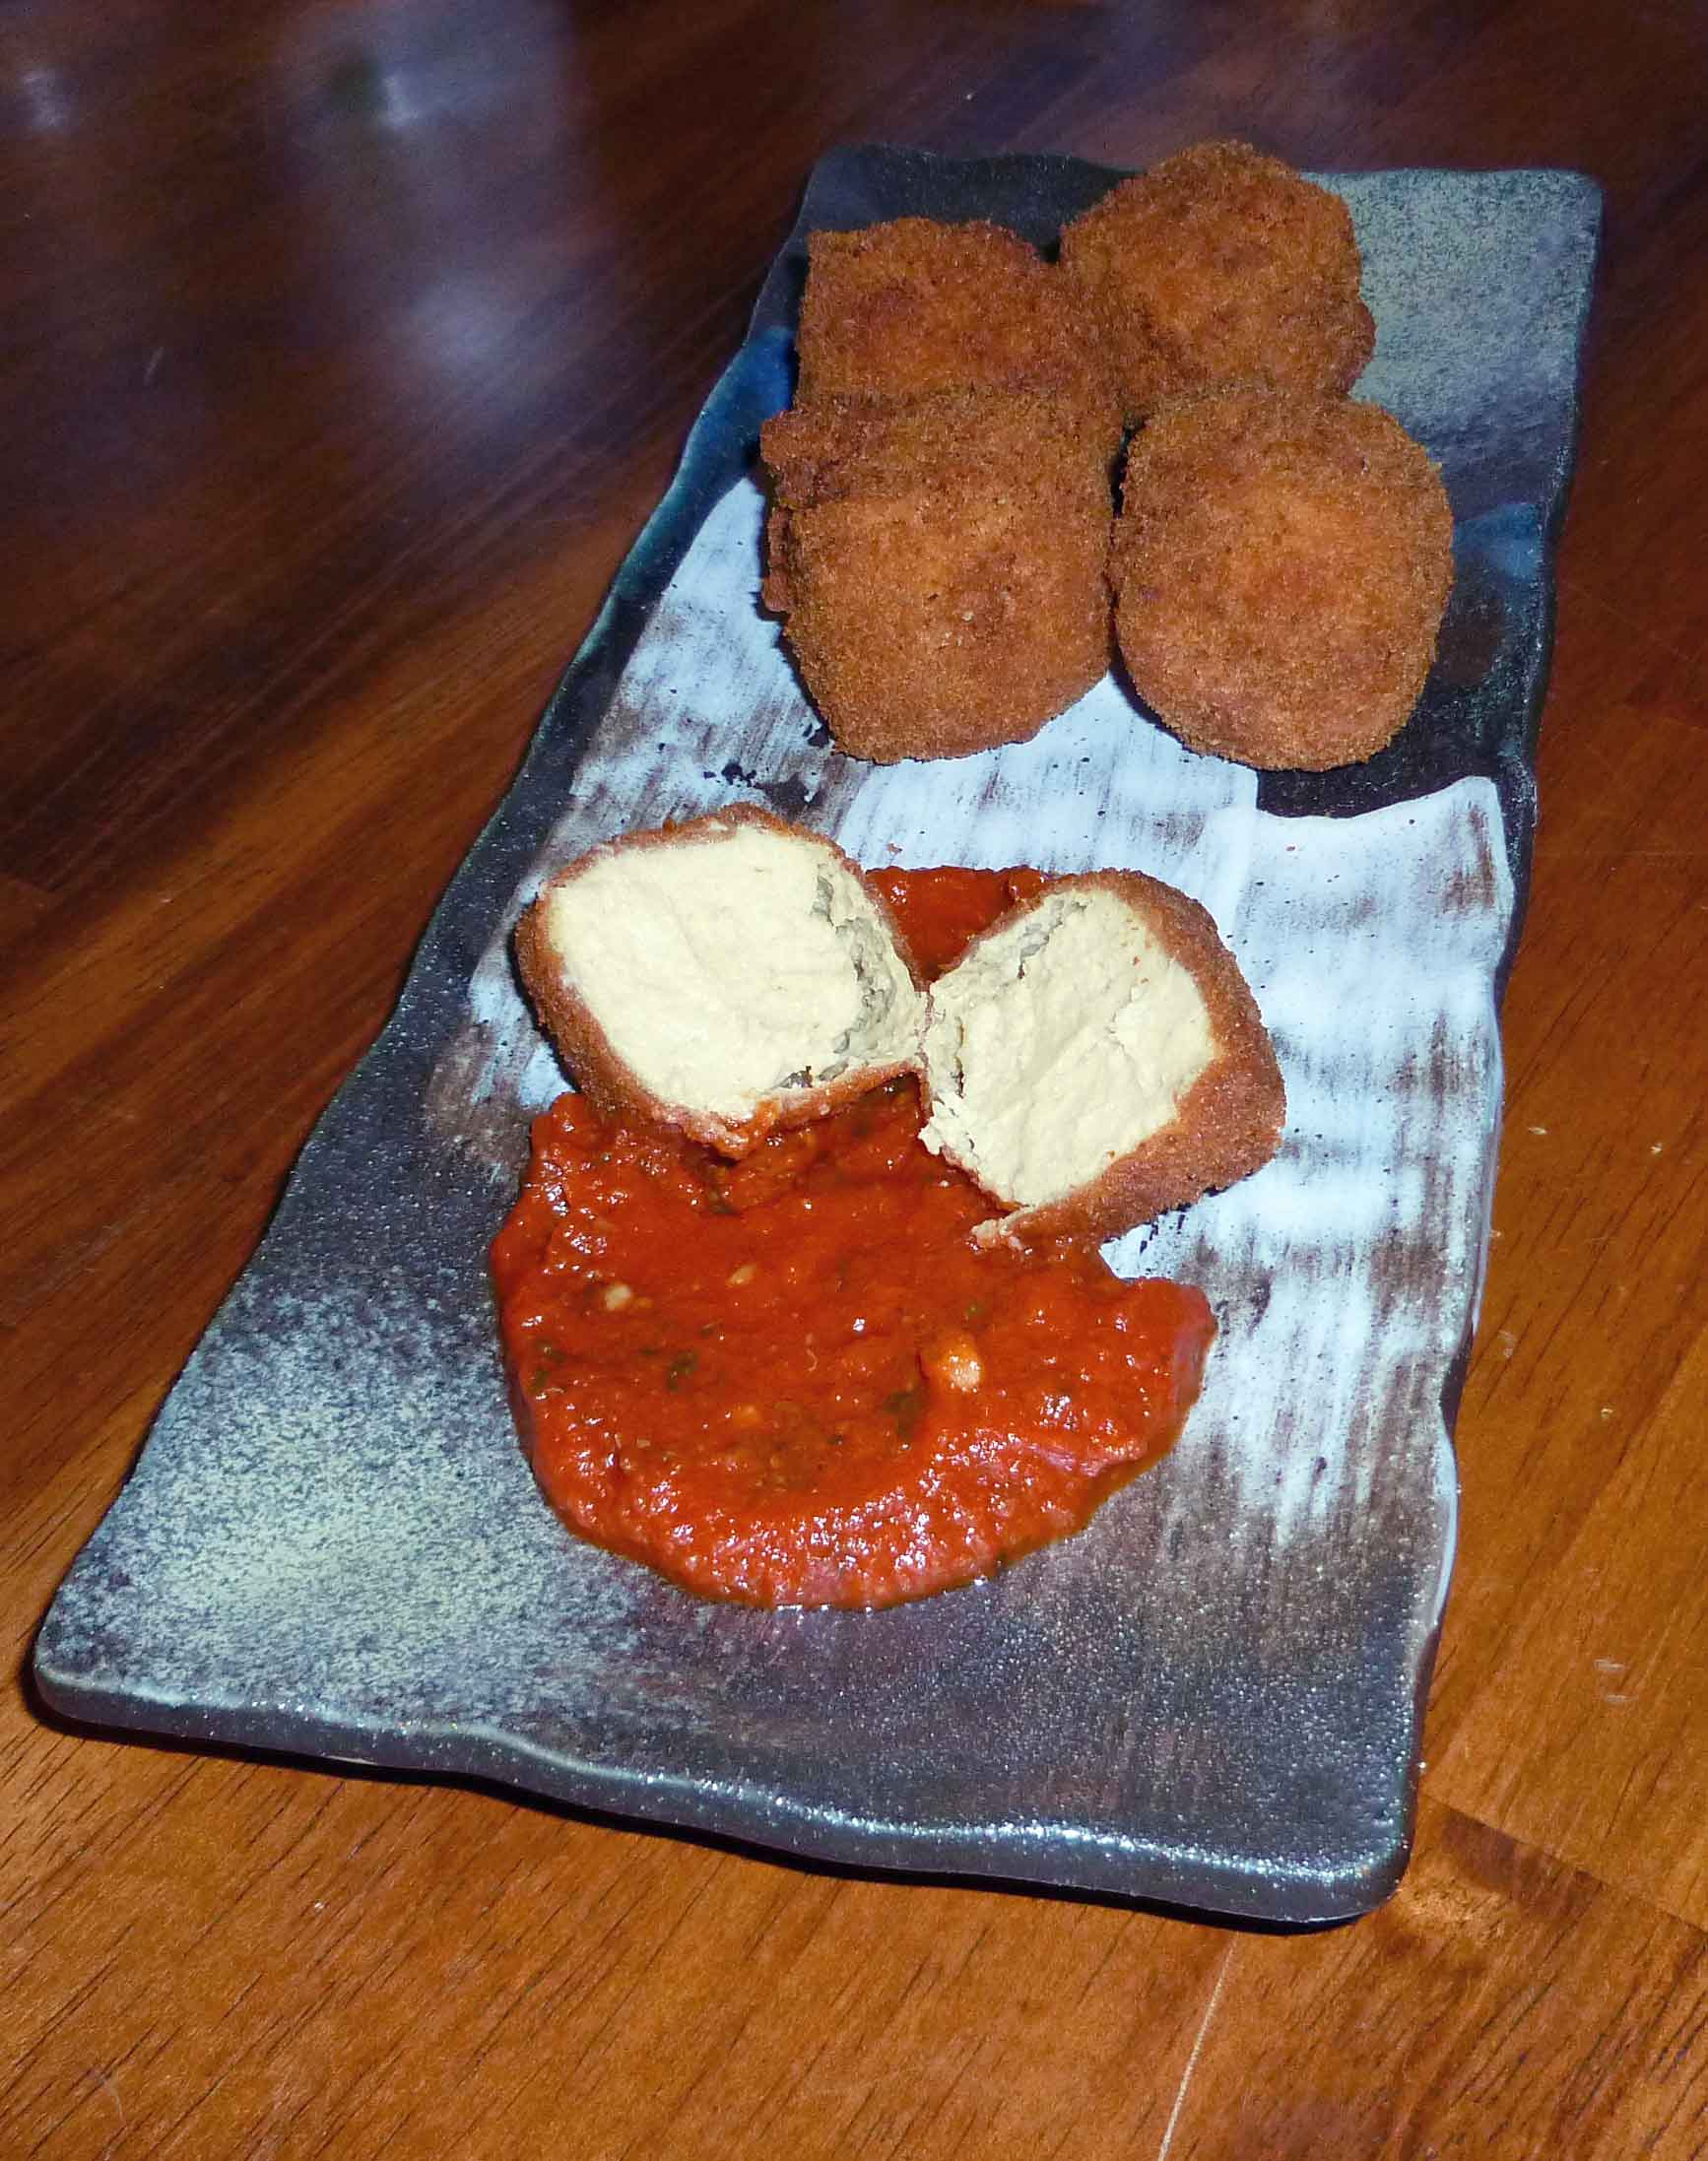
Miraculous Cheez Nuggets
There are two things you need to do in advance — make the cheez and make the bread crumbs. You could buy bread crumbs, but it may be easier to make your own and control the bread. For gluten-free bread crumbs, we suggest either Ener-G White Rice Bread or Food for Life White Rice Bread. In my opinion (MK), neither one is a fantastic sandwich bread, but the white rice breads do make excellent bread crumbs for frying.
For either one, lay the slices out on the oven rack and bake for about 2 hours at 200°F. Let cool completely, and then put through the food processor. You won’t use the whole loaf’s worth of crumbs, but why not keep the rest on hand? They keep well in a plastic bag or other sealed container.
Make cheez:
Place the following ingredients in the saucepan:
2 cups rice milk
½ cup nutritional yeast flakes
7 Tablespoons oat flour (if you can’t get gluten free certified oat flour, grind gluten free certified rolled oats in a blender, food processor or coffee grinder until you have flour)
¼ cup tahini
¼ cup cornstarch
4 Tablespoons lemon juice
1 Tablespoon onion powder
1 teaspoon kosher salt
Whisk all ingredients together until well combined.
Cheez Ingredients mixed before heating
Cook over medium-low heat, whisking occasionally until mixture starts to thicken. Turn heat to low, whisk constantly until mixture starts to pull together and away from sides of pan.
Cheez after cooking
Spoon into silicone molds or ice cube trays, approximately 1 tablespoon per cube. Try your best to smooth out the tops.
Cheez in Silicone Ice Cube Trays
Cool in fridge. Then cover with plastic wrap and freeze the cheez over night. The cheez must be frozen to hold up to frying without becoming a really nasty mess. The last batch we made we had intended to fry the the next day but couldn’t, so the cheez was in the freezer for a week or so with no ill effect. To save time, you could keep some cheez made ahead of time in the freezer and then just bread and fry when you want some.
Frying Fun!
Fill the frying pot (described above) with about 3 inches of canola oil, and put your frying thermometer in place. Start heat over medium-low and aim for 360ºF.
Frying Set Up
While waiting for your oil to heat, you will bread your cheez. Make an “egg” mix by mixing the following:
2 Tablespoons Ener-G egg replacer powder
1/2 cup warm rice milk
Place egg mix in a deep enough container or bowl that you can dip the cheez nuggets in it and coat them easily. Place bread crumbs in a low flat container so that you can easily roll the nuggets to coat them in the bread crumbs.
Remove cheez nuggets from silicone molds. One at a time, dip nuggets in egg mix, then in bread crumbs. Place on a tray to until you are ready to fry them.
Coating Cheez in Bread CrumbsCheez Nugget Coated in Bread CrumbsTray of Breaded Cheez Nuggets
Fry them! Drop nuggets (gently!) in the hot oil and then cover the pot with the splatter screen.
Putting Cheez Nuggets into OilCheez Nuggets FryingUsing Splatter Screen
Our pot was about 8 inches in diameter, with 3 inches of oil, and we could fry 5 nuggets at a time. Each batch took approximately 5 minutes with the starting oil temperature at 360-370ºF. We were able to test the interior temperature (remember, these will still be frozen when you drop them in the oil) with the probe thermometer — anything over 70ºF is good (take a nugget out of the oil and test it on a plate. DO NOT TRY TO PROBE A NUGGET WHILE FRYING). You can also just cut one open and feel it.
Blurry Photo of using Probe Thermometer
If you put too many nuggets in the oil at once, you will drop the temperature too far down (don’t go below 330ºF), and you won’t get a golden brown outside with a warm cheezy center. If your oil drops more than 15 degrees, put fewer nuggets in the next time around. You can also adjust your stove temperature to try to keep the oil temperature consistent.
When the nuggets are done, lay them on the cookie sheet that you’ve prepared — cover the cookie sheet with paper towels and lay your cooling rack upside down on the paper towels. The fried nuggets will be kept up off the paper towels, and the towels will draw the oil down. These nuggets are NOT greasy if you’re doing all this right, and they are wonderful.
Taking out Cheeze Nuggets to Put on RackCheez Nuggets on Rack
Serve while still warm, with marinara if you so wish.
You can freeze any leftovers, but reheat them low and slow — 250ºF for about 30 minutes seems to work. We only tested reheating them once, though, so if you do it, let us know how it goes!
New Year, new resolutions, right? I have been transitioning to chemical-free cleaning for the past few years. When I moved into my current place, I spent some house with ammonia-based cleaner in the kitchen, and while it needed the heavy-duty, chemical-laden cleaner, I felt awful afterwards. Since then, I’ve been making my own. So we’re going to talk, here, about cleaning for the next few Wednesdays. Denise addressed cleaning and caring for yourself if you have allergies — specifically coconut allergies, though all her products were great for anyone. I’m going to talk about cleaning your place.
Beyond my food allergies, I have environmental allergies to beat the band. I am allergic to almost everything and am overly sensitive to fragrances, particularly those of the fake, chemical kind. Yay me! Since I can’t live in a bubble, I do my best to make my environment habitable.
My allergist recommended establishing a “safe zone” in my bedroom — if you can minimize the allergens in your bedroom, you have 6-10 hours per day in which you can sleep and recover, giving your body a break. To do this, wrap your box spring, mattress, and pillows in dust mite protectors. Wash bedding in hot water weekly to kill dust mites, or use a specially-formulated dust mite killing detergent that works in cold water. Or, you know, move to Denver (apparently dust mites do not thrive at high altitudes. Minimize the fabrics in your bedroom — where possible, eliminate carpet, drapery, and upholstery, where mites can thrive unmolested, and where you have those fabrics, treat them with an allergen neutralizing spray (there are different formulations depending on your allergies and whether you have pets in the house). For any sort of specialized allergy products, I have to recommend National Allergy out of north Georgia. They do not pay me; I like their stuff.
For cleaning my house, though? I make my own products. I still buy dishwashing liquid, laundry detergent, and floor cleaner. I am not allergic to coconut or its derivatives, but for those who are, we’ll address that with the laundry detergent.
What will you need to embark upon this adventure? Not much. Overall, cleaning your house in an environmentally responsible manner which is also allergen-friendly? It’s CHEAP. With this arsenal, you can clean EVERYTHING in your house (not including dishes and laundry and yourself), I swear, and the grand total for cleaning for the year is well under $100, and some of these supplies will last for 5 years or longer. At first, the castille soap and essential oils might seem a bit spendy, but in the long run, they are not. They are cheaper than your common cleaning products and safer for use with kids and pets and people.
If you’re ready for this, I recommend the following:
Cleaning cloths — an old sheet or t-shirt will easily provide you a good number of cloths for dusting, polishing, and screen cleaning. A cheap stack of terrycloth washcloths will work for scrubbing and spot cleaning (either buy a stack at a home goods store or get some at a thrift store). For dishes, nothing works better than knitted dish rags. If you don’t knit, do you know a knitter? ALL of these can be washed in hot water and dried in the dryer, stay germ-free with regular washing, and are reuseable for years.
Do you have pets? You’ll need a pet hair remover unless your vacuum is really awesome (I’ve never owned that great a vacuum). I really like the Pledge pet hair remover. It works really well.
Rubber gloves. Especially if you have coconut allergies and want to use regular castille soap (which is coconut-based).
Baking soda — the cheapest and biggest size you can find.
White vinegar — again, buy the big cheap bottle.
Vodka — yeah, again, cheap, big, gallon bottle of gut-rot.
Rubbing alcohol.
Distilled water.
Castille soap (yes, this is all coconut-based. If your coconut allergies are severe, you can use Denise’s olive oil liquid soap (stop before you do the shampoo add-ins, just melt the olive oil bar soap down), but I’m going to say that for cleaning? It’ll be easier to suck it up and buy gloves. You are going to rinse everything off, so it won’t linger to touch your skin at all.) Your best deal is going to be Dr. Bronner’s baby soap if you want to add scents. I also like the tea tree for cleaning.
Borax
Olive oil
Essential oils — there are a billion “flavors” out there, so sniff ’em all and decide what you like. Only one warning — for the products we’ll be spraying on to things (counters or fabrics), you will need to avoid some citrus essential oils, which will stain. These scents are not like the fake scents added to most cleaning products, which are often likely to trigger environmental allergies and are, by some studies’ conclusion, very bad for your health.
Start your gathering. We’ll be talking clean for the rest of the month, and you’ll be ready way before spring cleaning begins.
So the year before I got my allergy diagnoses, I spent time perfecting a brownie recipe. Which was, of course, based on wheat flours, and which did not, of course, translate well to gluten-free. It was my first attempt at my own gluten-free recipe — I replaced the flour in the recipe with a GF baking mix and made the first and only baked good that was not completely devoured by my office mates. It was sad; I was sad.
And yet, I kept trying because brownies are something that is almost universally loved. A very special group of my friends has cannonized my friend Michelle’s *special recipe* brownies, which I’ve added as a decadent alternative at the end of this recipe — “Book Club” Brownies should be reserved for very special occasions, and only for those who are worthy of such decadence.
And now, I bring you this recipe. I am sorry it’s not nut-free, but I have not yet found the right combination for nut AND gluten free.
I’d also like to introduce my new love, George, the best Christmas present ever. To clarify some confusion from my FB post — George is a girl, named in part after the Bugs Bunny Abominable Snowman cartoon and in part for George in the Nancy Drew books. Now that that’s cleared up, meet George!
GEORGE! I made a video, but it was really really boring.
At Last Gluten-Free Brownies
Line a square pan with parchment paper. Make sure you know if you have an 8×8 or 9×9 pan, as it will affect baking times below.
Pre-heat oven to 350F.
1 Tablespoon chia seeds, preferably white
4 Tablespoons water
Grind your chia seeds. I use a coffee grinder for spices, flax, and now chia — grind it good and fine. With a fork or small whisk, mix the ground seeds in a small bowl with 4 tablespoons of water. Set this aside — it will turn into a pretty stiff gel.
1/4 cup soy-free Earth Balance
2 Tablespoons coconut oil
Melt the oils together in a small pan. Because I wander off measuring other things, I always do this in my ad-hoc double boiler (small skillet on top of a saucepan). It’s safer for me, but feel free to do it in a pan directly on the heat or even in a microwave if you own one.
1.5 cups almond flour or almond meal (doesn’t seem to make a difference for this recipe)
1/2 cup gluten-free oat flour
1/4 cup coconut flour
2 Tablespoons quinoa flour
2 Tablespoons tapioca starch
1/2 cup cocoa powder
1/2 teaspoon salt
1/4 teaspoon baking soda
1 cup brown sugar, packed
Mix all your dry ingredients together well — yes, including the brown sugar. Now, to this, add your chia gel, the melted oils, and the following:
1/3 cup almond milk
3 teaspoons vanilla extract
Dry ingredients with melted oils and chia gel
Mix well, adding a little more almond milk if necessary. Dough should be stiff, but not dry — more like a cookie dough than a cake batter. It should stick to the beaters, but not make it hard for them to run.
Add your mix in ingredients. The chocolate chips are not, in my opinion, optional. The nuts absolutely are.
1/2 cup allergen-free chocolate chips
1/2 cup walnuts (optional)
Dump your batter into the lined brownie pan. It should not spread out on its own — so use your spatula to smash it down and spread it out, getting it into the corners. When it’s smooth, place a piece of parchment over the top and smooth it down onto the batter.
parchment paper topper
Bake at 350F. 8×8 pan — 35-40 minutes (my oven takes 37. It just does.) 9×9 pan — 25-35 minutes (again, 32.)
Now, and this is really really reallyimportant: DO NOT TRY TO EAT THESE BROWNIES HOT. They don’t have any structural integrity at all when they are warm. Peel the top sheet of parchment off. Cool them in the pan for 10-15 minutes, then use the parchment to lift out the brownies as a whole and set them on a cooling rack. Cool them completely. Then do your thing.
Bookclub Brownies variation
This is really guilding the lily, but it’s a tradition, so here you go.
In a double boiler (real, if you’ve got it, or fake it again), melt 2/3 cup of allergen-free chocolate chips with 3 Tablespoons of non-dairy milk. That’s it.
You could also make a frosting or even use a prepared frosting (many of Duncan Hines’ prepared frostings are allergen-free, though I don’t know about cross-contamination issues). But I find that to be more work than really necessary to get the good flavor here. Your mileage may vary.
While brownies are still warm and in the pan, pour this chocolate ganache over them and smooth it out. It won’t look like quite enough first, especially if you’re using a 9×9 pan, but it is. Taking two toothpicks, or better yet, wooden bbq skewers, poke holes all over the brownies, through the ganache. Follow through with the COMPLETE COOLING directive. Enjoy your extra fudgy magic brownies.
If you’d like to guild the guilding and make minty holiday brownies, top with crushed peppermint candies.
At Last Brownies, with “Book Club” variation
1 Tablespoon chia seeds, preferably white
4 Tablespoons water
1.5 cups almond flour or almond meal (doesn’t seem to make a difference for this recipe)
If I’m completely honest, that mayo or sour cream based French onion dip (one package of dip mix plus a carton of sour cream, I think?) wasn’t something I made all that often or bought all that often in my pre-allergen days. But I liked it at parties, and maybe that was enough for me back then? I don’t know.
But last year, I wanted onion dip. With potato chips — salty, greasy, oniony madness. I tried a few things, and when I still ate soy, tofu-based sour cream with a packet of stuff wasn’t too bad. Some of the mixes are free of some allergens, but reading the ingredients so carefully is a real turn off, honestly. So. Onion dip. Now that soy is out and I really don’t want to use a packaged mix, it was time to come up with a good substitute based as much as possible on real foods.
Earth Balance, refugeof the dairy-free for decent, actually dairy-free margarine, has come out with a vegan AND soy-free mayonnaise! You can read our review of this miracle HERE. I am going to assume that this recipe will more-or-less work with regular mayo, or any of the vegan versions that contain soy. It’s been tested only with Earth Balance mindful mayo because neither of us eat those others.
As wonderful as the mayo substitute is, a dip based on mayo alone, to be eaten with thick, ridged greasy and salty potato chips seemed overkill, so the base of this is actually pureed canned cannellini beans, with mayo-sub added for creaminess. The onion flavor comes from scallions and caramelized onions. This is onion dip to revel in. Even if it doesn’t photograph like anything other than a dip.
Kiss Me if You Dare Onion Dip
First, get on caramelizing your onions. You want a softball-sized onion or two smaller ones, and if you can get a sweet onion (Maui, Vidalia, Walla Walla), it will be even better. Cut it in quarters and slice it thinly.
Heat about a tablespoon of olive oil in a large skillet over medium heat. I always use my cast iron, which is 12 inches, and I need to do two rounds of this. You want a good sloppy coat of oil over the bottom of the pan, heated until shimmering, and add only enough onions for a single layer. Add a good sprinkle of salt, 1/2 teaspoon or so for my pan size.
If you’ve never caramelized onions, it takes some time to do it right. I could tell you all about it, but I’m going to kick you over to Slate, as Tom Socca’s already covered it.
Set the onions aside to cool. I do not drain the oil off, as this dip is supposed to be rich.
Into your food processor (or blender, if you have a high powered one), add:
1 can of cannellini beans, rinsed and drained
1 scant cup of Earth Balance Mindful Mayo, original
3-4 cloves of roasted garlic
1-2 Tablespoons of lemon juice, fresh-squeezed if you can
Spin it through the food processor until all smooth and well combined. IF you are using a blender, I’d suggest doing the beans first, and then adding the mayo as a second step.
Add the onions and pulse until they are chopped up and well mixed in to your dip.
Dump dip into a serving bowl, and mix in about 1/4 cup of chopped scallions, green and light green parts only, reserving some for garnish if you wish. Refrigerate for a few hours before serving with lots of salty potato chips. Ruffles are my choice.
a bit of onion dip left after the party
Kiss Me if You Dare Onion Dip
1 softball-sized sweet onion, quartered and sliced thin
2 Tablespoons (+) olive oil (not extra-virgin) or canola oil
about 1 teaspoon kosher salt
1 can of cannellini beans, rinsed and drained
1 cup Earth Balance Mindful Mayo, original
3-4 cloves of roasted garlic
1-2 Tablespoons of freshly-squeezed lemon juice
1 bunch of scallions, sliced thin, green and light green parts only
Caramelize onions, then mix everything else in a food processor or high-speed blender, adding onions last, and garnishing with some of the green scallions if you remember.
This season seems to be full of tradition on so very many levels, including food, food, and food. I think this can make the holidays difficult for adults with newly diagnosed food allergies. This was me last year — going to holiday gatherings where I could not safely eat anything. Missing traditional foods, wanting to indulge, not wanting to ruin the holidays by eating the wrong thing and getting sick. ARGH.
Lucky for me, our only real family tradition is trying new things for the holidays. Doesn’t mean I don’t miss some of the traditional cookies, but it does mean that I don’t feel left out of the traditions — in fact I now get to drive them
How many foods are traditional celebratory foods that are also, in and of themselves, a reason for celebrating? Well, if potatoes are your personal proof that there is some order in the universe? Latkes are that food.
Also, they are amazing.
Traditionally served for Hanukkah, the symbolic importance of the latke is the oil in which the potatoes are fried, not the potatoes themselves. Also traditionally, the potatoes are mixed with onions, flour, and eggs (though the flour doesn’t appear in every recipe, so traditions vary. Here’s your primer, if you are interested in Chanukkah. (See, even the spellings differ!) Hanukkah is not as major of a holiday in the Jewish calendar as those who are not Jewish often think or assume, but it may have my favorite food traditions.
The substitutes for the allergenic ingredients in latkes are pretty easy. Instead of flour, potato starch works just fine. Instead of eggs, ground flax or ground chia seeds, mixed with water, make a good stand in. Ground flax gel will mix in easily. Ground chia seeds require a little extra work, as the gel is a bit stiffer; massage it in and around the potatoes and you’ll be fine.
Serve with applesauce, and you’re set. I know this should likely be considered a side dish, but I eat it as a main dish because that’s the way I roll.
This recipe is for a small batch, but double, triple, make as many as you can manage.
latkes
Latkes
2 medium baking potatoes potatoes
1 baseball-sized onion
3 Tablespoons potato starch
1 Tablespoon chia seeds or flax seeds, ground, and added to 3 Tablespoons water (4 if using chia)
1 teaspoon salt
canola oil, enough to thickly coat bottom of skillet
applesauce for serving
Shred potatoes and onion. The photo to the left includes the Sharpie for scale. I’d love to tell you how many pounds of potato to buy, but I hate those recipes as I never remember to weigh the potatoes and I don’t have a scale at home.
Shredded, you should have 4 cups of vegetable matter. If your food processor is like mine, pick out any big chunks of onion that somehow get through.
Place the shredded veg in a colander lined with a large, thin clean dish towel. This step is extremely annoying and extremely necessary. Fold the towel over the top of the potatoes in the colander and press down with as much force as you can muster, multiple times. When that seems to be done, twist the top of the towel and pick up the bundle and squeeze out more liquid. Do this until it’s not very effective anymore (or, in essence, until you’ve squeezed out as much water as your strength allows). I find that my hands aren’t extremely strong, so I push against the divider in my sink.
Put the oil in your skillet over medium heat about now. Also turn your oven on to 200F so that you can keep the whole batch warm.
Dump your well-squeezed shreds into a bowl, add the potato starch and chia egg (add a touch of water if you need to to get the chia gel mobile again), and salt. Mix this really really thoroughly, making sure the starch and chia are spread all throughout the veg shreds.
ground chia gelpotato and onion shreds
Now start making latkes. Taking about 2 Tablespoons, make patties in your hands, flattening them out, and not worrying about the raggedy edges. DO, however, worry about the tendency of hand-made patties to dome in the middle — work on making yours FLAT so they cook all the way through. The mound-shaped ones are still edible, but not as good. This does take practice, however, so be kind to yourself and remember that fried potatoes are fried potatoes and they are good.
Lay patties down in the oil carefully. If you’ve squeezed well, there won’t be a splatter of oil caused by water meeting the hot oil. Watch the edges and when one side is browned, flip ’em. Rinse and repeat. When you get to the last batch or so, the mix will be wet. Take your patty scoops and squeeze the water out before throwing them in the oil.
Latkes
Put the cooked latkes on a sheet pan and throw them in the oven until you’re done. Serve with applesauce.
Honestly, each time you make these, they get better. The ingredients are so simple that their awesomeness is based on your technique, so keep practicing! Only about a third of my latkes come out awesomely golden brown all over, evenly. I blame my stove, but likely it’s at least partially my fault. Guess I’ll have to keep practicing. OH THE HARDSHIP! (This is where a sarcasm font would come in handy).
This past summer, one of my co-workers went through a phase of making Thanksgiving dinners — I don’t think she was cooking a whole turkey, but part of it, plus dressing and cranberries. I think it happened more than once, and the craving turned out to be transferable.
But for me? Turkey, eh, whatever. I don’t like it or dislike it, but I don’t feel excited enough to cook one if I don’t have to. What I love about Thanksgiving are the side dishes, and while most of my family’s traditional foods are not allergen-free in their original formats, it is truly easy to make most of them safe with dairy alternatives (although, personally, I prefer vegetable broth to most non-dairy milks in mashed potatoes — less chance for an odd sweet flavor to happen).
For my mid-summer Thanksgiving, I decided to do a casserole of all my favorite flavors, and since there is just one of me, I did individual casseroles so that I could freeze some of them. If you wanted turkey, you could make it on the side. If you wanted a full vegan meal and you’re not gluten-free, add diced seitan with the mushrooms in the gravy portion, but be sure to leave some extra room for it at the top of your casseroles. Some sort of cranberries on the side? Why not? This can be the main dish, the centerpiece, the only dish, or a side. Nothing but versatile, right?
This casserole has a base of mashed rutabaga, a center of vegan, gluten-free chestnut and celery dressing, and a rich mushroom gravy, all baked in one lovely personal-sized casserole. I’ve never made this as one large casserole, but I think doubling each layer and increasing the cooking time would work.
Mini-Thanksgiving, Casserole Style
3 servings
Pre-heat oven to 350F, and spray three 1/2 cup mini-casserole dishes with cooking spray (note on cooking spray — the only one I’ve found free of all allergens including soy is Pam for Grilling).
First, make the rutabaga:
2 cups stock (veg or chicken) or 2 cups water and 2 bouillon cubes (watch for hidden gluten and soy in stock and especially bouillon — look for natural brands for boxed stock for the best selection of options)
about 2 cups of cubed rutabaga (look for it frozen and bagged)
Boil rutabaga in stock until cooked through. Takes 20-30 minutes for fresh rutabaga, but 10 or so for frozen.
Drain rutabaga, and mash with:
1+ Tablespoon soy-free Earth Balance
salt and pepper to taste — be generous with the pepper here.
Spoon into bottom of dishes and press down with the back of the spoon. Should be about 1/4 to 1/3 an inch at the bottom of each dish. If you have leftovers, pack them in or eat them.
Rutabaga base
Next, make the dressing. In large skillet, over medium heat, heat
1 Tablespoon olive oil. When shimmery hot,
Add:
1 cup of diced onion. Cook until translucent.
Add 1 cup celery, chopped, cook until hot, 3-4 minutes
Add one package of chestnuts, chopped (my package was 5.2 oz, and was about 15 chestnuts)
Heaping 1/2 teaspoon thyme, crushed as you add it.
Chestnut-Celery Dressing
Cook everything about 5 minutes. Onions should be entirely clear, celery should still retain a bit of crisp, the chestnuts don’t appear to change.
Stir in 1/3 cup gluten-free bread crumbs (I make my own from the leftover pieces of bread from each loaf, but if you need to buy some, the Ener-G loaves make good bread crumbs).
Spoon over rutabaga, leaving just a bit of room (1/4 inch or so) at the top. Scrape all the bits out of the skillet.
Chestnut-Celery Dressing, stage 2
Finally, make the gravy. Into the same skillet you just used (really no need to wash it out), still over medium heat, add
2 Tablespoons olive oil. When shimmery hot,
Add 1/4 cup onion, diced small. Cook until translucent.
Add 1 3.5 oz package of shitaki mushrooms, washed, stemmed, and diced. Cook until the liquid comes out of the mushrooms (watch, if you don’t know what I’m talking about — you’ll see it). 2-5 minutes. Then add
2 Tablespoons nutritional yeast
2 Tablespoons garbanzo bean flour
2 Tablespoons of soy sauce, gluten-free tamari, or coconut aminos
Whisk these until you’ve made a slurry, good and thick. Let it cook for a minute. Begin to slowly drizzle in water, about 1 Tablespoon at a time, stirring and letting each addition thicken before adding the next drizzle. Add at least 1 cup of water, and not more than 1.5 cups.
Spoon gravy over casseroles. At this point, you can cover the casseroles and refrigerate overnight, or you can bake them immediately. If immediately, cover with foil and bake for 15 minutes. If you are taking them out of the fridge, let them sit 15 minutes or so to come up towards room temperature, and then bake 25-30 minutes. These freeze okay, but let them thaw thoroughly and then bake.
2 cups stock (veg or chicken) or 2 cups water and 2 bouillon cubes
about 2 cups of cubed rutabaga
1+ Tablespoon soy-free Earth Balance
salt and pepper to taste — be generous with the pepper here.
1 Tablespoon olive oil
1 cup of diced onion
1 cup celery, chopped
1 5.2 oz package of chestnuts, chopped (15 chestnuts)
Heaping 1/2 teaspoon thyme
1/3 cup gluten-free bread crumbs
2 Tablespoons olive oil
1/4 cup onion, diced small
1 3.5 oz package of shitaki mushrooms, washed, stemmed, and diced
2 Tablespoons nutritional yeast
2 Tablespoons garbanzo bean flour
2 Tablespoons of soy sauce, gluten-free tamari, or coconut aminos
(Final note — it seems to me that chestnuts are tree nuts, but did not confirm this. Assuming this is so, this recipe is not nut-free. MK, and readers, I checked this morning and confirmed they are tree nuts -Denise)


 onion. The photo to the left includes the Sharpie for scale. I’d love to tell you how many pounds of potato to buy, but I hate those recipes as I never remember to weigh the potatoes and I don’t have a scale at home.


