Notice: Function _load_textdomain_just_in_time was called incorrectly. Translation loading for the wp-ultimate-recipe domain was triggered too early. This is usually an indicator for some code in the plugin or theme running too early. Translations should be loaded at the init action or later. Please see Debugging in WordPress for more information. (This message was added in version 6.7.0.) in /home/maryzahc/public_html/adultfoodallergies.com/wp-includes/functions.php on line 6131 Vegetarian/Vegan – Page 11 – surviving the food allergy apocalypse (archive)
My friend Corinne, of sparecake, decided to move out to Wyoming for a job. So I went down to spend a day hanging out with her before she left. We’ve cooked together a few times — Corinne isn’t gluten-free, but her mom is, so we’ve tried out some recipes. For this final attempt, we did a Frankensteined faux Thin Mint, using the cookie from one cookbook and the chocolate “frosting” or glaze from another because that’s what we had all the ingredients to do.
The cookies were not exactly like the originals, but were still crisp and chocolatey and minty, so overall, I’ll call this a success. We did reduce the amount of mint extract in the chocolate coating by a lot, as it was almost dental cleaning strong the first time around. Interestingly, there is no mint in the cookie part of a thin mint. Who knew? It’s just in the chocolate glaze.
The dough for these cookies was super dry, and we had doubts it would hold together for rolling or cutting, but it did both admirably.
This dough is pretty dry. But it ends up tasting good.Cut out cookies.
So this dough involves cutting in the shortening, “kneading” the very dry dough until it sort of holds together, and then rolling and cutting. After the cookies are baked and cooled, add chocolate mint coating. It is a few more steps than “regular” cookies, but, hey, this is re-creation. Miss Girl Scout cookies? This is the recipe for you.
For the full recipe, I’m going to shoot you over to Corinne’s site, sparecake. For the allergic, you will need a non-dairy milk, a safe-for-you shortening, and a meltable safe chocolate.
I have another canning inspired recipe for you. I made and canned plum sauce because I wasn’t able to find a safe commercial version for me, and because I eat a lot of Asian and Asian inspired food. Since I’ll be using this as a condiment for some of the dishes that are coming up, I decided to post a version that you can do without canning. If you want to can this recipe, it’s found in theBall Complete Book of Home Preserving on page 285 (linked to Amazon for convenience, no affiliation). I’ve cut the quantities down so that it only makes about a pint of sauce, so that you can use it before it goes bad without canning it. If I’m overestimating your potential use, you could also freeze half of it.
Plum Sauce
1/2 cup of brown sugar (make sure it’s safe for you, I corn-ed myself good by not reading labels on brown sugar once. If it says inverted sugar on it, don’t buy it if you’ve got an allergy to corn)
1/4 cup of granulated sugar
1/4 cup of apple cider vinegar (Bragg’s is generally safest for corn allergies)
3 Tablespoons of finely chopped onion
1/2 Tablespoon of finely chopped jalapeno or other green chili pepper
1/2 Tablespoon of mustard seeds
3/4 teaspoon of salt
1/2 – 1 clove of garlic (recipe converted calls for half a clove, but if you like garlic, by all means use it up)
3/4 teaspoon of fresh grated ginger
2 1/2 cups of pitted, finely chopped plums
In a large stainless steel or other non-reactive (ceramic or enamel, do not use aluminum or cast iron) pot, add the brown sugar, granulated sugar, vinegar, onion, jalapeno, mustard seeds, salt, garlic, and ginger. Bring to a boil over high heat, stirring constantly. Add the plums, and return the mixture to a boil. Then reduce the heat and boil gently stirring occasionally until the mixture is thick and syrupy, about 2 hours.
Since this recipe is not being canned, at this point you could choose to use a stick blender to puree the mixture to a smooth consistency. (Note: If you are canning the recipe, follow the directions in the Ball Complete Book of Home Preserving and do not puree the sauce. You could be risking botulism otherwise.)
Let the sauce cool, and once cool enough, place in a container in the fridge (or freeze some) to store. I usually put mine in a squeeze bottle so that I can use it like ketchup.
Okay, as Denise and I raved on Friday, it is officially citrus season up here in New England, which means someone has trucked citrus fruit all the way up to the frozen north. After two years of just eating or juicing the citrus, I’m finally starting to try cooking with them beyond. I’ve been marinating and dressing and mixing and playing and it’s brilliant. Let me share my favorite side dish so far.
Broccolini was kind of a cheat for me. I could happily eat broccoli every single day and not get too bored, but it seems like we should eat more than just one vegetable, right? So the other night when I was tempted to pick up more broccoli at the store, I decided on a bunch of broccolini instead. Turns out that broccolini is not just a different stage of broccoli’s growth. Broccolini is a hybrid of broccoli and another vegetable I’m not particularly familiar with (kai-lan, an Asian vegetable I’ve never cooked). A quick internet search tells me it was developed in the early 1990s and made it to the US in the late ’90s. It has tender stems and less dense tops, and it’s a nice variation on broccoli. The flavor is pretty similar, but greener and more mild.
This recipe cooks both the long tender stems and the tops, but adding the stems first so they will be done when the tops are, with neither part overdone. It also takes two pans, but I think it’s worth it. I’ve cooked the sauce first and set it aside while cooking the broccolini. When chopping up the broccolini, I’ve pulled off all the “tops” that are on lower stems, too.
From top left: whole raw broccolini, blood orange and squeezed juice, finished sauce, and toasted garlic in Earth Balance margarine
Blood Orange Broccolini
2 Tablespoons Earth Balance or other safe-for-you fat or oil (if you are not using a margarine or butter, add a pinch of salt to your oil)
1 Tablespoon chopped garlic
3 Tablespoons fresh-squeezed blood orange juice (about 1/2 an orange)
2-3 teaspoons olive oil
1/2 teaspoon salt, divided
1 bunch broccolini, stems and tops chopped separately
Melt your Earth Balance in a small skillet or sauce pan over medium low heat. When foamy, turn the heat a notch or two on your stove — you want basically the point between low and medium, wherever that is for you. Add the garlic, stir well, and cook over this low heat for about 10 minutes or so. Garlic should be caramel brown when you’re done. Remove from heat and set aside. When it’s no longer hot, stir in the blood orange juice.
Heat a large skillet over medium heat. When hot, add the broccolini stems and about 1/4 teaspoon salt. I’ll be honest — I almost never remember to measure salt in cooking (baking is different). I just added a large pinch. When the stems start to get a little browned, stir in the tops and another pinch of salt. Keep stirring every few minutes until the stems and tops are just barely fork-tender.
Add the sauce, stir well, and heat it all together for 2 or 3 minutes. Scrape the pan well to get all the garlicky goodness out and stir to coat all the broccolini well.
I needed a really simple dinner the other night because I wasn’t all that hungry, but I had to eat something and it was already 10:00 p.m. (I really need to stop doing that kind of thing.) So since I’m trying to work through all this rice that I keep buying at Asian markets because I cannot walk away from how inexpensive it is compared to regular grocery stores, I decided to throw a rice thing together. I liked it enough that I’ll make it again, and I can see this as being a great side dish to go with tacos (or in my case, taco salads, as I haven’t found a safe tortilla recipe I can stand) or with fajitas.
Green Tomatillo Rice
1 Tablespoon of olive oil, or other oil that’s safe for you
1 cup of rice (I used sushi rice because that’s what I’m trying to use up, but any rice would work, arborio would be lovely)
1 medium onion, peeled and diced
1 clove of garlic, peeled and minced
1 – 16 ounce jar of green tomatillo salsa that’s safe for you (I used my home-made, home-canned version)
2 to 2 1/2 cups of water, depending on how tender you like your rice
1 to 2 Tablespoons of minced fresh cilantro (optional)
In a large skillet with a lid, add the oil, rice, onion and garlic, and stir with a spatula over medium heat. When the onion is translucent, add the water, salsa and cilantro, and stir to mix thoroughly. Turn the heat to medium high, put the lid on and bring the rice mixture to a boil. When the rice mixture reaches a boil, stir it, put the lid back on, and bring the heat down until the mixture just simmers. Simmer for 10 to 20 minutes, until the rice is tender, and the sauce is thick.
You know how there are those brownie in a mug recipes out there? And how none of them work for those of us with food allergies who need a really quick cake fix and (1) can’t wait 35-40 minutes for a cake to bake, or (2) can’t eat a whole cake before it goes stale? Well, now you can have a nice smallish cake that cooks in the microwave in between 7-8 minutes, which is good, or really bad, depending on your perspective. I’ve eaten a lot of cake in the last week getting this recipe right, and I think the psyllium really rocks. It gives the cake a consistency and body similar to that of a regular cake with regular flour. I give you almost instant cake. You’re welcome!
Microwave Individual-ish Chocolate Wacky Cake
Makes 8 inch round cake.
a bit of olive oil, or another mild oil that’s safe for you, to grease the pan
3/4 cup of all purpose gluten-free flour mix (I used Cara Reed’s mix from her blog, Fork and Beans)
2 Tablespoons of cocoa powder that’s safe for you (I used Penzey’s Dutch Process although some that are allergic to corn cannot tolerate it)
1/2 cup of sugar
1/2 teaspoon of baking soda
1/4 teaspoon of salt
1/2 teaspoon of rice wine vinegar, or other mild vinegar that’s safe for you
1/2 teaspoon of vanilla extract (Here’s a bunch of recipes for vanilla extract, make sure to use safe alcohol if corn or wheat are an issue for you. I use either Vikingfjord or Luksusowa Vodka because they are made only from potatoes, where some vodkas may also use grain or corn.)
4 Tablespoons olive oil, or another mild oil that’s safe for you
1 Tablespoon of whole husk psyllium(no affiliation with Amazon, just linking so you can see the product)
1/2 cup of water (water amounts are provided separately because they are used at different points in the recipe)
1/4 cup of water and 3 Tablespoons of water
Grease a microwave safe 8 inch piece of stoneware, Corning ware or Pyrex, with your safe oil. Set aside.
In a large mixing bowl, add the AP gluten-free flour mix, cocoa powder, sugar, baking soda, and salt, and use a whisk to combine the dry ingredients thoroughly.
In a small bowl, whisk the psyllium and 1/2 cup of water together thoroughly. It will jell up fairly quickly.
Make three little depressions or wells in the dry mix, add the vanilla to one, the oil to another and the vinegar to the third. Add the psyllium mixture and the remaining water water to the bowl, and mix with the whisk until the mixture is mostly smooth. The psyllium is going to make things a bit lumpy, so don’t worry about that.
Pour the cake batter into your greased pan, and microwave on high for 7-8 minutes (my microwave is 1100 watts, times may vary with different microwaves) or until the cake pulls away from the edge of the pan.
Microwave Individual-ish Chocolate Wacky Cake
Let the cake cool, and then cut and serve, or just eat it out of the pan.
I wish I could claim credit for inventing the following recipe, but I can’t. My former neighbor told me, as we were all sitting outside one evening, that he made “the world’s best cauliflower.” I don’t know about you, but cauliflower is not a vegetable I’d ever considered for a “world’s best” anything nomination. As a child, we got cauliflower doused in cheese sauce on an occasional basis, and while it was fine, it wasn’t something any of us clamored for. Since then, I’ve seen it on raw veggie platters, had it in “California blend” frozen vegetable bags, and had it roasted once or twice. Again, not bad, but not generally exciting.
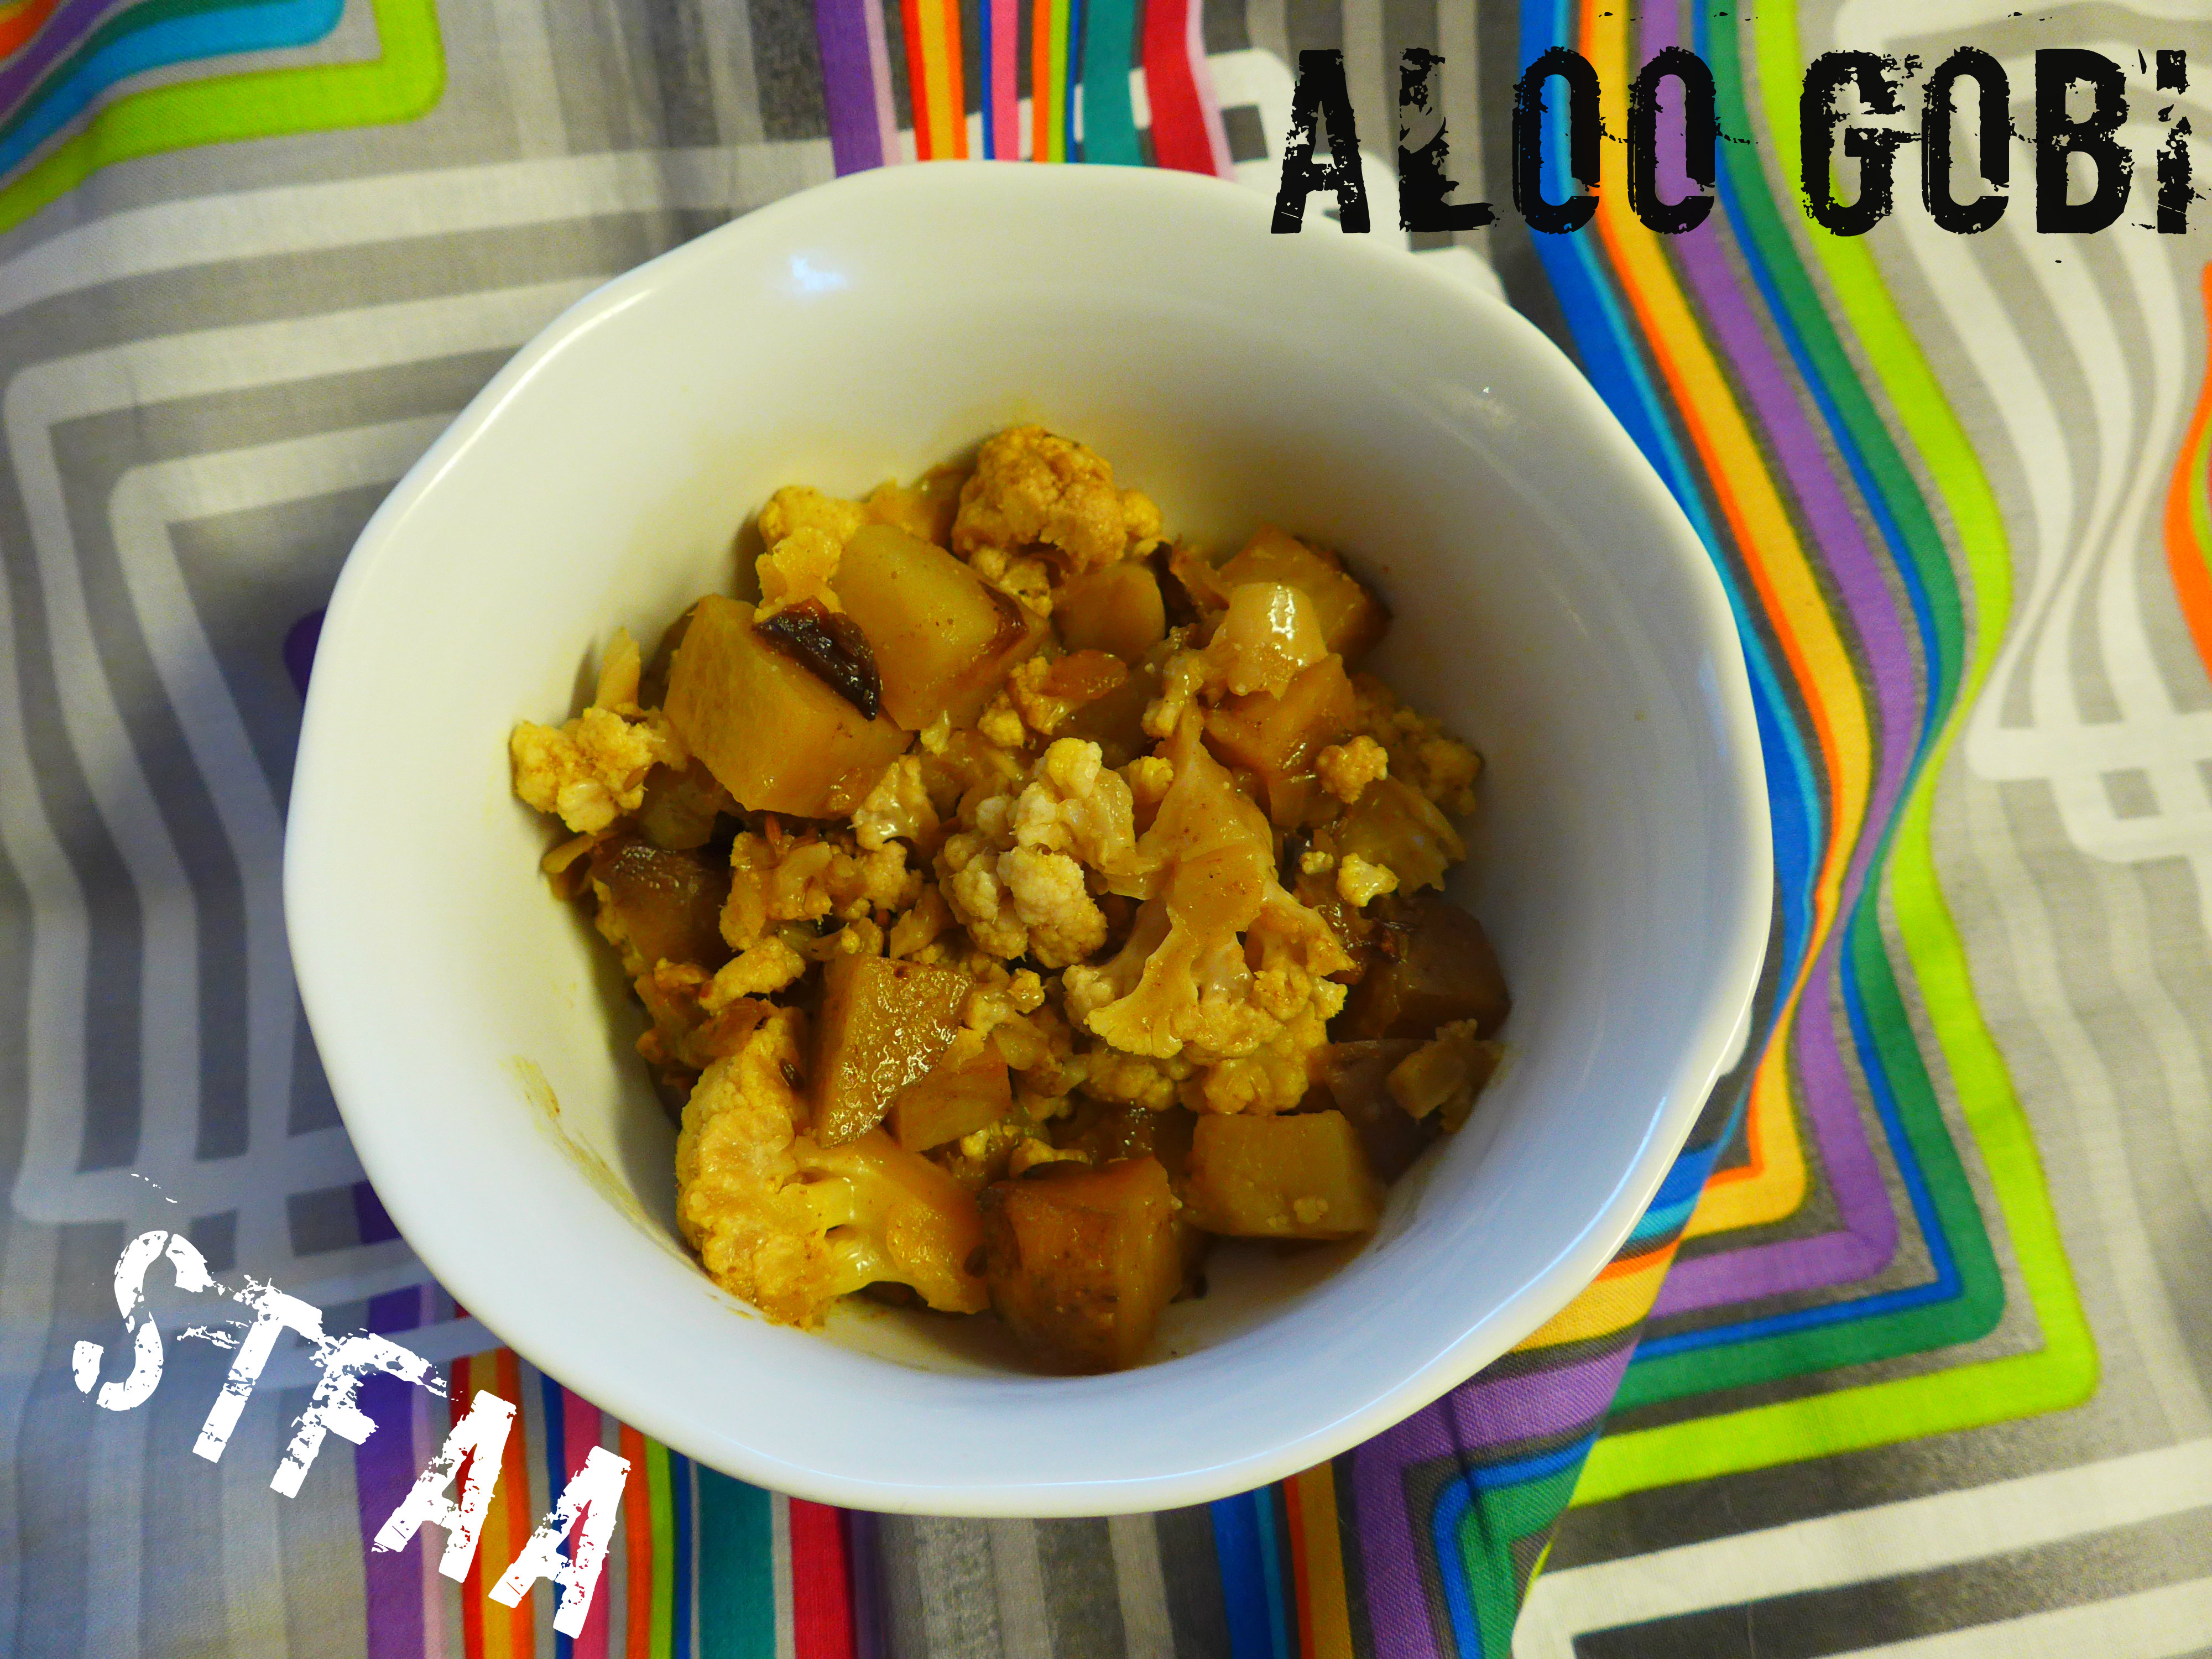
But Mukesh was not lying — this really is the World’s Best Cauliflower, and it will make a believer out of you, too. The usual name for this dish is “aloo gobi” (just “gobi” if you leave the potatoes out), and it’s amazing. The cauliflower is tender but not mushy, well-seasoned but not “hot” spicy, and the color is gorgeous (we eat with our eyes first, supposedly). This is shared with permission, a family recipe from Mukesh Singh. The only modification I’ve made is to cook it in the crock pot because my version never turned out as tender as his did.
I’d have given you more photos, but while this cauliflower tastes great, it’s kind of boring to photograph.
The World’s Best Cauliflower (Aloo Gobi)
1 tablespoon vegetable oil
1/2 small onion, chopped
1 head of cauliflower, cut into bite-sized pieces
3 small potatoes, cubed
1 teaspoon cumin seeds
1/2 teaspoon ground turmeric
1/2 teaspoon paprika
1 teaspoon ground cumin
1/2 teaspoon curry powder
salt to taste
2 Tablespoons water
Heat the oil in a medium skillet over medium heat.
Add onion and cook until lightly browned.
Mix in the cauliflower and potatoes, and then all the spices. Mix well to combine.
Scrape pan into your slow cooker. Use the 2T of water to “rinse” all the leftover spices out of the skillet into the slow cooker. Cook over low heat for 10 hours.
Serve with rice for a full meal, or serve as a side dish.
I have to admit, I spend a lot of fall jealous of people eating cider doughnuts and apple treats of all sorts. It’s part of a day out in the fall — stop at an orchard, get some fried appley things, eat bliss. Nowadays, I get cider, which is great, but somehow not as filling. Lucky for me, I think apple crisp is the pinnacle of baked apple dishes, as that’s super easy to take the gluten out of — it’s not meant to hold together. It’s meant to go in a bowl with ice cream and just be brilliant. But it’s not a fried apple treat of any kind, and I missed those.
So when Denise and I decided to have another day of frying everything, apple fritters were on my mind. I think it’s been years and years since I had one, so I’m not entirely sure these are “traditional,” but they were tasty, and they kept well in the oven (set down at 170ºF) while we made the rest of the fried things. I’d love to tell you how they did a day later or frozen, but I can’t. We ate them all. I’m not big on food guilt anyway, but I can say that if you fry things maybe three times a year, you can’t really feel bad about eating everything.
How many fritters you get will depend on how big you make them, and there’s really not a lot of measuring the mess into the oil. Just try to make them similar sizes so that they can be done about the same time. I’m not sure an exact count would be possible anyway — you’ll be eating them as soon as they are cool enough, way too fast to count, anyway, unless you have inhuman strength. The recipe is loosely based on the Chai-Spiced Pancakes recipe on The Canary Files, which is my go-to pancake recipe (my favorite thing about it is that you need to make it the night before and let it sit in the fridge overnight. I LOVE that. I don’t really do mornings so much as mornings happen to me.) For a fritter batter, though, I’ve altered it quite a bit, and then dunked it in hot oil; I’m just saying don’t expect health food.
Batter, Frying, Draining (and absorbing sugar)
Gluten-free, Vegan Apple Fritters
3/4 cup gluten-free all-purpose flour, blend of your choice (THIS is my go-to)
1 Tablespoon sugar
1 Tablespoon baking powder (corn-free, if you need it)
1/4 teaspoon salt
2 teaspoons cinnamon
1/8 teaspoon nutmeg
2 1/2 cups rice milk, DIVIDED (if you make this by hand, add slightly less water than called for, about a 1:1 ratio of cooked rice to water, and strain it really well for a thicker texture that is so much better for baking)
1 Tablespoon of chia seeds, ground, mixed with 3 Tablespoons warm water to form a chia egg
2 Tablespoons light olive oil (regular will be fine, you just might taste it a bit)
1 1/2 teaspoons ground psyllium husk
4 medium apples, peeled, cored, and shredded (medium=baseball-sized)
powdered sugar for dusting. Really, don’t even bother to mention this, just sift or sprinkle it on.
Mix the dry ingredients (AP flour to nutmeg) together well. Add 1 1/2 cups rice milk, chia egg, vanilla bean, olive oil, and psyllium. Mix well, adding more rice milk if needed. Then put in the fridge for an hour. It will thicken considerably. Add the rest of the rice milk and stir in the apples. You want a thick dough, sort of like regular gluten-containing muffin batter would be, so pay attention as you add the liquids.
Heat a pot of oil to 370ºF. Drop the fritter batter in by spoonfuls, making sure not to crowd the fritters. If you use two spoons, you can sort of flatten or spread the fritters as you form them, making them more UFO saucer shape than rounds, and this will mean the insides cook better. They WILL stick together or stick to the sides of the pot, so bounce them around enough to make sure they don’t. Flip a few times, and see how they brown. You may have to test a few — I’m not giving you a cooking time as it varies widely based on how thick each fritter is, but after 3 or 4, you’ll have the hang of it.
When they are nicely golden brown, remove them to a paper towel-lined plate or tray to drain. Let the oil return to 370ºF, if need be, before doing the next batch. An oven turned down as low as it goes (170ºF on my oven) will keep them nicely warm until you’ve finished all of them.
Dust liberally with powdered sugar and no longer feel left out.
We hope you all made it through Thanksgiving okay. Mary Kate and I only set two smallish fires on her stove, but no harm, no foul. There will be more posted about the “Fry-Day” Thanksgiving later on.
The reason I developed this recipe is because I had a pumpkin from the Community Supported Agriculture share I split with Mary Kate. I’m not a huge fan of pumpkin, I hated pumpkin pie in the long, long ago when I could still eat whatever I wanted. And I never eat pumpkin spice anything when the seasonal pumpkin spice everything starts. But I do like pumpkin bisque with a bit of onion, rosemary and sage. You could also do this with your left over butternut squash from Thanksgiving if you have any. I finished this soup just before the power went out on Wednesday the night before Thanksgiving, and the power did not return until Friday evening. It warmed up really well in my Jetboil camp stove set up on my dining room table while we had no power and no heat. Yeah, I know I’m not supposed to use them inside, and I’m not advocating that anyone else follow my poor example (don’t sue me if you do something dumb just because I did).
Pumpkin (or Butternut Squash) Bisque
1 large onion, diced
1 Tablespoon of olive oil (or other safe for you oil)
2 cups of vegetable stock (I used homemade, here’s a link on how to make vegetable stock, or if you can buy safe commercial stock, have at it)
4 cups of cooked pumpkin or butternut squash (here’s a link on how to roast and make puree, also if you’re using pumpkin, make sure you use pie pumpkins or your bisque might be a little blah)
1/2 teaspoon of rosemary
1/2 teaspoon of sage
2 Tablespoons of non-dairy safe for you margarine (I make my own margarine due to the corn thing, but if you can use Earth Balance, go for it)
1/2 cup of cashew milk (or other safe for you non-dairy milk, I make my own from this recipe but I skip the added ingredients other than water and cashews)
Salt and black pepper to taste
1 Tablespoon of brown sugar (optional – you might not need it if you’re using butternut squash)
A couple of squirts of your favorite hot sauce (optional)
A bit of minced parsley as a garnish (optional)
In a large stock pot or dutch oven, saute your onions in the olive oil until they have some color, and they are softer, as shown below.
Sauteed Onions
Once your onions are ready, add the vegetable stock. Make sure to mix in all the brown bits on the bottom of the pan into the stock to get all the flavor you can.
Vegetable stock and onions
Add the pumpkin puree (you’ll note mine wasn’t that pureed), the sage and the rosemary.
Pumpkin, vegetable stock and onions
I simmered mine for a bit to make sure my roasted pumpkin was tender, and for the onions to cook and soften further. Once I thought the pumpkin and onions were tender enough, I used my immersion/hand/stick blender to puree everything nicely.
Pureed Pumpkin Bisque
Now add your margarine, and cashew milk, and stir well to incorporate. Taste your soup and add the salt, pepper, brown sugar, and hot sauce as needed. Ladle some into a bowl, sprinkle with your parsley, and bask in the warmth of the soup.