Notice: Function _load_textdomain_just_in_time was called incorrectly. Translation loading for the wp-ultimate-recipe domain was triggered too early. This is usually an indicator for some code in the plugin or theme running too early. Translations should be loaded at the init action or later. Please see Debugging in WordPress for more information. (This message was added in version 6.7.0.) in /home/maryzahc/public_html/adultfoodallergies.com/wp-includes/functions.php on line 6121
Meatless/Veg*n – Page 4 – surviving the food allergy apocalypse (archive)

Category: Meatless/Veg*n

Meatless/Veg*n – Savory recipes which do not contain any meat or which may fall into either the vegetarian (no meat or fish) or vegan (no animal products of any kind) categories. Dishes generally feature beans or vegetables as the central ingredients. We will not be putting baked goods and desserts in this category, although most of our baking will be vegan (and will be tagged as such). These recipes will not contain dairy, eggs, gluten, wheat or hazelnuts. If we use a top 8 allergen, we will use a tag warning of its use.

  • The World's Best Cauliflower (aka Aloo Gobi in the slow cooker)

    Aloo Gobi
    Aloo Gobi

    I wish I could claim credit for inventing the following recipe, but I can’t. My former neighbor told me, as we were all sitting outside one evening, that he made “the world’s best cauliflower.” I don’t know about you, but cauliflower is not a vegetable I’d ever considered for a “world’s best” anything nomination. As a child, we got cauliflower doused in cheese sauce on an occasional basis, and while it was fine, it wasn’t something any of us clamored for. Since then, I’ve seen it on raw veggie platters, had it in “California blend” frozen vegetable bags, and had it roasted once or twice. Again, not bad, but not generally exciting.

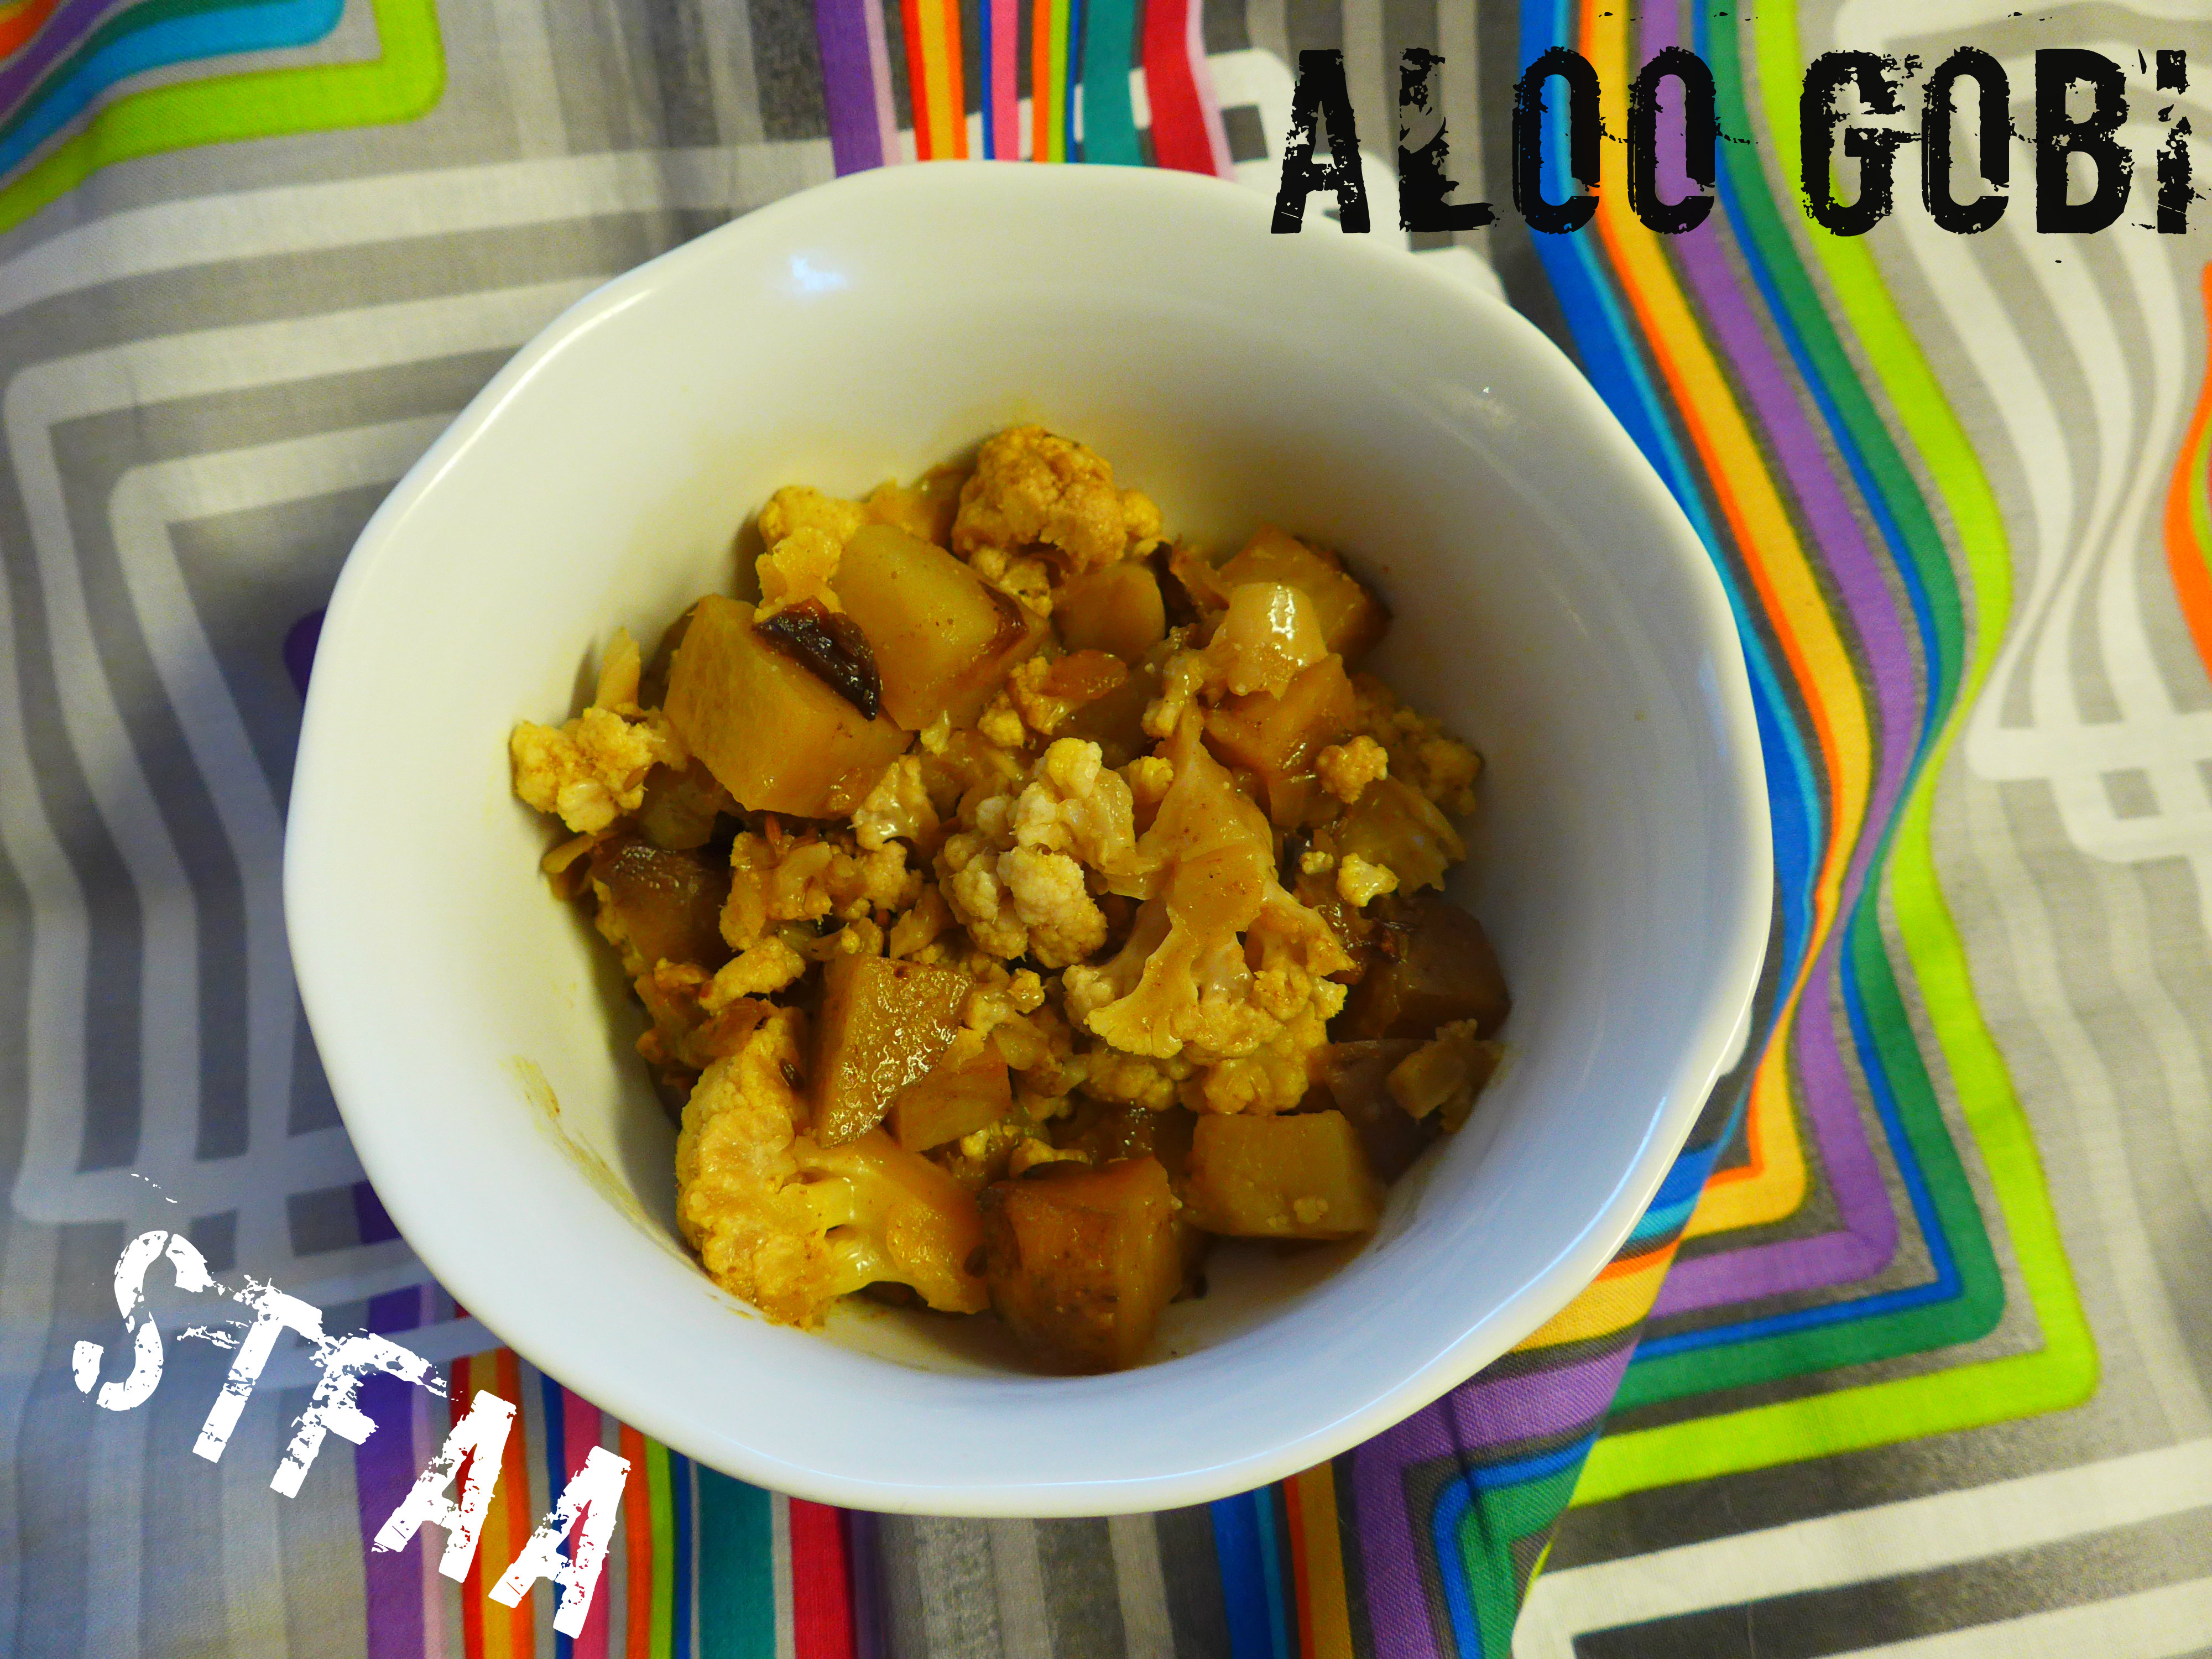
    But Mukesh was not lying — this really is the World’s Best Cauliflower, and it will make a believer out of you, too. The usual name for this dish is “aloo gobi” (just “gobi” if you leave the potatoes out), and it’s amazing. The cauliflower is tender but not mushy, well-seasoned but not “hot” spicy, and the color is gorgeous (we eat with our eyes first, supposedly). This is shared with permission, a family recipe from Mukesh Singh. The only modification I’ve made is to cook it in the crock pot because my version never turned out as tender as his did.

    I’d have given you more photos, but while this cauliflower tastes great, it’s kind of boring to photograph.

    The World’s Best Cauliflower (Aloo Gobi)

    • 1 tablespoon vegetable oil
    • 1/2 small onion, chopped
    • 1 head of cauliflower, cut into bite-sized pieces
    • 3 small potatoes, cubed
    • 1 teaspoon cumin seeds
    • 1/2 teaspoon ground turmeric
    • 1/2 teaspoon paprika
    • 1 teaspoon ground cumin
    • 1/2 teaspoon curry powder
    • salt to taste
    • 2 Tablespoons water

    Heat the oil in a medium skillet over medium heat.

    Add onion and cook until lightly browned.

    Mix in the cauliflower and potatoes, and then all the spices. Mix well to combine.

    Scrape pan into your slow cooker. Use the 2T of water to “rinse” all the leftover spices out of the skillet into the slow cooker. Cook over low heat for 10 hours.

    Serve with rice for a full meal, or serve as a side dish.


  • Pumpkin (or Butternut Squash) Bisque

    Pumpkin Bisque
    Pumpkin Bisque

    We hope you all made it through Thanksgiving okay. Mary Kate and I only set two smallish fires on her stove, but no harm, no foul. There will be more posted about the “Fry-Day” Thanksgiving later on.

    The reason I developed this recipe is because I had a pumpkin from the Community Supported Agriculture share I split with Mary Kate. I’m not a huge fan of pumpkin, I hated pumpkin pie in the long, long ago when I could still eat whatever I wanted. And I never eat pumpkin spice anything when the seasonal pumpkin spice everything starts. But I do like pumpkin bisque with a bit of onion, rosemary and sage. You could also do this with your left over butternut squash from Thanksgiving if you have any. I finished this soup just before the power went out on Wednesday the night before Thanksgiving, and the power did not return until Friday evening.  It warmed up really well in my Jetboil camp stove set up on my dining room table while we had no power and no heat. Yeah, I know I’m not supposed to use them inside, and I’m not advocating that anyone else follow my poor example (don’t sue me if you do something dumb just because I did).

    Pumpkin (or Butternut Squash) Bisque

    • 1 large onion, diced
    • 1 Tablespoon of olive oil (or other safe for you oil)
    • 2 cups of vegetable stock (I used homemade, here’s a link on how to make vegetable stock, or if you can buy safe commercial stock, have at it)
    • 4 cups of cooked pumpkin or butternut squash (here’s a link on how to roast and make puree, also if you’re using pumpkin, make sure you use pie pumpkins or your bisque might be a little blah)
    • 1/2 teaspoon of rosemary
    • 1/2 teaspoon of sage
    • 2 Tablespoons of non-dairy safe for you margarine (I make my own margarine due to the corn thing, but if you can use Earth Balance, go for it)
    • 1/2 cup of cashew milk (or other safe for you non-dairy milk, I make my own from this recipe but I skip the added ingredients other than water and cashews)
    • Salt and black pepper to taste
    • 1 Tablespoon of brown sugar (optional – you might not need it if you’re using butternut squash)
    • A couple of squirts of your favorite hot sauce (optional)
    • A bit of minced parsley as a garnish (optional)

    In a large stock pot or dutch oven, saute your onions in the olive oil until they have some color, and they are softer, as shown below.

    Sauteed Onions
    Sauteed Onions

    Once your onions are ready, add the vegetable stock. Make sure to mix in all the brown bits on the bottom of the pan into the stock to get all the flavor you can.

    Vegetable stock and onions
    Vegetable stock and onions

    Add the pumpkin puree (you’ll note mine wasn’t that pureed), the sage and the rosemary.

    Pumpkin, vegetable stock and onions
    Pumpkin, vegetable stock and onions

    I simmered mine for a bit to make sure my roasted pumpkin was tender, and for the onions to cook and soften further.  Once I thought the pumpkin and onions were tender enough, I used my immersion/hand/stick blender to puree everything nicely.

    Pureed Pumpkin Bisque
    Pureed Pumpkin Bisque

    Now add your margarine, and cashew milk, and stir well to incorporate.  Taste your soup and add the salt, pepper, brown sugar, and hot sauce as needed. Ladle some into a bowl, sprinkle with your parsley, and bask in the warmth of the soup.

    Pumpkin Bisque
    Pumpkin Bisque


  • Vegetable Lentil Chestnut Soup

    Vegetable Lentil Chestnut Soup
    Vegetable Lentil Chestnut Soup

    Looking in my fridge and freezer, apparently all I’ve made for weeks are soups and stews and chilis. It’s getting cold (maybe it just IS cold?) and soup is warming. This soup is based on a recipe title I read a year or so ago, possibly on a can. I can’t remember where, and I never could find it again. All I had was “lentil chestnut” and it sounded good.

    I figured this would be a quick and easy soup if I used canned lentils and packaged chestnuts, both of which I usually have on hand, and my standard trio of soup vegetables: onions, carrots, and celery. I also used homemade stock, as I try to do, because frankly, mine tastes better.

    This soup is hearty because of the lentils, a bit sweet because of the chestnuts, and full of vegetables for flavor, texture, and, hey, nutrition. I even had a lentil naysayer taste the soup, and it got a general approval. My vegetables were rather giant in relation to the chopped chestnuts and tiny lentils, and if that will bother you, consider chopping everything more finely. I kind of liked it, and it made for more interesting photographs (so did having a better camera to play with).

    Vegetable Lentil Chestnut Soup
    Vegetable Lentil Chestnut Soup

    Vegetable Lentil Chestnut Soup

    • 1 Tablespoon olive oil
    • 1 cup chopped onion (about 1/2 onion)
    • 1/4 teaspoon salt
    • 1 cup chopped carrot (three small carrots)
    • 1 cup chopped celery (2 larger stalks)
    • 1 teaspoon chopped garlic (2 cloves)
    • 1/2 teaspoon thyme
    • 1/2 teaspoon dill
    • 1/2 teaspoon tarragon
    • 1/2 teaspoon dry mustard
    • 5 oz cooked and shelled chestnuts, chopped (this is the size of package I can buy around here — cook and shell your own, if you like, but be warned, it’s more work than you think it will be!)
    • 2 cups cooked lentils — any type you like except red, which will not hold their shape. I used black.
    • 3 cups of vegetable broth, preferably unsalted. Add your own salt.

    In a large sauce pan, over medium heat, add the oil to a hot pan. When the oil is shimmering hot, add the onion and salt; cook, stirring occasionally, until translucent (about 5 minutes). Add the carrots and cook for 2-3 minutes. Do the same with the celery.

    Now season: Add the garlic and stir well. Then add the spices and stir again. Give it a minute to heat up — this seems to let the garlic really permeate this base of the soup.

    Add the chestnuts and lentils, stir, and then add the vegetable broth. Cover and bring to a boil. There are two ways to do this. If you’re feeling patient, leave the heat at medium and let it come up to a boil slowly. This is great for flavor, but honestly, not enough to insist that this is the right way to do it. You can also just turn the heat up to boil it fast. Either way, after you’ve had a boil, then reduce the heat and simmer for about 20 minutes.

    Enjoy soup.

    Vegetable Lentil Chestnut Soup
    Vegetable Lentil Chestnut Soup
  • Potato Curry Soup

    Potato Curry Soup (on the moon!)
    Potato Curry Soup (on the moon!)

    Apparently, I first made this recipe in September 2007 — I’m an historian, so I do tend to date all my notes. I never really finished it, though. Like so many things, I made it once, liked it enough to sketch down sorta kinda what I did and what I threw into the pot, and never looked back at it. But this is why good notes are important right?

    For this time of year, when “cool” feels “cold” because of transitions in temperature, a nice soup with warming spices might be the most perfect dinner. Also, the house smells amazing. As a finishing note, I add coconut milk, just a bit, to give it a richer, creamier curry flavor, though this is not necessary. I am reasonably sure that most non-dairy milks would work here, though I’m not sure rice milk would add much (and don’t use “light” coconut milk — it adds very little). But I think it’s fine without the added non-dairy milk, too. Because of the optional coconut milk, I’ve confusingly tagged this with a “tree nut warning” as well as “nut-free.” It depends on how you make it; do what works for you.

    I basically took my forever-perfect combination for soup (onions, potatoes, carrots, celery) and changed up the seasonings to a mad fantastic curry blend. The spice of this soup stays mainly in the broth, which is a nice play against the earthy vegetables and beans. When you taste it to adjust seasonings, taste the broth AND a potato or carrot; they balance.

    Because this is a big pot, mix it up as you work through the leftovers. A handful of spinach added before re-heating is pretty awesome. I’ve also used a serving, with lots of broth, poured over fish and simmered until the fish is done. I like to get a little creative with leftovers.


    Potato Curry Soup
    Potato Curry Soup

    Curry Potato Soup

    • 1-1 1/2 Tablespoons olive oil
    • 1/4 of an onion, softball-sized, chopped (between 1/2 and 3/4 cup)
    • 2 cloves of garlic, pressed or chopped finely
    • 1 good chunk of ginger, one inch around (size of a walnut), finely minced or micro-planed
    • 1 Tablespoon curry powder (choose sweet if you like it mild, hot if you like that)
    • 1/2 Tablespoon turmeric
    • 1 teaspoon cinnamon
    • 1/4 teaspoon cayenne (optional, but I’d suggest adding at least a pinch)
    • 1/2 teaspoon salt (if you’re using commercial broth, use 1/4 teaspoon then taste)
    • 1/4 of a bell pepper (about 1/2 a cup)
    • 4 stalks celery, chopped
    • 3 carrots, chopped
    • 3 medium potatoes, small cubed (smaller than dice, about 3 1/2 cups). If you want a super creamy soup, peel your potatoes. If you’re lazy like me, or want the fiber, leave the skins on. It’s up to you.
    • 2 cups or one can of cannellini beans, rinsed and drained
    • 6-8 cups broth or stock, vegetable or chicken
    • 1/4 cup coconut milk, unsweetened and unflavored, optional
    • additional hot sauce, if that’s your thing, optional

    Heat a large stock pot over medium heat. Add oil to your stock pot for a good thick coat (hence the range), and let that heat until shimmery. Add your onion and cook until translucent.

    Add the ginger and garlic, stir well, and cook until fragrant. Add about 1/4 of a cup of broth and stir well, making sure to scrape up any of the garlic and ginger that stuck to the bottom.

    Add all the spices and stir well.

    Add the pepper, celery, and carrots, stir well, and cook for 5 minutes or so. Add potatoes, stir until completely coated with spices, then add the beans and stir again. Add the rest of the broth, covering your soup ingredients completely, stir well, and cover until it comes to a boil. Do this over medium heat. When you’ve reached the boil, turn the heat down to low and simmer until the potatoes are fully cooked and starting to break down a little — about 30 minutes.

    Stir soup well, and taste. Add salt, if needed, and then add the coconut milk, if using (or use another non-dairy milk here) and hot sauce if everyone wants it. If you do like it really spicy, I’d recommend harissa here.

    Enjoy. This soup reheats fantastically, but I’ve never frozen it.


  • Mung Bean Patties

    Mung Bean Patties with roasted potatoes
    Mung Bean Patties with roasted potatoes

    This recipe is actually perfect for coming out of last week, as, like so many things that happened last week it arose out of the ashes of me screwing something up because I did not know what I was doing and was not paying attention. Last week was just that kind of week. I need a nap. Or a vacation.

    A few years ago, I’d bought mung beans, dried, because I understood that they could be cooked relatively quickly, like lentils. So I put them in a pot with water, on a burner, and then wandered off to do something else. By the time I came back, I had mush instead of beans. Oops. So I made a bean loaf. You know, like meatloaf, but without vegetarian. The thing is, “bean loaf” sounds kind of gross, and baking this in a loaf meant you only had a few edges. Plus, it wasn’t really that successful at holding its shape when sliced.

    You really should soak the beans overnight, so far as I can tell, but you can also just dump a kettle of boiling water over them and soak them for about an hour. They will plump up quite nicely. They are “done” cooking when they are starting to fall apart but haven’t actually fallen apart yet.

    Since then, I’ve refined this so that I have less bean mush and more mushy beans, and revised the add-in vegetables and seasonings somewhat to create a flavorful bean-based patty. Actually, if you make them my way, they’re more ball-shaped, but bean balls isn’t appetizing either. We’ll go with patties. This recipe makes 16 patties measured out by a 1/2 cup ice cream scoop. These store and reheat well, but I have not tried freezing them. Structural integrity is still low, but they taste good, and who cares if your patty falls apart a bit? You already have a fork on hand.

    Soaked Mung Beans before cooking
    Soaked Mung Beans before cooking


    Mung Bean Patties

    • 2 cups dry mung beans, soaked overnight or covered in boiling water and soaked an hour
    • 3-4 carrots
    • 1/4 of a bell pepper (use up to half if you really love the flavor)
    • 1 bunch (6-8) scallions
    • 1 portobello mushroom cap
    • 2 cups fresh parsley leaves
    • 1 Tablespoon olive oil
    • 1 Tablespoon red wine vinegar
    • 1 teaspoon ground coriander
    • 1 teaspoon garlic powder
    • 1 teaspoon tarragon (crush the leaves as you add it)
    • 1 teaspoon thyme (also crush this as you add it)
    • 1 Tablespoon basil
    • 1/2 to 2 teaspoons salt (to taste)

    Put soaked mung beans in a saucepan and cover with water so that there’s about an inch of water over the mung beans. Put over high heat, covered, and bring to a boil. Boil 8-10 minutes, turn to low, and simmer, covered, for 25 minutes. Water should be completely absorbed, and beans should be slightly mushy but not entirely without structural integrity at this point. Remove from heat, remove cover, and let cool while you prep the veg.

    Preheat the oven to 350ºF.

    Using a food processor, grind up all the veg. You can do this any way you like, but here’s what works for me — I use the shredder attachment for the carrots and bell pepper, and then put the S-blade in to grind them up a bit more. The scallions and parsley will need liquid, so add the oil or vinegar to this. The mushroom should be fine with just the S-blade.

    Add the ground vegetables and all the seasonings, along with the mung beans, to a large bowl. Stir well, longer than you think you should, and then use your hands to really work the beans.

    There are two ways to form patties — either grease a muffin tin and fill it, or make scoops with an ice cream scoop and place on a cookie sheet lined with parchment paper or greased lightly. Make sure to pack the bean patties/balls together as you form them — these won’t be masterpieces that will stay together through a coming apocalypse, but they will hold their form as you dump them out of the muffin tins.

    Bake 15 minutes, then enjoy.

    Mung Bean Patties
    Mung Bean Patties
  • Greens and Beans: Swiss Chard and Cannellini

    image
    Swiss chard and cannellini@ beans

    I am not quite sure who figured out that beans and greens is an excellent combination, and that almost any greens and beans can be used, and that, if the beans are cooked (or canned, if you can use them) and the greens aren’t collards (which really do take time), this is a quick and healthy and satisfying meal. I’m a fan because I like greens and often forget how much — until I make another version of this and wonder why I don’t eat this regularly.

    Feel free to add a grain of your choice, but I usually skip that. Brown rice is particularly complementary. But in a rush, which I kind of feel I always am lately, beans and greens is enough.

    This makes two large servings, three “normal” sized servings, and is great leftover.

    Swiss Chard and Cannellini Beans

    • 2 Tablespoons oil of your choice
    • 1 can (or 2 cups) cooked cannellini beans, rinsed and drained (if canned)
    • freshly ground pepper, to taste
    • 2 Tablespoons dry sherry, dry white wine, or water
    • 1 Tablespoon chopped garlic (if using crushed from a jar, use about 2 teaspoons)
    • 1 bunch of Swiss chard, rainbow if you can get it, stems chopped, leaves chopped (separated)
    • 1-2 Tablespoons balsamic vinegar (beware “caramel coloring” or other additives) or lemon juice

    Heat a large skillet over medium heat until hot.

    Add oil. Heat until shimmering.

    Add beans. Cook maybe 5 minutes, until they start to crisp a little.

    Add pepper and sherry/wine/water. Cook until the liquid you just added is reduced by half.

    Add chopped stems and garlic and stir well. Cook 2-3 minutes.

    Add chopped chard leaves in handfuls, stirring each handful in as it wilts and adding the next. When it’s all in, add the vinegar or lemon juice, stir well, and let cook another minute. Taste, and add salt, pepper, or olive oil as needed to finish.

  • Fresh Corn Stew

    Fresh Corn Stew
    Fresh Corn Stew

    I hate writing recipes I know Denise can’t eat, but that’s one of the things we deal with with food allergies — I almost feel guilty eating things someone else can’t. But I also know not to push that guilt on them. So sorry, corn-allergic friends and readers, but this one isn’t for you.

    With our CSA share, we are currently getting a ton of corn — about 6 ears a week. And I get all of it (which, I think works out — Denise has taken all the lettuce because I don’t eat it.) Corn on the cob is awesome (if you’re not allergic), but frankly, it gets boring quickly. Using up all the leftover corn gave rise a few variations to this recipe, a corn stew, though I’m not entirely sure about calling it a “stew.” It’s not primarily broth, like a soup, but it’s not a chowder because there is no cream or milk in it (though if you stir in the cashew sour cream suggested as a topping, BAM: chowder!). So we’ll go with stew. English. So imprecise sometimes.

    If you’ve never taken corn off the cob, here are some ideas about how to do this. I just use my largest cutting board and a long thin knife and clean up the mess.

    This stew is completely vegan, but depending on the toppings you choose, you might alter that. I suggest considering, as toppings: avocado, crumbled bacon, scallion greens, cashew sour cream, cheese (vegan or not, as you decide), and cilantro. You sure don’t need all of these, but this stew kind of begs for a topping or two. In any case, it highlights the sweet corn that says “summer” to so many people.


    Versatile: with bacon, vegan, and with cashew sour cream
    Fresh Corn Stew is Versatile: with bacon, vegan, and with cashew sour cream

    Fresh Corn Stew

    • about 2 T oil or fat of your choice (if you are going to top this with bacon, consider using the fat!)
    • 2 leeks, chopped (about 3/4 cup)
    • 1 Italian pepper, chopped (about 1/4 cup)
    • 3 ears of fresh sweet corn, cooked and kernels cut off the cob (between 1.5 and 2 cups)
    • 1 teaspoon dried basil (or about 4 leaves fresh, chopped)
    • salt and pepper to taste
    • 16-20 oz. of vegetable broth or stock
    • 3 small fresh tomatoes, cut into chunks (between 3/4 and 1 cup)

    Toppings, all optional:

    • scallions
    • cashew sour cream*
    • fresh cilantro, chopped
    • bacon, cooked and crumbled
    • cheese or cheese substitute
    • avocado

    In large pot, heat oil over medium heat. When hot, add leeks, stir well, and then add chopped pepper. Cook for about 5 minutes, or until soft.

    Add corn kernels, stir well, and then add basil, salt, and pepper. If you are using commercial broth, go light on the salt until you’ve tasted the broth. Stir seasonings in well.

    Add broth and bring to a low boil. Add tomatoes, and when low boil is again achieved, turn down the heat to low and simmer about 10 minutes.

    Top as desired, and enjoy. This soup is great the next day.

    Cashew Sour Cream (modified from oh she glows!) (obviously this makes it not nut-free)

    • 1/2 cup raw cashew pieces, soaked overnight or in hot water for a few hours
    • 3 Tablespoons water
    • 2 teaspoons lime juice
    • pinch salt (to taste)
    • 1 teaspoon chives

    Add cashews, water, and lime juice to blender. Blend until smooth. Stir in chives and salt. Refrigerate for an hour to thicken.

    Enjoy.

    Fresh Corn Stew with Bacon
    Fresh Corn Stew with Bacon
  • Zesty Mexican Style Bean Salad

    Zesty Mexican Style Bean Salad
    Zesty Mexican Style Bean Salad – Photo by J. Andrews

    I modified this recipe from a recipe in an old Weight Watcher’s magazine. The original had raw green bell pepper and Great Northern beans in it instead, but back in the day before food allergies, I preferred it with roasted red pepper in a jar and garbanzo beans, and with some added spice enhancement. (Shocker, I know.) These days I can’t buy roasted red peppers at the store because of the citric acid, and I’ve been meaning to can my own so I could make this, but I hadn’t gotten around to it yet with everything else on my plate. So when Mary Kate and I decided to have a cookout, a light bulb went off that I could grill the red peppers and make this again. You could also broil the red peppers in your oven. (Not sure why that did not occur to me until I went to type up this post; I could have been making this all along. Sigh.)

    Zesty Mexican Style Bean Salad

    • 1 – 15 ounce can of black beans (Find a safe brand for you. I pressure can my own from dry beans.)
    • 1 – 15 ounce can of garbanzo beans (Find a safe brand for you. I pressure can my own from dry beans.)
    • 1 1/2 cups of chopped tomatoes
    • 1 cup grilled or broiled red bell pepper (about one and half peppers)
    • 1 cup of sliced green onions
    • 1 cup of salsa (Make sure you use a safe for you brand. I used my home canned salsa.)
    • 1/4 cup of red wine vinegar
    • 2 Tablespoons of fresh chopped cilantro
    • 1/2 teaspoon of salt
    • 1/2 teaspoon of black pepper
    • 1 teaspoon of Adobo seasoning (If you don’t have Adobo seasoning or you don’t have a safe version, mix 1/8 cup of paprika, 1 1/2 Tablespoons of ground black pepper, 1 Tablespoon of onion powder, 1 Tablespoon of dried oregano, 1 Tablespoon of ground cumin, 1/2 Tablespoon of ground chipotle, and 1/2 Tablespoon of garlic powder, this makes half a cup of seasoning)
    • hot sauce to taste (Use a safe for you brand. I used my own homemade version of Sriracha.)

    Cut your red bell peppers into quarters and seed and de-stem them.

    Quartered and de-seeded peppers - Photo by J. Andrews
    Quartered and de-seeded peppers – Photo by J. Andrews

    Place the red bell pepper quarters on a hot grill or under the broiler in your oven on a rack with a cookie sheet under it, and grill/broil them until they have a bit of char and are tender. When they are done, take them off the grill or out of the oven and let them cool a bit.

    Peppers on the grill - Photo by J. Andrews
    Peppers on the grill – Photo by J. Andrews

    In a large bowl, place the chopped tomatoes, sliced green onions, salsa, red wine vinegar, cilantro, salt, black pepper, and Adobo seasoning. Drain and rinse the black beans and garbanzo beans and add them to the bowl.

    All ingredients except the grilled red pepper - Photo by J. Andrews
    All ingredients except the grilled red pepper – Photo by J. Andrews

    Now that your red bell pepper has probably cooled down a bit, either give them a quick spin in a food processor to chop them into small pieces, or chop them up finely with a knife, and put them in the large bowl.

    Mix everything in the bowl together very well with a spatula or spoon. You want to make sure that none of the spices are clumping up. Taste it, and then decide how much hot sauce to need to add. Mix in the hot sauce really well.

    Mix all ingredients together - Photo by J. Andrews
    Mix all ingredients together – Photo by J. Andrews

    If you have safe chips, feel free to eat this with them. I don’t at the moment, but I’m happy just eating it with a fork or spoon. It also holds up very well in the refrigerator if you have leftovers.

    Enjoy!


    Zesty Mexican Style Bean Salad
    Zesty Mexican Style Bean Salad