Notice: Function _load_textdomain_just_in_time was called incorrectly. Translation loading for the wp-ultimate-recipe domain was triggered too early. This is usually an indicator for some code in the plugin or theme running too early. Translations should be loaded at the init action or later. Please see Debugging in WordPress for more information. (This message was added in version 6.7.0.) in /home/maryzahc/public_html/adultfoodallergies.com/wp-includes/functions.php on line 6131 Condiments – Page 3 – surviving the food allergy apocalypse (archive)
Condiment [kon-duh-muh nt] noun: early 15c., from Old French condiment (13c.), from Latin condimentum “spice, seasoning, sauce,” from condire “to preserve, pickle, season,” variant of condere “to put away, store,” from com- “together” (see com- ) + -dere comb. form meaning “to put, place,” from dare “to give”. These recipes will not contain dairy, eggs, gluten, wheat or hazelnuts. If we use a top 8 allergen, we will use a tag warning of its use.
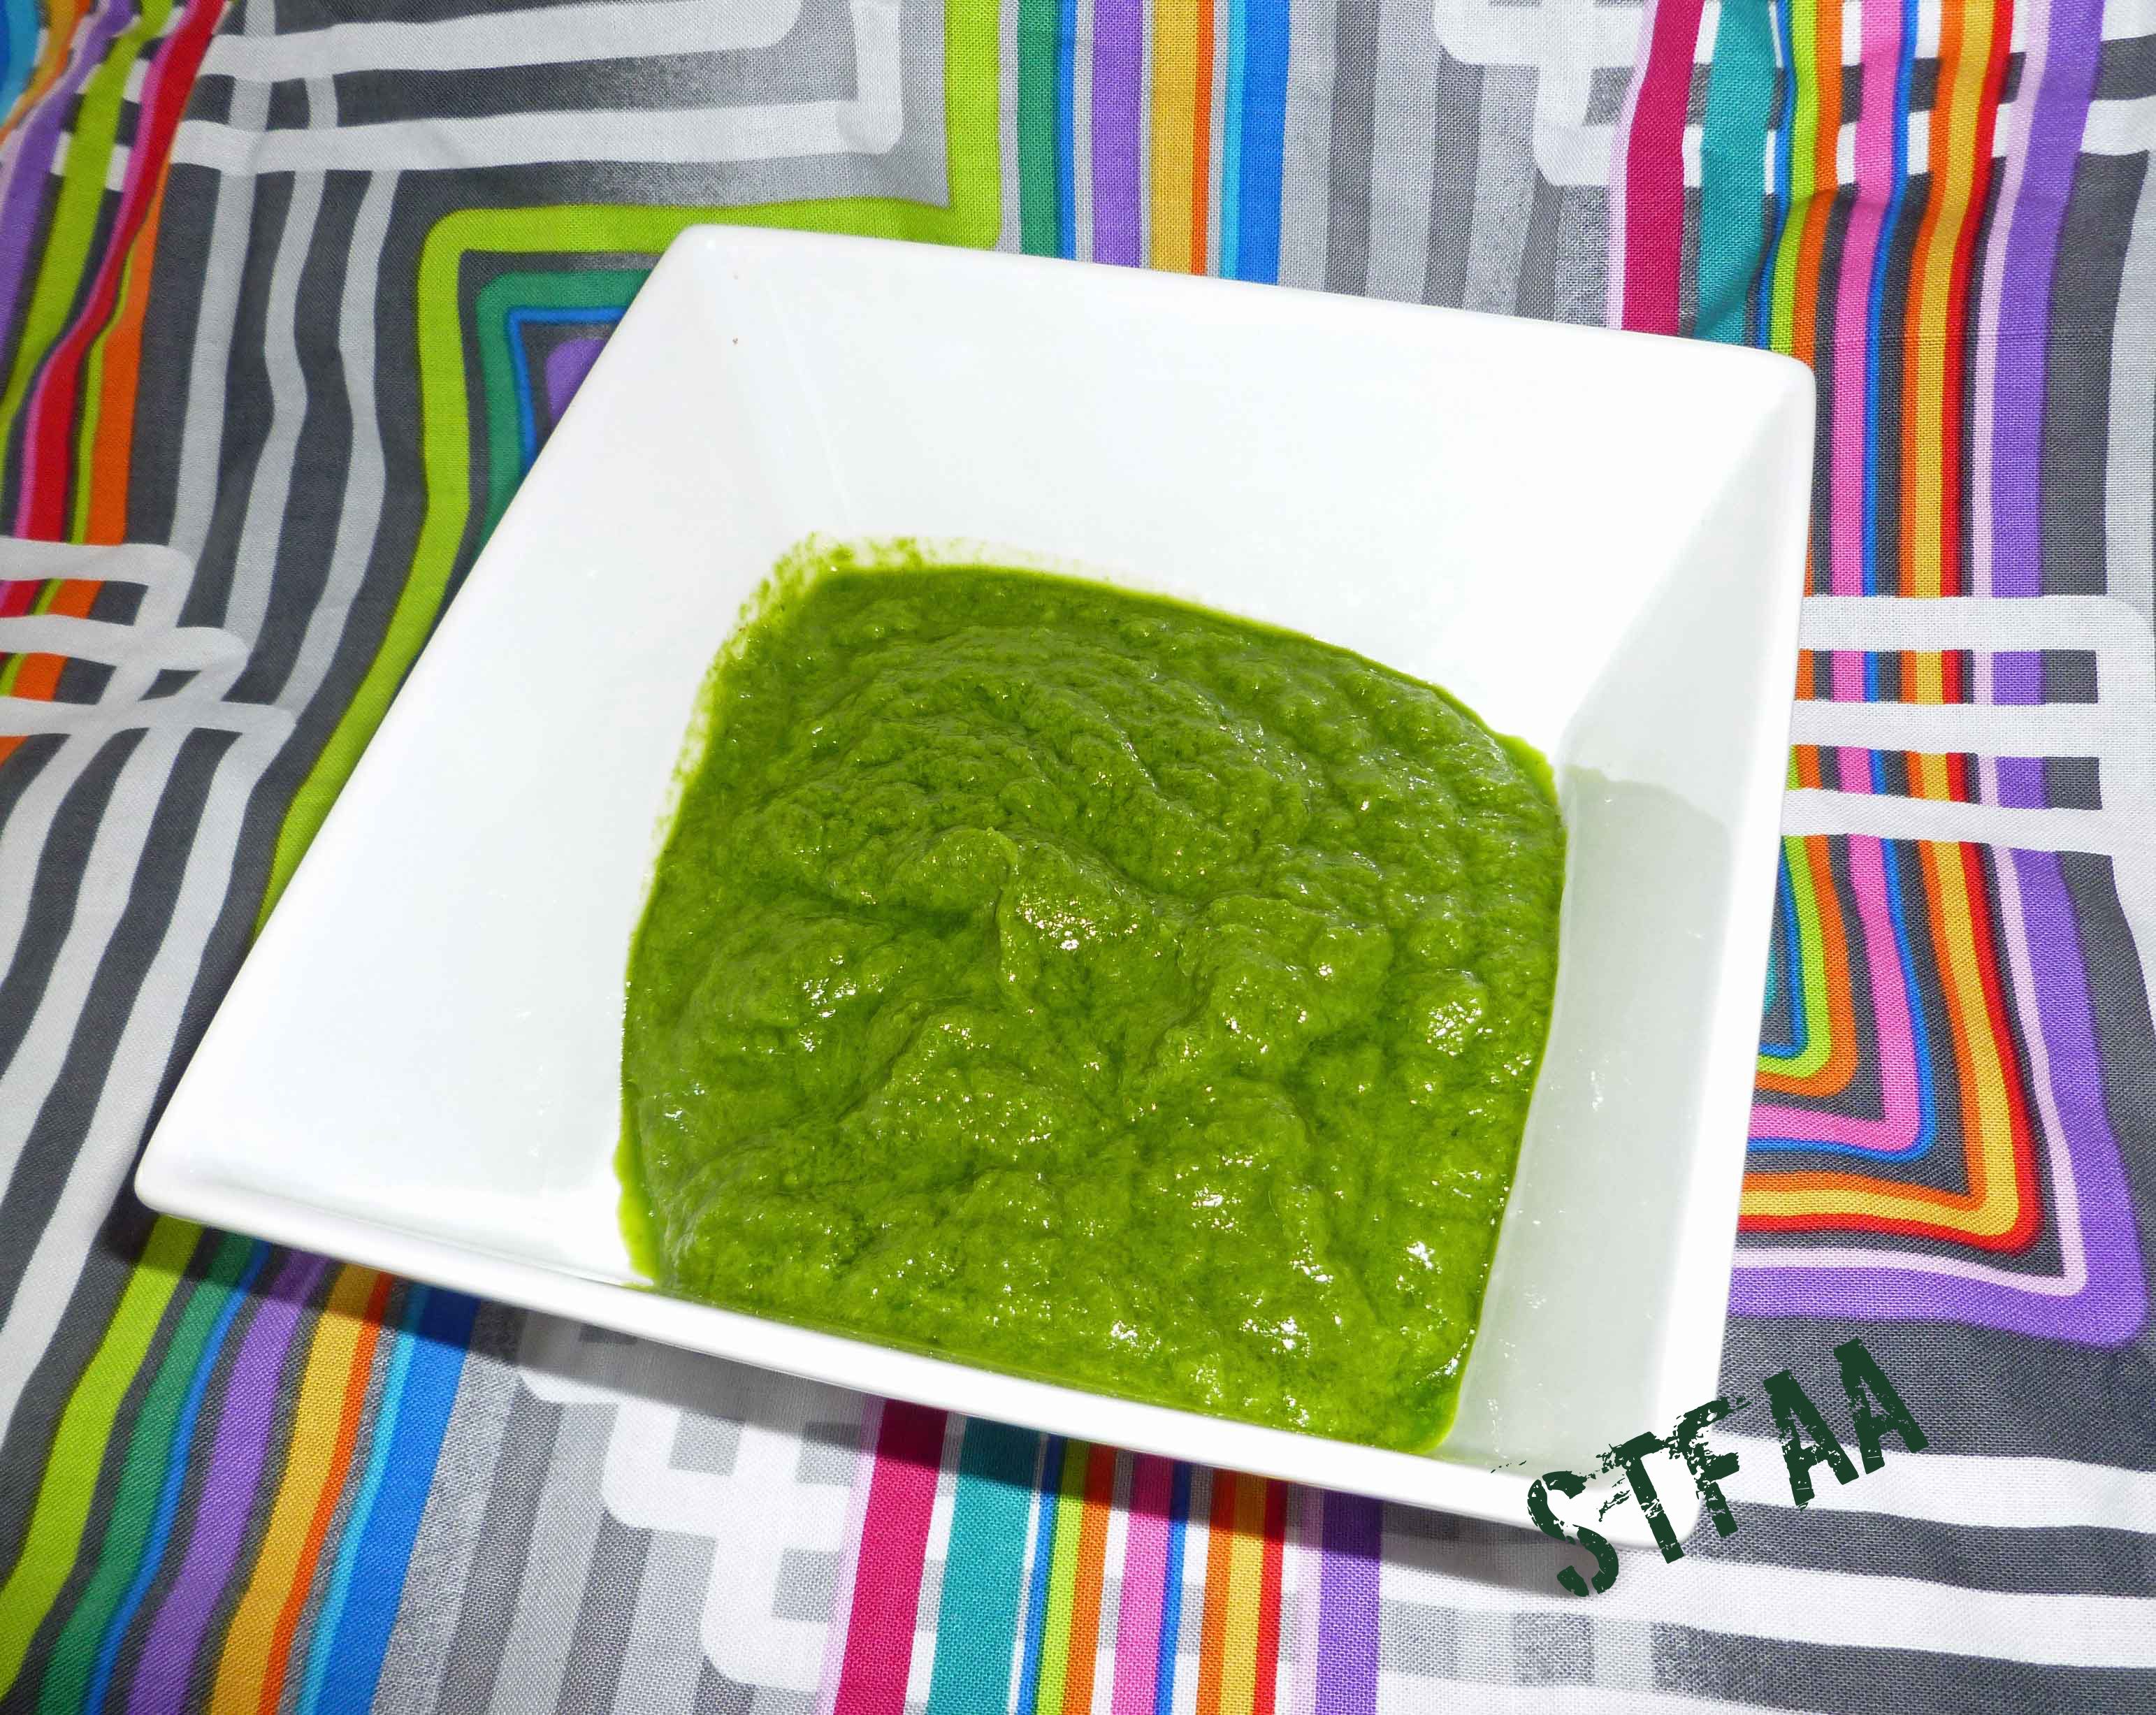
My friend Mary S, of the green thumb, has been gifting me garlic scapes. Since her garlic was planted in the fall and is almost as tall as me, her garlic has lots of scapes, whereas my garlic was planted in the spring, and the tallest plant might be, oh, six inches high, and there are no scapes to be seen. Since I had some basil leftover from another dish, I decided to make a sauce. You will need a blender for this recipe.
Garlic Scape Pesto Sauce
1 cup of tightly packed basil leaves
1 cup of garlic scapes, chopped into 1 to 2 inch pieces
1 cup of olive oil (make sure it’s safe for you, I do well with California Olive Ranch)
1/4 cup of white wine vinegar (make sure it’s safe for you)
1/2 teaspoon of salt
Roughly chop up the basil leaves. Add the basil, garlic scapes, olive oil, and vinegar to the blender. Process until the sauce is pulverized to your liking. I like mine pretty smooth.
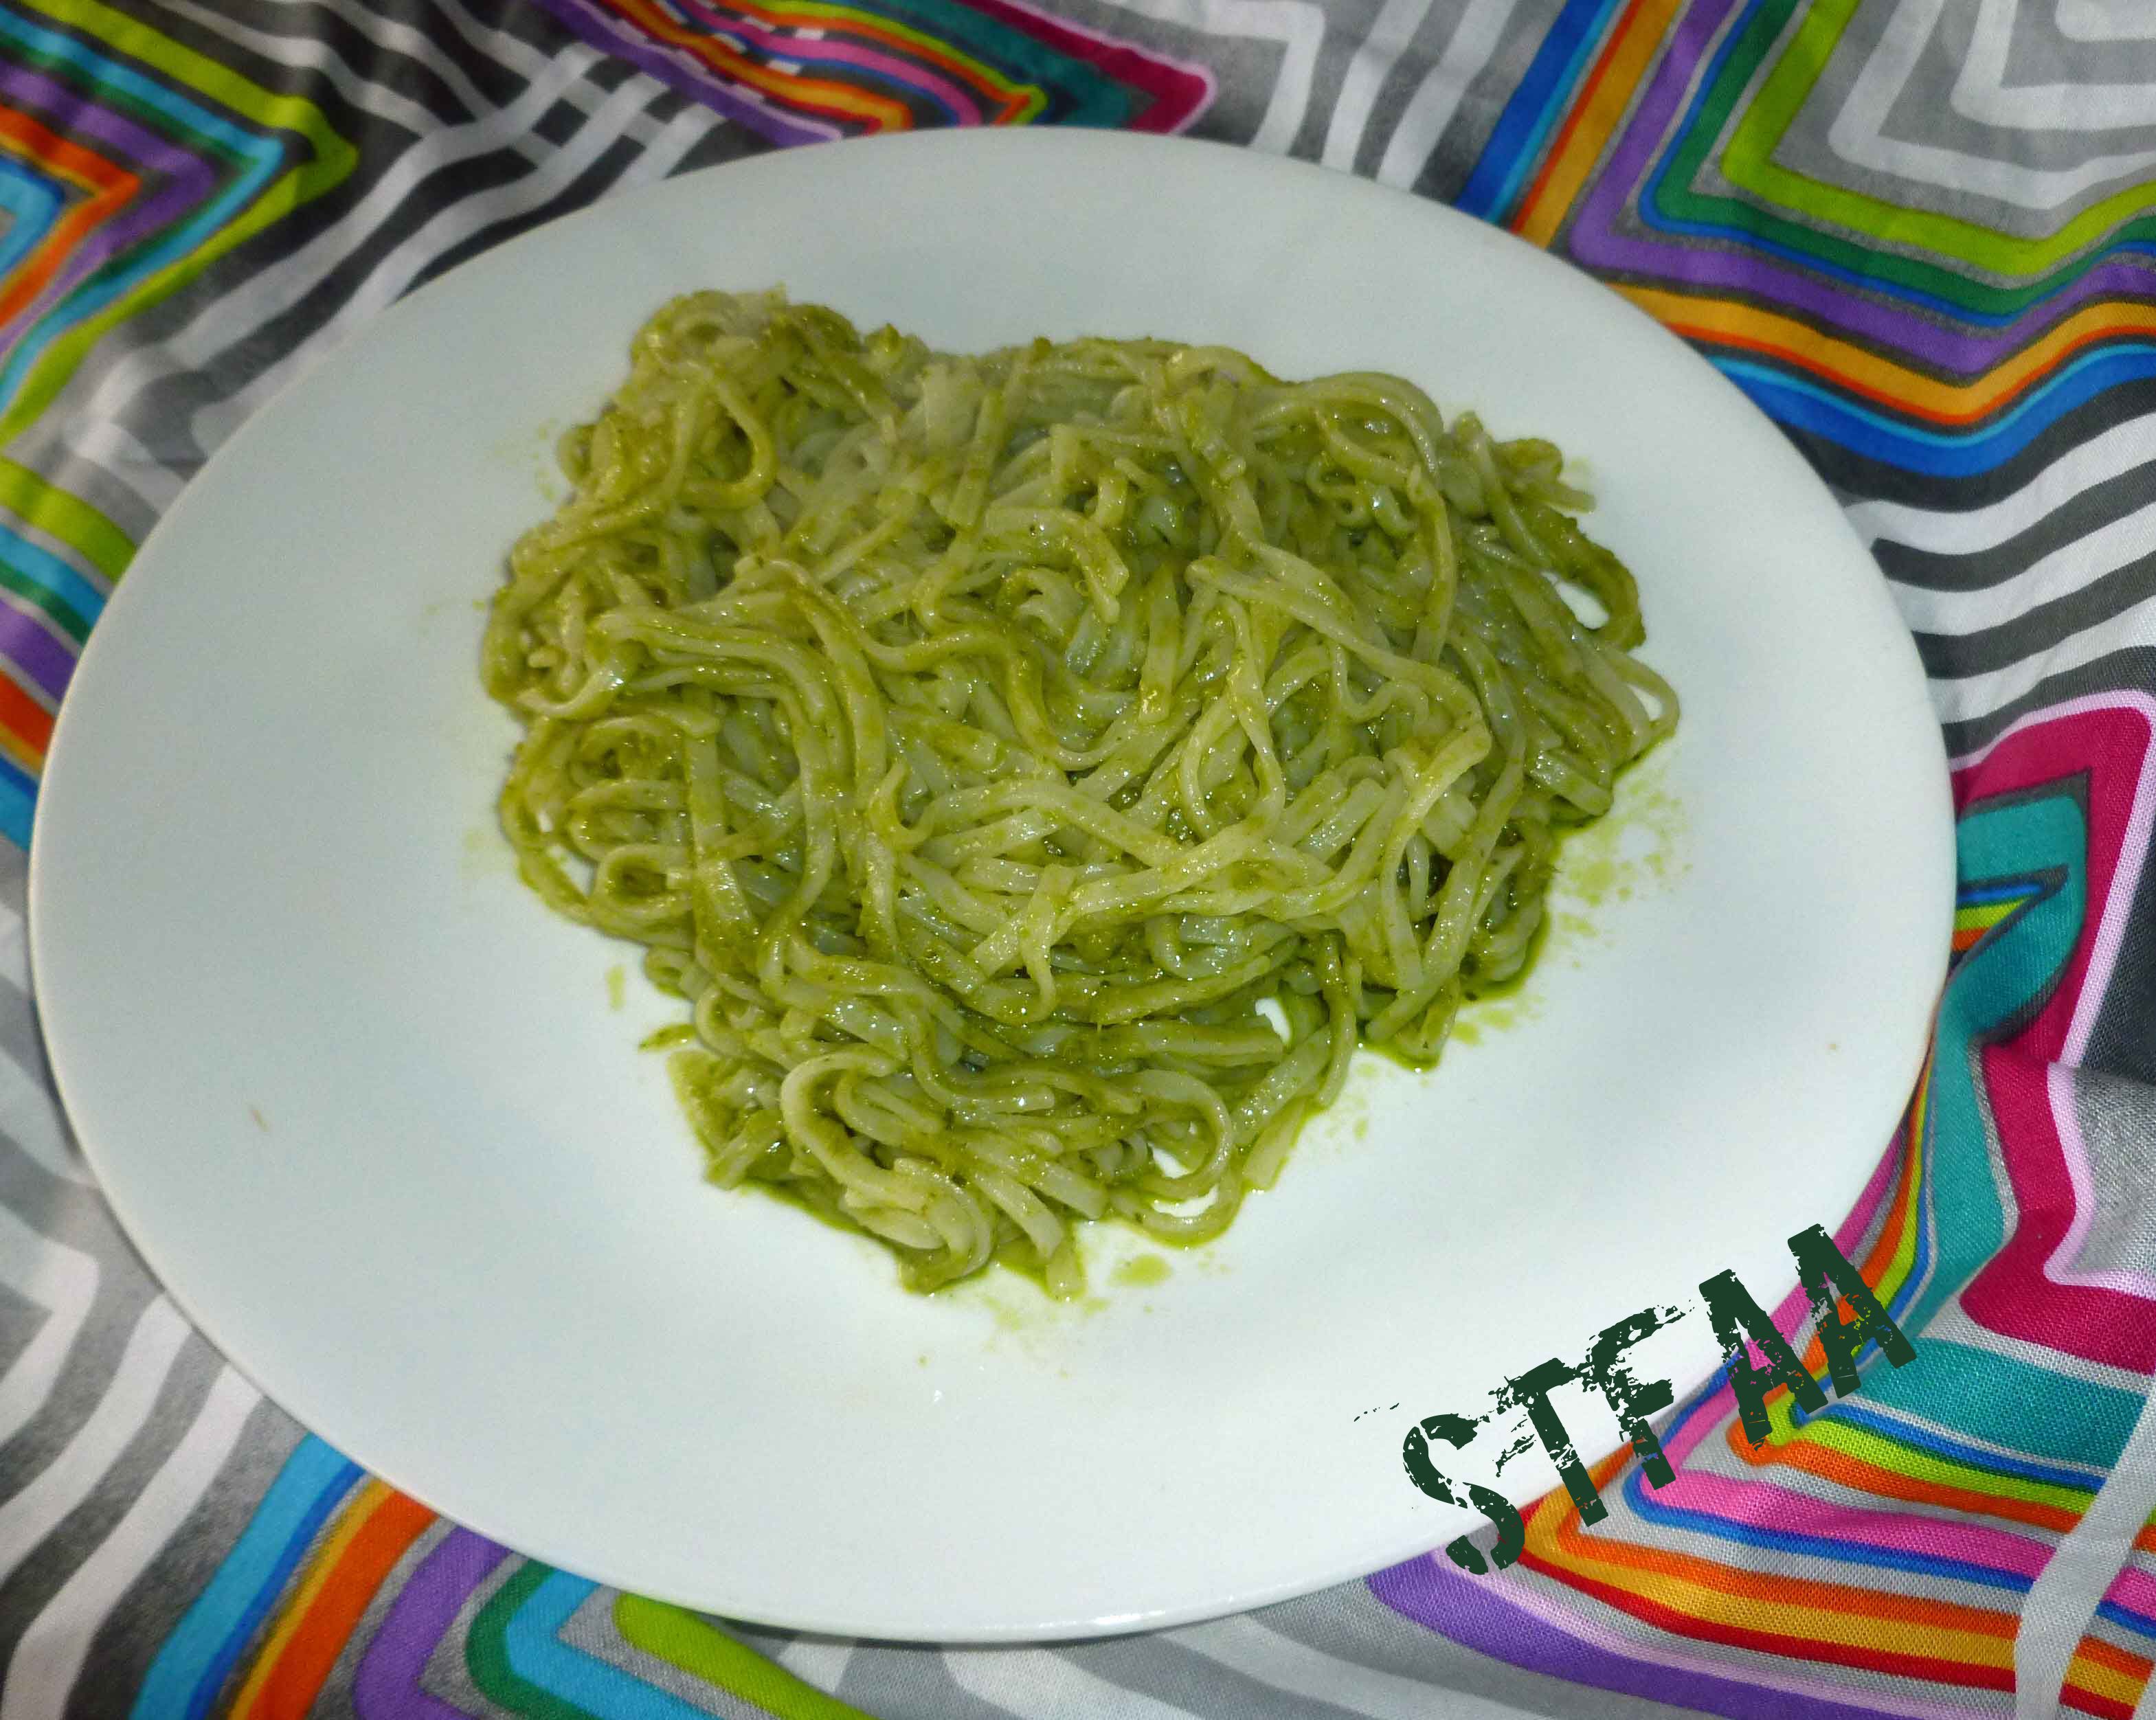
This is a pretty versatile sauce. It can be used mixed into cooked hot rice noodles or even just brown rice to use as a savory side dish. You can use it as a dipping sauce for grilled meat, or toss it with steamed veggies. You can thin it down with a little more vinegar and use it as a salad dressing. If you come up with other ways to use it, please let us know.
Apparently it’s mango season. In browsing the grocery store flyers looking for inspiration, I noticed that two of our three chains had mangoes on sale. I’ve never eaten a mango before, but I’ve had mango juice and liked it. So I thought I’d give it a try. Why not, right?
According to the Mango Board, mangoes are ripe when they give a little under a gentle squeeze — like avocados. As I said on Friday, it’s really worth your time to watch the video before deciding you know how to cut a mango. You can make it a lot harder than it needs to be (I sure did), but mangoes are sweet and tropical and taste like summer. If your “spring” as been like ours in New England, you need a reminder that warmer weather is coming. Tropical mango flavor helps.
“Salsa” generally conjures up tomatoes, but fruit salsas are pretty amazing and seem to have a better, brighter balance of flavors for certain main dish meals. (And yes, I know that biologically tomatoes are a fruit, but US law says they are vegetables). Salsa isn’t the quickest thing ever, but the work that goes in pays amazing dividends in flavor.
This salsa is fine with chips, but if you want to really highlight it, serve it over a meal. Things I think would work well with the summer mango salsa:
Shrimp and rice, if you can do shellfish (this was my choice)
Chicken, pork, or fish, if any of those work for you
Black beans and rice
Let us know what you try so that, if it’s good, we can copy you. I have a feeling I’ll be making this a few more times, and I’d love some new ideas for what to serve it over.
Summer Mango Salsa
Summer Mango Salsa
1/2 of a sweet onion, finely diced (this should be between 1/3 and 1/2 cup — adjust according to your love for onion)
1/2 teaspoon kosher salt
2 Tablespoons lime juice (I wanted to give you a measurement, but I’ve had to use everything from 2 whole limes to 1/2 a lime to get 2T. It varies widely. I always buy limes in pairs, for whatever reason.)
1 serrano pepper (buy a size commensurate with your love of spice), stem, seeds, and inner membranes removed, diced very finely
1 mango, cut into small cubes
1 avocado, cut into small cubes
3 Tablespoons chopped cilantro
The order of the ingredients above is deliberate. I love onion in my salsa, but I don’t like it too strong. If you chop it first and then let it marinate in the lime juice while you fight with the mango, it mellows out a bit. I’m assuming that the acid “cooks” the onions a bit, as it does for fish in ceviche. If you’re a better food scientist than I am, I’d love to know if this is true; it could just be the power of suggestion.
For the best flavor profile, you want the onions and the chile diced very finely, as finely as you can manage, and the mango and avocado a good bit chunkier (but still, not too big). The onion and chile go into the lime juice first. The mango next, and last the avocado — the avocado will break down the more you stir it, and I like it pretty well intact.
Basically, chop everything up and mix it together in a bowl. This is a very fresh salsa, and it doesn’t need much time to meld — half an hour at room temperature seems to be enough, although it is great the next day. I doubt it would last all that much longer, but I’ve made it a few times now and I’ve yet to test that.
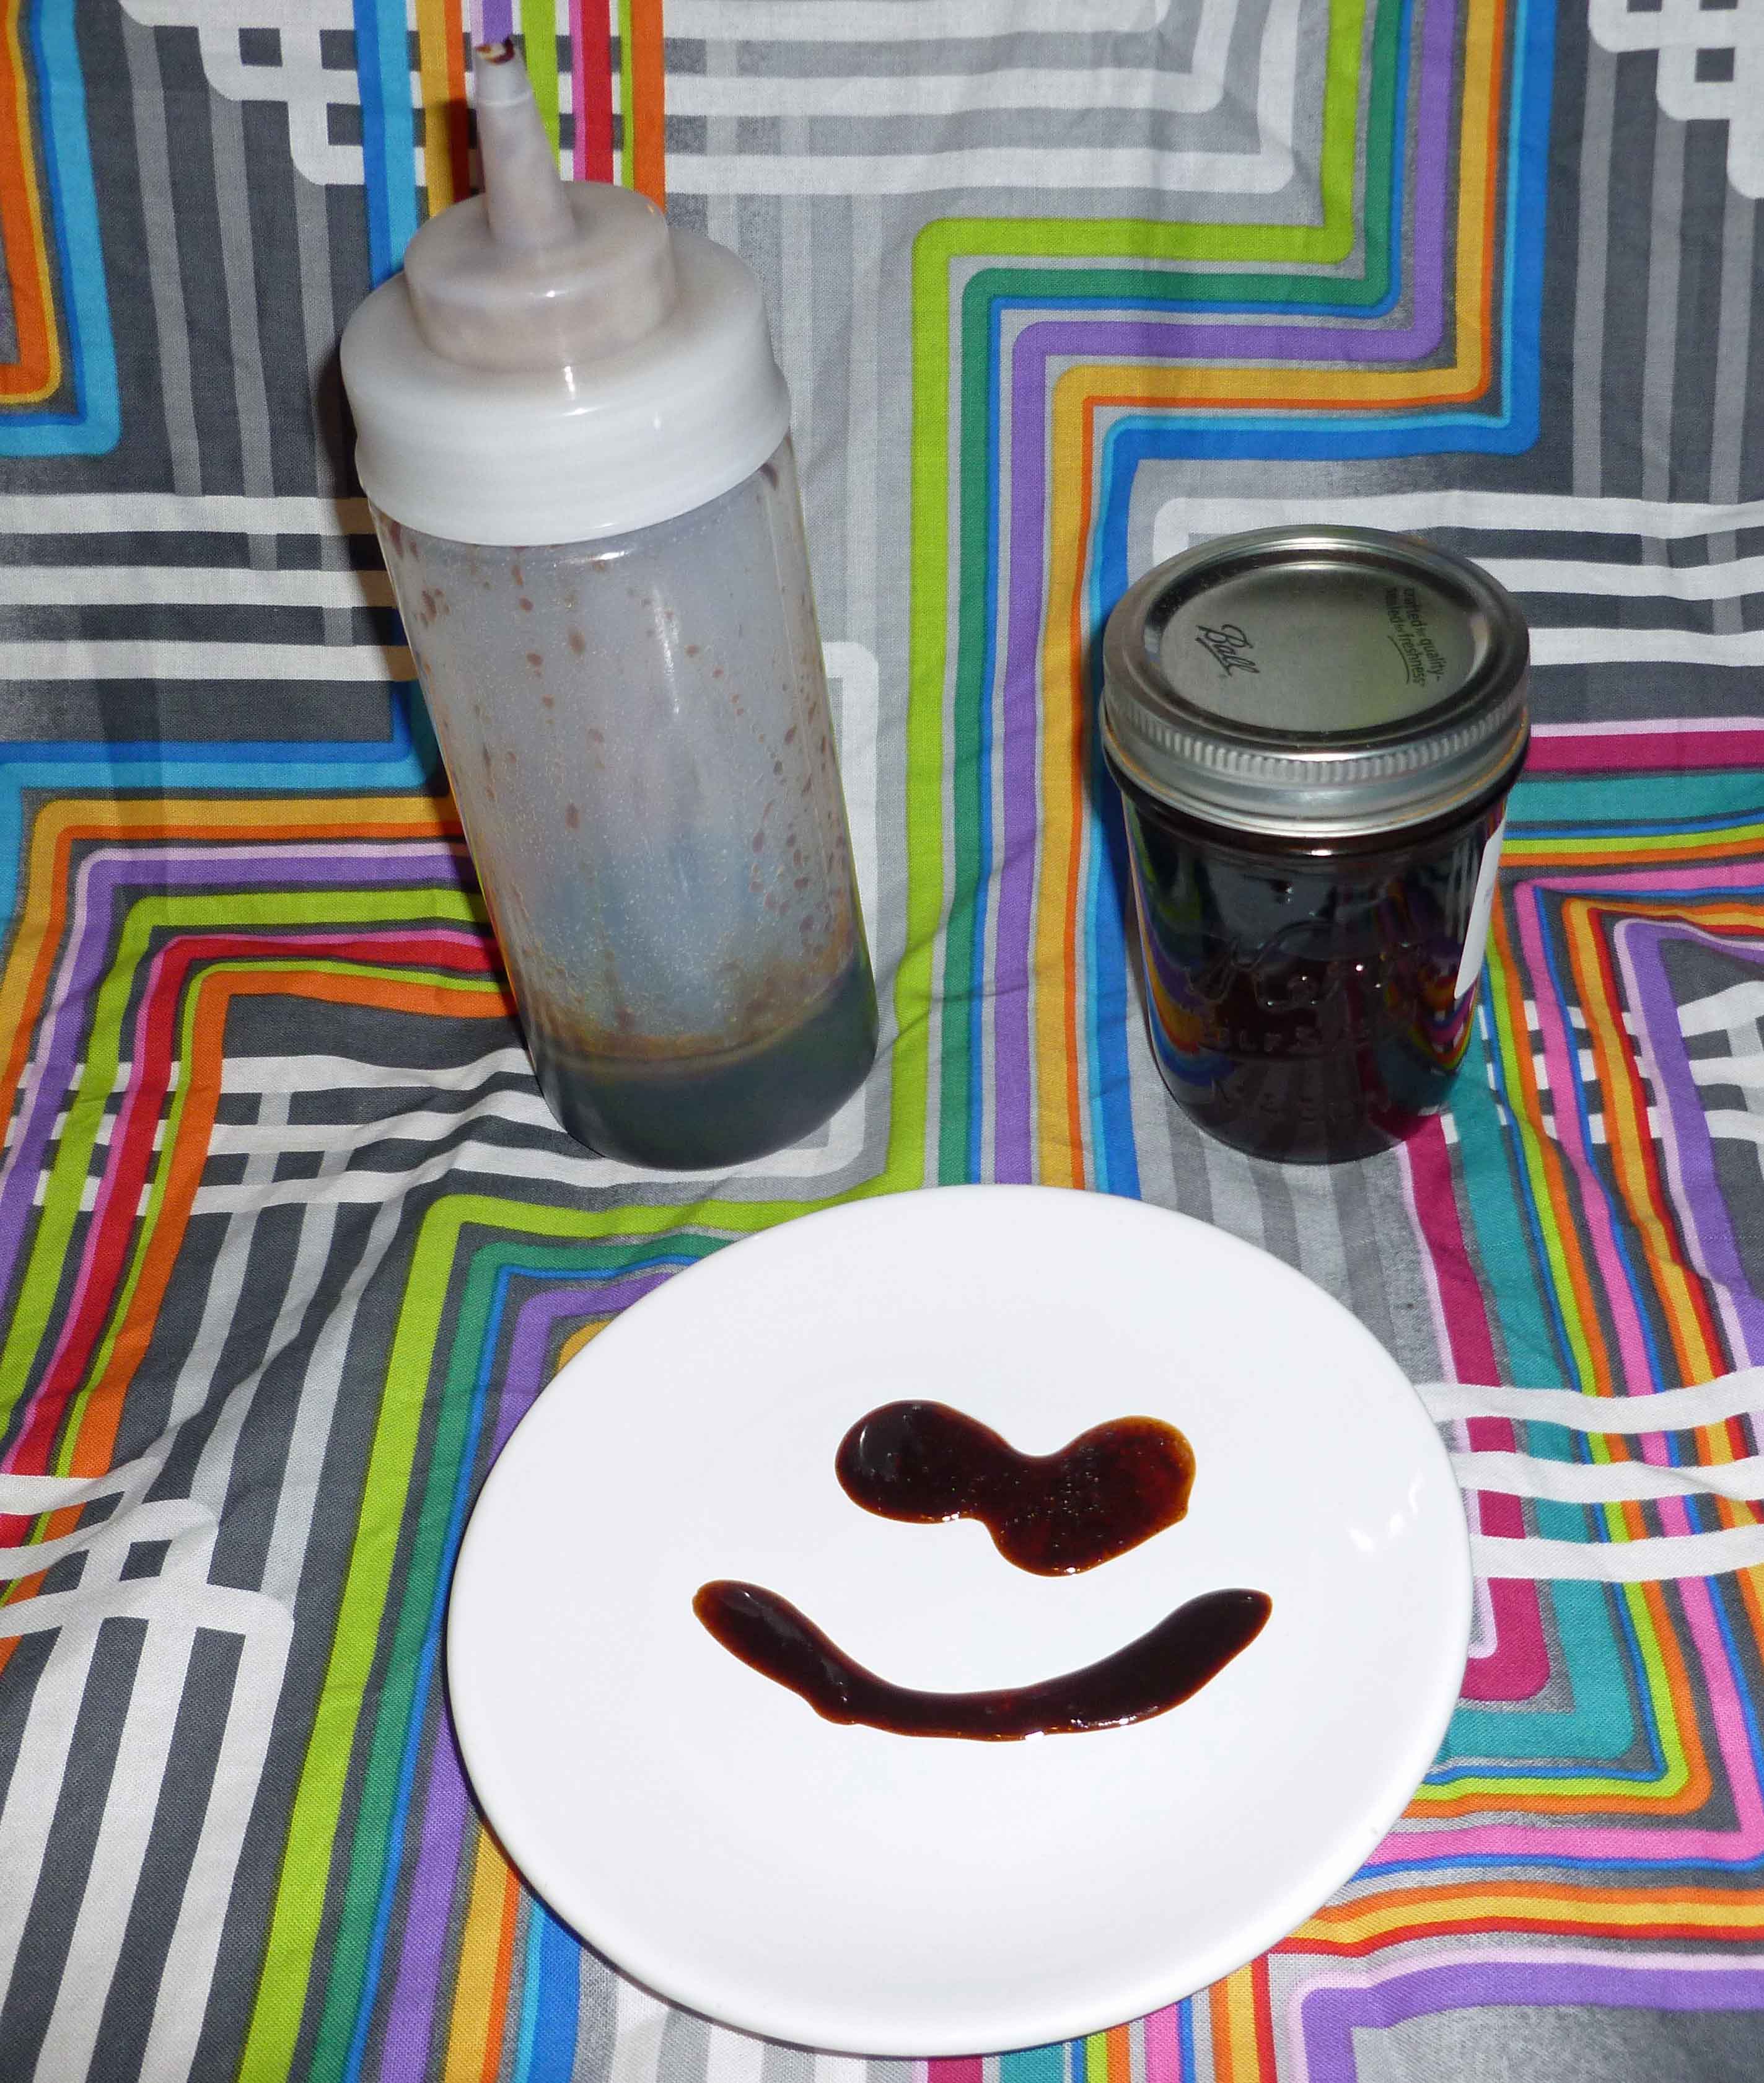
Hoisin sauce was just another well-loved condiment no longer within my grasp until I found a recipe and modified it to be safe for me. If you have a soy allergy (I don’t) try this with Mary Kate’s Soy-Free, gluten-free “Tamari Sauce” and let us know how it worked out for you.
Hoisin Sauce – Gluten-free with Soy-free option
Makes 1 cup.
1/2 of a 15 ounce can of Black Beans, rinsed and drained (I use my home canned, but use what’s safe for you.)
1 Tablespoon of either Sesame Oil, Chili Oil or other safe for you oil (I can’t use Sesame, so I made a homemade Chili oil with my safe oil.)
1/2 Tablespoon of minced Garlic
1/2 cup brown sugar
1/2 Tablespoon of Molasses
2 Tablespoons of Apple Cider Vinegar (Bragg’s is generally safest for those with corn allergies)
2 Tablespoons of Rice Vinegar
2 1/2 Tablespoons of Soy Sauce (I do well with San-J Tamari Gluten Free Soy Sauce, the alcohol is from cane sugar not corn, but if you can’t use soy, try Mary Kate’s recipe for a Soy-Free, gluten-free “Tamari Sauce” )
1 Tablespoon of water
1/8 teaspoon of crushed red pepper
In a food processor, purée the black beans into a fine paste. If it is too thick and doesn’t process well, add a little bit of water (1 teaspoon at a time) until you can continue to pulse the black beans. They should be puréed into mush.
In a non-reactive pan (I used an enameled cast iron pan), heat the oil until it is hot, but not yet smoking. Add the garlic and cook for about 2 minutes (don’t let it turn brown).
Once the garlic is cooked, add all ingredients to your pan and stir together really well. Bring to a boil, and then reduce heat to medium-low and simmer for 15 to 20 minutes. The sauce should coat and stick to the back of a wooden spoon when it is ready.
Remove from heat immediately and let it cool before placing it a container in the refrigerator. I put mine in a squeeze bottle so I can use it easily whenever I want.
Enjoy with all your favorite Asian and Asian-inspired dishes!
Red Wine Vinaigrette Using the Salad Dressing Recipe Theory
So, salad dressing. It’s one of those things that I can’t buy any more, my corn allergy pretty much blew any hope of being able to find a commercial product to buy out of the water. I don’t really use recipes any more, I tend to throw things in a blender and have at it, but you might want a slightly more careful approach at the beginning, but I’m pretty sure you’ll end up throwing stuff in a blender too after I explain this.
Salad Dressing Recipe Theory
The parts to a dressing recipe are the base, the acid, the emulsifier (sometimes), and your spices/flavors. Now, the conventional wisdom is that the ratio is 3 parts base to 1 part acid, and then add your emulsifier and flavors to taste. However, I think you should mix the ratio so that you like it. I tend to almost flip the proportions of base and acid, but feel free to fiddle those proportions as you wish. Also, this is not a table to be read from left to right across a row, as it’s not in any particular order. Also, I tend not to just pick one emulsifier or spice/flavors or I might even skip the emulsifier altogether when I do a dressing, and I may even put a combo of two of the acids.
fresh herbs – any of dill, parsley, cilantro, mint, scallions
silken tofu (if no soy allergy and if you can find one without corn in it)
Lemon Juice
jam or fruit preserve
minced onion or shallots
an avocado
Lime Juice
tahini (if you don’t have a sesame allergy)
dried herbs – any of marjoram, thyme, rosemary, oregano, basil,
chopped tomatoes
Orange Juice
tomato paste
dried chili powders – chipotle, ancho, jalapeno
raw cashews soaked and blended into cream (if you don’t have a nut allergy)
Pickle Juice – left over from my homemade fermented dill pickles or my home canned pickles
ground black pepper or peppercorns
sugar to sweeten
salt
For example, if I wanted to make a red wine vinaigrette, I’d use extra virgin olive oil, red wine vinegar and a bit of fresh squeezed lemon juice, some of my home made Dijon mustard, some garlic, marjoram, thyme, rosemary, oregano, basil, ground black pepper, salt and a bit of sugar, and blend it. If I wanted to make a Mexican spiced tomato vinaigrette, I’d use some chopped tomatoes and some extra virgin olive oil, some lime juice, maybe a bit of honey if I had a safe one, and some garlic, hot sauce, cilantro, oregano, basil, chipotle, black pepper, and salt, and blend it. I could also do an avocado ranch (I don’t have any safe yogurt, mayo or tofu to use as a base instead, although I could use cashews blended into a cream) using an avocado, some extra virgin olive oil, lemon juice and apple cider vinegar, and some garlic powder, onion powder, dill, salt, basil and red bell pepper flakes. Note that this combo didn’t use an emulsifier because the avocado has enough body on its own. You could also do an Asian themed dressing with some grapeseed oil, rice wine vinegar, minced scallions, soy sauce, ginger, garlic and Sriracha. See what kind of craziness you could come up with?
Now, I know what you’re saying – “Denise, Denise, how will we know if we got the proportions right? You’re not giving us enough information.” Yep. Because some of this stuff is trial and error. And the answer is you should taste it, and see how it is. If you like it, you got it right. If it needs something, fiddle with it. But, to give you a guideline, if the combination of your base and acid equals about 3 cups or so (because the ratio of the base and acid is up to you), I’d add a tablespoon or two of the emulsifier, and I’d add the spices/flavors to taste. Start with about a teaspoon of your combined spices/flavors and see if you like it, or if you need to add more.
But for those of you who want a conventional recipe, I’ll make an easy Red Wine Vinaigrette for you. But since you’re making it, if you don’t like something, leave it out. Also, I added a bit of paprika and crushed red pepper, because I’m Denise. God forbid that I don’t have some form of chili in a recipe, but I’ve marked them optional for you. Also, note that my proportions of base and acid are the way that I like dressing, so if you like a dressing with less acid (I like my dressing screaming) use 2 cups of extra virgin olive oil and 1 cup of red wine vinegar. (Yes, that’s still not 3 to 1, but if you need to it be 3 base to 1 acid, do the math).
Red Wine Vinaigrette, based on the Salad Dressing Recipe Theory
2 cups of red wine vinegar (I make my own, but make sure that you have a safe source)
1 cup of extra virgin olive oil (I do well with California Olive Ranch)
1 Tablespoon of prepared mustard (I use my homemade Dijon, make sure you get one that’s safe for you)
1 clove of minced garlic
1/2 teaspoon of marjoram
1/2 teaspoon of thyme
1/2 teaspoon of basil
1/2 teaspoon of oregano
1/2 teaspoon of sugar
salt and pepper to taste (I used a 1/4 teaspoon each)
optional: 1/8 teaspoon of paprika
optional: 1/4 teaspoon of crushed red pepper
Put it all in the blender.
Red Wine Vinaigrette Using the Salad Dressing Recipe Theory
Blend it. I start on low for a minute and then move it up to high, blending for at least a minute or two to make sure the oil incorporates with your emulsifier and base.
Red Wine Vinaigrette Using the Salad Dressing Recipe Theory
I then use a funnel and put it in an old wine bottle or vinegar bottle I’ve saved. You should store it in the refrigerator. Because California Olive Ranch is really good olive oil, it will solidify a bit in the refrigerator, so shake well, and let it sit on your salad a bit to warm up before eating.
This makes a good bit of salad dressing. Usually, I put it in two bottles and take half to work to leave in the refrigerator there (your salad doesn’t get all wilted and gross if you don’t dress it before you leave for work) and leave some at home. I could make it as needed, but with food allergies, we all have enough stuff to do and making an amount in volume saves time.
Red Wine Vinaigrette Using the Salad Dressing Recipe Theory
What are your favorite flavors and combinations? If you try out our “theory” let us know about combinations you come up with that you particularly enjoy. We’d love to see what inspired ideas you come up with!
I have another canning inspired recipe for you. I made and canned plum sauce because I wasn’t able to find a safe commercial version for me, and because I eat a lot of Asian and Asian inspired food. Since I’ll be using this as a condiment for some of the dishes that are coming up, I decided to post a version that you can do without canning. If you want to can this recipe, it’s found in theBall Complete Book of Home Preserving on page 285 (linked to Amazon for convenience, no affiliation). I’ve cut the quantities down so that it only makes about a pint of sauce, so that you can use it before it goes bad without canning it. If I’m overestimating your potential use, you could also freeze half of it.
Plum Sauce
1/2 cup of brown sugar (make sure it’s safe for you, I corn-ed myself good by not reading labels on brown sugar once. If it says inverted sugar on it, don’t buy it if you’ve got an allergy to corn)
1/4 cup of granulated sugar
1/4 cup of apple cider vinegar (Bragg’s is generally safest for corn allergies)
3 Tablespoons of finely chopped onion
1/2 Tablespoon of finely chopped jalapeno or other green chili pepper
1/2 Tablespoon of mustard seeds
3/4 teaspoon of salt
1/2 – 1 clove of garlic (recipe converted calls for half a clove, but if you like garlic, by all means use it up)
3/4 teaspoon of fresh grated ginger
2 1/2 cups of pitted, finely chopped plums
In a large stainless steel or other non-reactive (ceramic or enamel, do not use aluminum or cast iron) pot, add the brown sugar, granulated sugar, vinegar, onion, jalapeno, mustard seeds, salt, garlic, and ginger. Bring to a boil over high heat, stirring constantly. Add the plums, and return the mixture to a boil. Then reduce the heat and boil gently stirring occasionally until the mixture is thick and syrupy, about 2 hours.
Since this recipe is not being canned, at this point you could choose to use a stick blender to puree the mixture to a smooth consistency. (Note: If you are canning the recipe, follow the directions in the Ball Complete Book of Home Preserving and do not puree the sauce. You could be risking botulism otherwise.)
Let the sauce cool, and once cool enough, place in a container in the fridge (or freeze some) to store. I usually put mine in a squeeze bottle so that I can use it like ketchup.
So here’s another canning inspired recipe, because these pickles were really a winner. I used the recipe from the Ball Complete Guide to Home Preserving, but modified it to leave out the ClearJel (which is modified corn starch) and to substitute the distilled white vinegar for apple cider vinegar instead. I did water bath can them originally, but I’ve rewritten the recipe here for a much smaller quantity and so that you can do them as a refrigerator pickle for those of you who don’t can. These would be great to do as a part of your appetizer plate for Thanksgiving. They’ll need to sit in the refrigerator for a week or so to absorb the flavors, so start them now for Thanksgiving.
Makes 1 quart.
2 cups of a mix of zucchini and summer squash, washed, trimmed of stem and blossom ends, and cut into 1/2 inch cubes (you can use pickling cukes, but they are harder to get this time of year)
1 2/3 cups of onions, chopped
1/2 Tablespoon and 1/4 teaspoon of canning salt or sea salt (nothing with any additives)
1/2 cup and 1/3 cup of sugar
1/2 Tablespoon and 1/4 teaspoon of ground mustard
3/4 teaspoons of ground ginger
3/4 teaspoons of ground turmeric
1 1/2 Tablespoons of water
1/2 cup, 1 Tablespoon and 1/2 teaspoon of apple cider vinegar (safest for those allergic to corn is probably Bragg’s)
1/4 of a red bell pepper (put the rest in your freezer in a zip top freezer bag and use it the next time you make pasta sauce or chili)
In a non-reactive bowl (stainless steel or glass), mix the zucchini and summer squash and onions. Sprinkle them with the canning or sea salt, cover and let them stand at room temperature for an hour or so. Transfer the vegetables to a strainer/colander over the sink and drain them well.
In a non-reactive (stainless steel or ceramic or enamel, do not use aluminum or cast iron) sauce pan, combine the sugar, mustard, ginger, and turmeric. Stir well, gradually blending in the water. Add the vinegar and red bell pepper. Bring the mixture to a boil over medium-high heat, stirring often to dissolve the sugar. Add the drained vegetable mixture and return to a boil for two minutes.
Ladle the mixture into a non-reactive heat safe container (beware that putting them in a plastic container will cause the plastic to be permanently dyed yellow with the turmeric). Your best bet is probably a mason jar or glass container with a lid. Just make sure to warm up the jar/container with some hot water (don’t leave the water in the container, just put the hot water in the container to warm it up and then dump it out) before putting the hot veggies and brine into it. Put a lid on the container and let it sit on the counter until it reaches room temperature, and then place it in the refrigerator for a week.
As many of you know, I’ve been canning for well over a year now because it was the only way to replace commercial condiments that I could no longer buy at the grocery store because of the whole corn thing. When I saw this recipe in the Ball Complete Book of Home Preserving (you can also find it at this link) I knew I had to make it because I loved that sauce. And I made it, and it was good. Really good. So good that you want to dip all fried food in it. Seriously, dairy-free, gluten-free, fried onion rings are so good dipped in this stuff). I shared a jar with Mary Kate, and she discovered that it’s awesome when used as a salad dressing. So when she ran out, she asked me for help in converting the recipe to a reasonable amount that she could just put in the fridge, as she did not want to learn to can and have nine 8 ounce jars hanging around her apartment. (If you do want to make it in quantity and can it, follow the recipe at the link above.) Since it’s free of the top eight allergens, complies with each of our restrictions, and is fantastic, I thought I’d share the refrigerator version.
Thai Hot and Sweet Dipping Sauce
Makes a little less than 2 cups.
4 1/2 teaspoons of finely chopped garlic
1/2 teaspoon and a pinch of salt
1 cup, 3 Tablespoons, and 1 teaspoon of apple cider vinegar (safest for those allergic to corn is probably Bragg’s)
1 cup, 3 Tablespoons, and 1 teaspoon of sugar
4 1/2 teaspoons of hot pepper flakes
Combine the garlic and salt in a small bowl, and set it aside.
In a non-reactive (stainless steel or ceramic or enamel, do not use aluminum or cast iron) sauce pot, add the apple cider vinegar and bring it to a boil. Add your sugar and stir with a non-reactive utensil (wooden, rubber, nylon or silicone spatula or spoon), until the sugar is fully dissolved into the vinegar. Reduce the heat and boil gently for about 5 minutes or so. Add the garlic mixture and hot pepper flakes and stir well. Reduce the heat to medium low, and simmer for 15 minutes. Remove the sauce pan from the heat and let it cool until it is safe to put it into a storage container. Place it in the refrigerator to store.
Thai Hot and Sweet Dipping Sauce
Go fry all the things, and dip the fried things in this stuff, or dump it on your salad. You won’t be sorry.
This one’s pretty simple, but often the rubs and seasonings that you can buy pre-mixed at the grocery store have something I’m not supposed to have, whether it’s citric acid for flavor, or a filler, or an anti-flow agent that happens to be derived from corn, wheat or milk. I can’t tell you how ticked off I was to find that one of my favorite taco seasonings had lactose in it. I’ve given this a try on some boneless pork ribs and I bet it’d be great on chicken, but I can’t find out since I’m allergic to chicken. I really liked the bark (the crispy browned bits) the rub gave to the pork. I mixed just enough as listed in the ingredients below to cover two pieces of pork about six to eight inches long and about five inches wide, because I live in an apartment and they won’t let me put a grill on my second floor balcony. If you grill a lot, you might want to double or triple the recipe so that you can have it on hand. This is also pretty great on roasts and stuff you broil in the oven since we’re getting pretty close to only indoor cooking time of year. The recipe below makes about a third of a cup or so.
Dry Rub for Barbecue
2 Tablespoon of brown sugar
1 Tablespoon of kosher salt
1/2 Tablespoon of ground cumin
1/2 Tablespoon of paprika
1/2 Tablespoon of garlic powder
1/2 Tablespoon of onion powder
1/2 Tablespoon of chili powder
1/2 teaspoon of black pepper
1/2 teaspoon of white pepper
1/2 teaspoon of cayenne
Put all ingredients in a bowl and mix well with a fork or a whisk until everything is completely blended. Wow, that was easy wasn’t it? Put it in an air-tight container to store.
To use it, simply coat your cut of meat with it and put it on the grill or roast or broil it in the oven. If you’d like to use it with vegetables, I’d coat the veggies in a safe oil first, and then coat them in the rub.