Notice: Function _load_textdomain_just_in_time was called incorrectly. Translation loading for the wp-ultimate-recipe domain was triggered too early. This is usually an indicator for some code in the plugin or theme running too early. Translations should be loaded at the init action or later. Please see Debugging in WordPress for more information. (This message was added in version 6.7.0.) in /home/maryzahc/public_html/adultfoodallergies.com/wp-includes/functions.php on line 6121
WARNING – COCONUT – surviving the food allergy apocalypse (archive)

Tag: WARNING – COCONUT

Recipe contains coconut or coconut derivatives.

  • Morning Glory Overnight Oats

    Morning Glory Overnight Oats

    At the end of last year, I took a very cold trip out to the SeaTac airport area for a writing seminar with Anne Heffron. She walked us through a lot of exercises designed to help us figure out why we would take a very cold trip out to an airport hotel on a Friday night — why we say we want to write and don’t. Why we set ourselves goals and then flounder at them. To figure out what it is that writing means to us.

    A weird and wonderful night, I was really grateful for the long trip back home on the light rail because it let me process enough of that night that I could sleep when I got home. And I’m writing things — not things I want to share with the world, exactly, but I feel like this outlet I’ve been toying with since elementary school actually works for me instead of against me.

    So Anne is doing this wonderful experiment to more fully inhabit her own skin and the life around it. Part of it involved a change of diet. Hey, I know changes of diet. I understand missing things I used to be able to eat easily! She talks often of Morning Glory muffins as a thing that has been left behind. I don’t know, honestly, if Morning Glory muffins are THAT amazing or if they are a well-named food to be brought up again and again. I’ve never had a morning glory muffin. But I looked them up, and the flavor profile sounds pretty good — apples, carrots, coconut, cinnamon. All things I like. And since I’ve been trying to mix up breakfasts lately, I decided to be inspired by Anne’s left behind food and reinvent it a bit — into overnight oats.

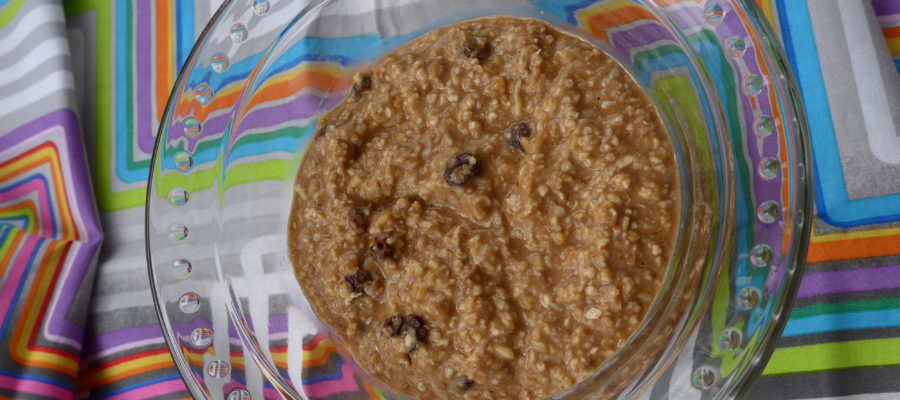
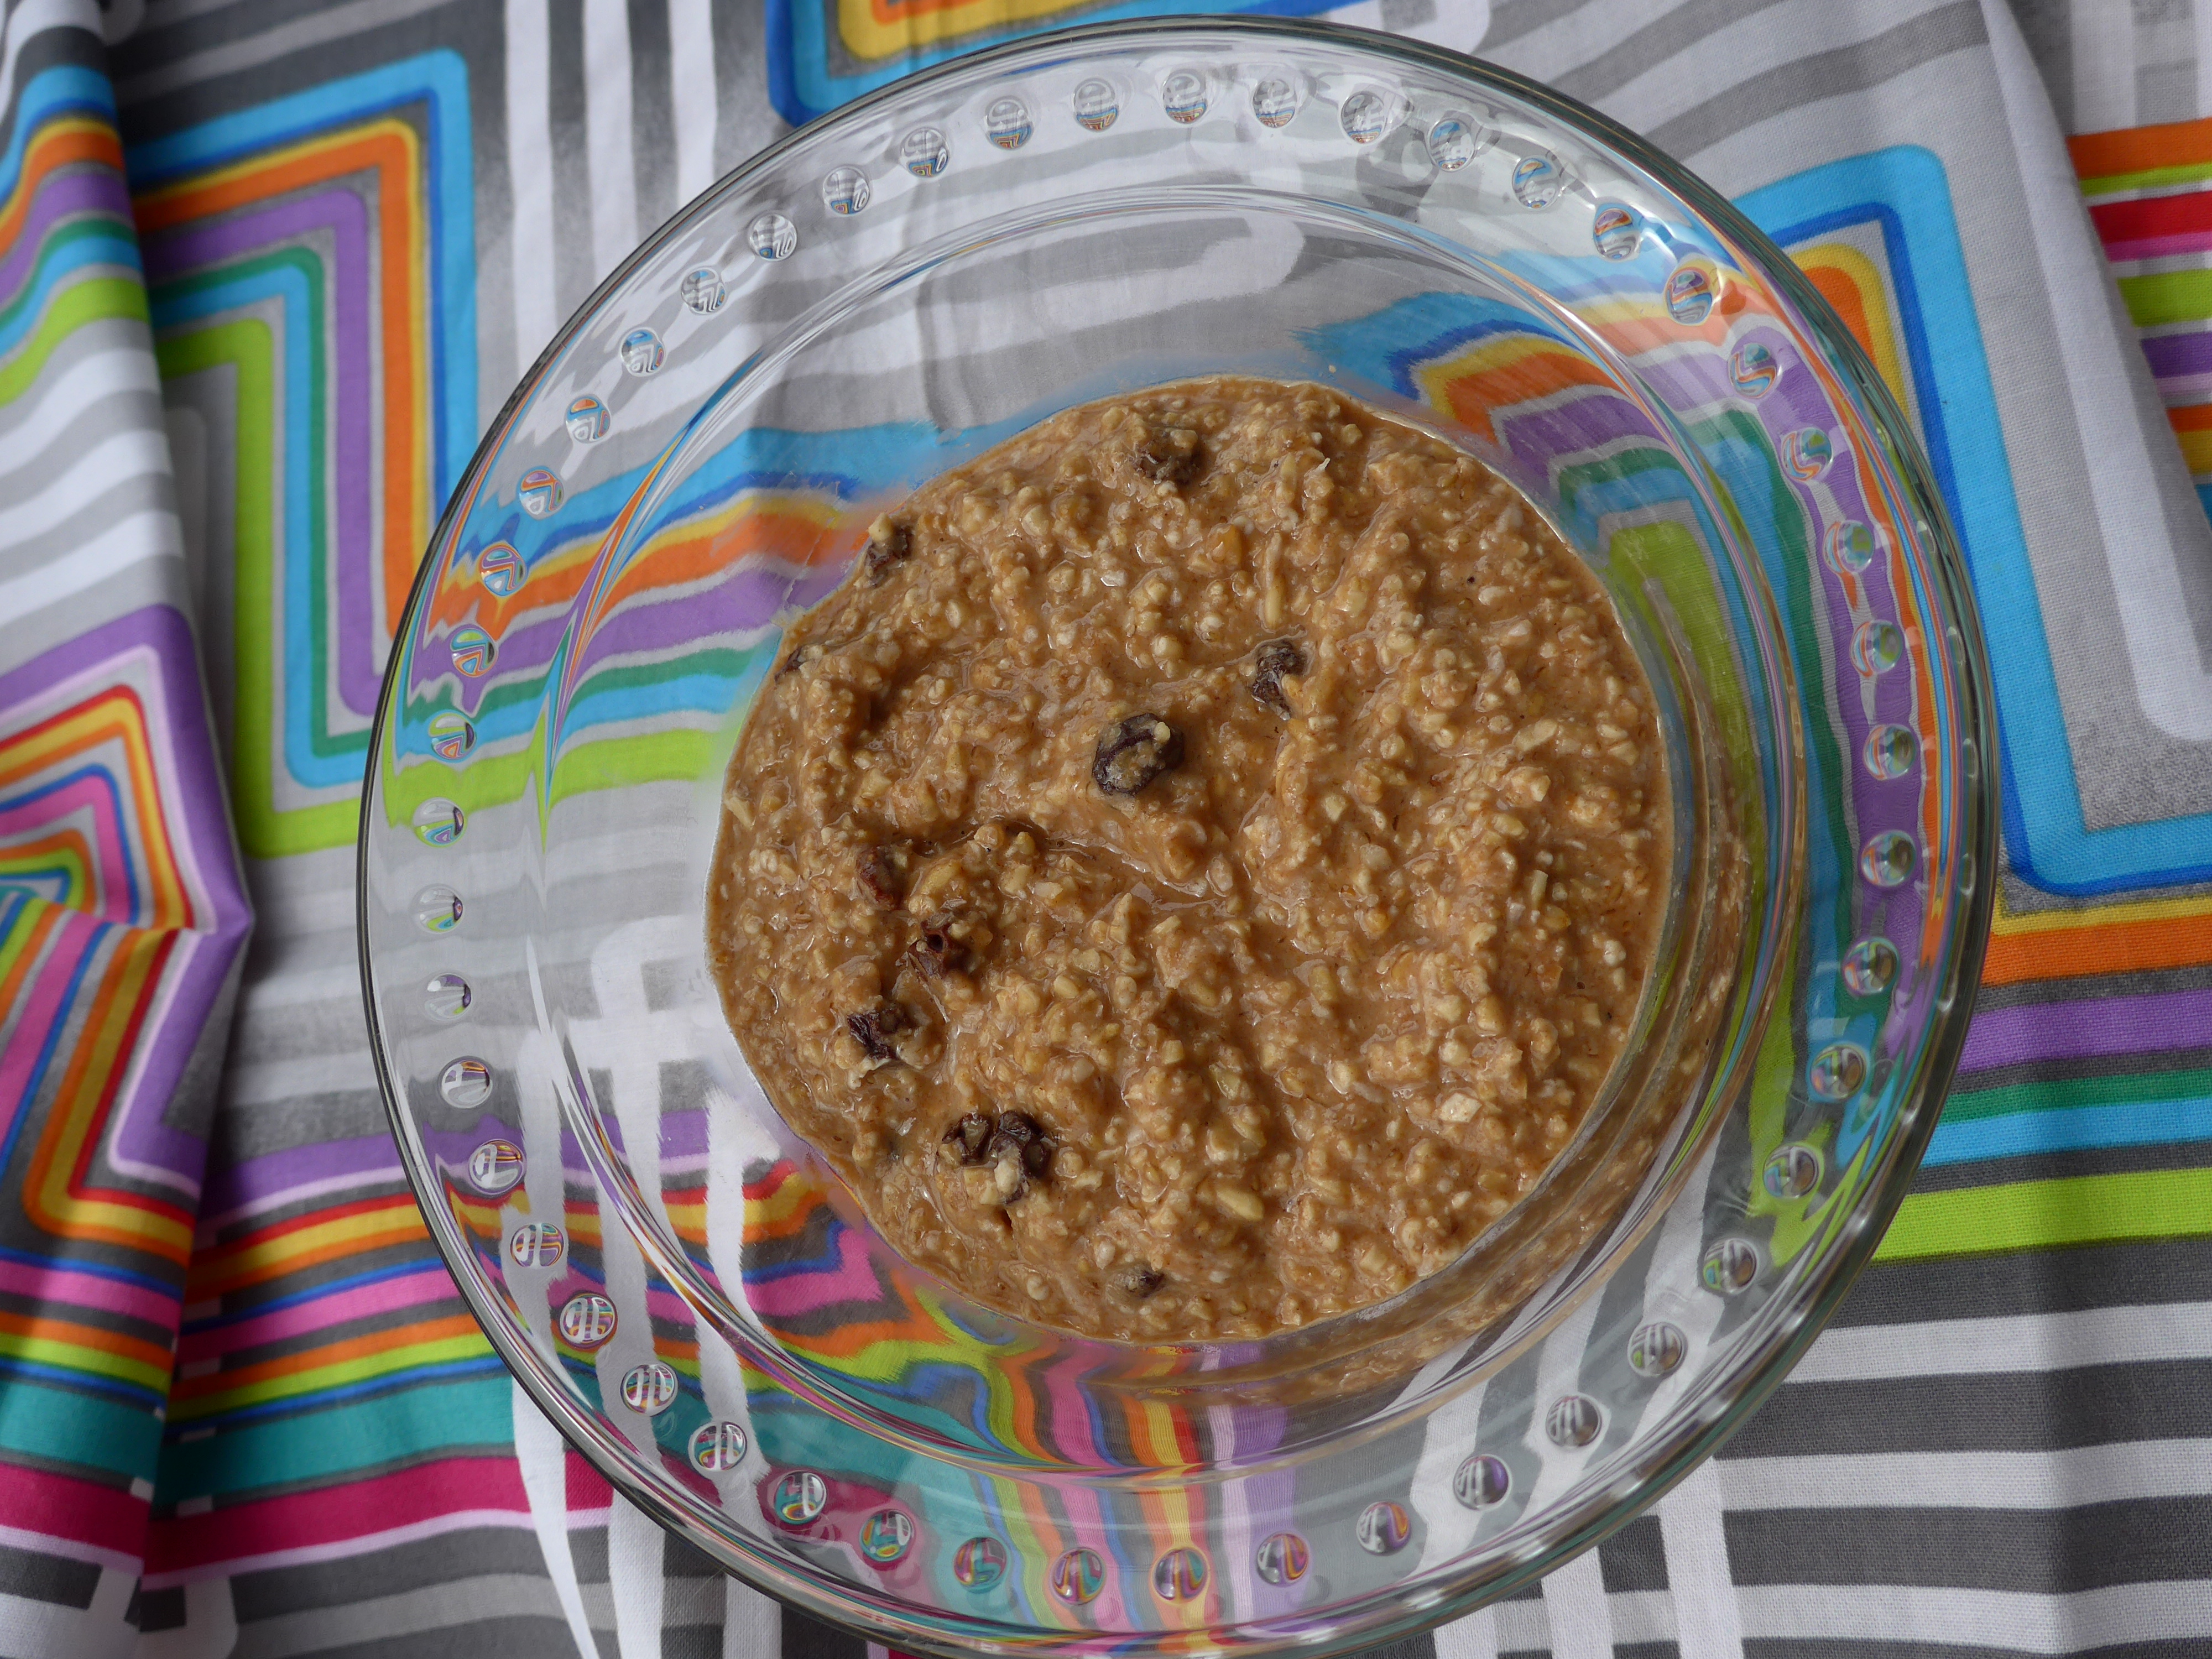
    Morning glory oats are oatmeal but with so many different textures and flavors that your mouth and brain don’t get bored. I had everything to make this oatmeal in my house already, though I will admit that I haven’t tried this with rolled oats because I am so bored of them and I’m out and haven’t restocked. Many people with celiac cannot eat oats, so I tried this with quinoa flakes, as well. I think I personally like the steel-cut oats better because of texture, but the added protein from quinoa can’t hurt.

    If you can’t eat one of the many add-in items here, skip it! Make it nut-free by leaving out the walnuts (and coconut, if needed). Make it low FODMAPs by leaving out the applesauce (I think that would be the only thing — but I’m not an expert on FODMAPs). Adjust it however you need to suit you or your family.

    This recipe is written for one hearty serving. Increase as desired. I don’t usually find the glory in morning, but I do like this oatmeal.

    In a clear bowl, light brown porridge with raisin, on a brightly colored backdrop
    Morning Glory oatmeal (if you note that you can’t see the orange of the carrots here, know that the only time I remembered to take photos was the time I left it out.)

    Notice: Trying to access array offset on value of type bool in /home/maryzahc/public_html/adultfoodallergies.com/wp-content/plugins/wp-ultimate-recipe/helpers/models/recipe.php on line 254
    Morning Glory Overnight Oats
    Print Recipe
    Servings Prep Time
    1 serving 10 minutes
    Cook Time Passive Time
    2-5 minutes 8+ hours
    Servings Prep Time
    1 serving 10 minutes
    Cook Time Passive Time
    2-5 minutes 8+ hours
    Morning Glory Overnight Oats
    Print Recipe
    Servings Prep Time
    1 serving 10 minutes
    Cook Time Passive Time
    2-5 minutes 8+ hours
    Servings Prep Time
    1 serving 10 minutes
    Cook Time Passive Time
    2-5 minutes 8+ hours
    Ingredients
    • 1/3 cup gluten-free steel-cut oats* I buy mine from GF Harvest because I trust their purity protocol
    • 2 oz applesauce about half one of those little cups I always keep around for GF baking
    • 3/4 teaspoon cinnamon
    • 1/2 teaspoon vanilla powder optional, but worth seeking out
    • 2 Tablespoons ground walnuts
    • 2 Tablespoons unsweetened shredded coconut
    • 2 Tablespoons raisins
    • 2-3 Tablespoons shredded carrot (just shred a small one and go with it)
    • 1/2 cup non-dairy milk I used flax milk and really liked it.
    Servings: serving
    Instructions
    1. Mix all ingredients together in a heat-proof container of your choice. If you can’t find your shredder, like me, just peel the carrots and then keep peeling the part you want to eat, too. Chop the peeled bits. Put in the fridge overnight.
    2. In the morning, stir and add more milk if needed. Heat and eat. If you’re using the steel-cut oats and want them softer, cook a little longer. If you’ve used rolled oats or quinoa flakes, just heat it.
    Recipe Notes

    *I’m gluten-intolerant & pretty sensitive, but I can tolerate most certified gf oats. I’ve used steel-cut purity protocol oats here, but you could substitute rolled oats or quinoa flakes for a different texture.

    Share this Recipe
     
    Powered byWP Ultimate Recipe
  • Coconut Milk Vegan Fudge

    Coconut Milk Vegan Fudge

    The first recipe I ever perfected was fudge. I admit, part of it had to do with the fact that fudge was something my mom had given up on making well. Starting in about middle school, to judge by the handwriting on the recipe card, I made many batches of fudge each winter. Teachers, family, and friends all got fudge as holiday gifts, and no one ever complained.

    But when I gave up dairy, some 10 or 12 years ago, I gave up on fudge. I tried making evaporated and sweetened condensed non-dairy milks a few times, never all that satisfied with the results. When I found a coconut milk-based sweetened condensed milk this year, I was thrilled! Until I realized that my amazing fudge recipe used evaporated milk. Darn it all.

    There is a conversion. It involved math. I did it. And the results are tasty. It’s not perfect — coconut milk is brilliant, but in almost every use, it still tastes of coconut, and fudge generally doesn’t taste of coconut, but the flavor isn’t too strong to get past here. Bonus: this recipe is easy. It takes less than 10 minutes of active work, and requires no specialized equipment. Plus, the way the chocolate just doesn’t look like it is going to blend in — and then it does? It’s like magic.

    Earth Balance vegan margarine, sweetened condensed coconut milk, dark chocolate chips


    Notice: Trying to access array offset on value of type bool in /home/maryzahc/public_html/adultfoodallergies.com/wp-content/plugins/wp-ultimate-recipe/helpers/models/recipe.php on line 254
    Coconut Milk Fudge
    Print Recipe
    Prep Time
    10 minutes
    Passive Time
    1 hour
    Prep Time
    10 minutes
    Passive Time
    1 hour
    Coconut Milk Fudge
    Print Recipe
    Prep Time
    10 minutes
    Passive Time
    1 hour
    Prep Time
    10 minutes
    Passive Time
    1 hour
    Ingredients
    • 1 can sweetened condensed coconut milk 7.5 oz was the only size out there
    • 1 Tablespoon non-dairy milk
    • 1.5 cups sugar
    • 1/2 cup butter or margarine PLUS
    • 2 Tablespoons butter or margarine
    • 1 1/4 cup chocolate chips check for allergens!
    Servings:
    Instructions
    1. In a saucepan over medium heat, bring non-dairy milks, sugar, and butter or margarine to a boil. Boil for one minute, stirring constantly.
    2. Remove from heat, and add chocolate chips. Beat with a wooden spoon for 3 minutes.
    3. Pour into lined baking dish at least 8×8 inches square.
    4. Cool completely and cut to desire serving sizes.
    Share this Recipe
     
    Powered byWP Ultimate Recipe
  • (Gluten-free, dairy-free) S’mores Pie

    (Gluten-free, dairy-free) S’mores Pie

    S'mores Pie -- campy goodness
    S’mores Pie — campy goodness

    This is the post for the chocolate lovers. I know. Today, you’re buying Valentine’s Day chocolate on sale, but here’s a classy way to do chocolate. PIE. Chocolate pie. Make this pie for a video games party (if that’s a thing you might do), for a Primary watching party, for Thanksgiving, for Pi Day (coming up!)

    Basically, I’m saying that it’s a pie for almost all occasions. Lovely graham cracker crust, rich, creamy chocolate filling, and toasted marshmallows on top. This pie should be served at least slightly chilled, so keep  that in mind (but in winter, that means it’s good in the car for a bit).

    I’ve used pre-made gluten-free graham crackers, which I keep around as a snack, and regular mini-marshmallows, which are safe for me. If you need to make graham crackers or marshmallows, we’ve got you covered (see the links in the recipe!), but plan ahead for the extra time.

    Enjoy the whole pie.

    S'mores Pie
    S’mores Pie

    Notice: Trying to access array offset on value of type bool in /home/maryzahc/public_html/adultfoodallergies.com/wp-content/plugins/wp-ultimate-recipe/helpers/models/recipe.php on line 254
    S’mores Pie
    Print Recipe
    Graham cracker crust, rich chocolate filling, and toasted marshmallows on top
    Servings Prep Time
    8-16 slices 5 minutes
    Cook Time Passive Time
    10 minutes 2 hours
    Servings Prep Time
    8-16 slices 5 minutes
    Cook Time Passive Time
    10 minutes 2 hours
    Ingredients
    Graham Cracker Crust
    • 1 1/2 cups graham cracker crumbs I like Kinnikinnick brand, but use regular if you don’t need gluten-free, and make your own if you need full control of ingredients
    • 1/3 cup brown sugar
    • 5 Tablespoons coconut oil can use other fat that works for you, but coconut oil sets nicely
    Chocolate Filling
    • 1 can (15 oz) full-fat coconut milk do not use “light”! It won’t set.
    • 1 bag (10 oz) safe-for-you chocolate chips (or chop 10 oz of your safe chocolate into small pieces)
    • 1 teaspoon vanilla extract
    Marshmallows
    • 1 1/2 cups mini marshmallows use what is safe for you — regular, vegan, or make our marshmallow recipe
    Servings: slices
    Instructions
    Crust
    1. Crush graham crackers. If you’ve had a bad day, put them in a bag and beat them with a rolling pin. That’s how I was taught to do it growing up, and it’s a good stress-reliever. But you can also use a food processor or blender for a quicker and smoother crumb.
    2. In a bowl, combine the graham cracker crumbs, sugar, and melted coconut oil. Do not try to do this in the pie plate! I always think this is going to be an excellent idea — why get two things dirty? But it NEVER works out well. With the higher sides of a bowl, you can quickly and completely mix all the crust ingredients using a fork, without scattering them all across the kitchen.
    3. Press crumb mixture into pie plate. This will not form up quite as well as a gluten-containing version does, so it really helps to start out with your greased hands to evenly spread the crust mix over the pie plate. If you need extra compacting, the bottom of a glass works well. Try to even out the top edges of the crust — this will help it hold together when it comes out of the pan.
    4. Chill the pie crust in the fridge for at least half an hour, but better 45 minutes. This is why coconut oil works better to keep the crust intact — it’s solidity when chilled is a benefit here.
    Filling
    1. Pour one can of coconut milk into a sauce pan. Heat over medium low until it begins to boil, stirring frequently. If the solids have somewhat separated, stir them back in to the coconut milk.
    2. When you have the coconut milk at a low boil, remove the pan from the heat. Add the chocolate and stir until it is completely combined with the coconut milk.
    3. Add the vanilla and stir well.
    4. Pour the prepared filling into the chilled pie crust, and put the pie in the freezer to set.
    5. Set your timer for 40 minutes. You want the pie to be mostly but not completely set when you top it with the marshmallows, as you want them to stick. Add the marshmallows and chill for another half an hour.
    6. Toast the marshmallows with your kitchen torch. Alternately, you can use your broiler for this — but set aside extra time to re-chill the entire pie before serving! The broiler will make the entire pie hot and it is easier to burn the marshmallows.
    Share this Recipe
     
    Powered byWP Ultimate Recipe
  • Delicious Failure Ice Cream Cake

    Delicious Failure Ice Cream Cake

    Delicious Failure Ice Cream Cake
    Delicious Failure Ice Cream Cake

    Cake. I adore cake. Cake is the whole point of birthdays, right? But allergies, man, they make cake harder. Gluten, dairy, eggs — all of these have structural properties in baking, and while it’s very possible to make cake without these things, when you take them all out, there are a lot of adjustments.

    If you’re new to gluten-free baking, or new to gluten-free vegan baking, or even if you’ve been doing gluten-free baking for a long time, sometimes things will fall apart. You will fail. You will try a new recipe, or you will alter a recipe, or the stars will not be aligned.

    Wait! Failure doesn’t have to ruin dessert! This is more of a process or an idea than a recipe, but it will save dessert, so it’s important.

    This method of dessert preservation came about this past summer, when Jack made me a birthday cake. Well, he tried. I sometimes buy Cherrybrook Kitchen cake mixes, which are safe for me and formulated to be made without eggs. Jack found another cake mix that was safe, but it called for three eggs, which are not. He tried a sub, but here’s a GF vegan baking tip : Don’t try to substitute more than 2 eggs. It’s not that it is always impossible, but it’s an advanced baking move. Don’t try it when you really want a recipe to work the first time.

    That cake had no structural integrity. It came out of the pan a nice tasty pile of cake crumbs. We “fixed” it by sandwiching layers of cake crumbs between layers of ice cream, freezing it and frosting the whole thing. It wasn’t pretty, but it tasted amazing. So, see, he did make me a cake. Just not the one originally intended.

    What’s funny is that I never associate ice cream cake with my summer birthday. Ice cream cake is for winter — for my brother’s birthday, mostly, which is in a week and a half. I was working on an ice cream cake that would replicate those Baskin Robbins roll cakes — you know, the ones that either look like a train or a plane? Do you remember those? The thing is that, so far, I don’t yet have a cake that survives the jelly rolling process of bending and being flexible and round. So I saved this cake the same way we saved my own birthday cake — and this is officially now the amazing decadent failure cake. It is SO GOOD that I’ll be planning to fail on purpose going forward.

    So pick a recipe. Make a cake. If it doesn’t hold up, make an ice cream cake (note: you will need a safe-for-you ice cream, so consider that in advance. Lucky for me, coconut milk is not an issue, and I like the options that exist. Cashew milk and soy milk are also commercially available options. But I’m thinking that this strawberry ice cream would also be awesome, with chocolate or vanilla cake!)


    Notice: Trying to access array offset on value of type bool in /home/maryzahc/public_html/adultfoodallergies.com/wp-content/plugins/wp-ultimate-recipe/helpers/models/recipe.php on line 254
    Delicious Failure Ice Cream Cake
    Print Recipe
    Here’s what you do with structurally failed cake.
    Servings Prep Time
    9 (ish) 15 minutes
    Passive Time
    2 hours
    Servings Prep Time
    9 (ish) 15 minutes
    Passive Time
    2 hours
    Delicious Failure Ice Cream Cake
    Print Recipe
    Here’s what you do with structurally failed cake.
    Servings Prep Time
    9 (ish) 15 minutes
    Passive Time
    2 hours
    Servings Prep Time
    9 (ish) 15 minutes
    Passive Time
    2 hours
    Ingredients
    • 1 recipe cake with structural issues
    • 1-2 pints safe-for-you ice cream
    • 1 recipe frosting (Most Duncan Hines flavors are gluten and dairy-free)
    • Sprinkles or other decorations
    Servings: (ish)
    Instructions
    1. Slightly soften ice cream by leaving it out while your failed cake cools.
    2. Crumble cake slightly, if it needs help.
    3. Mix ice cream to a consistently soft consistency.
    4. In a cake pan lined with parchment (a 9-inch round works, as does an 8×8 square pan, but this will depend on what your original cake was intended to be) Two options — Either mix cake and ice cream (works best if cake pieces are really small or you want one texture throughout) OR Layer cake and ice cream in thin layers, beginning and ending with cake.
    5. Freeze ice cream cake until solid at least on the outside (45 minutes or so).
    6. Add frosting over entire cake OR just on top. Add sprinkles if using. Re-freeze, another hour is good, or overnight. Really, just go distract yourself while the cake freezes. Watch a movie or do something fun.
    7. Let thaw enough to cut (how long that is will depend on many things, from weather to how you layered the cake and what ice cream you used). Enjoy the salvation of your baking failure enough that you purposely make cakes that don’t work just to have an excuse to make ice cream cake again.
    Share this Recipe
     
    Powered byWP Ultimate Recipe


  • Blue Squash Ginger Soup

    blue squash ginger soup
    blue squash ginger soup

    This soup was inspired by the huge fragment of a Blue Hubbard Squash I bought because I wanted to try one. But then I had to figure out what to do with 3.5 lbs of squash. That’s too much roasted squash to be reasonable, so I figured why not soup.

    Blue hubbard is weirdly blue-ish on the outside, and lighter and yellower than butternut squash on the inside. It’s a subtler flavor than butternut, in the best way possible. For lack of a better description, it’s a “cleaner” squash taste. It’s really good. I really liked the blue hubbard, and despite the fact that hacking it up is a bit of a chore, I will definitely buy more of it.

    Because it’s chock full of ginger, I think this would also be a soothing soup if you weren’t feeling well. It’s a pretty straightforward recipe, but plan a little time for hacking at the squash with your biggest, sharpest knife. It’s light enough that it might make a good opener for Thanksgiving if soup or squash are on the menu, but a big bowl with a salad would also make a decent lunch.


    Notice: Trying to access array offset on value of type bool in /home/maryzahc/public_html/adultfoodallergies.com/wp-content/plugins/wp-ultimate-recipe/helpers/models/recipe.php on line 254
    Ginger Squash Soup
    Print Recipe
    A nice soup for a first course (if you are inclined to serve first courses) or any cold winter day. The coconut milk is nice, but completely optional, so feel free to omit it.
    Servings Prep Time
    1.5 quarts 15 minutes
    Cook Time Passive Time
    50 minutes 30 minutes
    Servings Prep Time
    1.5 quarts 15 minutes
    Cook Time Passive Time
    50 minutes 30 minutes
    Ingredients
    • 6 cups vegetable stock check for allergens if using commercial stock
    • 3.5 pounds blue hubbard squash (weight prior to removing rind)
    • 2 Tablespoons olive oil
    • 2 medium onions sliced thin for quicker cooking, about 2 cups
    • 2 inches fresh ginger peeled and grated
    • 1 Tablespoon garlic minced
    • 2 Tablespoons coconut milk OR other non-dairy milk, optional
    Servings: quarts
    Recipe Notes

    Cut large squash chunk into smaller chunks. Then cut rind off and cut remaining squash into large — 2 inch cube — chunks.

    Bring 6 cups of vegetable stock (or water and bouillon) to a boil in a large soup or stock pot. Add squash and cook until tender, about 20-30 minutes, but could vary based on the size of your chunks.

    Drain the squash, but reserve the liquid. Either scoop out the squash with a slotted spoon, or put a colander into a large heat-safe bowl and dump. You will use most, but not all, of the stock to make the soup.

    Saute the onions in the olive oil. When the onions are translucent and beginning to brown, add the ginger, stirring well, and the garlic, also stirring well. When these are fragrant, add the squash; stir well.

    Add about 4 cups of the reserved stock, more if needed to cover all the squash, and bring the entire pot to a boil. Simmer for about 20 minutes.

    Puree the soup, preferably using an immersion blender, but carefully in a blender or food processor if you need to. Add the soup back to the pot if you removed it, and add the coconut milk or other non-dairy milk if using. Taste, and add salt or pepper if needed. Allow to simmer a few more minutes to blend in the milks, and serve hot.


    Share this Recipe
     
    Powered byWP Ultimate Recipe
  • Vegan, soy-free Strawberry Ice Cream (using aquafaba)

    Vegan, Soy-free Strawberry Ice Cream
    Vegan, Soy-free Strawberry Ice Cream

    Okay, full disclosure: This isn’t really ice cream. There’s no cream. There’s no eggs. That’s what makes it vegan. And it’s a little lighter and less creamy and heavy than ice cream. So I should really call it “strawberry frozen dessert.” But frankly, that’s awkward, and if you’re playing in the cooking realms of “vegan” and “allergy-friendly,” you’re used to substitutes, so you know what I mean.

    YOU DON’T NEED AN ICE CREAM MAKER! I have one. It’s great. But this is a quicker and easier and doesn’t require as much planning ahead. This is much easier with a stand mixer, but if you’re patient (or have someone who will spell you with the hand mixer), you can do this without one. I would not try it without any mixer at all, though. Electricity is your friend, here.

    The key “secret” ingredient in this dish is aquafaba or “bean juice.” It’s the stuff you drain out of the can of beans before using them, and I’ve raved about it before on the blog. If you cannot eat canned beans, or would just prefer to make your own, try this recipe posted by noted cookbook author Bryanna Clark Grogan on the Vegan Meringues FB page. You need half a cup here, but I’m sure you can find 100 other uses for it (I have). Aquafaba acts as an egg replacer, specifically egg whites, and can be whipped into an incredible meringue, which is what you start with here. You’ll make the whipped base and the flavor base, and then fold them together and freeze. That’s it!

    In order to get the fat content up and add a little tang and creaminess, I have used vegan cream cheese. I know this can be a problematic ingredient for those with multiple food allergies — I use Daiya brand, as I have no issues with it. I was perfectly happy with Tofutti when I could still eat soy, and I assume that would work here, too. The Daiya contains coconut oil, so it’s not entirely nut-free. I believe Tofutti is. Choose what works for you. If you make a homemade version of cream cheese that works for you, share it with us in the comments.

    Stiff whipped aquafaba foam, foam and strawberry blend, ice cream in the making
    Stiff whipped aquafaba foam, foam and strawberry blend, ice cream in the making

    Vegan, Soy-free Strawberry Ice Cream

    • 1/2 cup aquafaba (liquid drained from a can of beans. Any beans! I used cannellini beans here)
    • 4 Tablespoons sugar, divided in half
    • 1 teaspoon cream of tartar
    • 1/2 cup strawberry puree
    • 2 1/2 Tablespoons vegan cream cheese (check the ingredients!)
    • 1 teaspoon vanilla extract

    Into a very clean bowl (any traces of fat will interfere with the whipping, I understand, just like with egg whites), add the aquafaba. Beat until you achieve stiff peaks. This can take up to 10 minutes, so be patient.

    Slowly add 2 Tablespoons of sugar, while you continue beating, and then the cream of tartar.

    If you’re using a stand mixer and have only one bowl, empty the foam into another bowl and reuse the mixer bowl. If you’re using a hand mixer, just get another bowl. Beat the cream cheese, strawberries, and vanilla until smooth.

    Fold the strawberry mixture into the aquafaba foam using a large spoon or spatula. Don’t stir. Fold. You will lose some of the air you’ve just whipped into the foam, but that’s okay. You just don’t want to lose all of it. When the mixture is fully incorporated, pour into a freezer-safe container and freeze at least 2 hours, maybe more depending on the size and shape of your container(s). This will never be as dense as “normal” ice cream, but it will take on a nice texture, distinct from the original unfrozen mousse.

  • Crispy Cereal Bars (gluten-free, vegan, contains tree nuts)

    Crispy Cereal Bars
    Crispy Cereal Bars

    THIS IS NOT HEALTH FOOD.

    I know that most of you know that granola bars have an unearned reputation as magically healthy. Like most things, they have some benefits, some downsides, and it all depends on a) what goes in them and b) how you define “healthy.” I’m not focused on healthy here, though, so if that’s why you want a granola bar, move on. It also has tree nuts and almonds, so apologies to the nut allergic people out there.

    What I wanted was something like the granola bars of my later childhood — something that’s basically a candy bar, but with a certain crunch and an airy mouthfeel — plus, dipped in chocolate. Just because. I’m not going to try to explain random cravings; I just cook them. We occasionally had these instead of cookies in our packed lunches, and for some reason, they remind me of this time of year — summer isn’t here, but you know it’s coming.

    I started this recipe off to use up a box of Environkidz Chocolate Koala Crisp. (Link informational, not affiliate). I am not a big cereal eater, but I go through phases where I like to eat it as a snack — this wasn’t the right texture or size for that, so it had been sitting on my shelf for a bit. But it was perfect for the main filler in this snack bar — it’s crunchy, airy, and just a bit chocolatey. Any crunchy cereal in small bits will work, so whatever is safe for you, buy that. I would consider using the Erewhon Crispy Brown Rice Cereal, (again, not an affiliate link) as that’s what I generally buy when I want actual cold cereal. But I’ve only made this with Koala Crisp, as I wanted to use that up, and I’d consider buying it again to make these bars.

    To the cereal, I added a bunch of trail mix staples — coconut, almonds, and dried cherries. (Note: dried cranberries or raisins work better, as they are smaller and don’t mess up the overall texture. But I just like dried cherries better.) As an adult, I wanted a little more variety of taste and texture than the kiddy granola bar I remember (but still with chocolate on). Make a sticky sauce (this is messy, I know. Sorry. It works.) and then add chocolate. Ka-blam. Childhood snack. Maybe healthier, maybe not, but it’s safe for me.

    Crispy Cereal Bars -- first without chocolate, then with, then sliced
    Crispy Cereal Bars — first without chocolate, then with, then sliced

    Cereal Snack Bars

    NOTE: dried shredded coconut appears on the ingredients list TWICE. This is not a mistake. I just find it less confusing to list it twice than tell you you need x amount, divided. This is not the sweetened coconut flakes — you could try that, but I think it would be too sweet. This is just pure dried/dessicated shredded coconut, which is wonderful.

    • 1 cup crispy cereal
    • 1/4 cup shredded coconut
    • 1/4 cup smallish dried fruit (I used cherries)
    • 1/4 cup thinly-sliced almonds (could also use chopped, but not whole — they won’t blend in)
    • 3 dates, pitted (about 50g)
    • 2 Tablespoons shredded coconut
    • 2 Tablespoons coconut oil
    • 4 Tablespoons brown rice syrup
    • 1 cup chocolate chips (brand that’s safe for you)

    Prepare an 8×8 inch baking pan by cutting a sheet of parchment that will fit in it. Don’t worry about being exact — just make sure you have enough to cover the bottom and sides when it’s filled.

    Mix the dry ingredients (cereal, coconut, dried fruit, almonds) in a bowl.

    In a food processor, add the dates, 2T shredded coconut, coconut oil (this can be solid, it’s fine), and brown rice syrup. They are in that order because you can use the same tablespoon if you do them in this order (the coconut oil will help the brown rice syrup not stick). Pulse it until the dates are chopped up well, then just blend. You will likely need to scrape the sides a few times, as this is really sticky. I’d suggest a silicone spatula, if you have one, and be careful not to cut it on the blades (I’ve lost a few this way).

    Add the wet ingredients to the dry. It will take a little work to get this out of the food processor. Again, the silicone spatula is the least sticky thing I’ve tried. Using the spatula, mix the wet and dry ingredients. Mostly, this is like kneading bread — bring up a scoop of the dry ingredients and sort of press them into the mass stuck into your sticky goo from the food processor. I am assuming that if you keep working at it, this will eventually incorporate everything. I’ve never managed to do that — I just grease up my hands with a bit of coconut oil and mix with my hands after a bit. It works fine.

    When you have a mostly solid mass of sticky bar ingredients, dump it into your prepared pan and press it down. I don’t worry too much about making it exactly fill the corners — the rustic edges make it look handmade! But always feel free to be more precise than I am.

    Put this in the fridge to set, maybe 15 minutes or so.

    Melt the chocolate. The microwave is easiest (20 second intervals, stirring), but I don’t own one, so I use my double boiler. Originally I had planned to dip each bar in the chocolate, but I realized that the easiest way would be to pour a layer of chocolate onto the whole pan, let it set, and then cut the bars. So do this — it is WAY less messy than dipping and it wastes less chocolate.

    Let the chocolate set, then cut into bars. These keep best in an airtight container in the fridge.

    Enjoy!

  • Carrot Chickpea Curry

    Carrot Chickpea Curry
    Carrot Chickpea Curry

    So I went away for a week and came back to New Hampshire summer. To be honest, as much as we complained about the cold, I wasn’t ready for full-on summer temperatures. If it stays this way, I’ll need to dig out the AC sooner, not later, just to get some sleep. It’s hot! It doesn’t help that my apartment holds the heat like an oven.

    Why, if it’s hot, would I give you hot food — hot in temperature as well as full of spices? Well, first off, it’s not hot everywhere — I hear that if you live in either of the Dakotas or Wyoming, you got snow this weekend. Secondly, hot food is a great way to make it feel cooler. It’s all about contrasts. Actually, this curry tastes great hot or cold, so make it for dinner and eat the leftovers for lunches. Oh! And whether this is “spicy” or “full of spices” is entirely up to you — if you like spicy foods, buy a spicy curry powder. Otherwise, buy a regular or “sweet” curry powder and you get all the flavor without the heat. I always buy sweet curry powder because I can add some cayenne if I want things spicy. There IS coconut in here — Denise and I have both made curry with cashew milk, but never successfully without a nut milk. Let us know if you have a nut-free way to make an Indian-style curry.

    This curry passes all my tests for a weeknight dinner — it takes less than 10 minutes to prep, and while cooking takes about 45 minutes total, only a few of those are active. You will need a skillet with a lid or a cover of foil. I have one skillet with a lid (finally), but I’ve found that because my cast iron skillet holds the heat better and is a slightly different shape, it works better than my lidded skillet. A sheet of heavy duty foil stands in for a lid here and lets the carrots steam to perfection.

    Carrot Chickpea Curry
    Carrot Chickpea Curry

    Carrot Chickpea Curry

    • 1 Tablespoon olive oil
    • 1/2 sweet onion (about 1/2 cup), chopped
    • 1/4 teaspoon kosher salt
    • 1 teaspoon chopped garlic (about 2 cloves)
    • 5 carrots, peeled and sliced in rounds
    • 1 can (15 oz.) chickpeas/garbanzo beans, drained and rinsed
    • 1 Tablespoon curry powder
    • 1 teaspoon cinnamon
    • 4 teaspoons cilantro
    • 3 Tablespoons coconut milk
    • 1 teaspoon ginger
    • rice to serve curry over, if desired

    Heat your pan over medium heat. When the pan is hot, add the olive oil. When the oil is hot, add the onions. Stir well to coat with oil, then sprinkle with salt. Cook, stirring occasionally, until the onions start to lightly brown.

    Add the garlic and stir until fragrant. Then add the carrots and beans, and the curry and cinnamon. Stir everything well until the spices are fully spread over everything.

    Now cover and cook for 15 minutes. There are two ways to do this — if you like browned bits, just let it go for the full 15 minutes. And I do mean browned, not burned. If you prefer no browned carrots or onions, stir it once or twice during the cooking time.

    Then add the cilantro, coconut milk, and ginger. Stir well, and cook another 5-10 minutes, stirring every few minutes.

    Serve over rice, or if you’re feeling less like rice, over greens for a salad.