Notice: Function _load_textdomain_just_in_time was called incorrectly. Translation loading for the wp-ultimate-recipe domain was triggered too early. This is usually an indicator for some code in the plugin or theme running too early. Translations should be loaded at the init action or later. Please see Debugging in WordPress for more information. (This message was added in version 6.7.0.) in /home/maryzahc/public_html/adultfoodallergies.com/wp-includes/functions.php on line 6121
Soy-free – Page 18 – surviving the food allergy apocalypse (archive)

Tag: Soy-free

Contains no soy.

  • Citrus-spiced Beef Short Ribs

    Citrus-spiced Beef Short Ribs with mashed potatoes and green beans
    Citrus-spiced Beef Short Ribs with mashed potatoes and green beans

    There are two times of the year when I want to eat like the midwesterner I am — dead of winter, and height of summer. And by that, I mean there are two times of the year when I think of meat, first, and then figure out what goes with it. In the summer, I just want to grill things. But in the dead of winter, I want hearty meat and potatoes and veg meals. When I was at the grocery store browsing the meat section, I found some beef short ribs that just looked good — I’d never cooked beef ribs before, nor short ribs of any sort, but trying new things is sort of the point of this blog. So I bought them.

    I looked up some things online — a few recipes for beef short ribs in particular, as well as some technique-focused posts on braising. I followed this post for the cooking technique, more or less. And I decided to go with a sort of sweet-and-spicy, braised in the oven beef dish. It was definitely a winner, and this is a perfect mid-winter dinner — it’s hearty and warm and sort of comforting. I highly suggest serving with mashed potatoes, and I added green beans for the vegetable. I’m thinking that bok choy might taste great with the sauce, though.

    A note on the sauce — the beef gets just a hint of the spice of the red pepper flakes. The sauce itself, which still contains the actual flakes, is a good deal spicier. Adjust the measurement according to your tastes.

    Ideally, use one covered pot or pan that you can do the stove top searing and then the oven braising in — fewer dishes is good for sanity and the environment, plus all the flavor stays together. If you have a Dutch oven, this is the time to use it. As soon as I sort out enough stuff in my storage area to create space to store one, I am buying one. I used my cast iron skillet and covered it tightly with foil as it doesn’t have a lid. This worked great, although I do need to re-season after cooking with an acidic citrus juice for a few hours. It was worth it.

    Citrus-spiced Beef Short Ribs
    Citrus-spiced Beef Short Ribs

    Citrus-spiced Beef Short Ribs

    • 1.5 lbs beef short ribs, bone in, separated into individual bones
    • salt and pepper to season the ribs
    • 1/2 of a medium (baseball-sized) onion, halved and sliced thin (I prefer sweet onions)
    • large pinch of salt (probably about 1/8 teaspoon)
    • 1 Tablespoon of minced garlic
    • 1/2t – 2t crushed red pepper flakes, adjusted to taste
    • 1 teaspoon sugar (optional)
    • 1 large grapefruit, juiced, with pulp in OR 1 cup of grapefruit juice
    • 1.5 inches of ginger, peeled and sliced into rounds
    • 2 Tablespoons coconut amino acids, gluten-free tamari, or faux soy sauce
    • 1/2 cup warm water

    Preheat the oven to 325ºF.

    Heat your chosen cooking vessel over medium high heat. If you’re not using a seasoned cast iron pan, brush or spray just a light coat of oil on the pan’s surface.

    Season your short ribs with salt and pepper, both sides. When the pan is hot, add the ribs. Sear well on both sides, and I also seared the edges of the few really thick ones. More flavor is always worth the effort. Remove the seared ribs to a plate.

    Add the onions with a pinch of salt, and cook until translucent. Then add the garlic and cook, stirring, until starting to turn golden. Add the pepper flakes and stir (but also, stand back and don’t breathe the steam right away!). Scooping all of this to one side of the pan, add the ribs back and then spread the onion-garlic-pepper mix over them.

    If using, sprinkle the sugar on the ribs. Scatter the ginger slices, add the coconut aminos, and then add the grapefruit juice and water. Cover your pot or pan, and slide it into the oven. Cook for 2.5 hours.

    After removing from the oven, let the dish sit for at least 15 minutes. I then sliced through the thin membrane holding the meat to the bones so I could just serve the meat. Serve topped with the pan sauce, but leave the ginger rounds out.

    As the post from The Kitchn suggested, if you find beef ribs to be fatty, you can either trim the fat (not all that highly suggested for this cooking method) OR cook them ahead of time and scoop the fat off the cooled sauce. I didn’t find them to be too greasy or fatty this time around, and enjoyed the richer sauce over mashed potatoes. Your tastes may vary, so know that this is an option.

    Enjoy with mashed potatoes and the vegetable of your choice.


  • Plum Sauce

    Plum Sauce
    Plum Sauce

    I have another canning inspired recipe for you. I made and canned plum sauce because I wasn’t able to find a safe commercial version for me, and because I eat a lot of Asian and Asian inspired food. Since I’ll be using this as a condiment for some of the dishes that are coming up, I decided to post a version that you can do without canning. If you want to can this recipe, it’s found in the Ball Complete Book of Home Preserving on page 285 (linked to Amazon for convenience, no affiliation). I’ve cut the quantities down so that it only makes about a pint of sauce, so that you can use it before it goes bad without canning it. If I’m overestimating your potential use, you could also freeze half of it.

    Plum Sauce

    • 1/2 cup of brown sugar (make sure it’s safe for you, I corn-ed myself good by not reading labels on brown sugar once. If it says inverted sugar on it, don’t buy it if you’ve got an allergy to corn)
    • 1/4 cup of granulated sugar
    • 1/4 cup of apple cider vinegar (Bragg’s is generally safest for corn allergies)
    • 3 Tablespoons of finely chopped onion
    • 1/2 Tablespoon of finely chopped jalapeno or other green chili pepper
    • 1/2 Tablespoon of mustard seeds
    • 3/4 teaspoon of salt
    • 1/2 – 1 clove of garlic (recipe converted calls for half a clove, but if you like garlic, by all means use it up)
    • 3/4 teaspoon of fresh grated ginger
    • 2 1/2 cups of pitted, finely chopped plums

    In a large stainless steel or other non-reactive (ceramic or enamel, do not use aluminum or cast iron) pot, add the brown sugar, granulated sugar, vinegar, onion, jalapeno, mustard seeds, salt, garlic, and ginger. Bring to a boil over high heat, stirring constantly. Add the plums, and return the mixture to a boil. Then reduce the heat and boil gently stirring occasionally until the mixture is thick and syrupy, about 2 hours.

    Since this recipe is not being canned, at this point you could choose to use a stick blender to puree the mixture to a smooth consistency. (Note: If you are canning the recipe, follow the directions in the Ball Complete Book of Home Preserving and do not puree the sauce. You could be risking botulism otherwise.)

    Let the sauce cool, and once cool enough, place in a container in the fridge (or freeze some) to store. I usually put mine in a squeeze bottle so that I can use it like ketchup.

    Enjoy!

  • Crock Pot Chicken Stock, a concept

    Crock Pot Chicken Stock in jars
    Crock Pot Chicken Stock in jars

    Here’s your thought experiment for this bright Monday: you live in New England. The snow piles are so high that you, in your sensible, fuel-efficient sedan, can’t see to turn corners. Another blizzard is predicted — the third in a few weeks — to last two days. But you live in New England, and you ignore it. Without really planning it, you get snowed in for two days. You could, were you industrious, brush the car off, shovel it out, brave the roads and hit the grocery store. Or you could scavenge in your own well-but-bizarrely-stocked kitchen and not bother to get dressed. Surely there’s enough food in there for two days.

    What do you do?

    You can start with soup. What I love about stock is that it’s a way to not waste bits and pieces — you get stock! This also means, though, that there is no real recipe for stock. I mean, you can write one. We have before. But this one is more of a concept than a recipe. I read something somewhere, likely on Facebook, about making stock in your crock pot. I think I may have linked it on a Friday. I mean, brilliant, right? So if you have a snow day, are not sure what to eat once you’ve demolished the leftovers in the fridge, and own a crock pot, this recipe is for you. Even if it’s not snowing. And even though this isn’t really a recipe.

    Stock full of ingredients
    Stock ingredients

    Basic technique: Fill crock pot with stock ingredients. Fill with water. Cook for about a day.

    But here’s what I do: I collect things in the freezer. When I roast a chicken or buy a rotisserie one, I keep any skin I don’t eat and all the bones — throw them in a bag in the freezer. Add other things you aren’t using — some leftover vegetables you don’t finish, mushroom stems, the quarter of an onion you don’t need for that recipe, the herbs you bought and don’t need all of. Don’t add celery — it just turns to mush in the freezer– and I’m not a fan of brassicas in stock at all (broccoli, cauliflower, cabbage) because they are very strong. Everything else? Fair game.

    This stock I took photos of started with a chicken I cooked, leaving all the skin and bones and one whole thigh (I got sick of chicken that week). I also added a bag of “leftovers” from the freezer — mushroom stems, probably three quarters of an onion, and some peas. I did thaw these for a bit, but I’ll tell you my secret cheat for that in a minute.

    To this cache from the freezer, I added everything that was still good in the fridge — a few handsful of parsley, a small bunch of thyme, a few carrots, some sad celery with the brown bits cut off, and a tablespoon or so of salt. Sometimes, I add peppercorns. Sometimes, I’ll roast some of the veg first; this adds great flavor, but it’s not necessary for good stock. If you have no fresh herbs, add some dried. I usually add a bay leaf, but I was out this time around. Thyme, basil, oregano, dill — all are good in stock. Add what sounds good. You can also add a bit of tomato paste, but this time, I had just finished a jar of pasta sauce for lunch, so I rinsed it out and added that water to the stock, too.

    Pack all this in your crock. Then fill the crock with water. Put on the lid and cook. It really is that easy. Cook 4-6 hours on high (recommended if you started with anything frozen), or 8-12 on low. I’ve never overcooked stock, so I think this is a pretty forgiving recipe.

    IF you have started with some frozen or partially frozen parts, here’s how to cheat — generally, crock pots don’t do well with frozen foods. They just don’t get hot enough. I thaw things for a few hours or overnight in the fridge first, but then I add a few cups of boiling water. Not starting from cold seems to help. You can also run the pot on high for the first hour and then turn it down.

    When your stock is done, you want to strain out all the “stuff” you just extracted flavor from — I use a giant kitchen bowl with a colander in it. Dump the entire pot in, and then lift out the colander full of bones and vegetables.

    If you plan to use plastic to store your stock, let it cool to room temp first. If you’re using jars, it works fine to pour it in hot. Stock should keep about 5 days in the fridge, and a few months in the freezer. Or, hey, get fancy and make some risotto right away with the hot stock.

    Let us know if there are any particular ingredients you love in stock!

  • Chocolate Covered Peppermint Marshmallows

    Chocolate Covered Peppermint Marshmallows

    Chocolate Covered Peppermint Marshmallows - Photo by J. Andrews
    Chocolate Covered Peppermint Marshmallows – Photo by J. Andrews

    Because we needed candy for the holidays, we decided to experiment with the marshmallow recipe we’d already posted, to add peppermint flavoring and cover them in chocolate. These would also be a great Valentine’s Day treat. Normally I’d list out the ingredients in the order that you’re going to use them, but since you’re going to have to make some ingredients ahead of time, I’ve listed those first. These marshmallows are a bit sturdy because they needed to hold up to being dipped in chocolate, but if you want them to be lighter with a little less structure, knock back the amount of gelatin by a tablespoon.

    Marshmallows:

    Ingredients:

    • 1 1/4 cup of cane sugar syrup (You will need to make it ahead of time – there are two good recipes and I’ve used both before. The one from thekitchn.com makes about a quart, and the one from justapinch.com makes about two cups.) 
    • 1 1/2 cups of powdered sugar (You will need to make it ahead of time – here’s a recipe from glutenfreegigi.com on how to do it. I used tapioca starch, or Trader Joe’s has a powdered sugar that uses tapioca starch instead of corn starch, but check the labels every time.) 
    • 1-2 Tablespoons of homemade peppermint extract or 4-5 drops of peppermint essential oil (To make my extract, I used dried peppermint and spearmint leaves in place of fresh, as described here. I use either Vikingfjord  or Luksusowa Vodka because they are made only from potatoes, where some vodkas may also use grain or corn.)
    • 4 Tablespoons of unflavored gelatin powder (Knox or Great Lakes are generally regarded as being okay if you’re not super sensitive to corn, again no affiliation with Amazon, just linking for reference)
    • 1 1/4 cups of cold water, divided
    • 1 1/2 cups of cane sugar (make sure you use a safe-for-you brand)
    • 1/8 teaspoon of salt
    • 1/2 cup tapioca starch (You could also use potato or arrowroot starch, whatever’s safe for you)
    • safe-for-you-oil for greasing the pan or you can use the oil in an oil mister as well
    • safe for you chocolate for melting – We used Dancing Lion’s Dark Chocolate for Baking, a product that is no longer available

    Kitchen Stuff you will need:

    • Stand mixer with the whisk beater attached
    • candy thermometer that will clip on the side a saucepan
    • 3 or 4 quart saucepan
    • 9 x 13 baking pan or another flat container to spread out your marshmallows
    • a pizza cutter or a sharp knife
    • the normal assortment of bowls, measuring cups, spatulas, forks or whisks and so on

    Grease or spray your baking pan with the oil. Use a paper towel to wipe the pan and make sure that every surface is coated in a thin layer of oil. Put the baking pan and a spatula next to your stand mixer, which should already have the whisk beater on it and your splatter guard ready to go.

    Mix a 1/2 cup of cold water in a measuring cup along with the peppermint extract or peppermint oil. Put the gelatin into the bowl of the stand mixer, and pour the water and vanilla mixture over it while whisking it with a fork or a small whisk. Mix until there are no lumps. Put the bowl back into your stand mixer and attach it.

    Gelatin, water, and vanilla extract well mixed
    Gelatin, water, and vanilla extract well mixed

    Place your saucepan on the burner and clip your candy thermometer to the side of the saucepan. Add the rest of the water (3/4 of a cup), and add the cane sugar, cane sugar syrup and salt. Don’t stir it up.

    water, sugar, cane sugar, syrup and salt with candy thermometer
    water, sugar, cane sugar, syrup and salt with candy thermometer

    Place the saucepan over high head and bring it to a rapid boil. Boil until the sugar mixture measures some where between 245ºF and 250ºF. Don’t let it go any higher than 250ºF. Take the saucepan off the burner and remove the candy thermometer.

    Sugar mixture at a boil
    Sugar mixture at a boil

    Turn on the stand mixer to medium and CAREFULLY pour the sugar mixture down the side of the stand mixer bowl. There will be some bubbling, so go slowly. Also it will freaking burn and hurt if you spill it on yourself, so please don’t.

    When all the sugar mixture is in the mixing bowl and is mixed to together, make sure your splatter guard is down and increase the mixing speed to high.  Continue to mix on high for 10 minutes. Make sure you do the full 10 minutes.

    Whipping marshmallow mixture
    Whipping marshmallow mixture

    Once the ten minutes is up, do not dally, get the marshmallow mixture into the baking pan as fast as you can as it will start to cool really fast, and you want to be able to spread it out in the pan. Use a spatula to scrap out the bowl, but it’s really think and sticky, so you won’t get every bit out. Once it’s in the pan, spray or coat your hands with your oil and spread out the marshmallow evenly.

    Marshmallows spread evenly in baking pan
    Marshmallows spread evenly in baking pan

    Let the marshmallows sit uncovered and at room temperature for 6 or more hours. Don’t let it go any longer than 24 hours though. Once they have cooled, mix your powdered sugar and tapioca starch in a bowl.

    Powder sugar and tapioca starch mixture
    Powder sugar and tapioca starch mixture

    Take a large cutting board or cookie sheet and sprinkle some of the powdered sugar mix on it.  Then sprinkle the top of the marshmallow in the pan with the mixture and smooth it out over the surface. Flip the pan over onto your cutting board. Once you’ve got them out of the pan, sprinkle more of the mixture over the top of the marshmallow layer that was previously on the bottom of the pan.

    Marshmallows powered before cutting
    Marshmallows powered before cutting

    Cut your marshmallows using a sharp knife or a pizza cutter into small squares.

    Marshmallow pieces cut by pizza cutter
    Marshmallow pieces cut by pizza cutter

    Put each square in the bowl with the powdered sugar and tapioca and toss it until coated thoroughly. (If you have extra marshmallow coating afterwards, put it in a jar and use it the next time.)

    Marshmallow being tossed in marshmallow coating
    Marshmallow being tossed in marshmallow coating

    Once you’re done with your marshmallows, it’s time to dip them in chocolate. You can melt in a double boiler, but our resident Master Chocolatier, Rich Tango-Lowy, at the Dancing Lion in Manchester, New Hampshire, recommends the use of the microwave because you don’t want to get any water in the chocolate which would ruin the crystalline structure. There’s all kinds of science on chocolate tempering that Rich explained at a lecture Mary Kate and I attended, but for our purposes, being lowly food bloggers, putting the chocolate in a microwave safe Pyrex or Corning ware container, and nuking it for ten seconds, checking it and repeating that until it’s melted (make sure you don’t burn it) works for us.

    We used a cookie sheet covered with parchment paper to place our dipped marshmallows while they cooled. Dip your marshmallows in the chocolate, or simply drizzle the chocolate over the top.  We ended up mostly drizzling because we were making too big a mess with the dipping process.

    Chocolate Covered Peppermint Marshmallows - Photo by J. Andrews
    Chocolate Covered Peppermint Marshmallows – Photo by J. Andrews

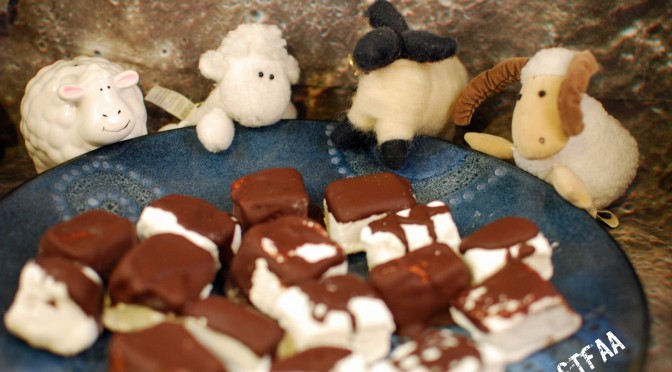
    Bonus picture because Mary Kate and Jack decided to play with my stuffed sheep collection when I left Mary Kate and Jack unattended in my apartment for a short period of time:

    Chocolate Covered Peppermint Marshmallows with Sheep - Photo by J. Andrews
    Chocolate Covered Peppermint Marshmallows with Sheep – Photo by J. Andrews

    Enjoy!

  • Blood Orange Broccolini

    Blood Orange Broccolini
    Blood Orange Broccolini

    Okay, as Denise and I raved on Friday, it is officially citrus season up here in New England, which means someone has trucked citrus fruit all the way up to the frozen north. After two years of just eating or juicing the citrus, I’m finally starting to try cooking with them beyond. I’ve been marinating and dressing and mixing and playing and it’s brilliant. Let me share my favorite side dish so far.

    Broccolini was kind of a cheat for me. I could happily eat broccoli every single day and not get too bored, but it seems like we should eat more than just one vegetable, right? So the other night when I was tempted to pick up more broccoli at the store, I decided on a bunch of broccolini instead. Turns out that broccolini is not just a different stage of broccoli’s growth. Broccolini is a hybrid of broccoli and another vegetable I’m not particularly familiar with (kai-lan, an Asian vegetable I’ve never cooked). A quick internet search tells me it was developed in the early 1990s and made it to the US in the late ’90s. It has tender stems and less dense tops, and it’s a nice variation on broccoli. The flavor is pretty similar, but greener and more mild.

    This recipe cooks both the long tender stems and the tops, but adding the stems first so they will be done when the tops are, with neither part overdone. It also takes two pans, but I think it’s worth it. I’ve cooked the sauce first and set it aside while cooking the broccolini. When chopping up the broccolini, I’ve pulled off all the “tops” that are on lower stems, too.

    From top left: whole raw broccolini, blood orange and squeezed juice, finished sauce, and toasted garlic in Earth Balance margarine
    From top left: whole raw broccolini, blood orange and squeezed juice, finished sauce, and toasted garlic in Earth Balance margarine

    Blood Orange Broccolini

    • 2 Tablespoons Earth Balance or other safe-for-you fat or oil (if you are not using a margarine or butter, add a pinch of salt to your oil)
    • 1 Tablespoon chopped garlic
    • 3 Tablespoons fresh-squeezed blood orange juice (about 1/2 an orange)
    • 2-3 teaspoons olive oil
    • 1/2 teaspoon salt, divided
    • 1 bunch broccolini, stems and tops chopped separately

    Melt your Earth Balance in a small skillet or sauce pan over medium low heat. When foamy, turn the heat a notch or two on your stove — you want basically the point between low and medium, wherever that is for you. Add the garlic, stir well, and cook over this low heat for about 10 minutes or so. Garlic should be caramel brown when you’re done. Remove from heat and set aside. When it’s no longer hot, stir in the blood orange juice.

    Heat a large skillet over medium heat. When hot, add the broccolini stems and about 1/4 teaspoon salt. I’ll be honest — I almost never remember to measure salt in cooking (baking is different). I just added a large pinch. When the stems start to get a little browned, stir in the tops and another pinch of salt. Keep stirring every few minutes until the stems and tops are just barely fork-tender.

    Add the sauce, stir well, and heat it all together for 2 or 3 minutes. Scrape the pan well to get all the garlicky goodness out and stir to coat all the broccolini well.

    Enjoy.

    blood orange broccolini
    blood orange broccolini
  • Green Tomatillo Rice


    Green Tomatillo Rice
    Green Tomatillo Rice

    I needed a really simple dinner the other night because I wasn’t all that hungry, but I had to eat something and it was already 10:00 p.m. (I really need to stop doing that kind of thing.) So since I’m trying to work through all this rice that I keep buying at Asian markets because I cannot walk away from how inexpensive it is compared to regular grocery stores, I decided to throw a rice thing together. I liked it enough that I’ll make it again, and I can see this as being a great side dish to go with tacos (or in my case, taco salads, as I haven’t found a safe tortilla recipe I can stand) or with fajitas.

    Green Tomatillo Rice

    • 1 Tablespoon of olive oil, or other oil that’s safe for you
    • 1 cup of rice (I used sushi rice because that’s what I’m trying to use up, but any rice would work, arborio would be lovely)
    • 1 medium onion, peeled and diced
    • 1 clove of garlic, peeled and minced
    • 1 – 16 ounce jar of green tomatillo salsa that’s safe for you (I used my home-made, home-canned version)
    • 2 to 2 1/2 cups of water, depending on how tender you like your rice
    • 1 to 2 Tablespoons of minced fresh cilantro (optional)

    In a large skillet with a lid, add the oil, rice, onion and garlic, and stir with a spatula over medium heat. When the onion is translucent, add the water, salsa and cilantro, and stir to mix thoroughly. Turn the heat to medium high, put the lid on and bring the rice mixture to a boil. When the rice mixture reaches a boil, stir it, put the lid back on, and bring the heat down until the mixture just simmers.  Simmer for 10 to 20 minutes, until the rice is tender, and the sauce is thick.

    Enjoy!


    Green Tomatillo Rice
    Green Tomatillo Rice
  • Cottage Pie

    Cottage Pie
    Cottage Pie

    This recipe comes out of a birthday request. In my family, tradition was that on your birthday, you pick what we have for dinner. This weekend was a birthday, and the request was a cottage pie. I’ve never made cottage pie, so I did a bit of searching.

    So, here in New England, a meat pie topped with potatoes is called Shepherd’s Pie no matter what type of meat goes into it. As far as I learned, Shepherd’s Pie is lamb and gravy topped with mashed potatoes and baked. You know, shepherds? Sheep? Cottage Pie is the same basic idea but using beef as the meat. The internet has a variety of ideas about what cottage pie should be, from a basic lamb-based shepherd’s pie to a tomato sauced ground beef topped with potatoes and cheese. The former is poorly named, and the latter just sounds like casserole to me.

    What I wanted for this was a ground beef, gravy, and vegetable pie topped with lovely browned mashed potatoes. Anything topped with potatoes is bound to be good, right? To add a bit of extra flavor, browned the onions quite well, and used mushrooms, arrowroot starch, and balsamic vinegar in the gravy. For veg, I’ve added corn, carrots, and celery. I think this recipe is pretty versatile — change up the veg for what you think you’ll like best, and make it your way — just let us know how it turned out.

    Cottage Pie is served, with garnish
    Cottage Pie is served, with garnish

    Cottage Pie

    • 1 lb. ground beef
    •  salt and pepper, to taste
    • 1 Tablespoon olive oil or reserved beef fat
    • 3/4 – 1 cup medium onion, sliced thinly
    • salt, to taste
    • 1 cup carrots, finely chopped (about 3)
    • I cup celery, finely chopped (about 3 outer stalks)
    • 1 cup corn, frozen (optional)
    • 2 Tablespoons fat of your choice*
    • 1/4 to 1/2 cup baby bella mushrooms, finely chopped (optional)
    • 2 Tablespoons arrowroot starch
    • 1 1/2 teaspoons fresh thyme leaves
    • 1 to 1 1/2 cups beef broth
    • 1 Tablespoon balsamic vinegar (check to be sure this is “safe”)
    • 2 lbs potatoes, peeled and roughly chopped
    • 2 Tablespoons Earth Balance or other margarine or fat
    • 1/2 cup non-dairy milk of your choosing, heated to at least room temp, if not a little warmer
    • salt and pepper, to taste
    • fresh parsley, chopped (optional)

    Heat a large skillet over medium heat. If you have a skillet that you can use a whisk in (i.e. not non-stick), use it. Brown ground beef, breaking it up. Add salt and pepper to the cooking beef, adjusted to your taste. Remove beef, leaving any fat in the pan — I used a lean beef, so there was almost none, but if there is some, you can either use it to cook the onions or to make the gravy. If you want it for gravy, set it aside. Put the beef in a greased casserole that will hold all your ingredients.

    In the remaining drippings or in 2 T of olive oil, add the onion and brown to the point of caramelization. This takes some time! Probably close to 40 minutes. Be patient, stir occasionally, and know that this pays off in flavor. When the onion is almost done, add the carrots, stir and let cook a few minutes. Then add the celery, do the same, and finally, add the corn and just let it thaw. Add the cooked veg  to the beef, and stir it up.

    In the pot or pan you’ve been using, add the reserved grease OR 2 tablespoons of fat — margarine, oil, whatever — and heat. If you’re using the mushrooms, add them to the hot fat.Whisk in the arrowroot starch and cook this paste for a few minutes, and then gradually add 1 cup of the beef broth or stock, whisking continually. When you have a slightly liquid-y gravy, add the balsamic and cook until the vinegar smell dissipates. Add thyme, and cook a few more minutes, adding a little more beef stock if you need to thin the gravy. Taste, and add salt and pepper if needed. Pour the gravy over your meat and veg, stir and set aside.

    Make potatoes! Boil the potatoes in salted water until soft when pierced with a fork. Drain and mash with your margarine and non-dairy milk, adding the non-dairy milk gradually. You want a consistency that you can pipe, if you’re going to do that, so aim that direction while mashing. Taste, add salt and pepper if needed.

    If you are piping the potatoes, let the cool to just above room temperature, and then load your piping bag and make pretty designs on top of your casserole. Bake 25 minutes if you’ve just finished making everything, 30-40 minutes if you refrigerated the casserole, at 350ºF.

    Top with more of the optional chopped parsley, because it’s pretty, and serve.

  • Microwave Individual-ish Chocolate Wacky Cake

    Microwave Individual-ish Chocolate Wacky Cake
    Microwave Individual-ish Chocolate Wacky Cake

    You know how there are those brownie in a mug recipes out there? And how none of them work for those of us with food allergies who need a really quick cake fix and (1) can’t wait 35-40 minutes for a cake to bake, or (2) can’t eat a whole cake before it goes stale?  Well, now you can have a nice smallish cake that cooks in the microwave in between 7-8 minutes, which is good, or really bad, depending on your perspective. I’ve eaten a lot of cake in the last week getting this recipe right, and I think the psyllium really rocks. It gives the cake a consistency and body similar to that of a regular cake with regular flour.  I give you almost instant cake. You’re welcome!

    Microwave Individual-ish Chocolate Wacky Cake

    Makes 8 inch round cake.

    • a bit of olive oil, or another mild oil that’s safe for you, to grease the pan
    • 3/4 cup of all purpose gluten-free flour mix (I used Cara Reed’s mix from her blog, Fork and Beans)
    • 2 Tablespoons of cocoa powder that’s safe for you (I used Penzey’s Dutch Process although some that are allergic to corn cannot tolerate it)
    • 1/2 cup of sugar
    • 1/2 teaspoon of baking soda
    • 1/4 teaspoon of salt
    • 1/2 teaspoon of rice wine vinegar, or other mild vinegar that’s safe for you
    • 1/2 teaspoon of vanilla extract  (Here’s a bunch of recipes for vanilla extract, make sure to use safe alcohol if corn or wheat are an issue for you. I use either Vikingfjord  or Luksusowa Vodka because they are made only from potatoes, where some vodkas may also use grain or corn.)
    • 4 Tablespoons olive oil, or another mild oil that’s safe for you
    • 1  Tablespoon of whole husk psyllium (no affiliation with Amazon, just linking so you can see the product)
    • 1/2 cup of water (water amounts are provided separately because they are used at different points in the recipe)
    • 1/4 cup of water and 3 Tablespoons of water

    Grease a microwave safe 8 inch piece of stoneware, Corning ware or Pyrex, with your safe oil. Set aside.

    In a large mixing bowl, add the AP gluten-free flour mix, cocoa powder, sugar, baking soda, and salt, and use a whisk to combine the dry ingredients thoroughly.

    In a small bowl, whisk the psyllium and 1/2 cup of water together thoroughly. It will jell up fairly quickly.

    Make three little depressions or wells in the dry mix, add the vanilla to one, the oil to another and the vinegar to the third. Add the psyllium mixture and the remaining water water to the bowl, and mix with the whisk until the mixture is mostly smooth. The psyllium is going to make things a bit lumpy, so don’t worry about that.

    Pour the cake batter into your greased pan, and microwave on high for 7-8 minutes (my microwave is 1100 watts, times may vary with different microwaves) or until the cake pulls away from the edge of the pan.

    Microwave Individual-ish Chocolate Wacky Cake
    Microwave Individual-ish Chocolate Wacky Cake

    Let the cake cool, and then cut and serve, or just eat it out of the pan.

    Microwave Individual-ish Chocolate Wacky Cake
    Microwave Individual-ish Chocolate Wacky Cake

    Enjoy!