Notice: Function _load_textdomain_just_in_time was called incorrectly. Translation loading for the wp-ultimate-recipe domain was triggered too early. This is usually an indicator for some code in the plugin or theme running too early. Translations should be loaded at the init action or later. Please see Debugging in WordPress for more information. (This message was added in version 6.7.0.) in /home/maryzahc/public_html/adultfoodallergies.com/wp-includes/functions.php on line 6131 Gluten-free – Page 10 – surviving the food allergy apocalypse (archive)
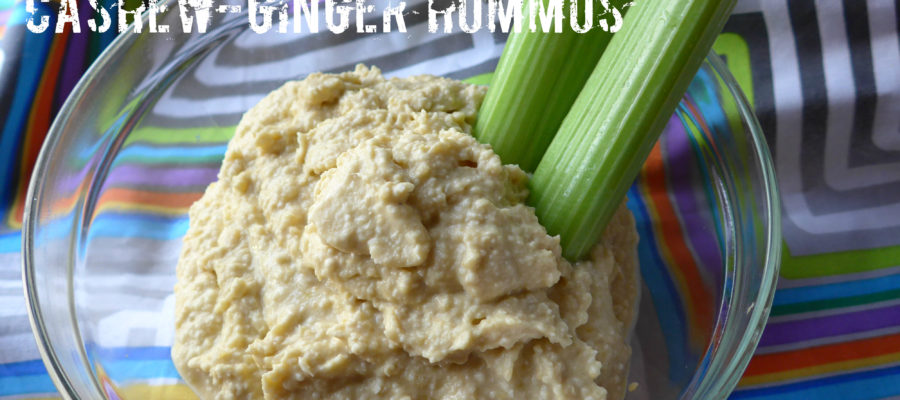
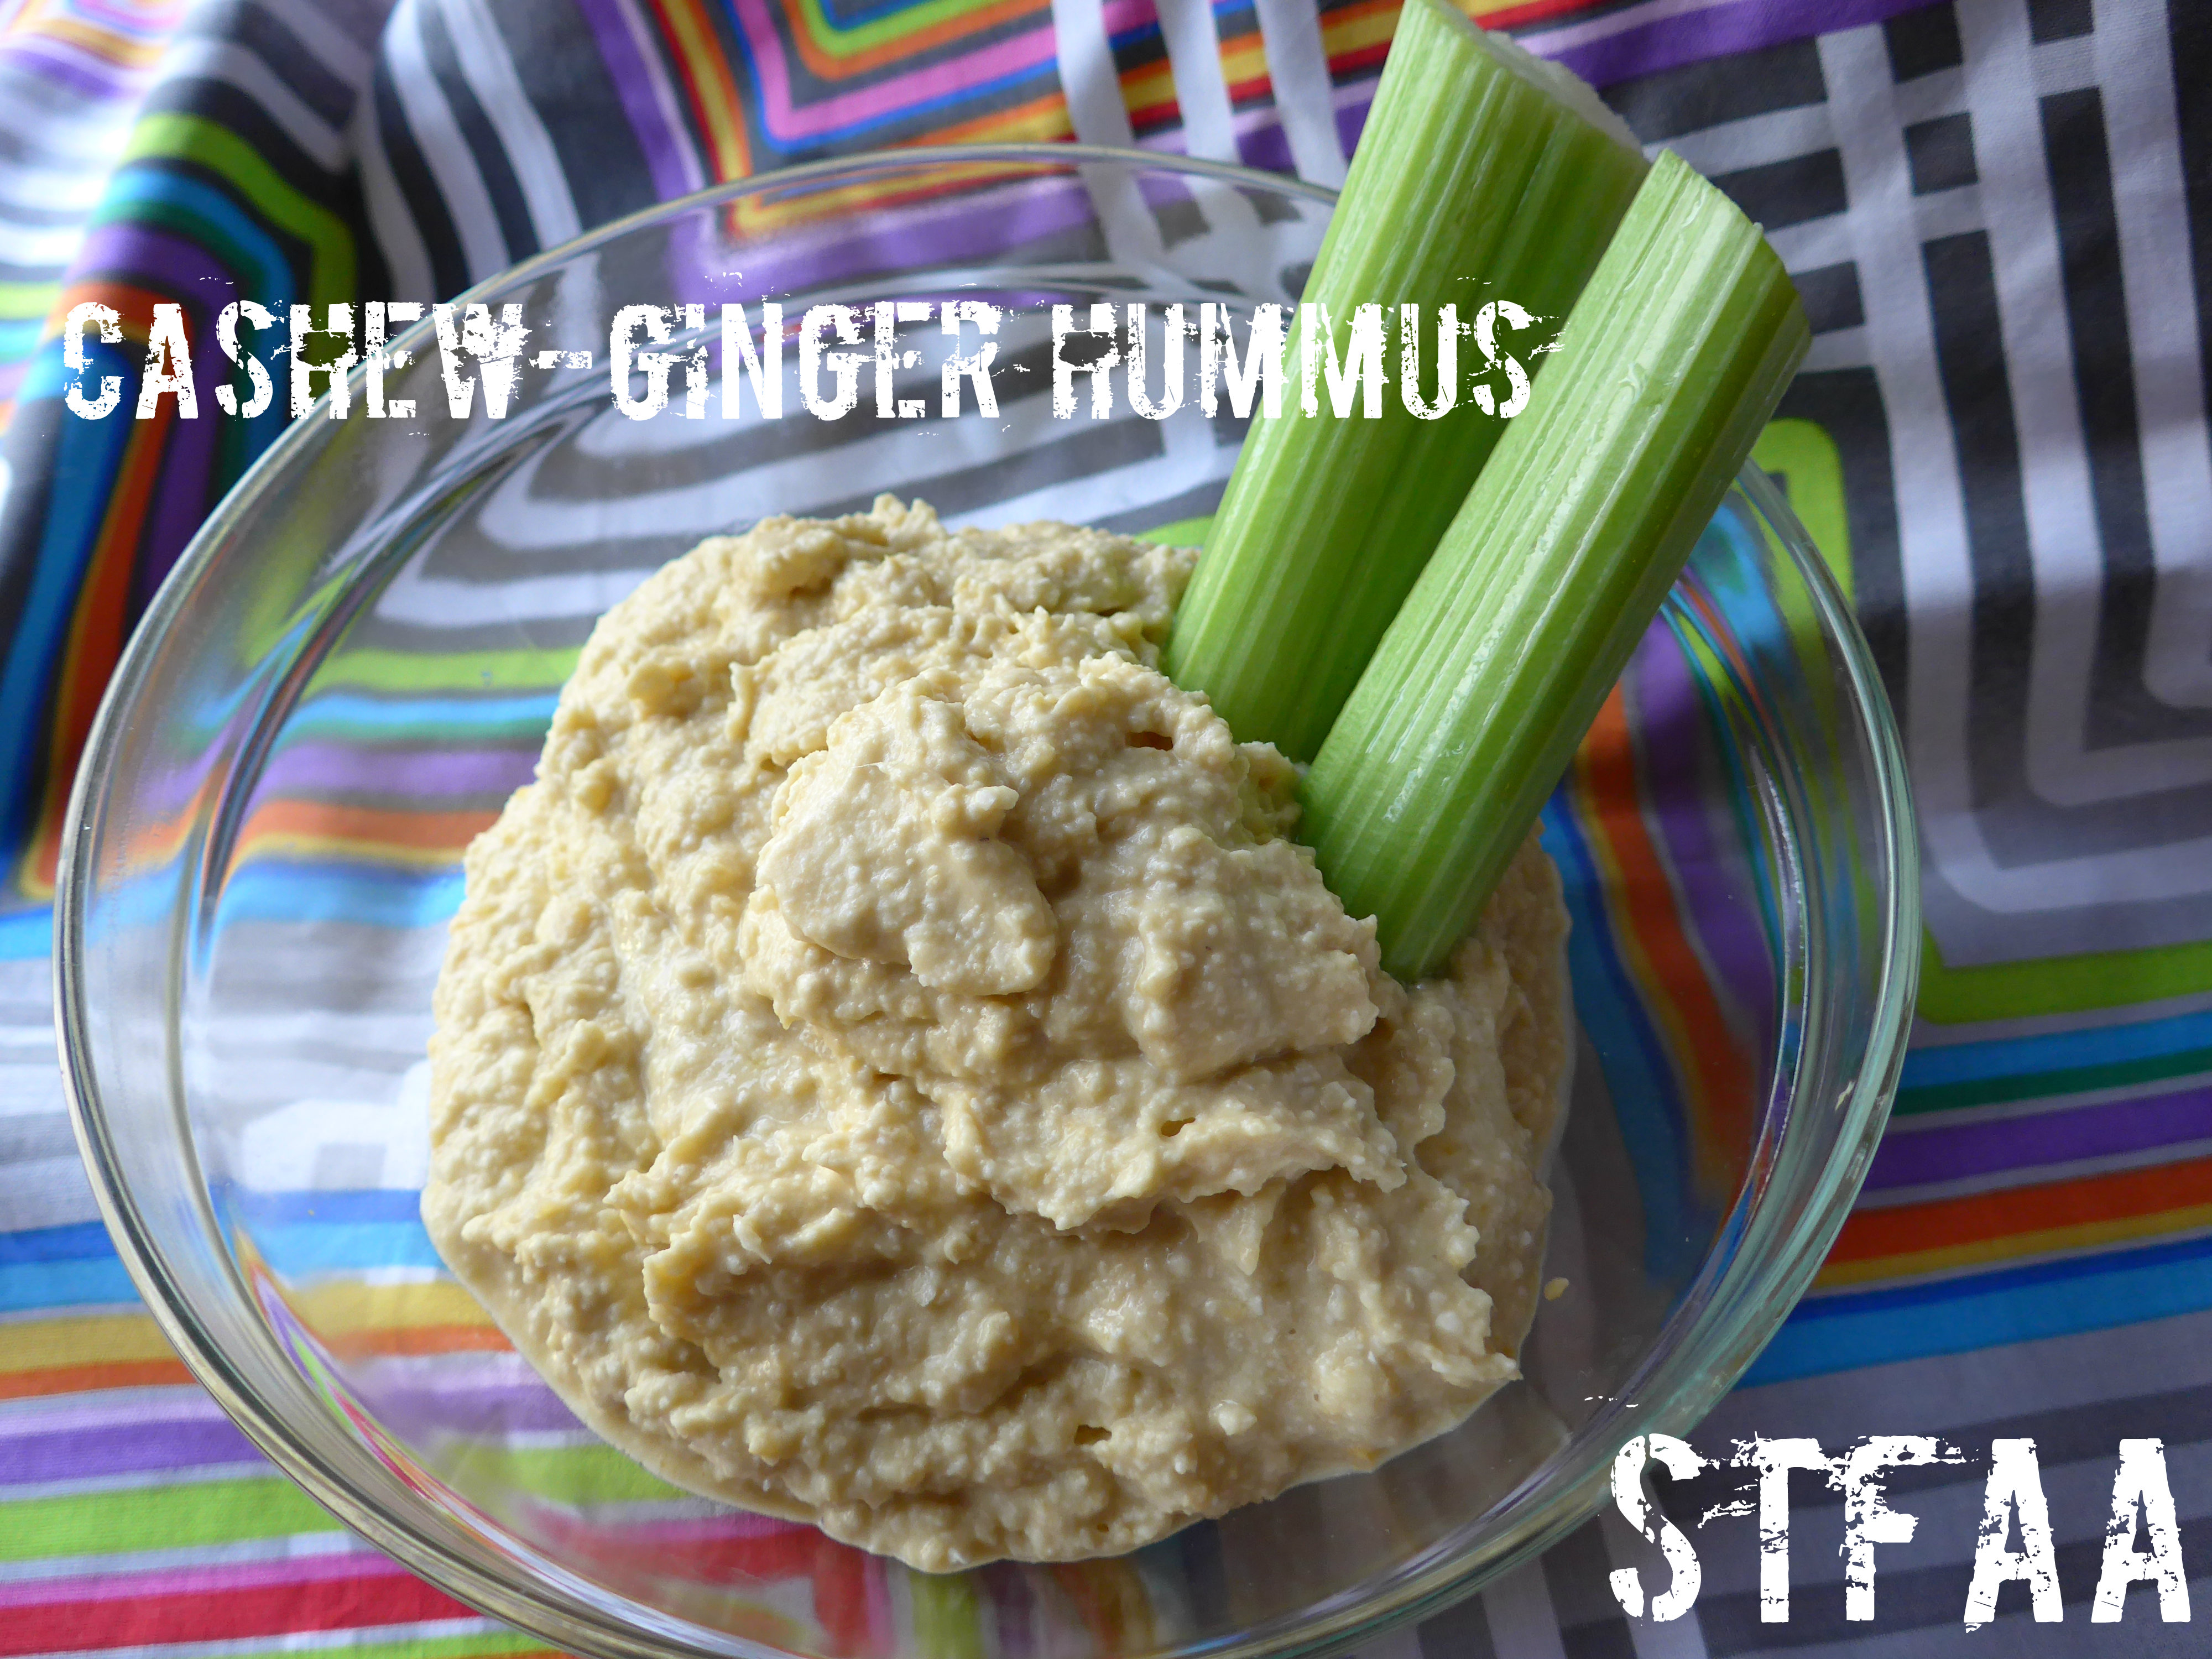
This recipe came out of what I had in the house when I wanted to bring some hummus over to Denise’s for a gathering. Denise is allergic to sesame, an allergy I understand is becoming more common, but not allergic to cashews. I’m not sure how common this combo is, but if your diet allows you to have cashews, give this spin on hummus a try. It’s enough like “typical” hummus to please purists, and different enough to be exciting. I think the cashews are a creamier, more neutral flavor than tahini, and it makes the perfect backdrop for ginger to pop. This is a really great hummus for making sandwiches or veggie wraps out of — somehow, the ginger just stands up well in a salad-like situation. I also stop my homemade hummus before it becomes too smooth — I like a little more texture than commercial hummus generally has.
Cashew-Ginger Hummus Notice: Trying to access array offset on value of type bool in /home/maryzahc/public_html/adultfoodallergies.com/wp-content/plugins/wp-ultimate-recipe/helpers/models/recipe.php on line 254
Cashew-Ginger Hummus
Print Recipe
This twist on hummus replaces tahini with ground cashews for more texture and a creamier texture, with ginger replacing garlic as the primary flavor. This hummus is most excellent as a sandwich spread.
Prep Time
10minutes
Prep Time
10minutes
Cashew-Ginger Hummus
Print Recipe
This twist on hummus replaces tahini with ground cashews for more texture and a creamier texture, with ginger replacing garlic as the primary flavor. This hummus is most excellent as a sandwich spread.
Prep Time
10minutes
Prep Time
10minutes
Ingredients
1/2cupraw cashews,
1Tablespoonfresh gingersee recipe for technique
16ouncesgarbanzo beans
1/4cupaquafaba(juice from can or cooking water from beans)
1/4cupolive oil
1teaspoongarlicchopped
1Tablespoonlemon juice
1/2teaspoonkosher salt
Servings:
Instructions
Using a food processor, add the ingredients in order of the recipe — with one big exception! If your ginger is already ground, chopped, or microplaned, start with the cashews. If not, begin with the ginger.
If beginning with the ginger, just pulse until it is all shredded.
If beginning with the cashews, pulse until you have a fine powder if you like texture. If you want your hummus to be really smooth, go ahead and make cashew butter.
Add the chickpeas and liquid and process. Then add everything else and process to your desired smoothness.
Enjoy as a spread or as a dip. If you’re using good quality pure olive oil, this will get somewhat stiff in the fridge. A few minutes resting at room temperature will fix that.
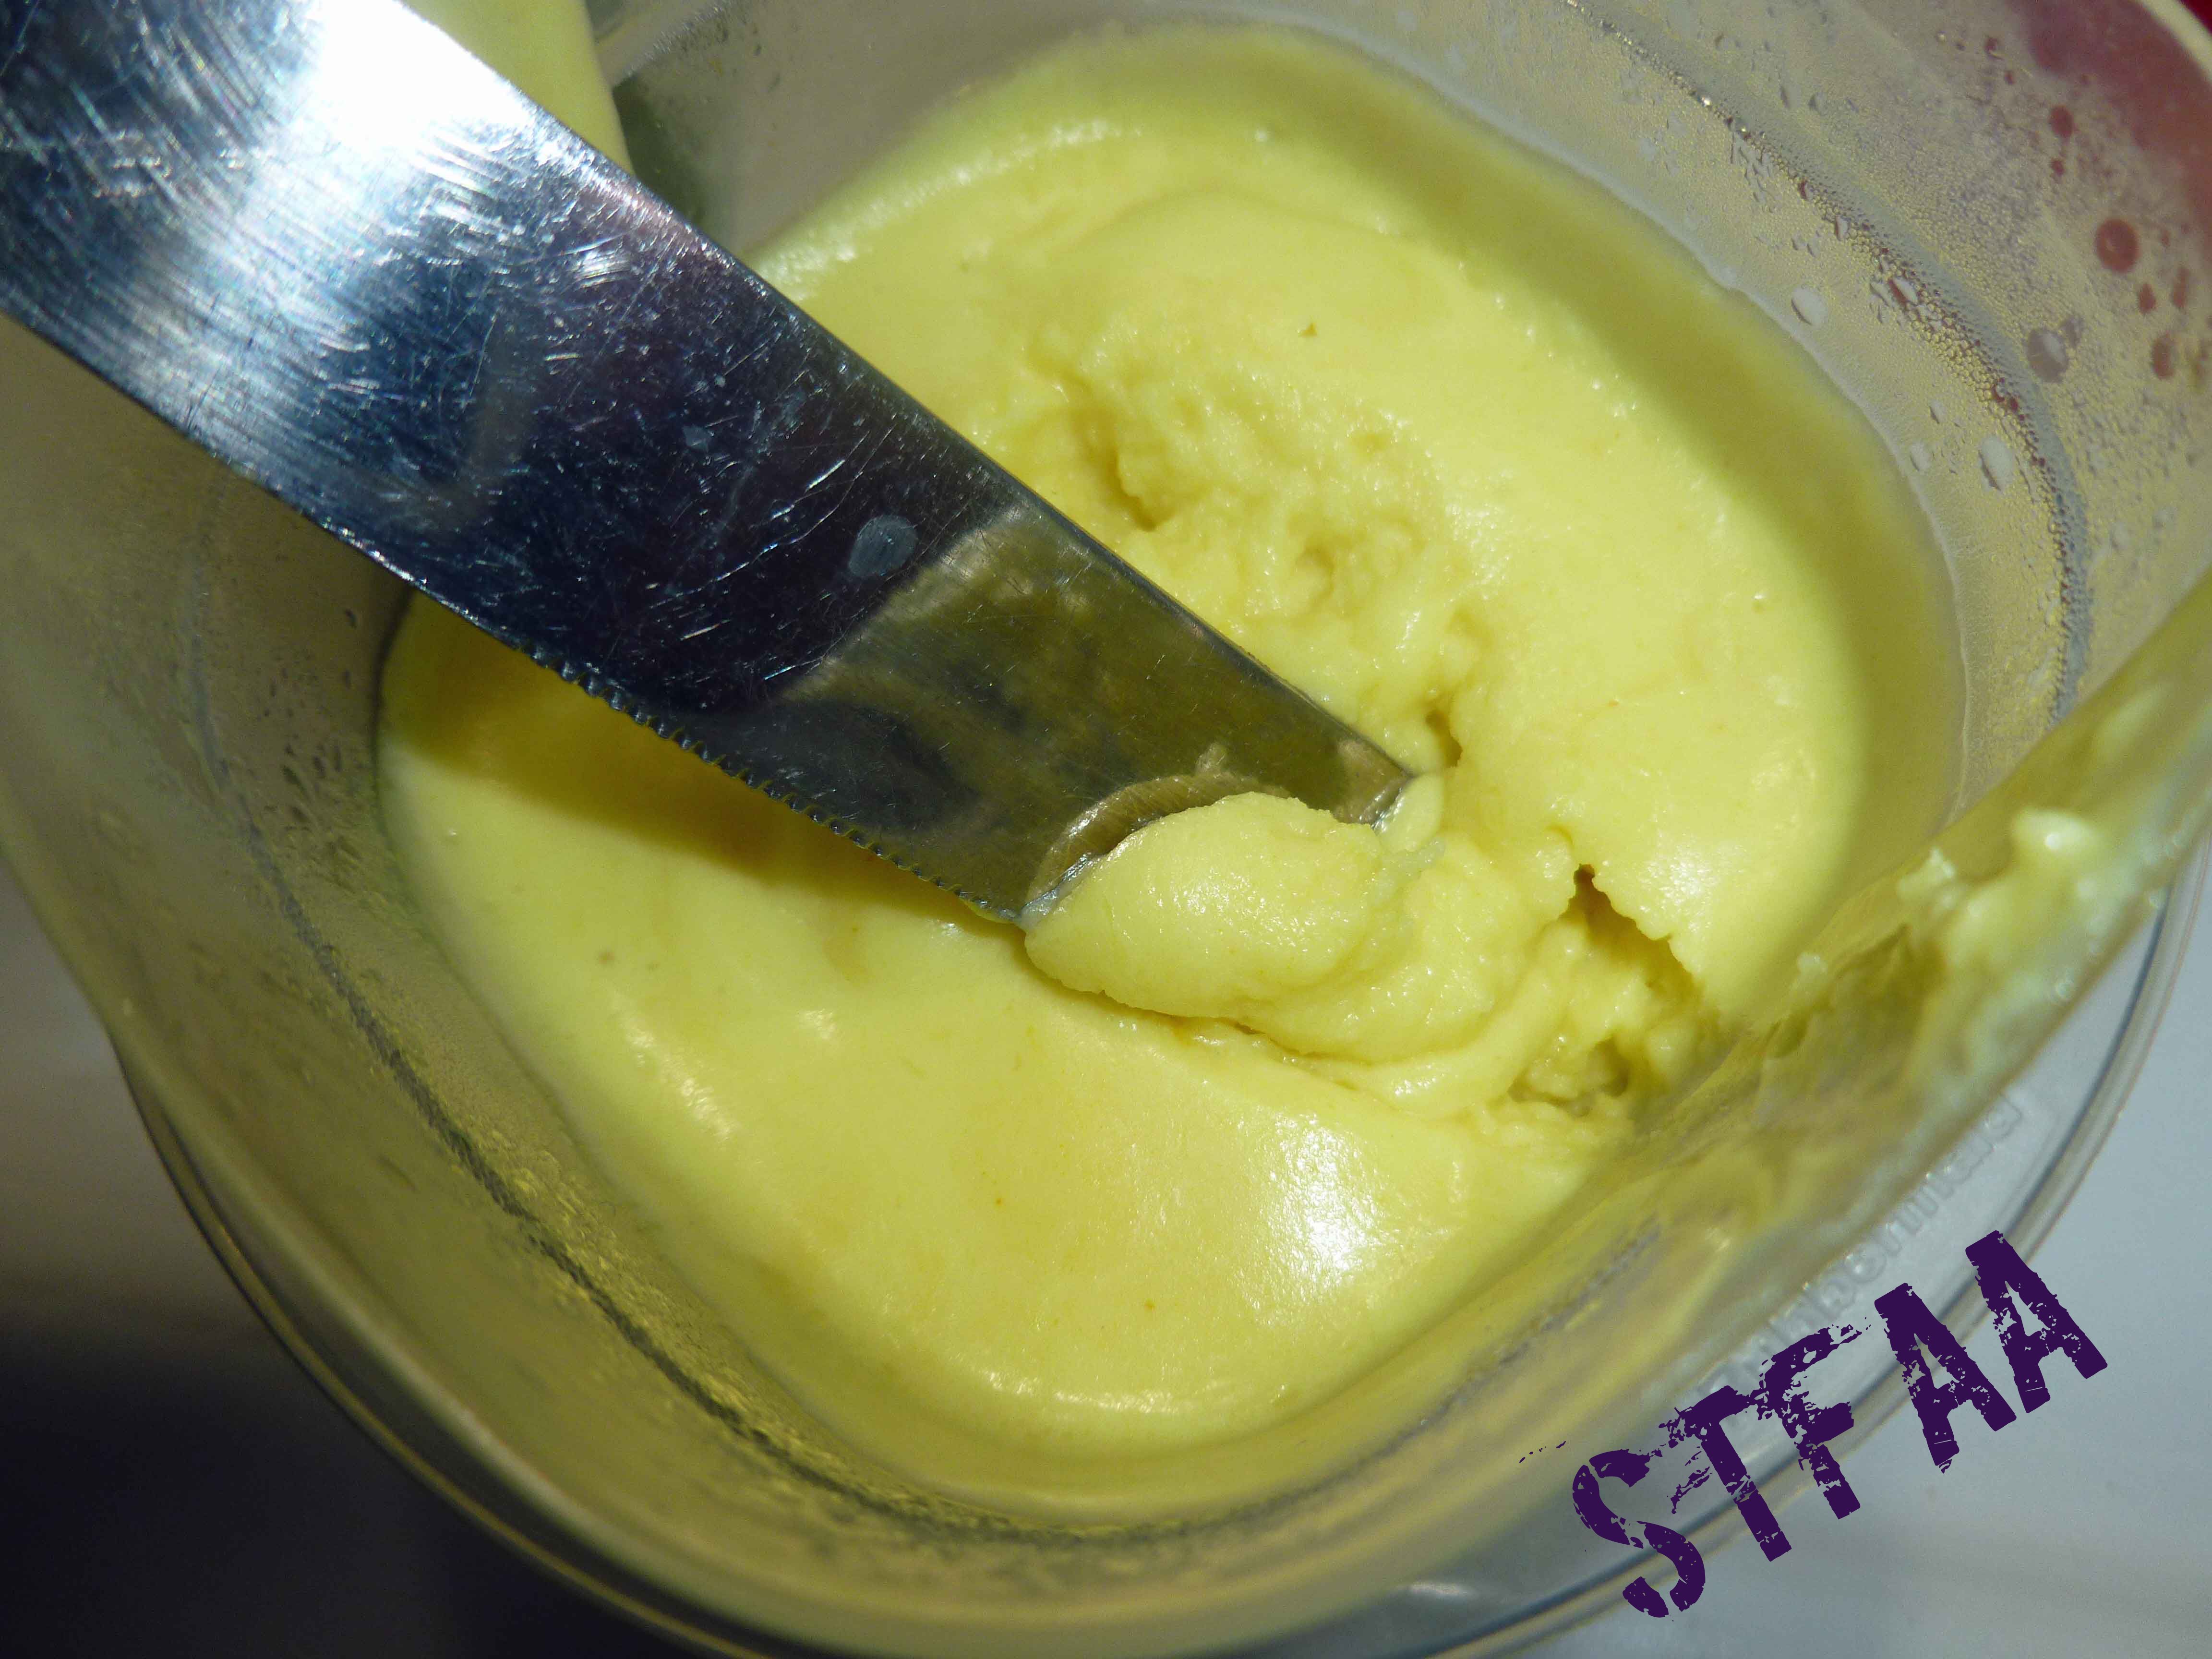
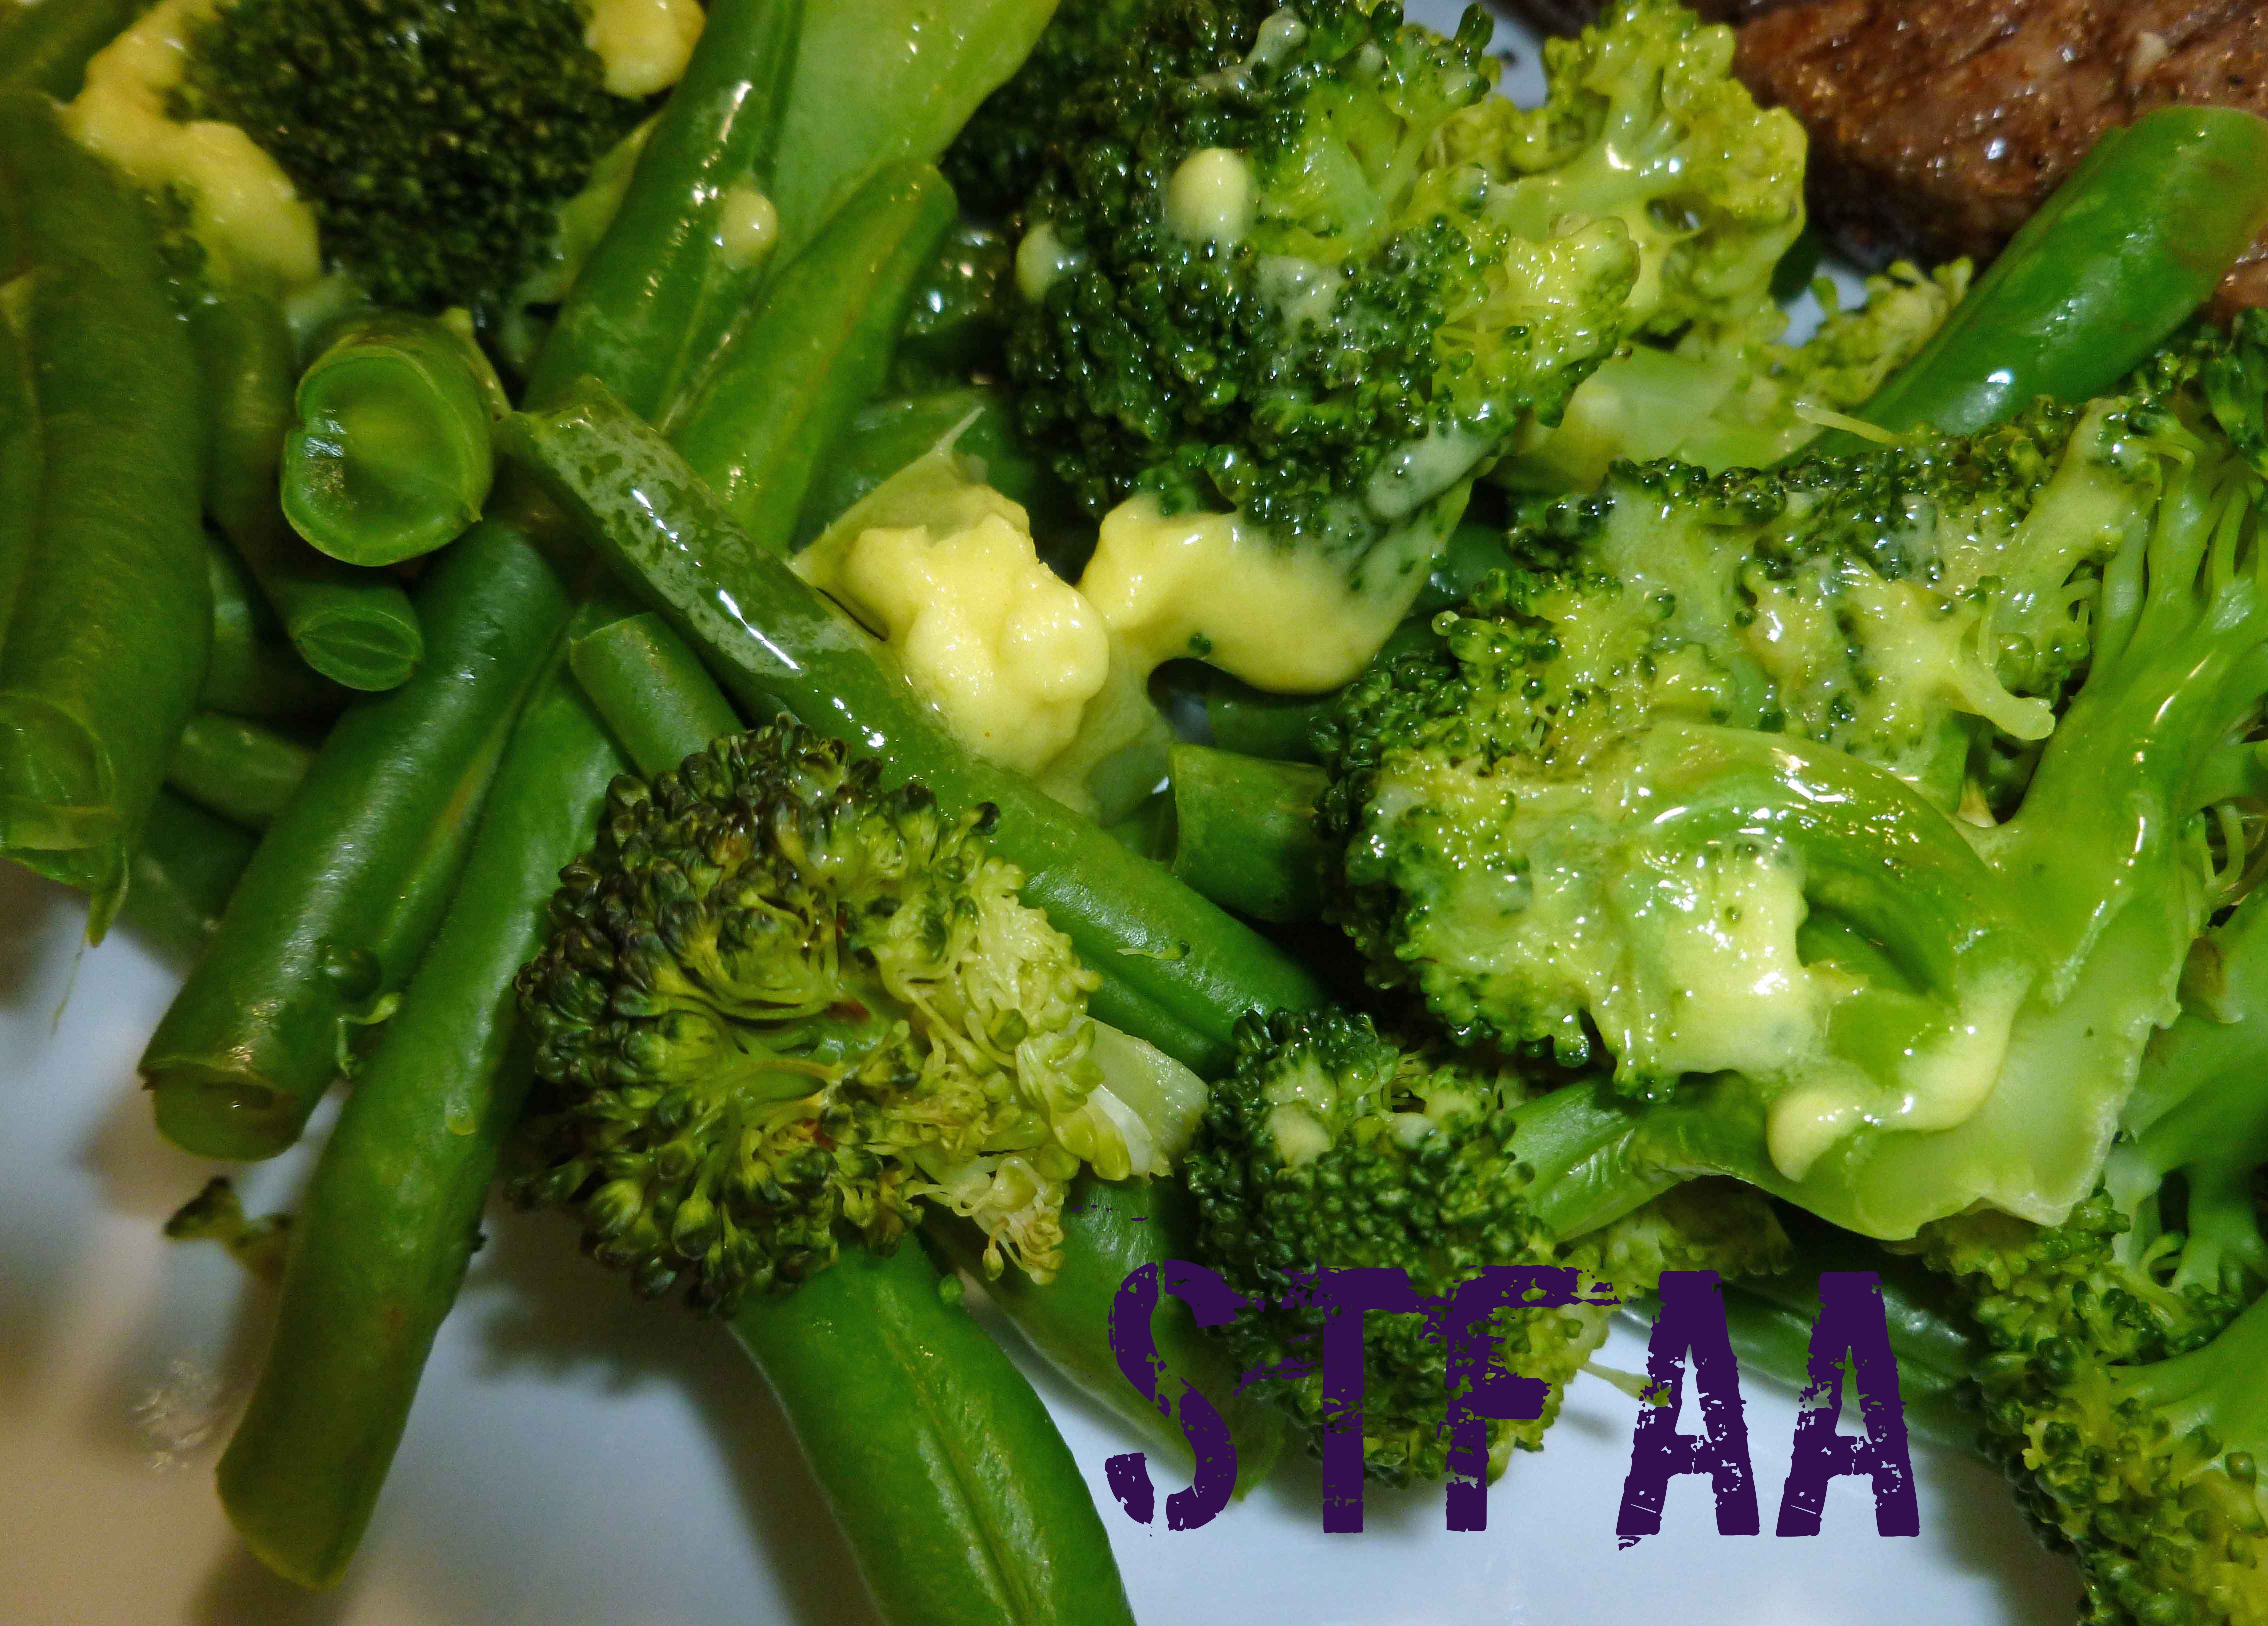
Some of you may remember when I posted about my margarine experiments in a Whatever Wednesday post. I’ve been using it for a while, but I wasn’t completely happy with it. The psyllium husk powder I used as an emulsifier didn’t melt well when I wanted to use it for things like lobster and there were gummy bits. Since my experiments with making Aquafaba Vegan Salad Dressing went so well and worked so well to emulsify the oils, I started wondering about it. And then I saw a post for a recipe for a Vegan Aquafaba Butter that one of the people in the Vegan Meringue – Hits and Misses! Facebook group for aquafaba developed, but I don’t have a safe, solid fat other than home rendered lard and home rendered beef tallow due to my allergies. So I decided to go back and play with my original recipe and add aquafaba. I doubled the recipe and switched out some of the cashew milk for aquafaba. It worked, and the margarine is perfect. There’s no gummy bits, the butter is spreadable at refrigerator temperature on hot steamed veggies and potatoes, and it’s much more like butter than before. Now I just need to find a bread that works for me again, because I need to eat this with toast.
Homemade Margarine, New and Improved on steamed broccoliHomemade Margarine, New and Improved on baked potato
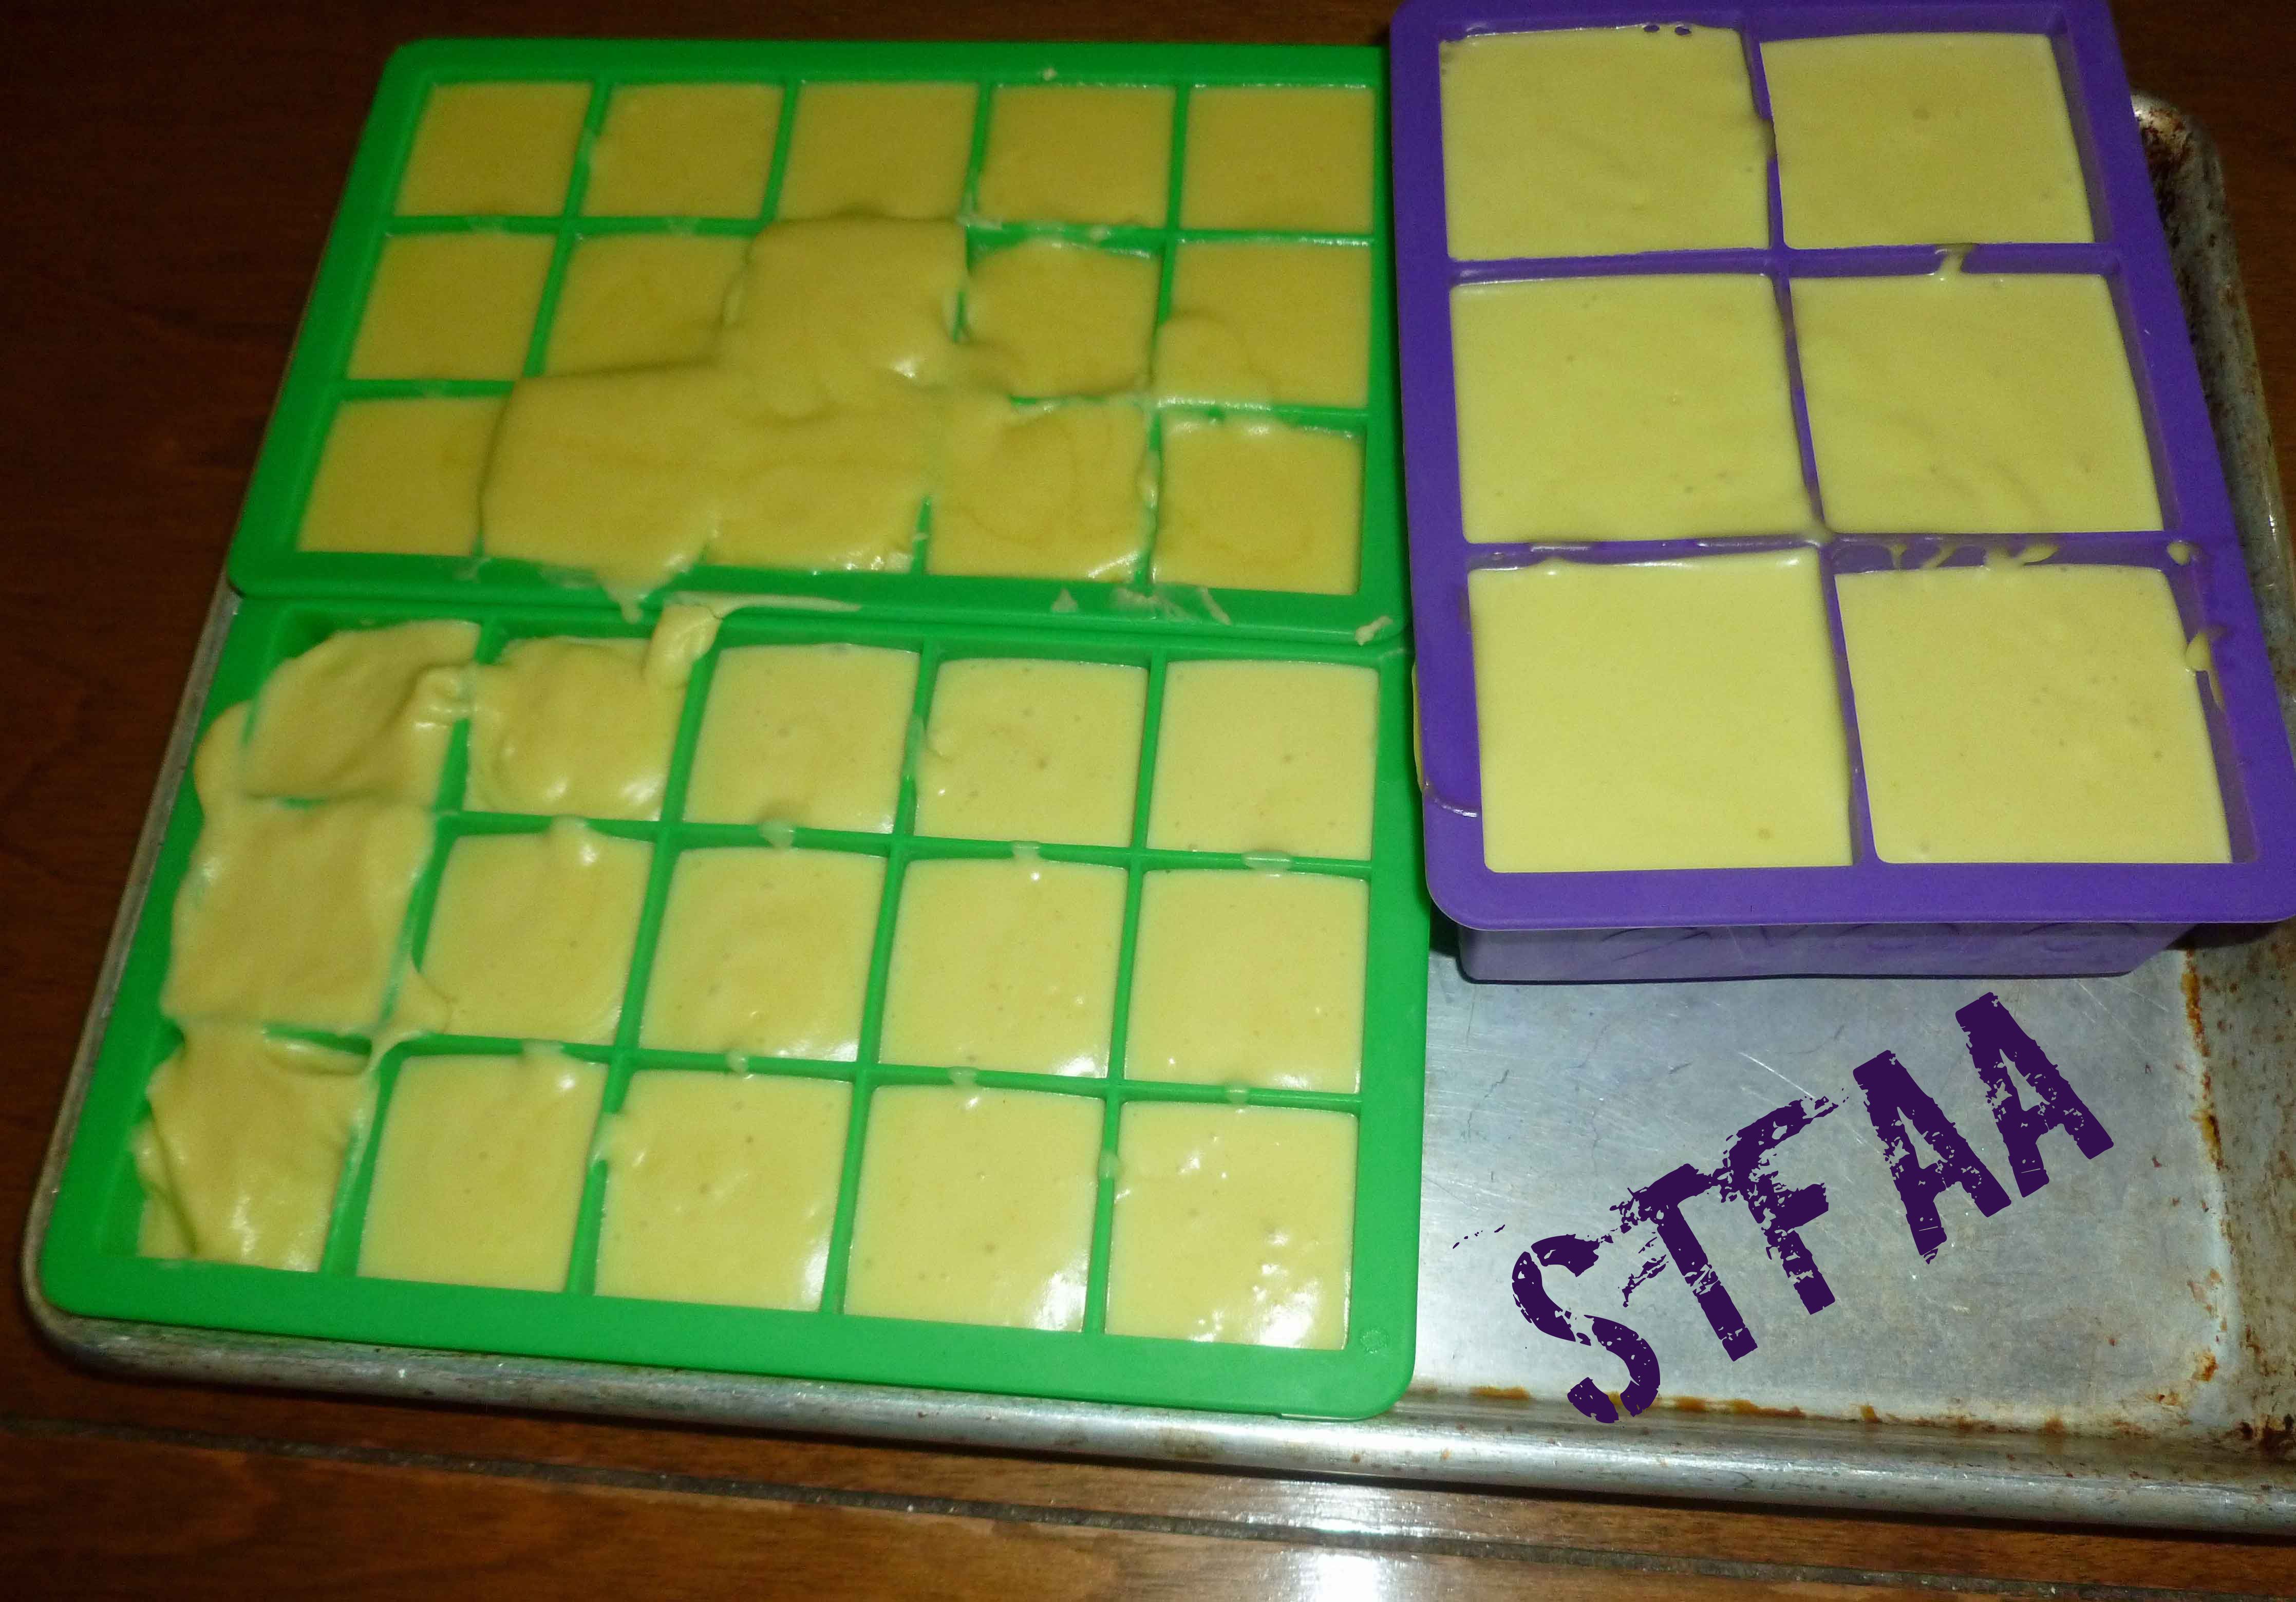
My original post about my WW: Homemade Margarine Experiments has links to information about rendering your own lard and tallow, if you have to do it yourself. (I do, fricking corn). I also used silicone ice cube trays to freeze the margarine into cubes. Once it’s hardened, I place it in to zip top bags to keep in the freezer. It lasts longer and I can just grab a cube or two when I need them.
Homemade Margarine, New and Improved in silicone ice cube trays before freezing Notice: Trying to access array offset on value of type bool in /home/maryzahc/public_html/adultfoodallergies.com/wp-content/plugins/wp-ultimate-recipe/helpers/models/recipe.php on line 254
Homemade Margarine, New and Improved
Print Recipe
A replacement for margarine when you can’t have commercial products, commercial shortenings or coconut oil.
Servings
Prep Time
2cups
15minutes
Servings
Prep Time
2cups
15minutes
Homemade Margarine, New and Improved
Print Recipe
A replacement for margarine when you can’t have commercial products, commercial shortenings or coconut oil.
Servings
Prep Time
2cups
15minutes
Servings
Prep Time
2cups
15minutes
Ingredients
2 ounces lard(I use my home rendered lard)
2 ouncestallow(I use my home rendered tallow)
1cup olive oil
1/3cup cashew milk or other non-dairy milk(I use my homemade cashew milk)
1/3cup aquafaba(See aquafaba.com)
1/2 teaspoon lemon juice(I used fresh squeezed lemon juice)
1/2teaspoonapple cider vinegar(Bragg’s is usually the safest option corn allergy wise)
1teaspoon sea salt
1/4 teaspoonground turmeric
Servings: cups
Instructions
Melt lard and beef tallow together in a double boiler. While waiting for it to melt, add all the other ingredients except the olive oil in a blender.
Once the lard and tallow are melted, add the olive oil to them, and stir to combine. Remove the double boiler from the heat.
Start blending the ingredients in the blender, and through the hole in the lid, very slowly pour the lard, tallow, and olive oil mixture into the blender in a fine stream. Continue pouring until the whole mixture has been added to the blender and blend until completely mixed.
Once it’s completely mixed, pour the margarine into a silicone ice cube tray, or into other freezer safe containers. Place the trays/containers into the freezer until the margarine sets. I empty the silicone ice cube trays into a zip top bag so that it lasts longer and I can grab a bit of margarine when I want.
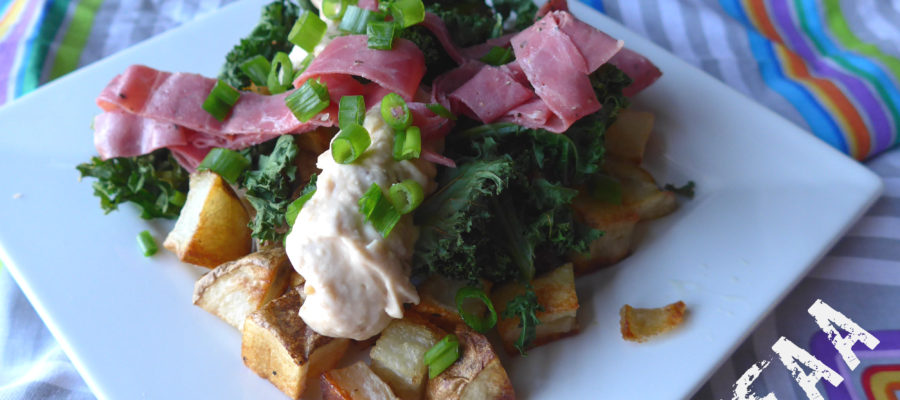
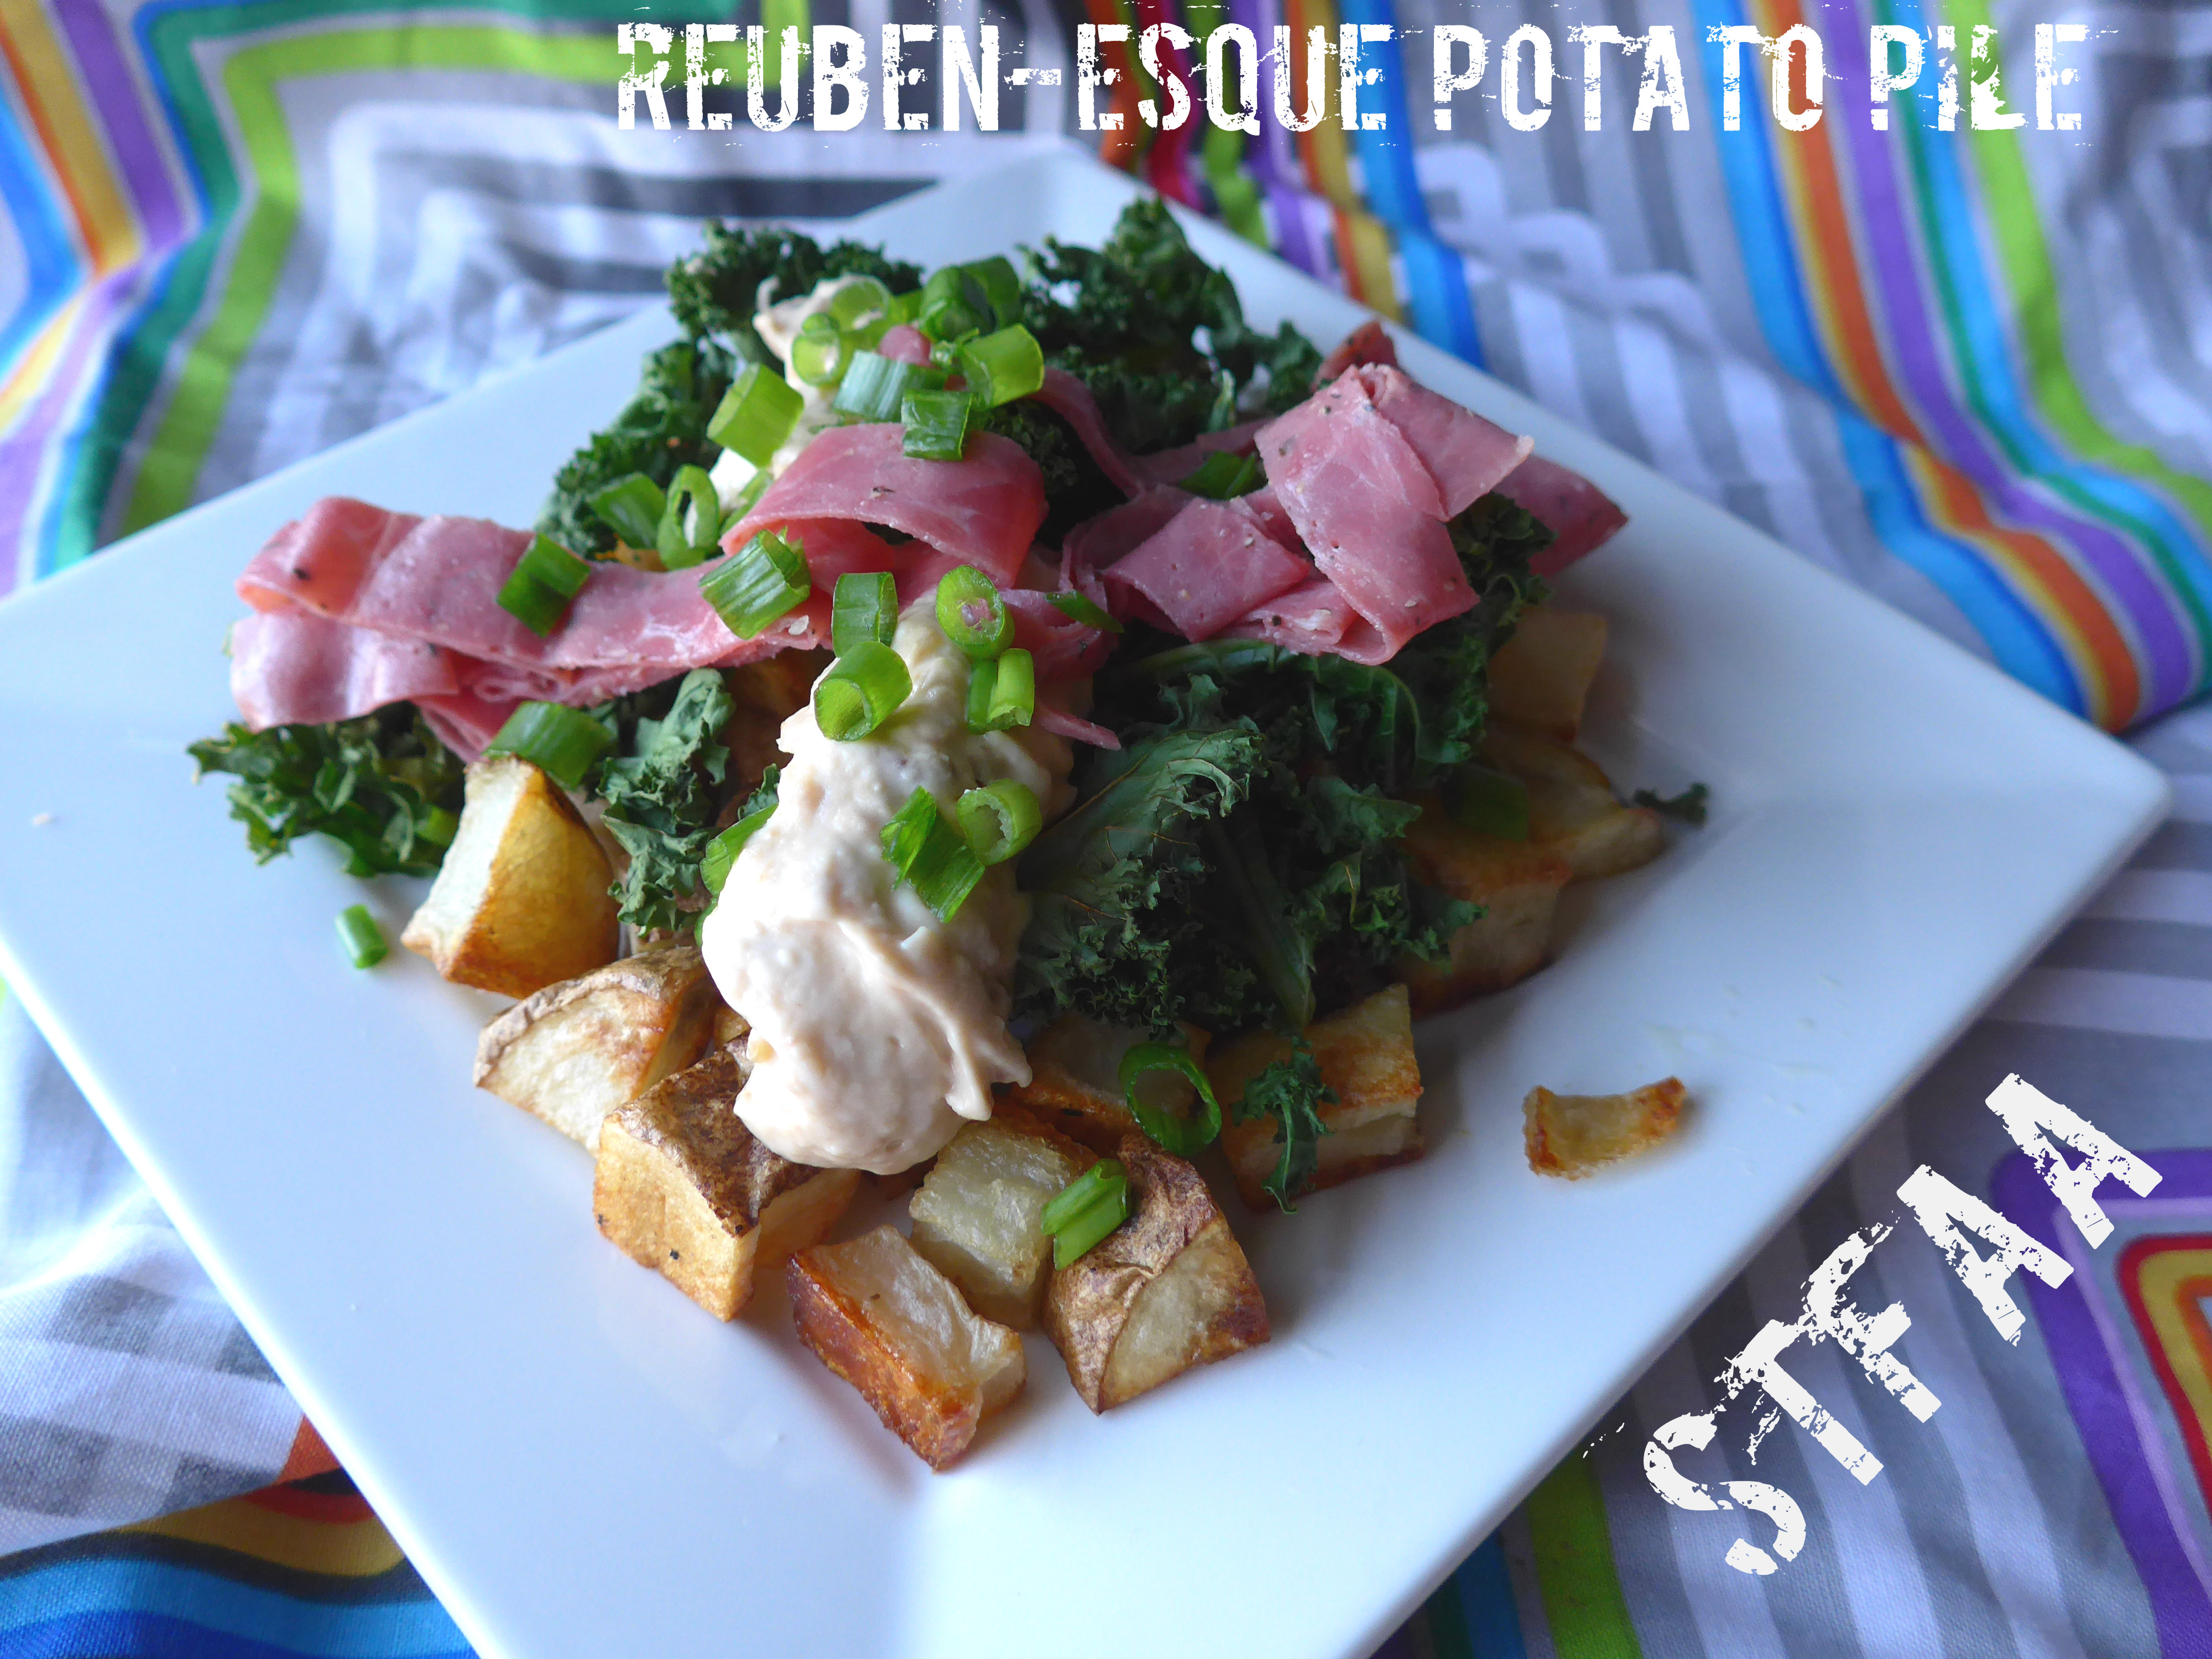
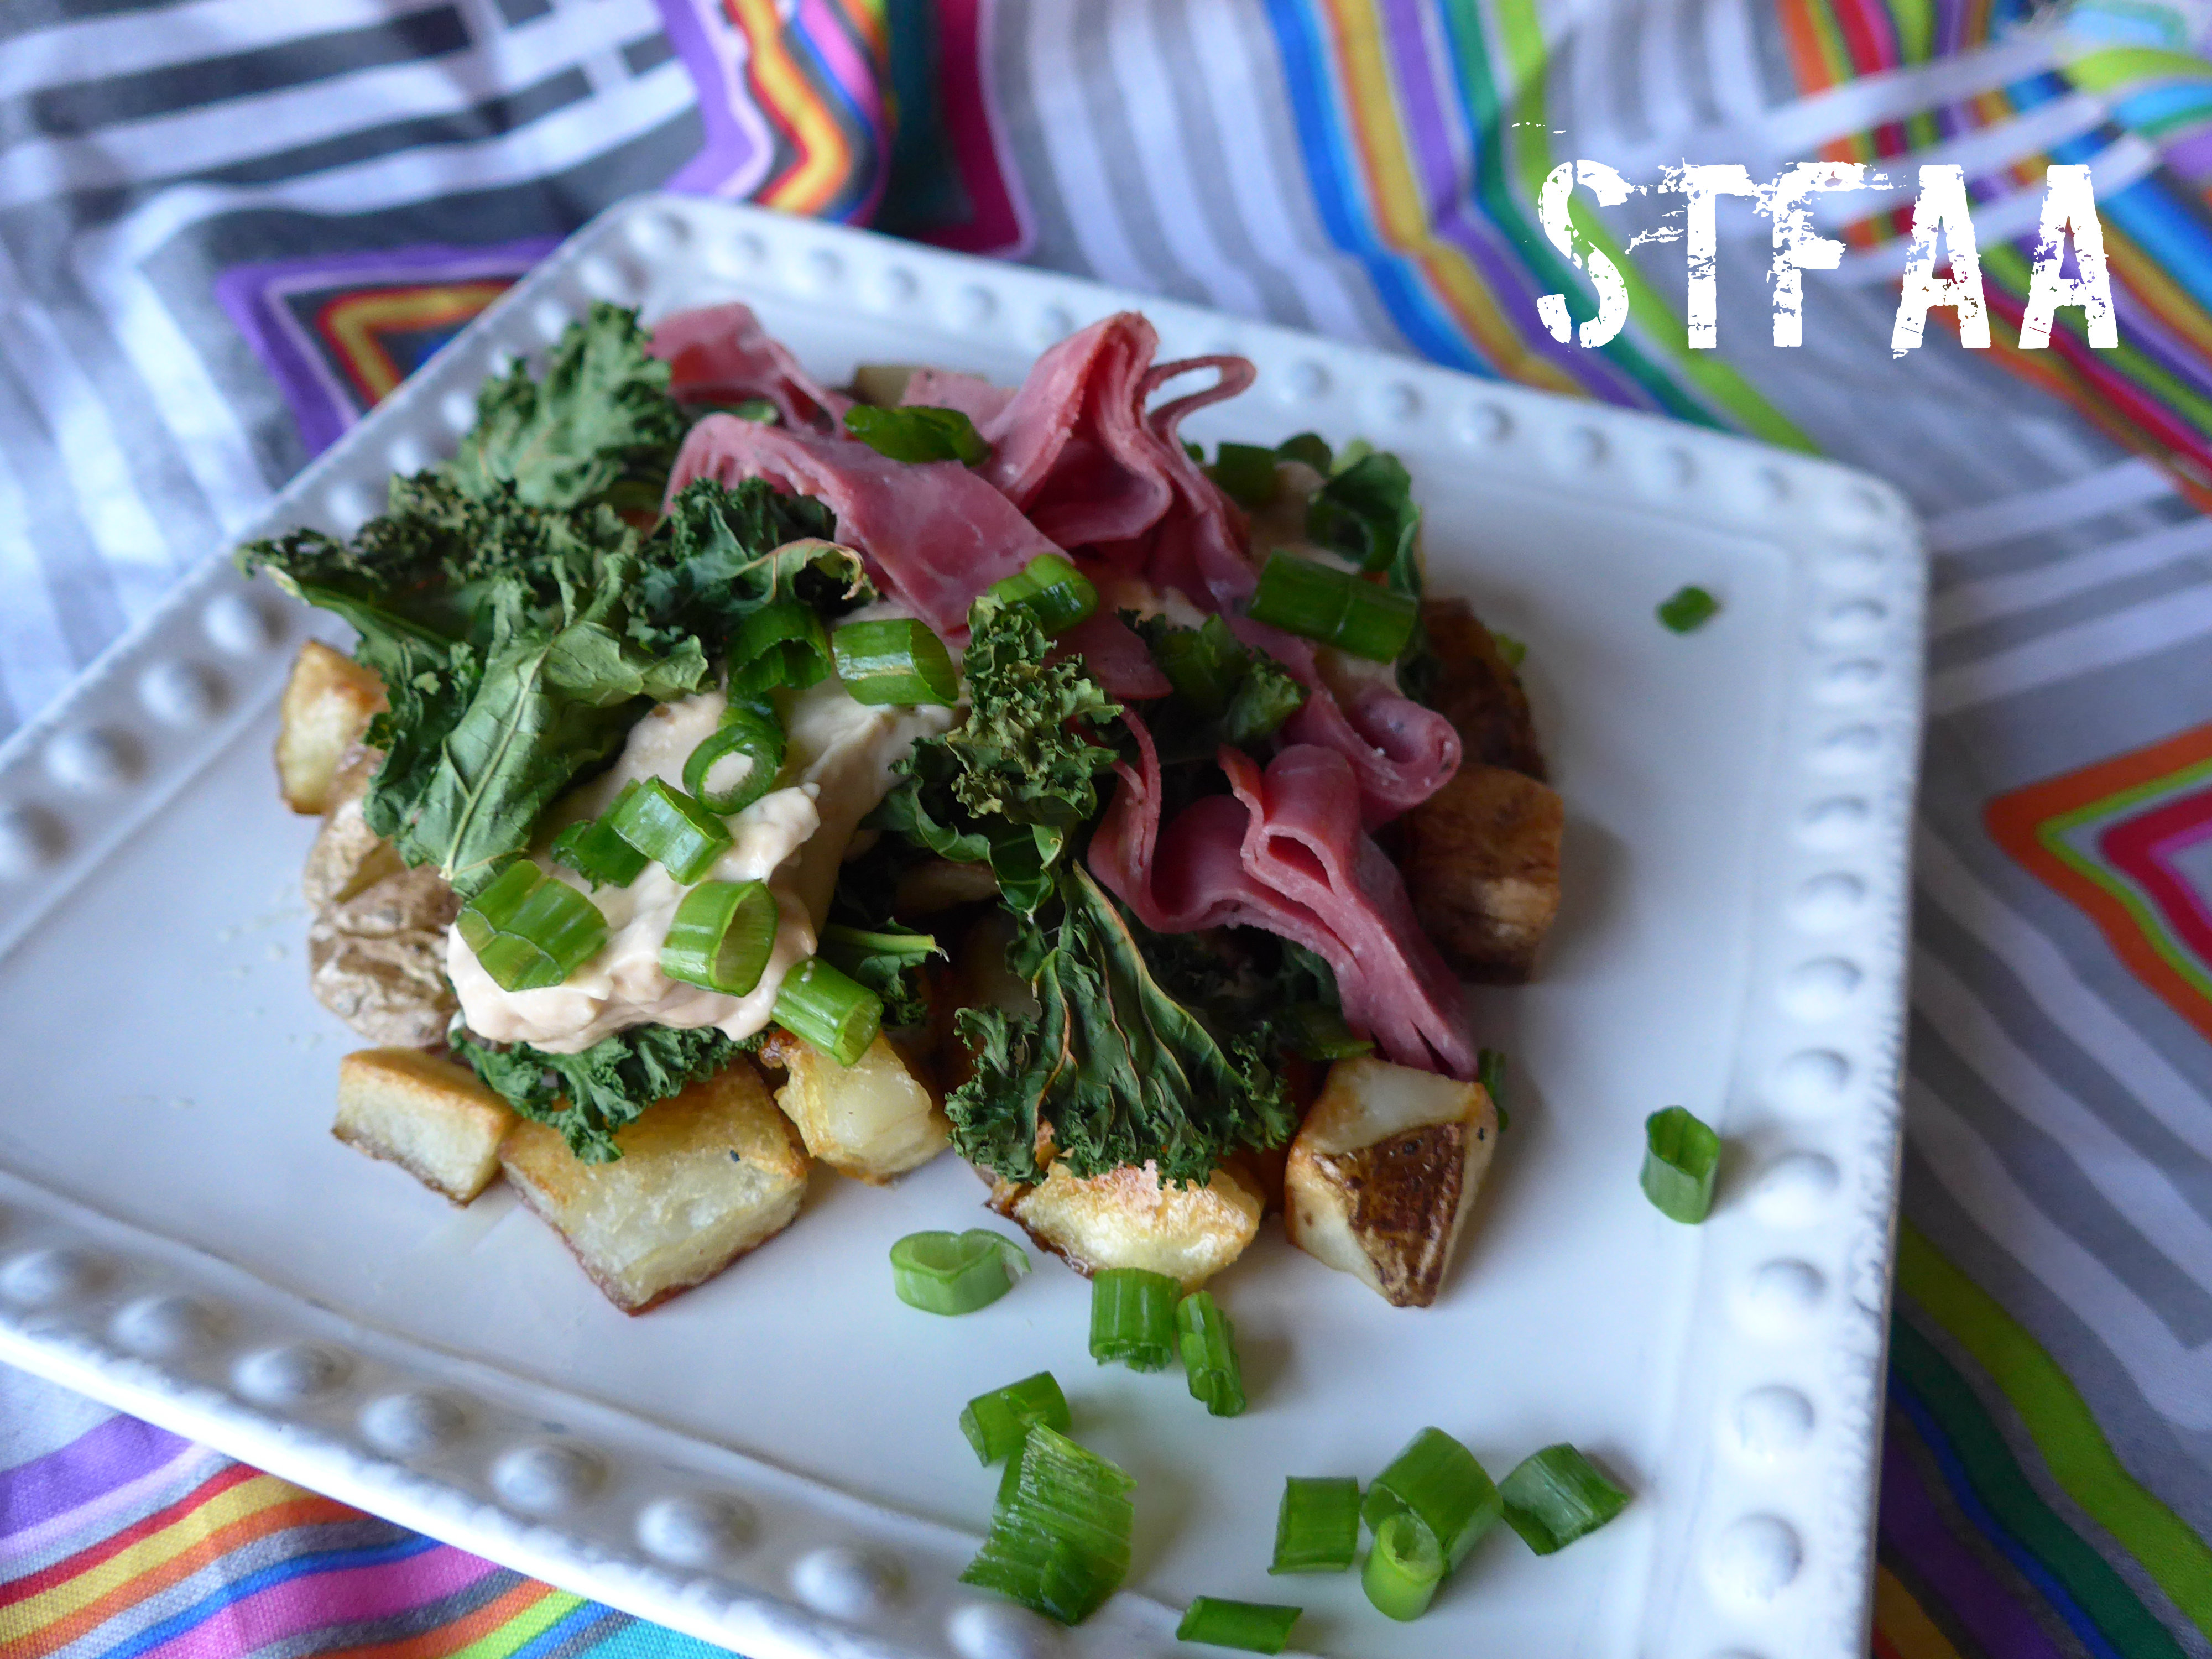
Sitting in a random deli in Providence, RI, on an April Friday afternoon, I was drinking some odd flavor of coffee (that was actually really tasty, and I’m not usually a fan of flavored coffee). Jack left me alone for about 3 minutes while the deli woman made a hot chocolate for him. When he came back, I was talking about “potato nachos” and describing flavors and asking the poor man whether kale was the right choice to go with onion dip. He’s used to this.
I knew I wanted potatoes and Kiss Me if You Dare onion dip (but maybe with the scallions on top instead of mixed in). Baked/roasted kale seemed likely, as it’s my favorite nacho ingredient lately. But it needed another flavor, and I thought that it was likely a meat. I ended up texting Denise to discuss what was missing from this weird recipe plan I was devising in my head. We decided it was pastrami, and man, were we right!
Have I scared you off describing the process of recipe development in my head? It’s really random. Turns out, potato “nachos” wasn’t quite right. Nachos implies chips, and while I made baked homemade potato chips, they really weren’t the right vehicle for this mess of flavors. Roasted cubed potatoes were exactly right.
The onion dip is based on caramelized onions, with a mix of pureed white beans and Earth Balance vegan mayo — if you can’t do the mayo, consider trying it with Denise’s Aquafaba Mayo recipe. It’s one more step, but worth it! The potatoes are fluffy and slightly salty, with creamy onion-y dip, a bit of crunch from kale, the brightness of green onions, and the … what exactly is the right way to describe pastrami? I don’t know what it is, but it was the flavor I was looking for to bring it all together.
I think this is a pretty great meal for a night you’re craving junk food or bar food. Not that it’s either, but it’s got a good mix of salty and crunchy and oily and creamy. I don’t run nutritional profiles on my recipes, and you won’t feel like running a marathon after this, but you also won’t be completely weighed down. You could also make a big batch as a snack to share. It’s relatively scalable, but the printable recipe below is for two servings.
For a meal, per person, you will need:
about 1 cup of roasted potato cubes (olive oil, salt)
2-3 slices of deli pastrami, rolled and sliced thin
2 green onions, tops only, sliced thin
Enjoy! And let us know if you try any additions or substitutions — especially if you try this without the meat. We’d love to hear some variations.
Potato Pile Notice: Trying to access array offset on value of type bool in /home/maryzahc/public_html/adultfoodallergies.com/wp-content/plugins/wp-ultimate-recipe/helpers/models/recipe.php on line 254
1recipeKiss Me If You Dare Onion Dipsee link, above
2 cupskaleroll leaves and cut into 1/3″ strips
6slicesdeli pastramirolled and sliced into ribbons
4-6scallionsgreen parts only, sliced
freshly-ground black pepperto taste
Servings: meals
Instructions
Preheat oven to 425°F. Wash and cube your potatoes. Peel or don’t peel — whatever you prefer. I love potato skin.
Toss potato cubes with olive oil and salt and spread out in a single layer on a baking sheet.
Roast potatoes for 25 minutes, then stir. Set the timer for 10 more minutes. Chop up your kale.
Add the kale to the baking sheet and watch it for the last 10 or so minutes. Kale can brown a bit, but don’t let it burn. Total cooking time for the potatoes should be approximately 45 minutes.
In the meantime, slice the pastrami and green onions/scallions. Set aside to top your finished Potato Piles.
Toss the potatoes with the onion dip. I know this isn’t what’s shown in the photos, but that’s because it looked better this way. It *tastes* better if you toss the potatoes in the dip.
Top your piles with scattered kale, a bit more onion dip, pastrami, and scallion tops. A bit of freshly-ground pepper on top is perfection.
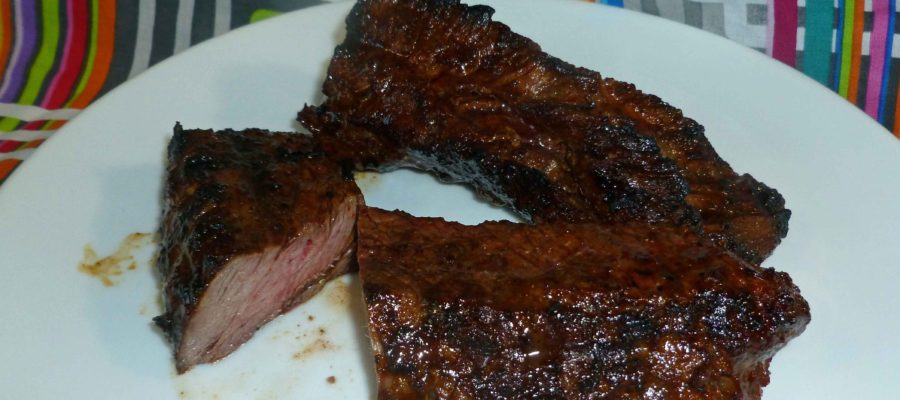
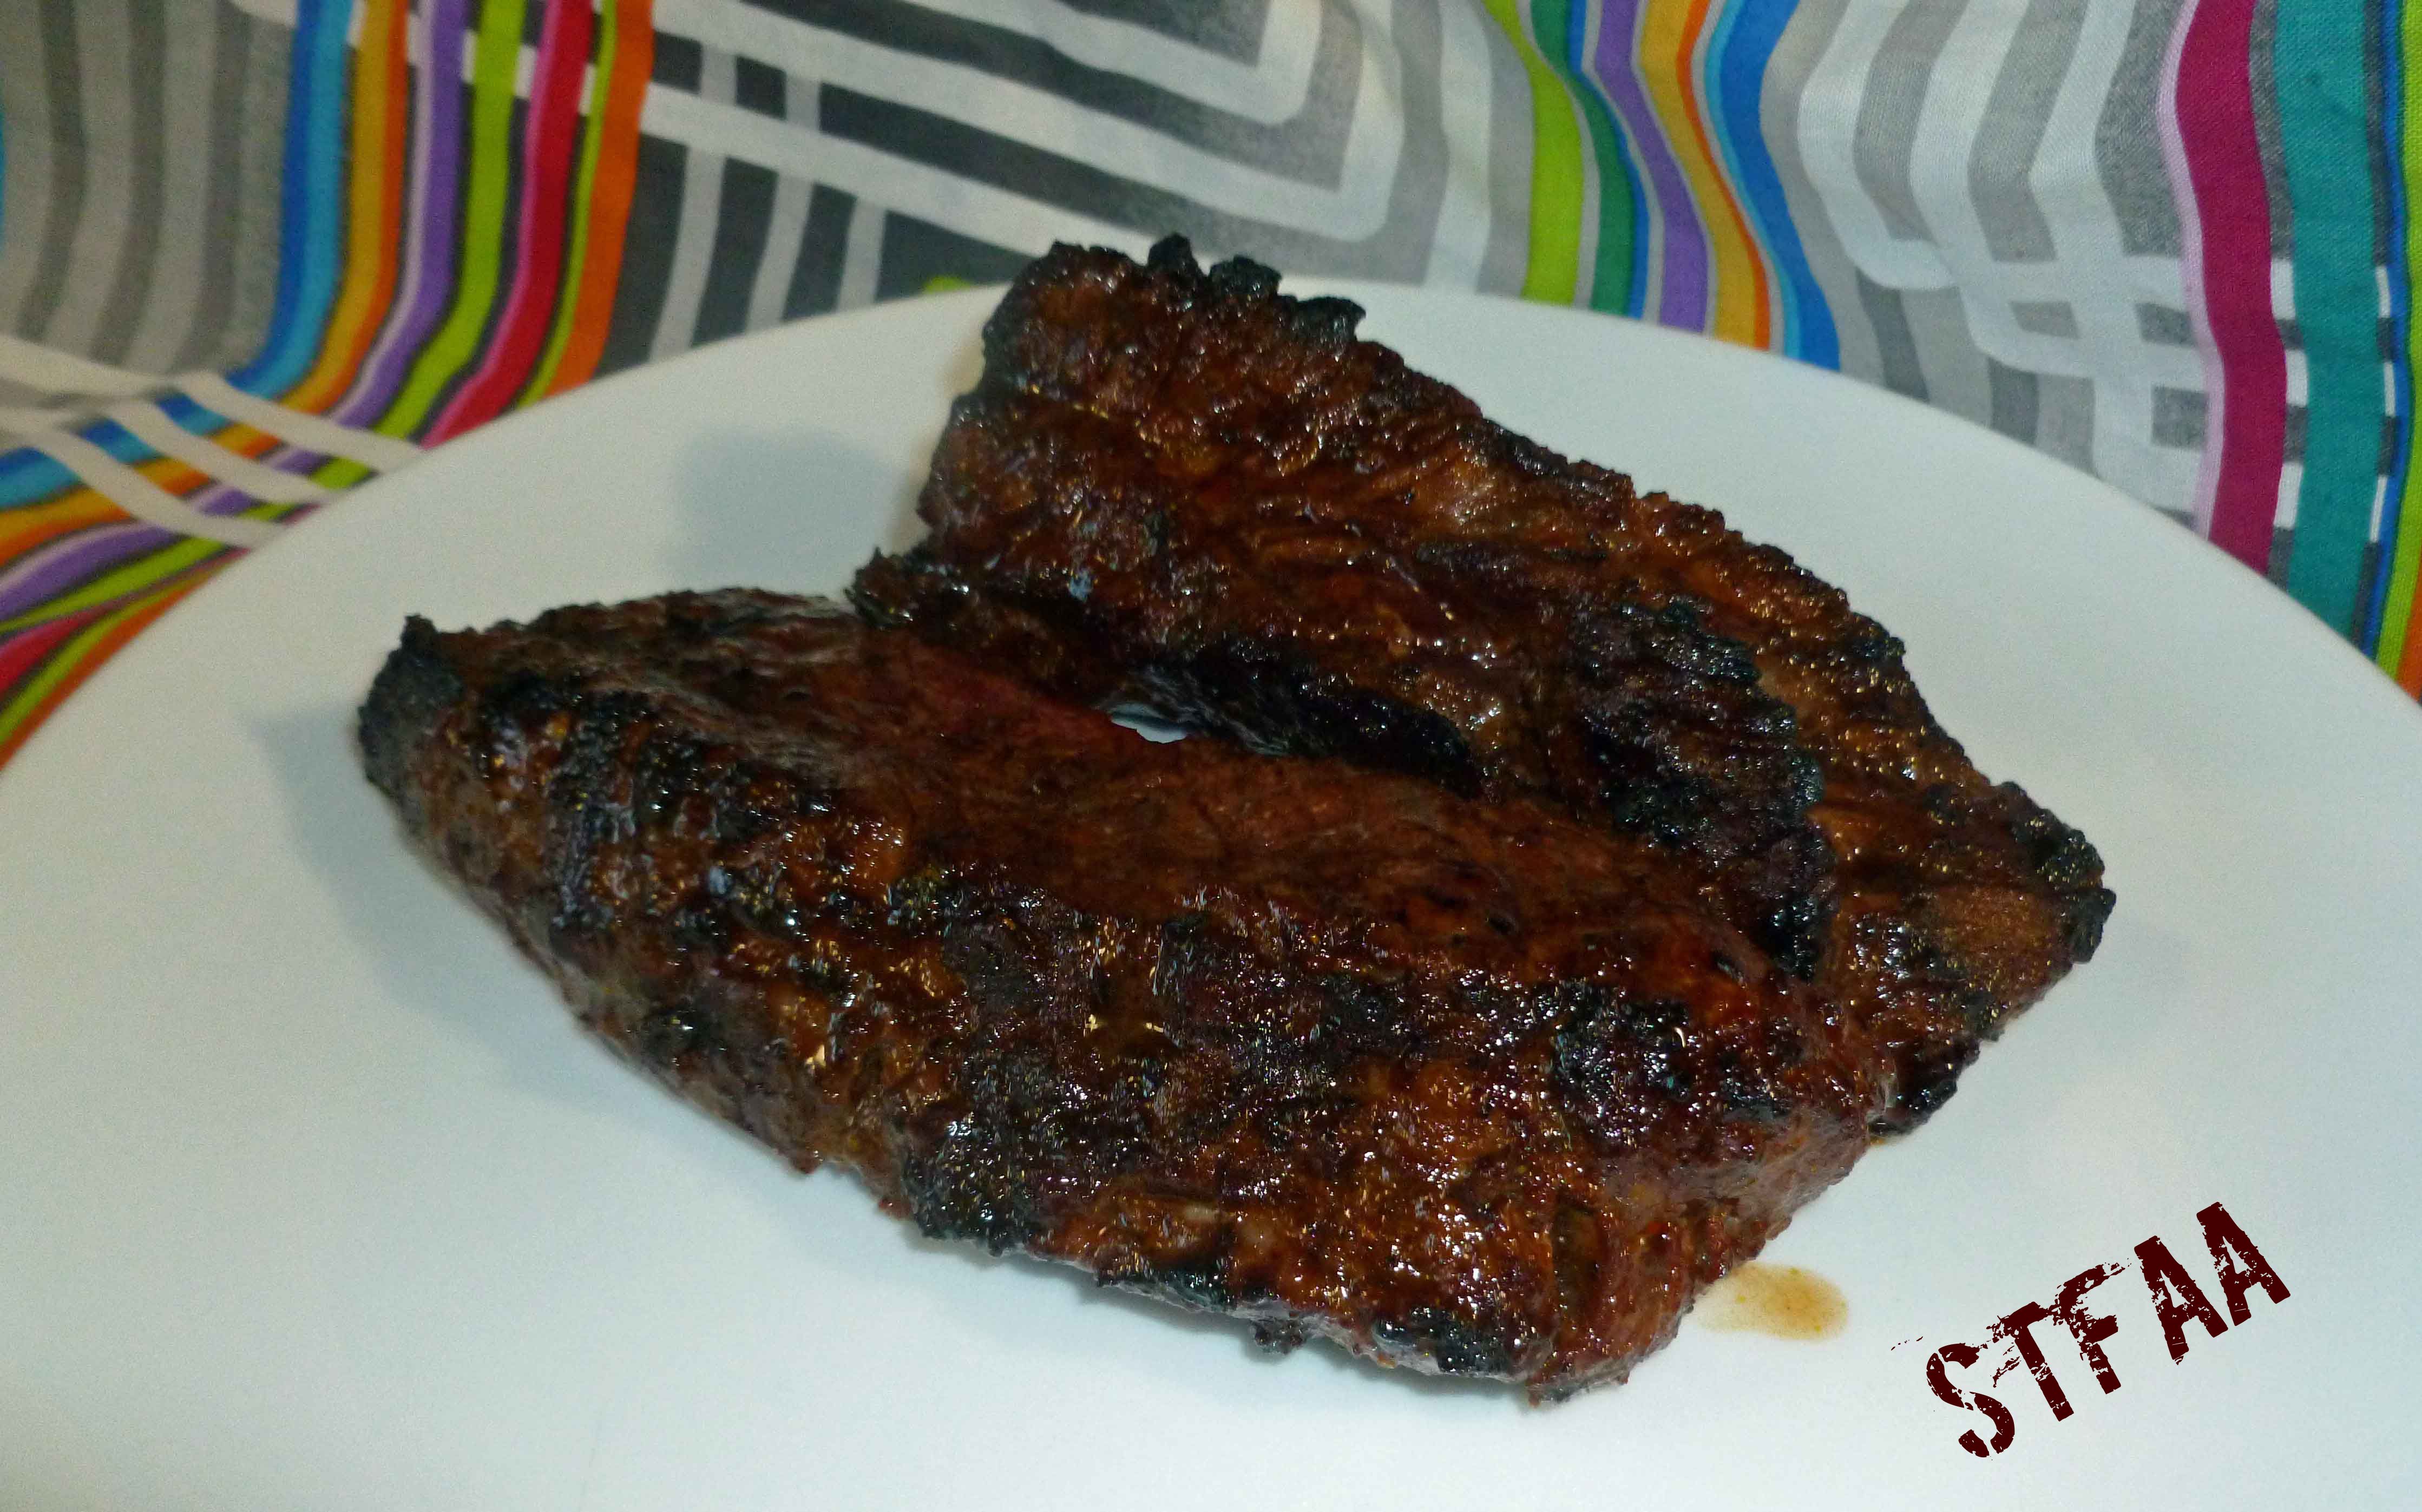
Well, I was going to go all ‘Denise-crazy’ on you guys and make the tortillas I posted two weeks ago and cashew sour cream (since I don’t have commercially available safe products) and make fajitas that looked all pretty, but my mom is visiting and I’m exhausted from pruning the rhododendrons in the front yard. And hey, sometimes a simple dinner is good. You can marinate these ahead of time and then throw them on the grill or broil them in your oven in a few minutes, and have a yummy dinner in no time. You can eat them by themselves with a nuked baked potato and veg, or you can slice them and throw them on a salad, or slice them and make fajitas. The pictures show me making only a pound, because my mother won’t eat anything spicy (sacrilege, I know), and half were being saved out for her dinner.
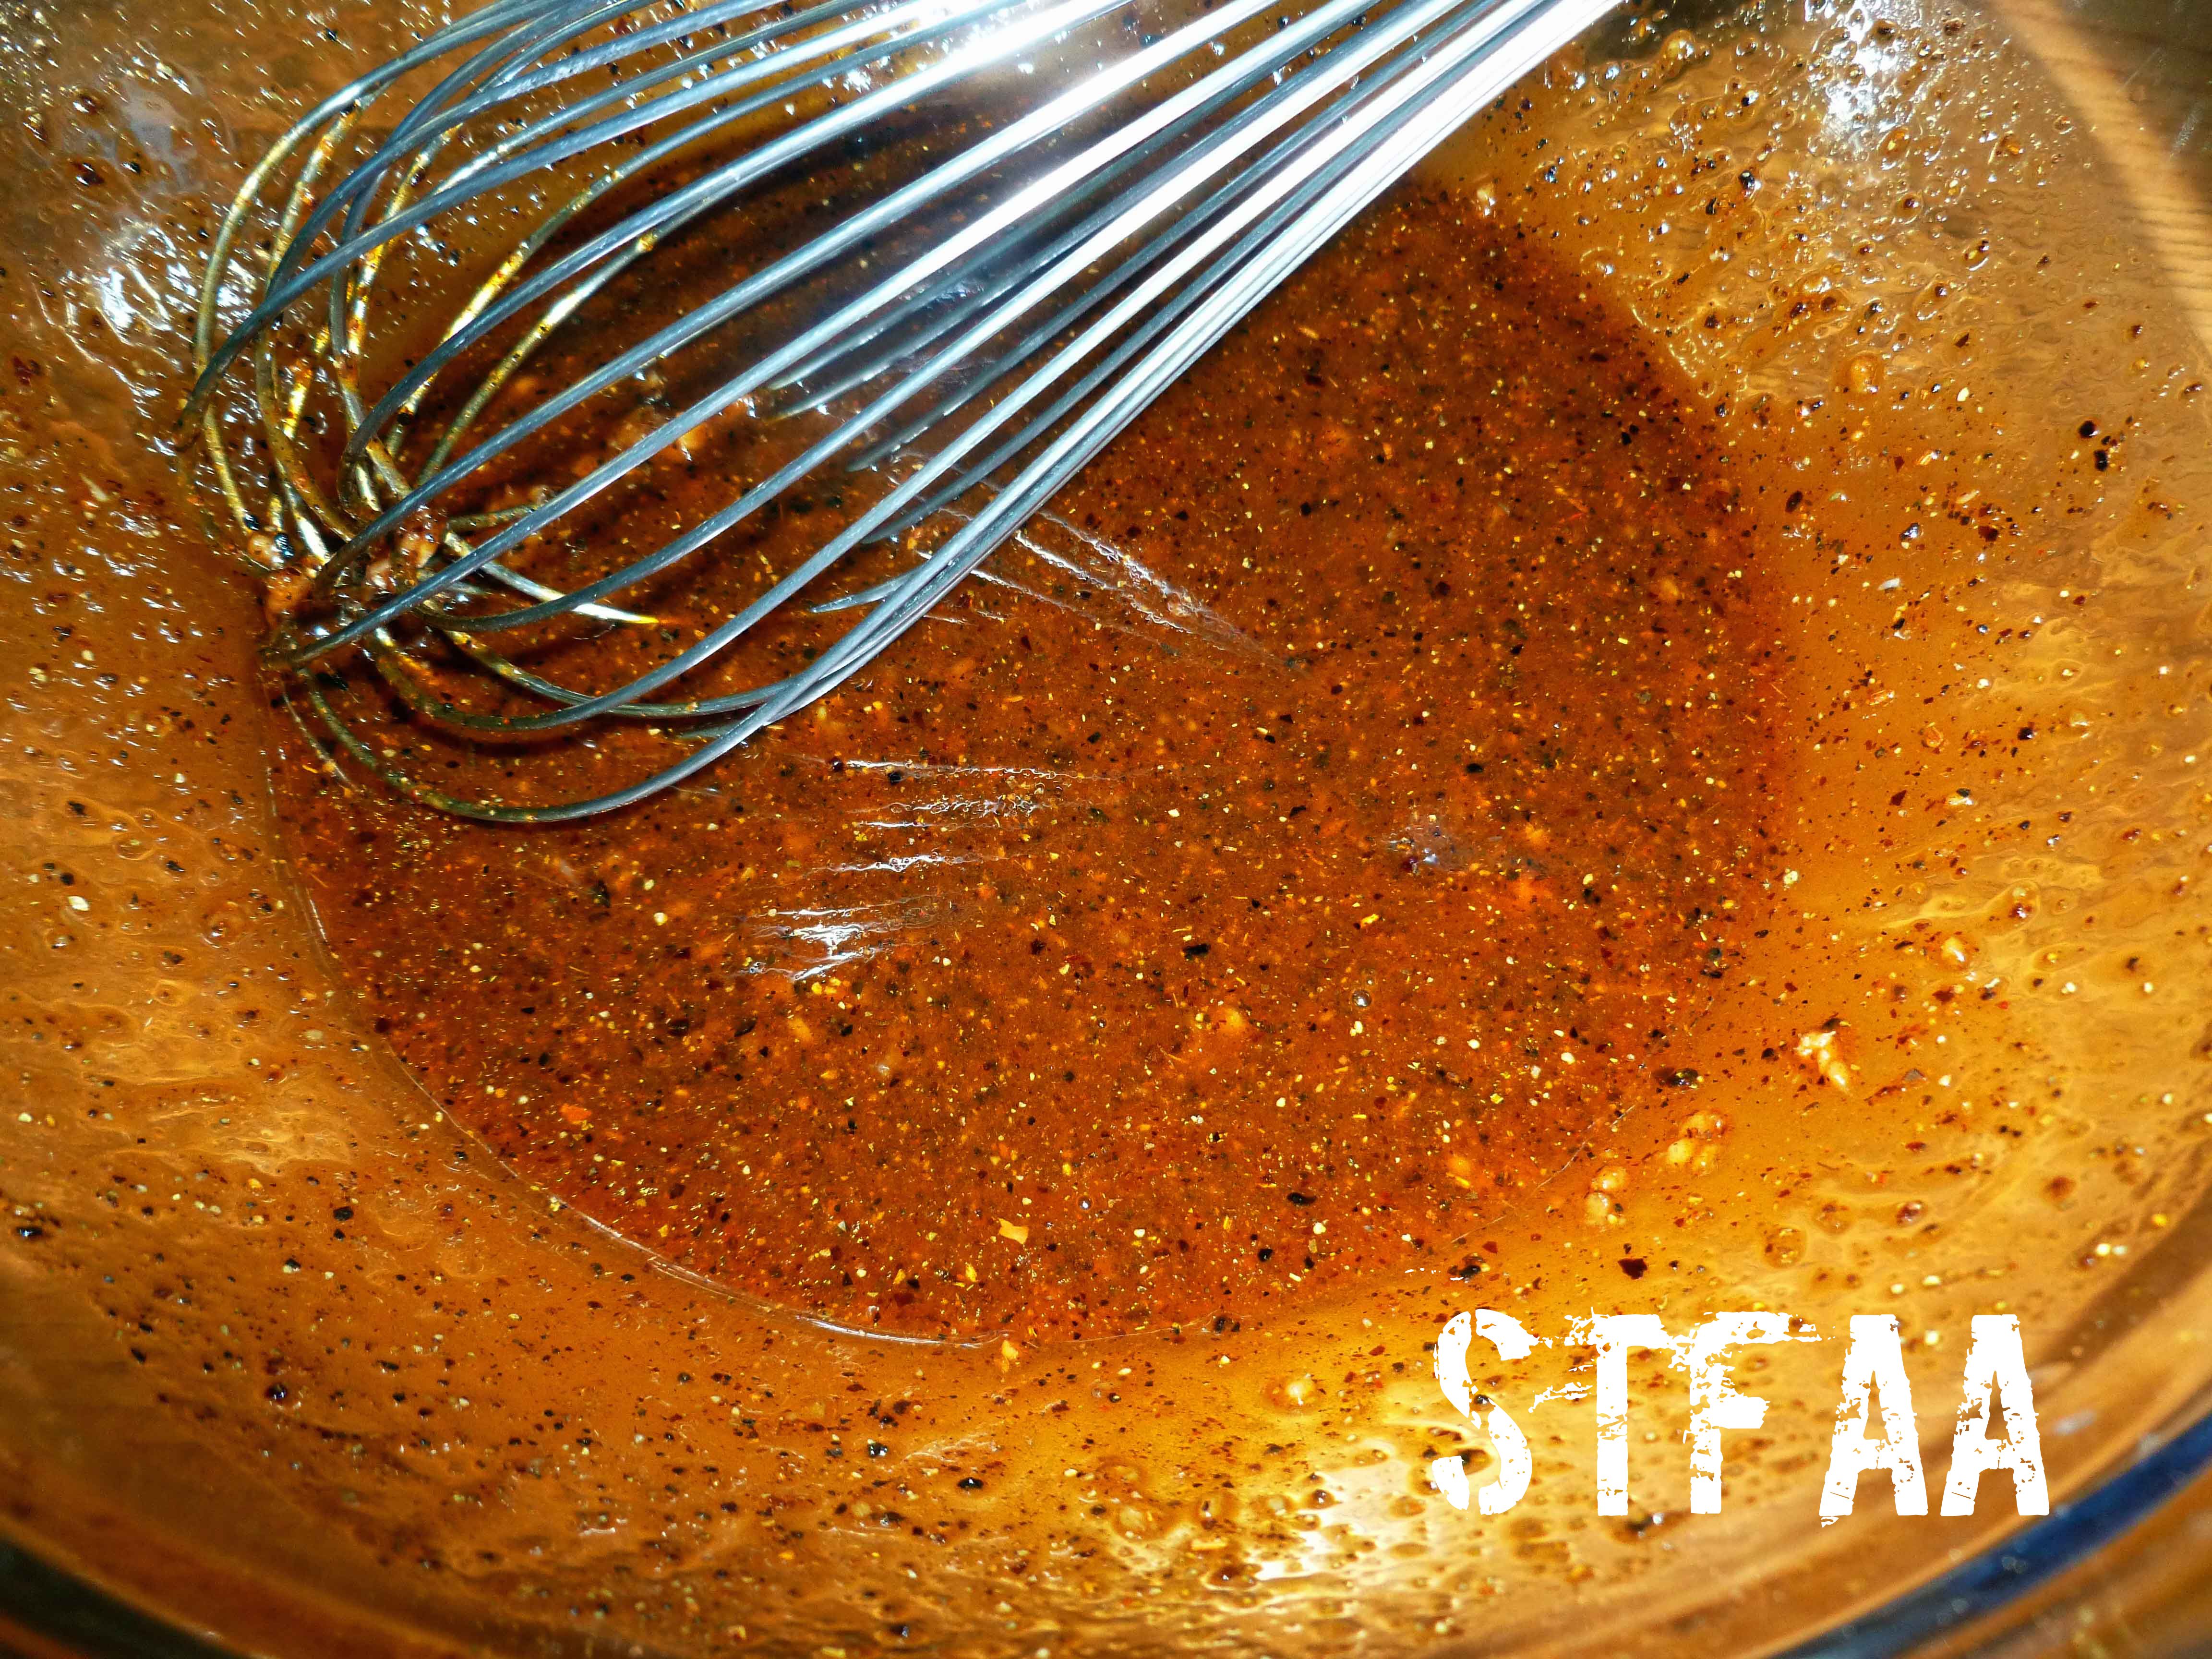
Fajita Marinated Steak Tips
2 pounds of steak tips
4 Tablespoons of olive oil or other safe for you oil
Juice of one lime, freshly squeezed
4 garlic cloves, minced
2 Tablespoons of DIY Chili Powder or other safe for you chili powder
1 teaspoon of ground black pepper
1 teaspoon of salt
1 Tablespoon of brown sugar
Place all ingredients except the steak tips in a bowl and whisk well to thoroughly combine.
Marinade mixture
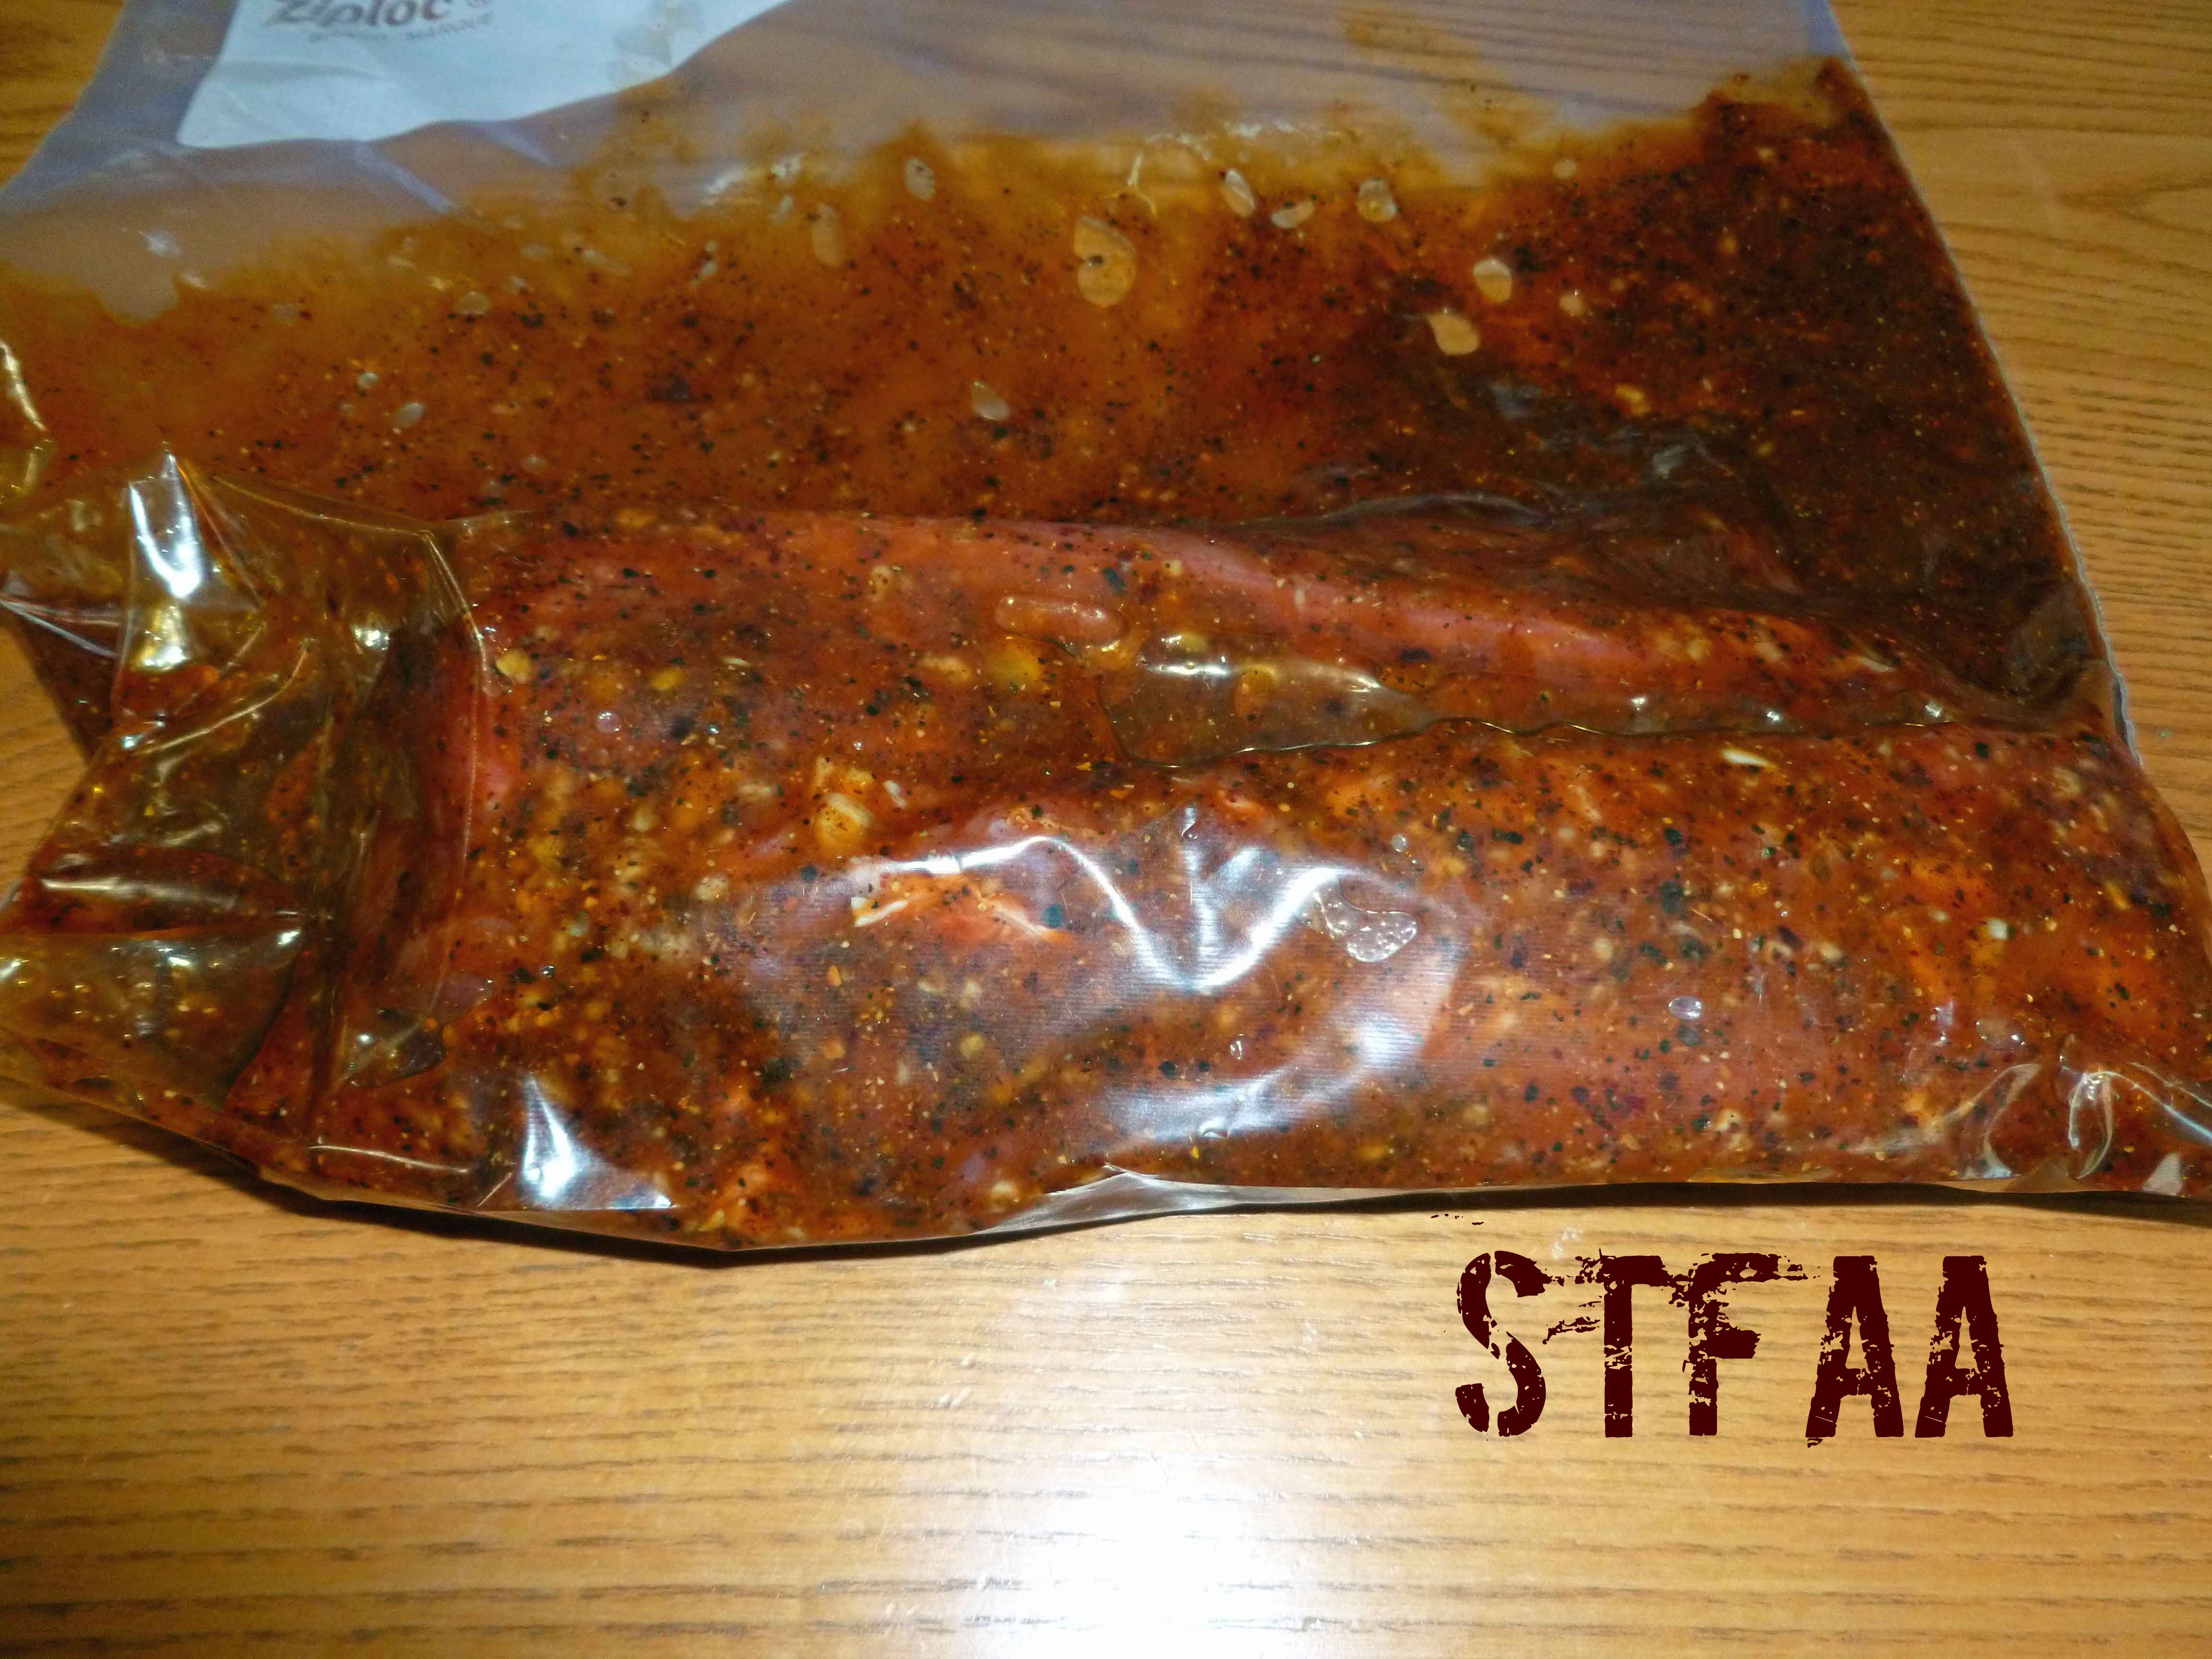
Place the steak tips into a zip top bag, and pour the marinade mixture over them, scraping the bowl down into the zip top bag. Squeeze air out of bag so that the steak tips are covered in marinade and place in the refrigerator for at least an hour or overnight.
Steak tips in marinade in zip top bag
If grilling, preheat your grill to about 500°F. Remove tips from marinade and place on the grill. Grill about 8-10 minutes a side (turning once), or until the temperature reaches about 135°F for rare, 145°F for medium rare, 160°F for medium or 170°F for well done.
Steak tips on grill
If broiling, preheat your oven to broil. Place a rack on a baking sheet, and place the tips on the rack, about 2-3 inches from the broiler element. Broil 8-10 minutes a side (turning once), or until the temperature reaches about 135°F for rare, 145°F for medium rare, 160°F for medium or 170°F for well done.
Fajita Marinated Steak Tips
Enjoy!
Notice: Trying to access array offset on value of type bool in /home/maryzahc/public_html/adultfoodallergies.com/wp-content/plugins/wp-ultimate-recipe/helpers/models/recipe.php on line 254
Fajita Marinated Steak Tips
Print Recipe
Great for a quick dinner on the grill! Marinate for at least a hour to overnight for best flavor.
2Tablespoons DIY Chili Powderhttp://adultfoodallergies.com/diy-chili-powder/
1teaspoon black pepper, ground
1teaspoonsea salt
1Tablespoonbrown sugar
Servings: people
Instructions
Place all ingredients except the steak tips in a bowl and whisk well to thoroughly combine.
Place the steak tips into a zip top bag, and pour the marinade mixture over them, scraping the bowl down into the zip top bag. Squeeze air out of bag so that the steak tips are covered in marinade and place in the refrigerator for at least an hour or up to overnight.
If grilling, preheat your grill to about 500°F. Remove tips from marinade and place on the grill. Grill about 8-10 minutes a side (turning once), or until the temperature reaches about 135°F for rare, 145°F for medium rare, 160°F for medium or 170°F for well done.
If broiling, preheat your oven to broil. Place a rack on a baking sheet, and place the tips on the rack, about 2-3 inches from the broiler element. Broil 8-10 minutes a side (turning once), or until the temperature reaches about 135°F for rare, 145°F for medium rare, 160°F for medium or 170°F for well done.
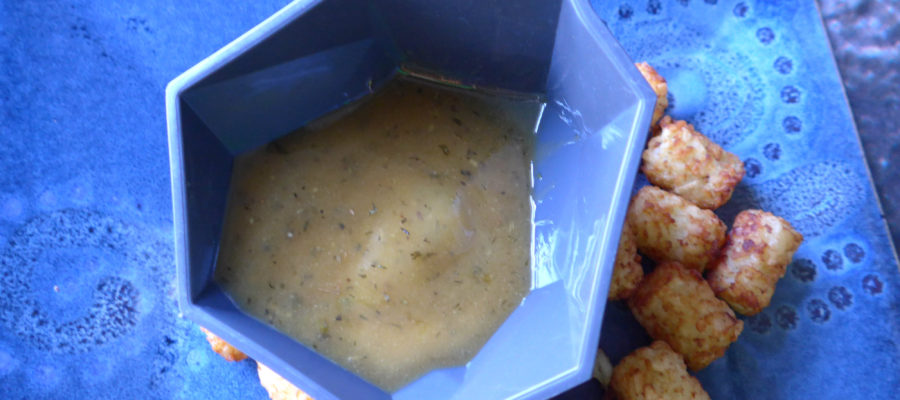
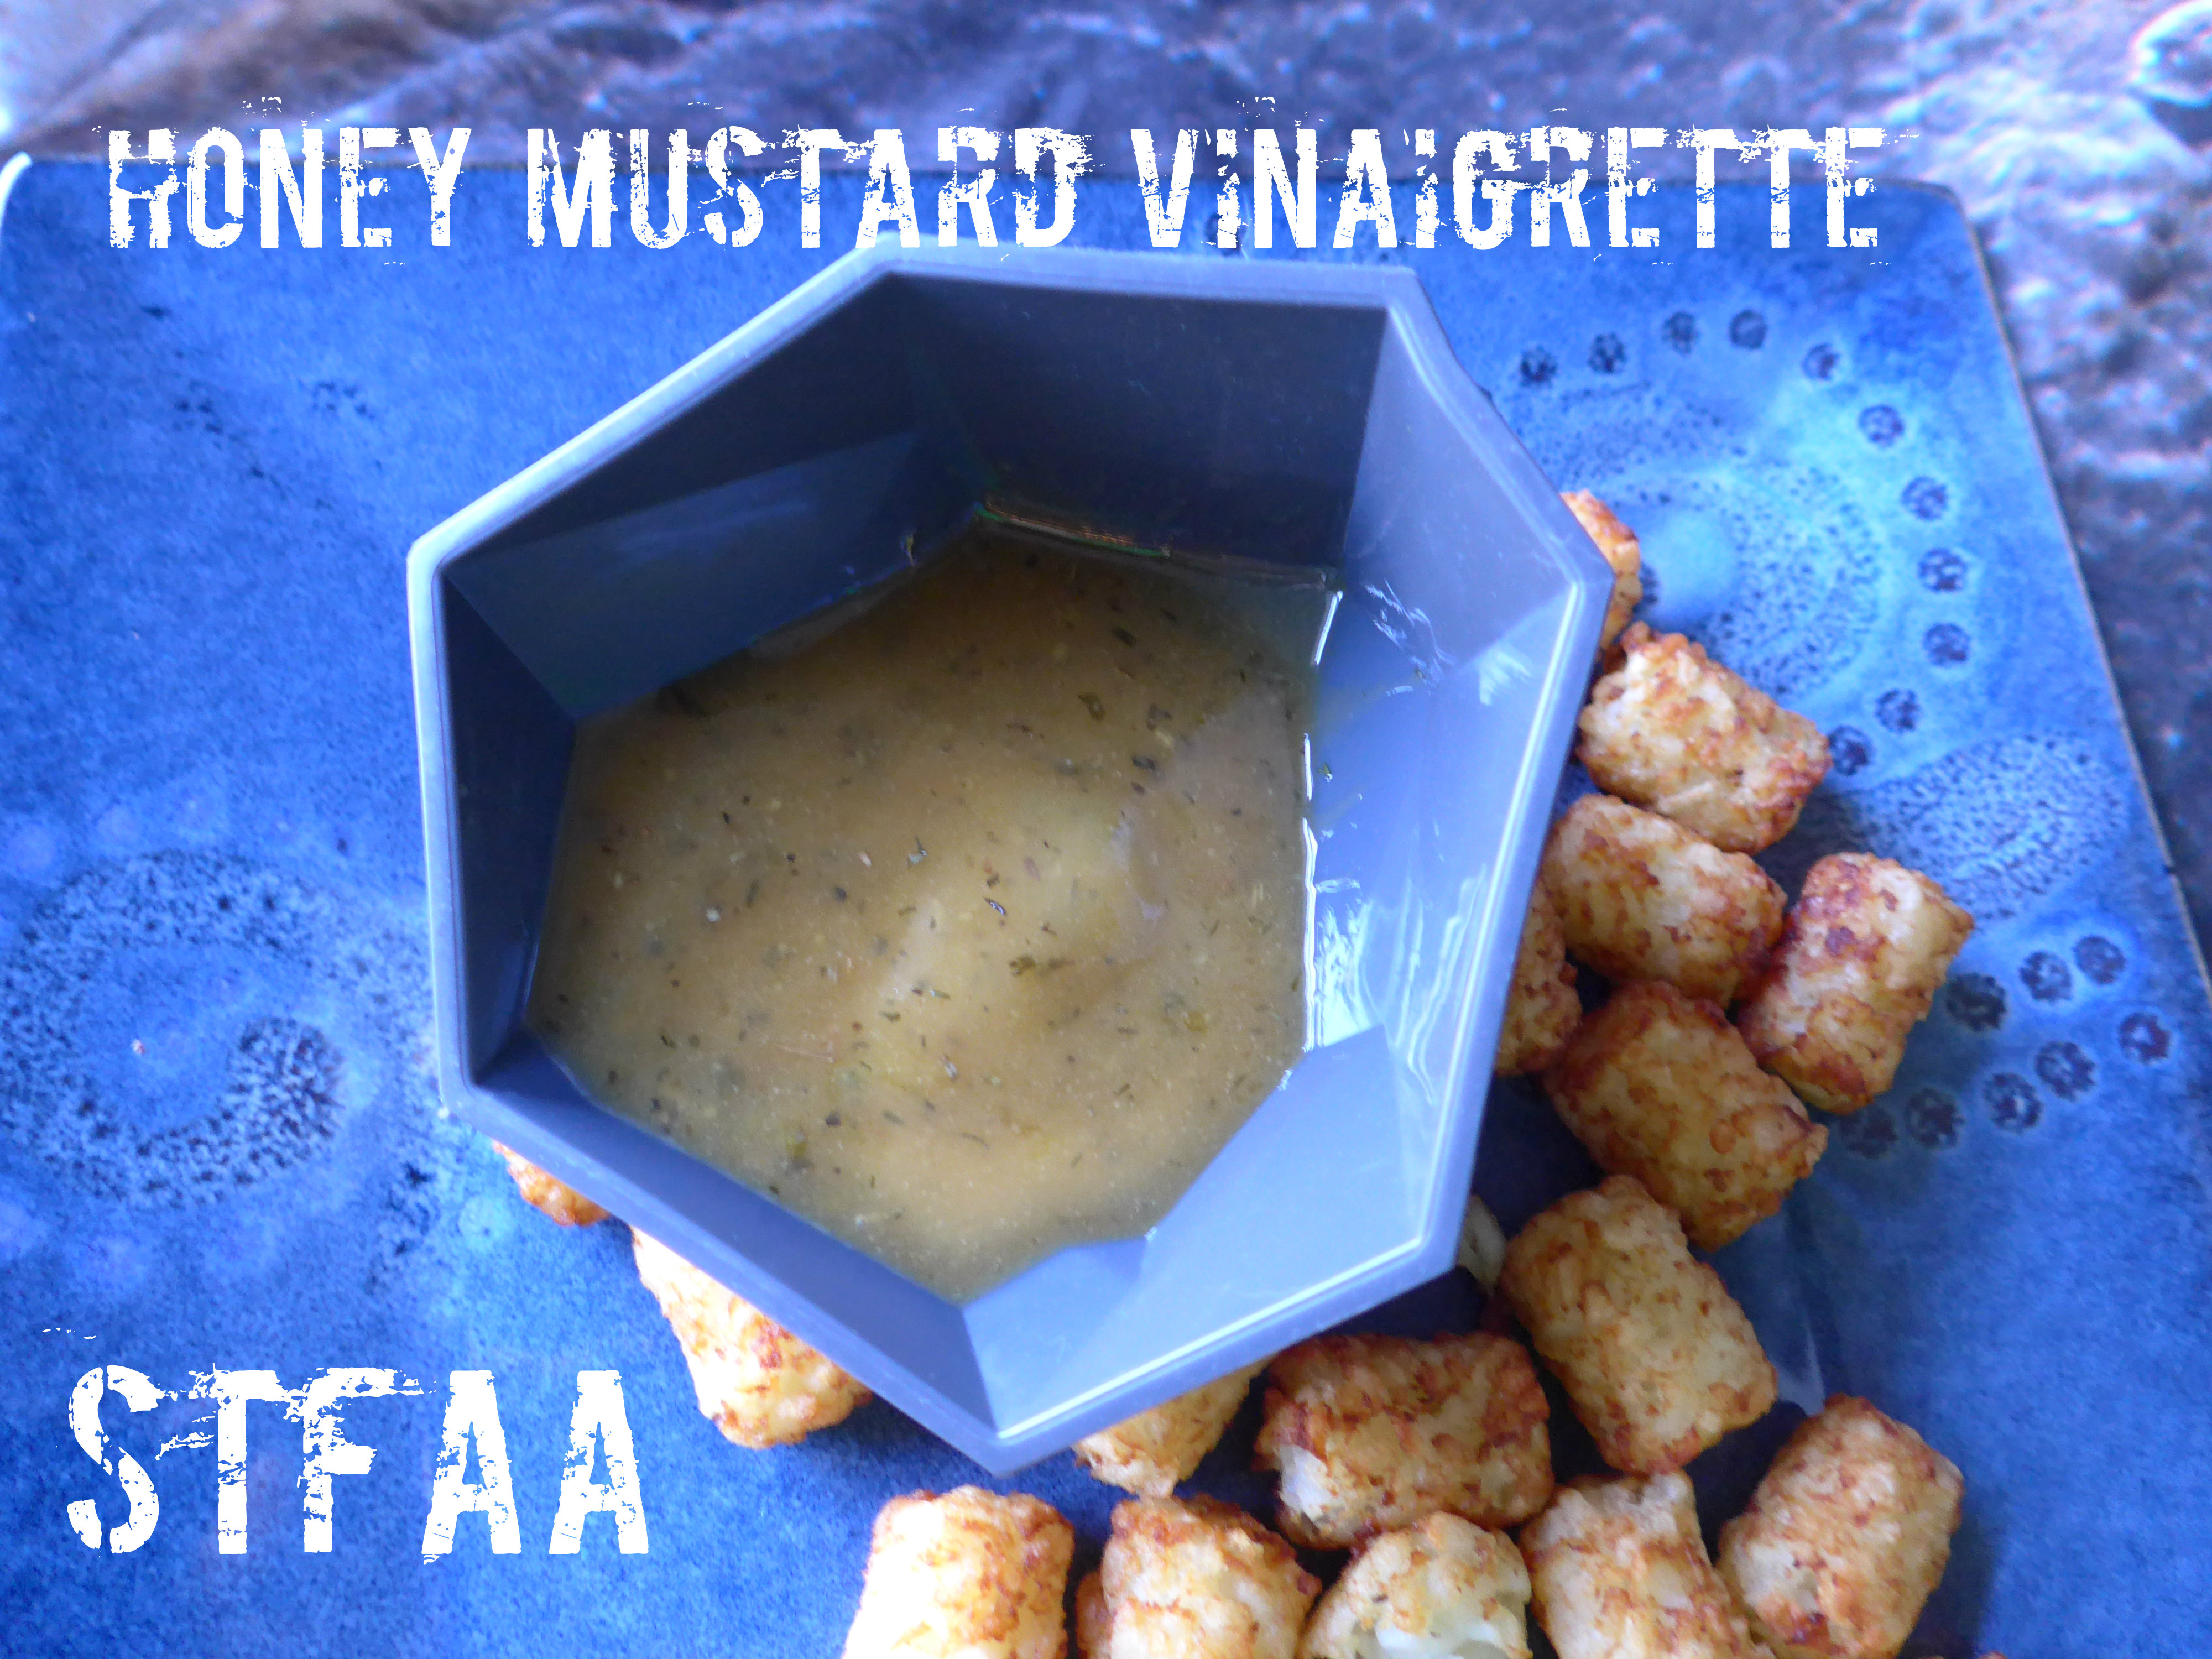
Honey mustard reminds me of childhood, specifically this restaurant, Ray’s on the River, outside of Atlanta. Apparently, it opened in 1984. We moved there in 1985, and my dad bought a piano “for the family.” What that meant was that my brother and I were signed up for piano lessons, with mandatory yearly recitals that involved being dressed up, playing horrible dreck in front of a crowd of the parents and other kids, and then going out to dinner as a family. While piano recitals were decidedly not my thing (I was a competent student, but I’m not a performer), this was the kind of dinner out that I actually really liked. We always went to Ray’s for “nice” dinners out — celebrations of some sort. Ray’s had a jazz band in the bar (and this was well before children were banished from bars — we got Shirley Temples and got to listen), a view of the muddy Chattahoochee River, and the best chicken fingers I’ve ever eaten. They had a crispy, light, almost tempura-esque coating which I never could replicated, not even with all the allergens in the world. They were served with a “fancy” honey mustard sauce, which was not like the gluey opaque salad bar version of honey mustard (which is mayonnaise-based). I’m sure this sauce had real honey and real mustard in it, and not a lot more — and this recipe is my attempt to recreate this flavor of my childhood.
This honey mustard is intended primarily as a salad dressing, but I’ve also cooked salmon, chicken, and potatoes in it with great results. Pick your herbs based on your destination, and you’ll do fine — I prefer the herbes de provence on chicken and salad, and the dill for fish, but the extra dressing never goes to waste no matter which version I make.
Honey Mustard. It’s better than piano recitals.
Notice: Trying to access array offset on value of type bool in /home/maryzahc/public_html/adultfoodallergies.com/wp-content/plugins/wp-ultimate-recipe/helpers/models/recipe.php on line 254
Honey Mustard Vinaigrette
Print Recipe
This sweet and savory classic gets an adult update with great herbs.
2Tablespoonsvinegar(I’ve used red wine and cider vinegar. Both are good. Use your favorite.)
1/4 – 1/2teaspoonkosher salt
1teaspoonherbes de provenceOR
1teaspoondill
Servings:
Instructions
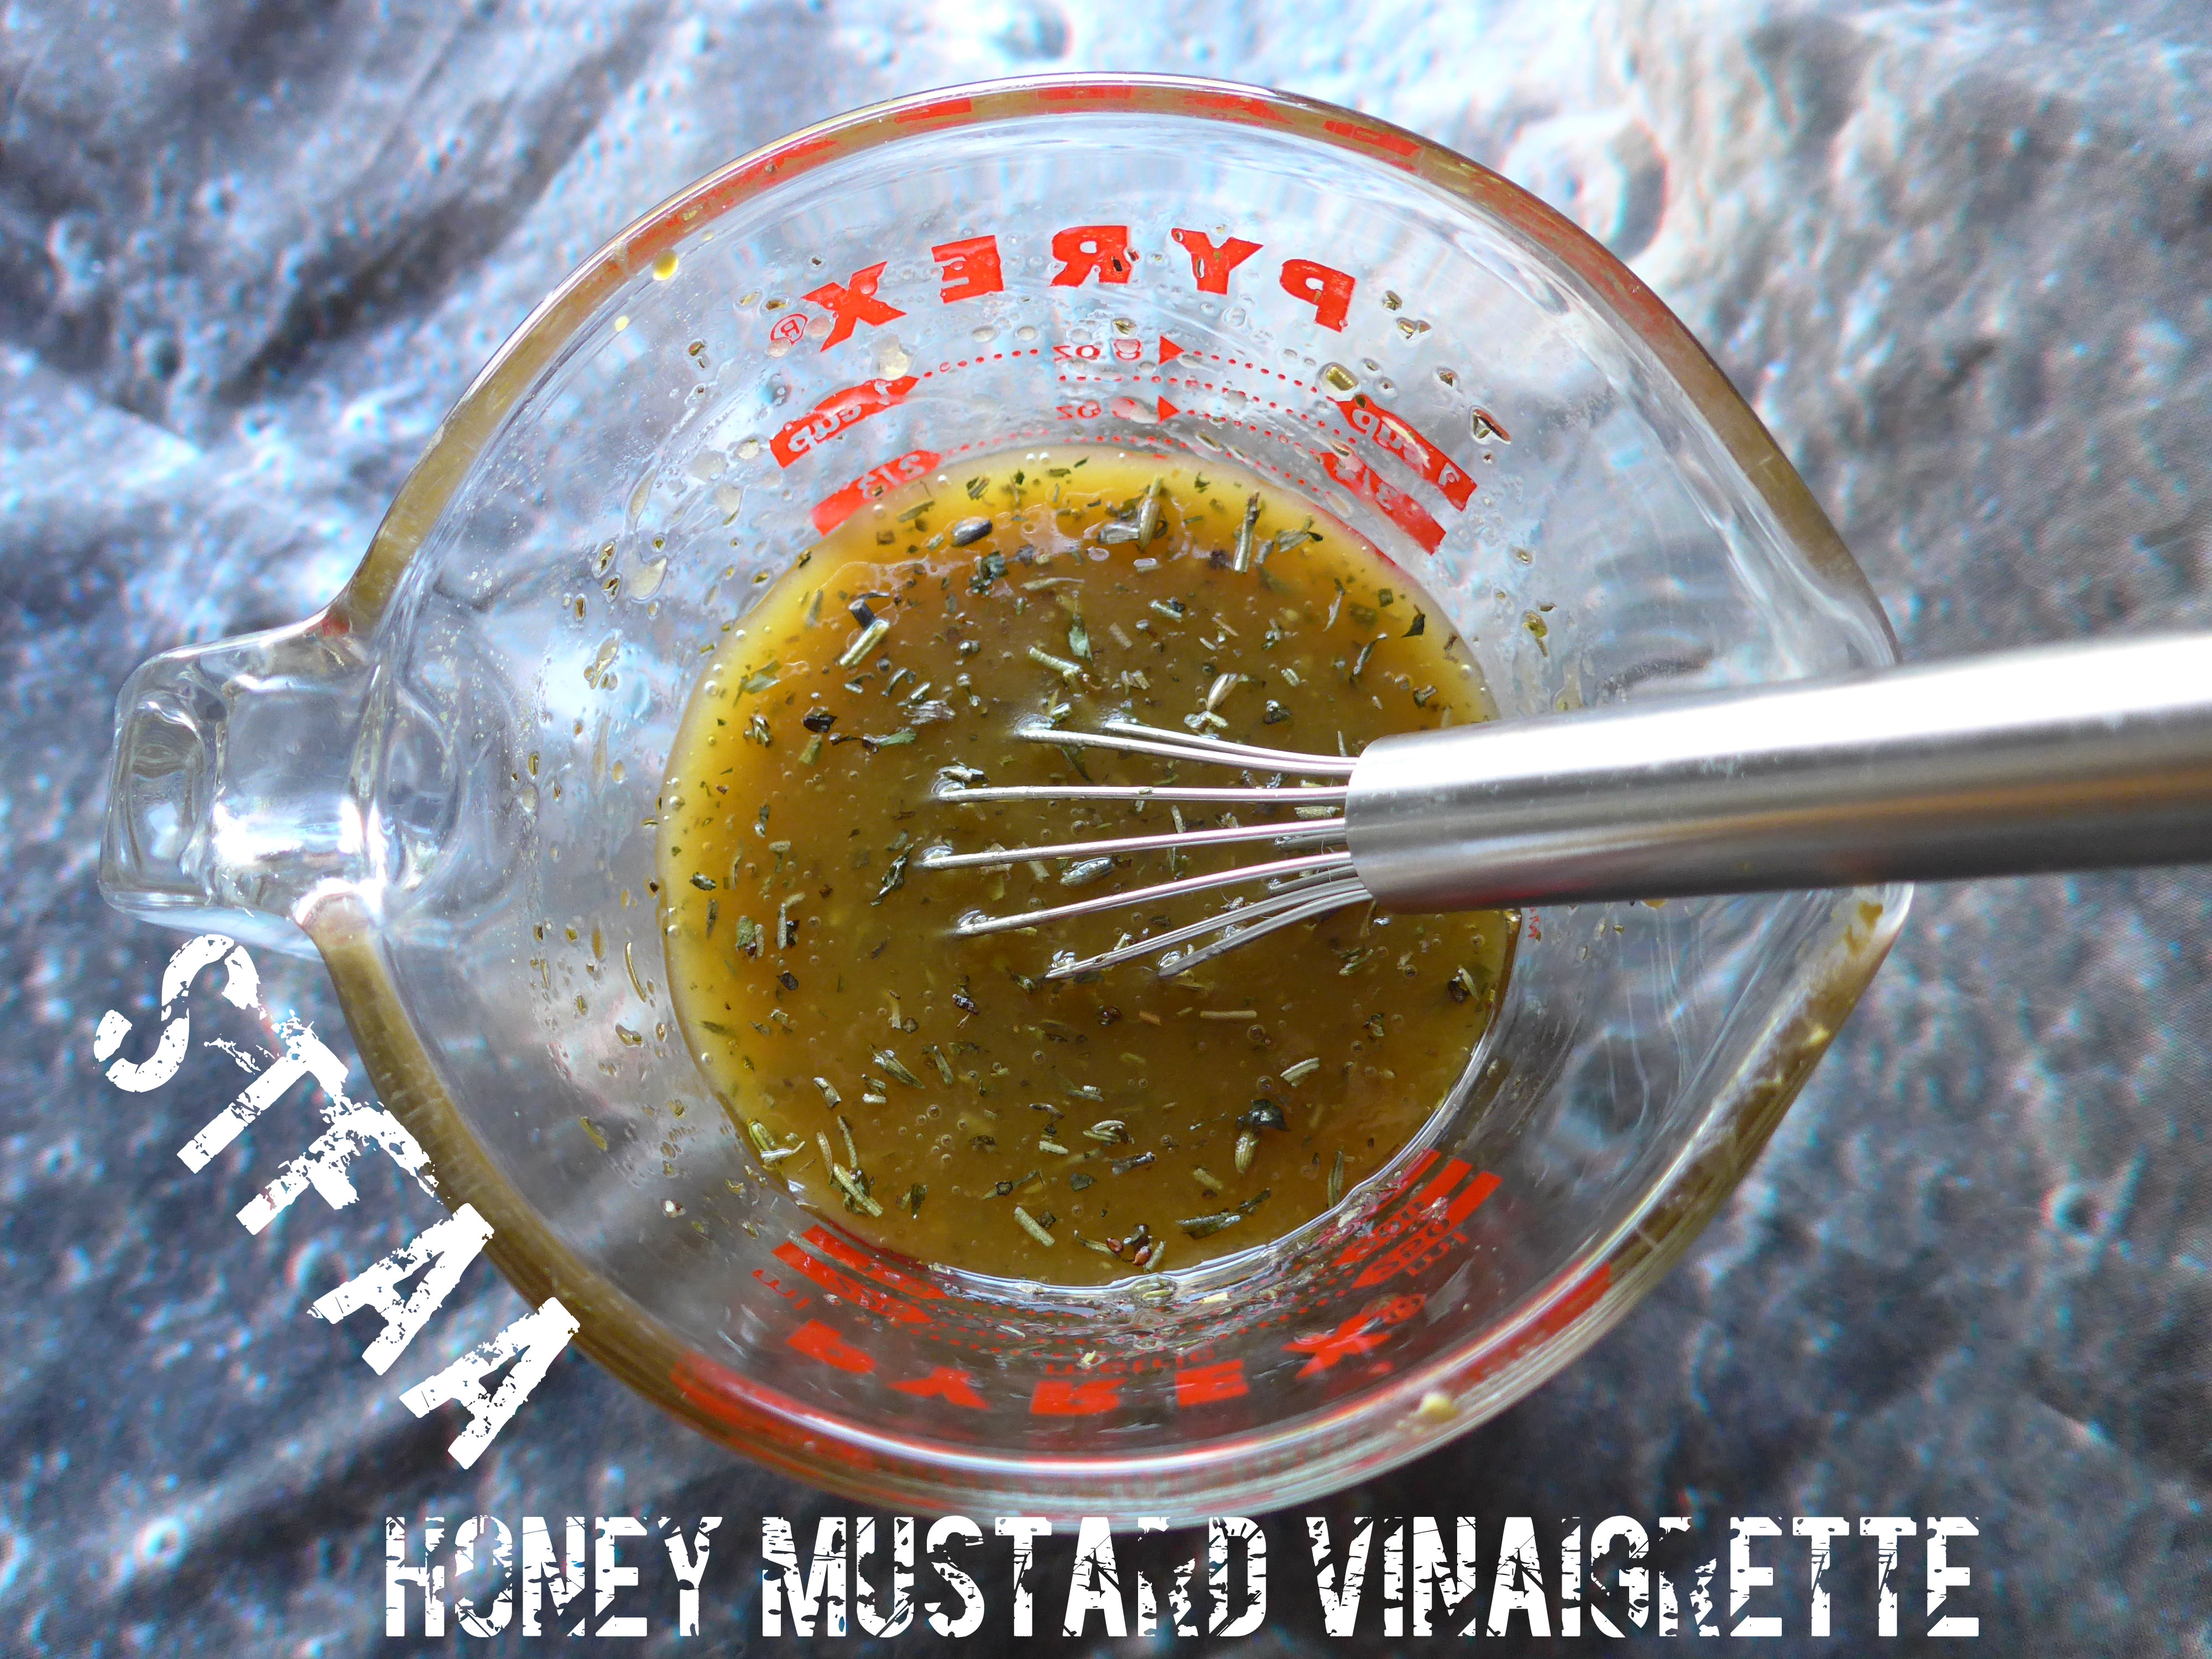
Measure ingredients into a bowl (I use a glass measuring cup, as the spout is good for pouring the dressing/sauce on a salad or dish). Mix well with a whisk.
Recipe Notes
The order of the ingredients is purposeful — if you measure the olive oil first, the honey and mustard will slide right out and you can use the same measuring spoon for the whole thing.
If you want to use this as a dipping sauce, I’d suggest making it the day before. A night in the fridge thickens it up quite nicely.
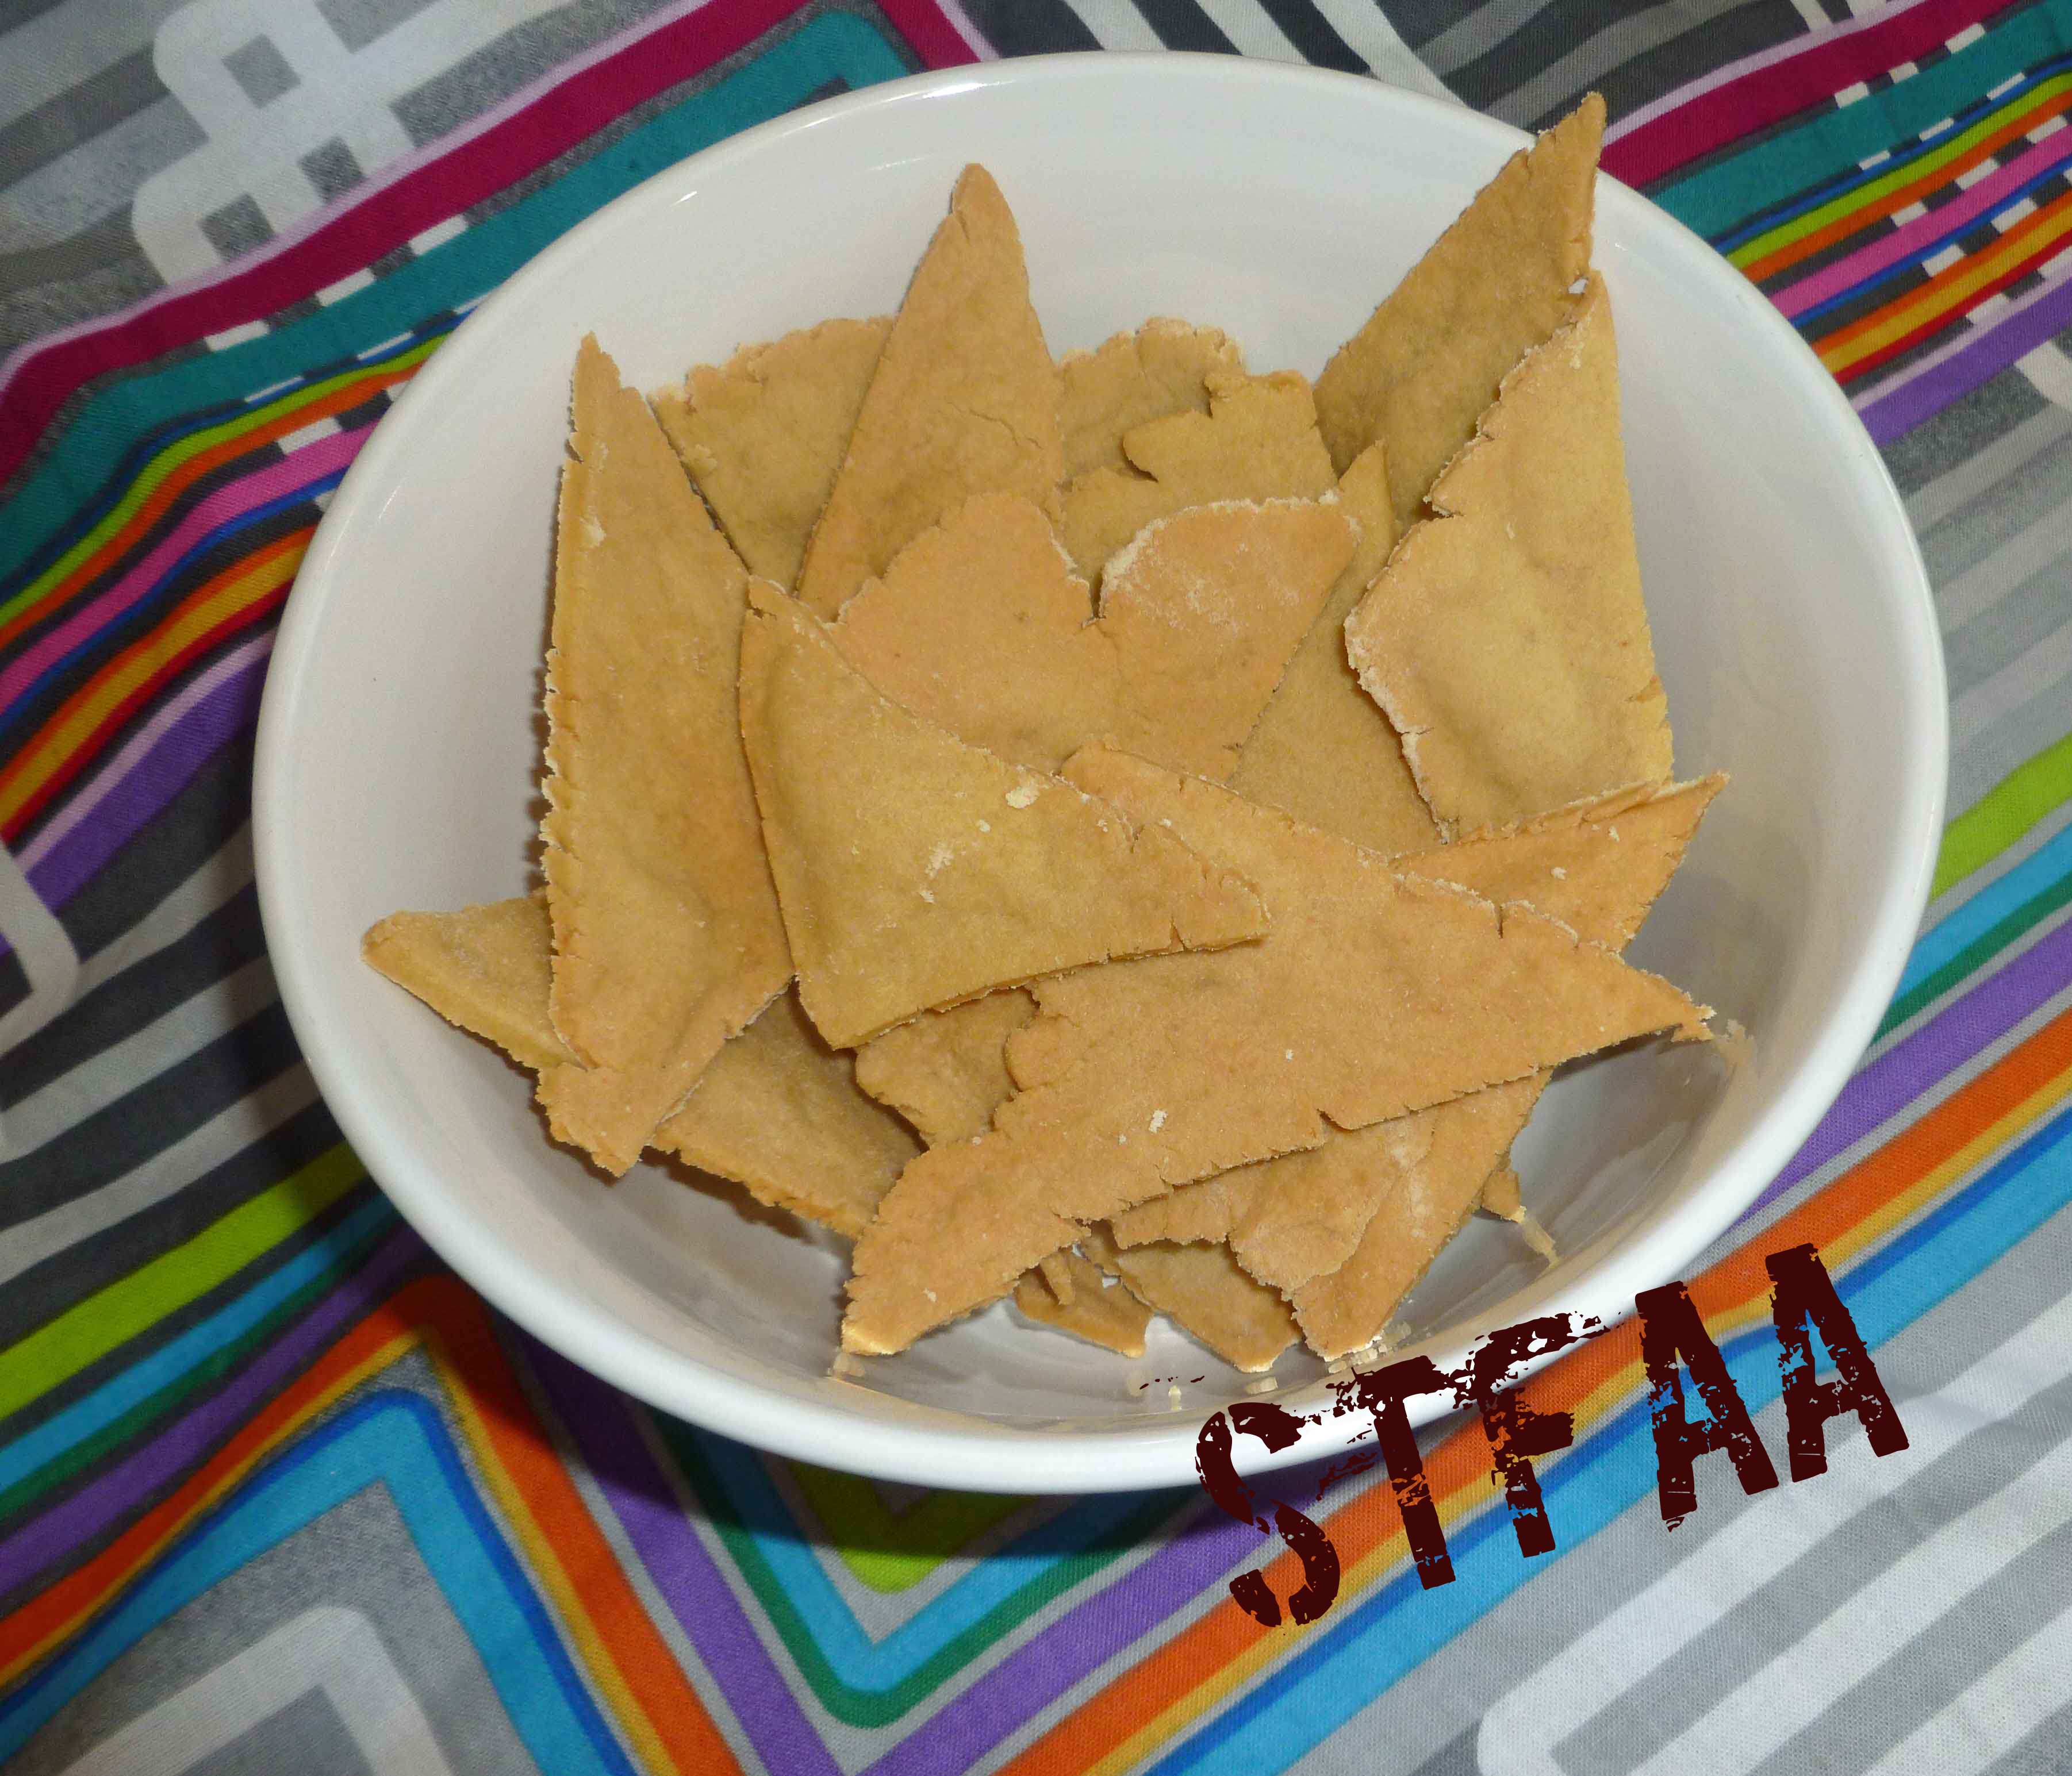
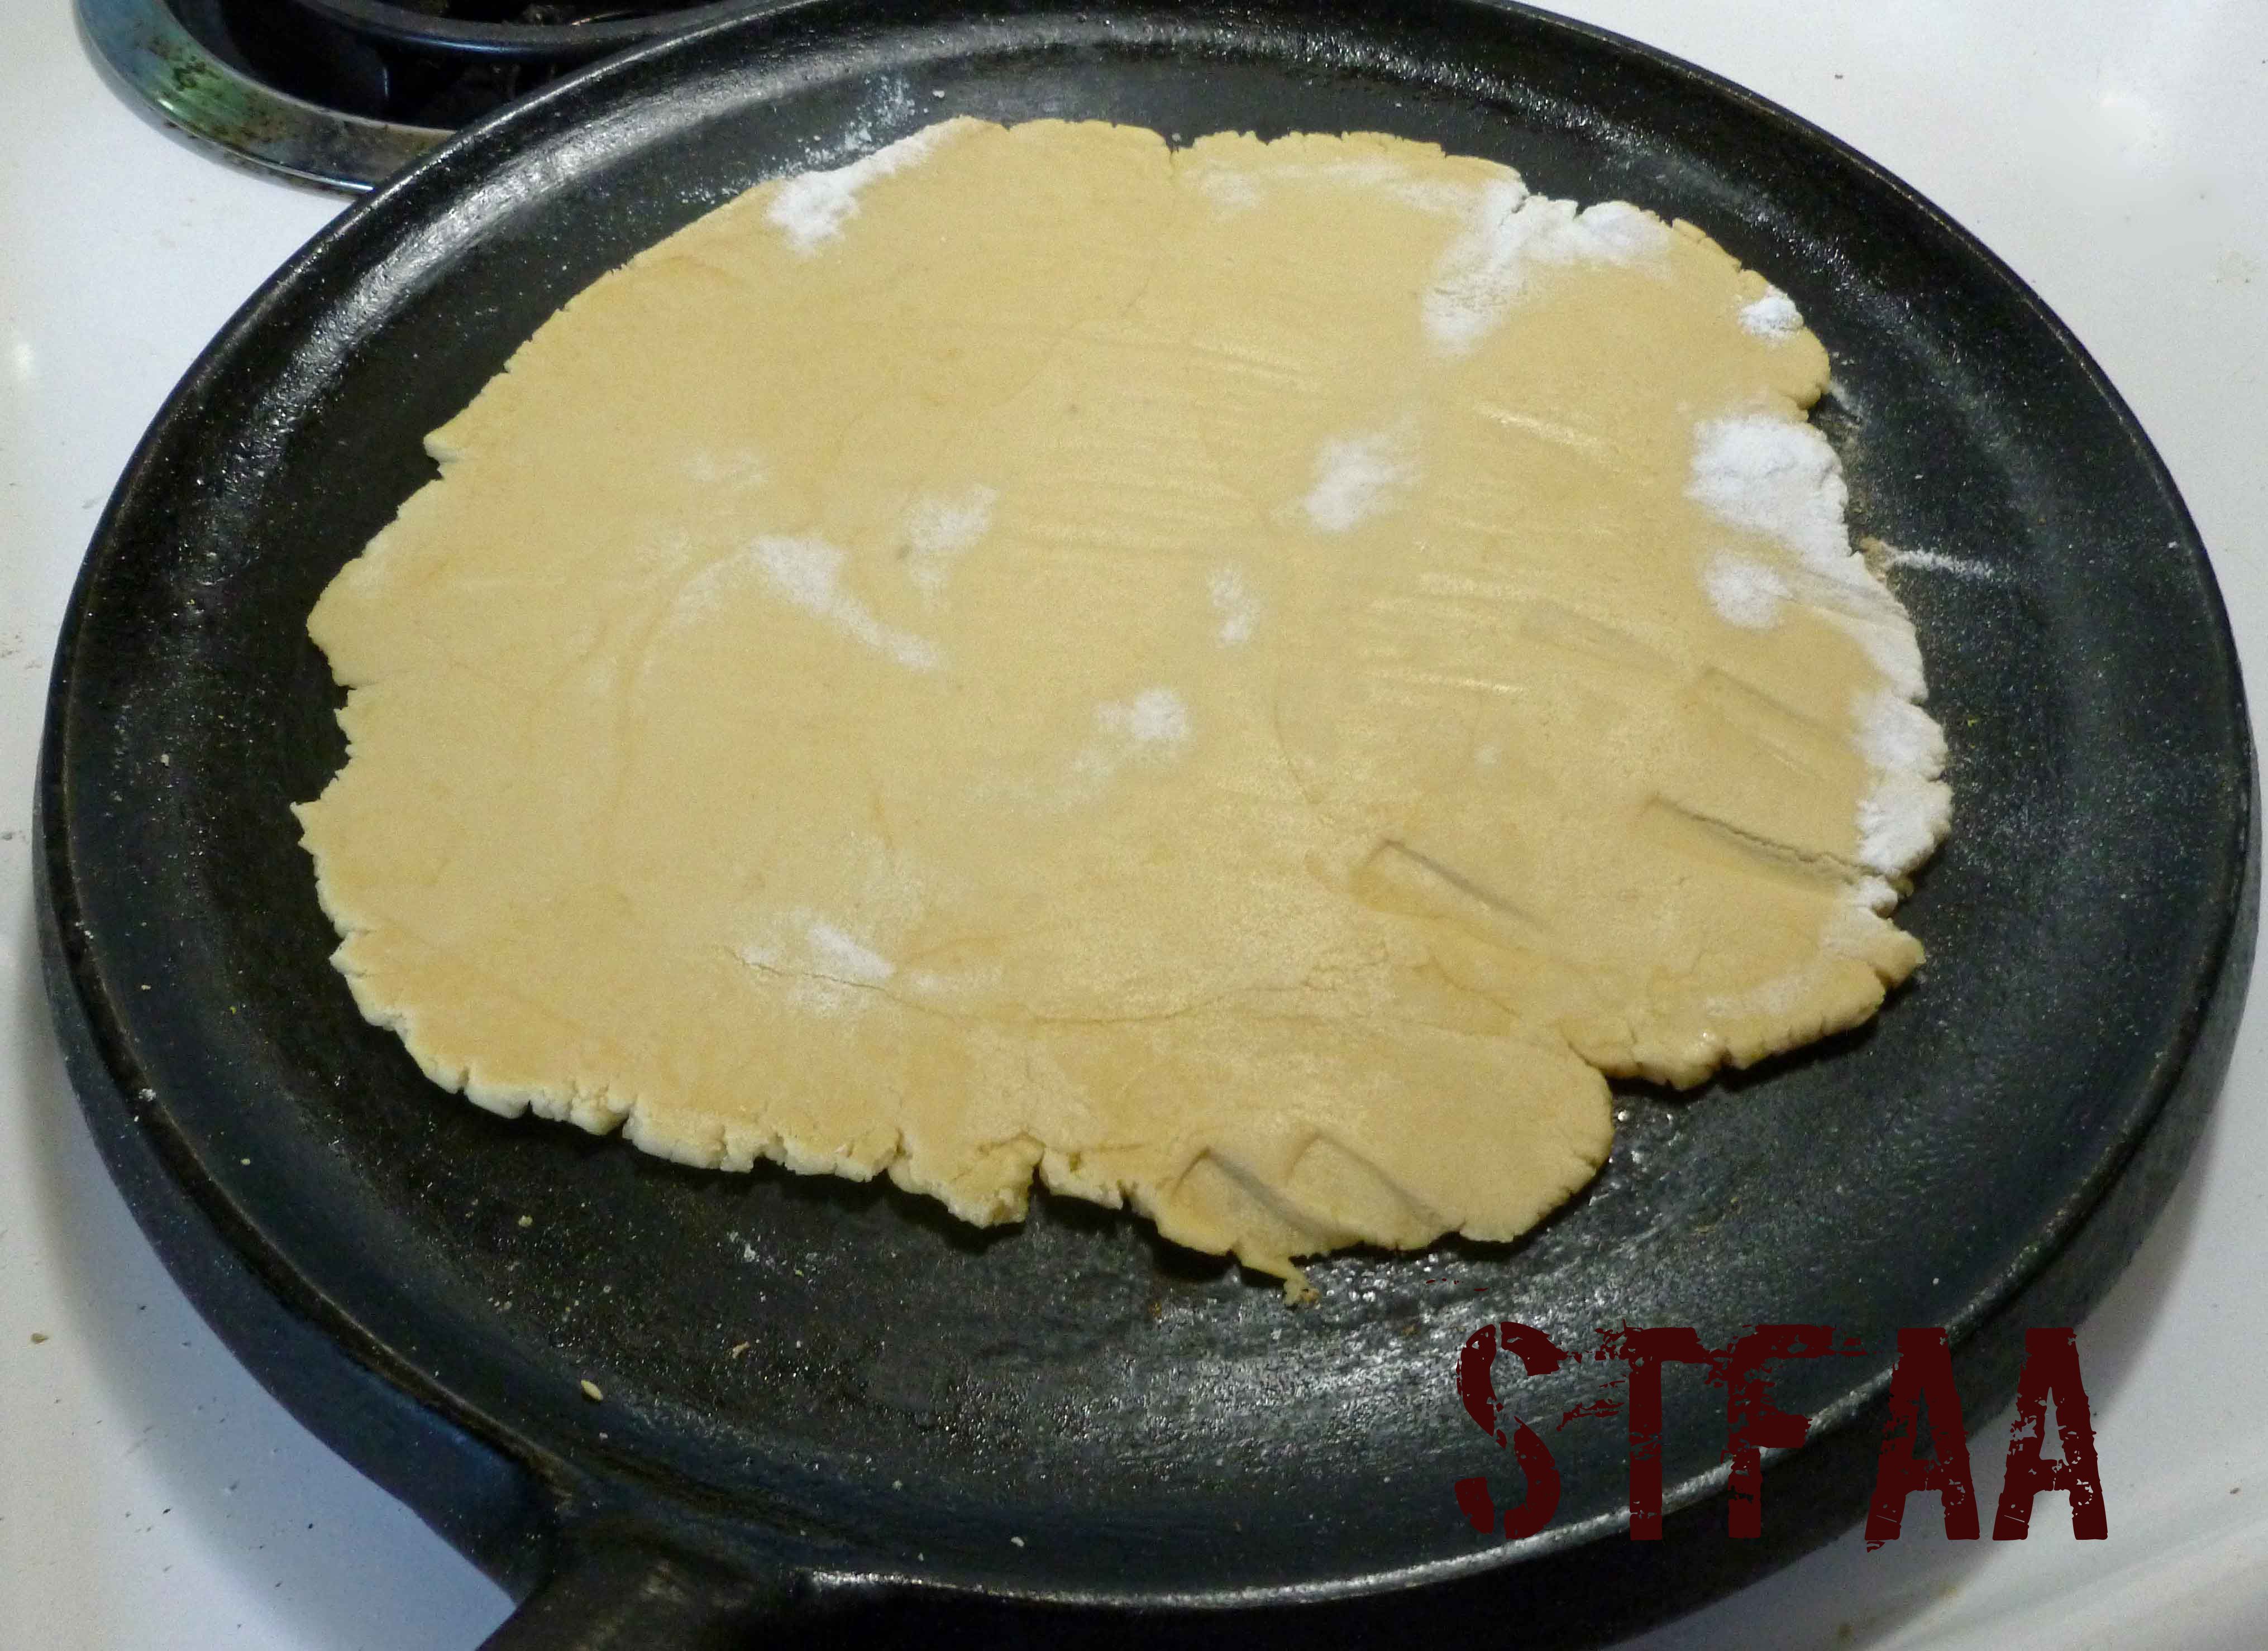
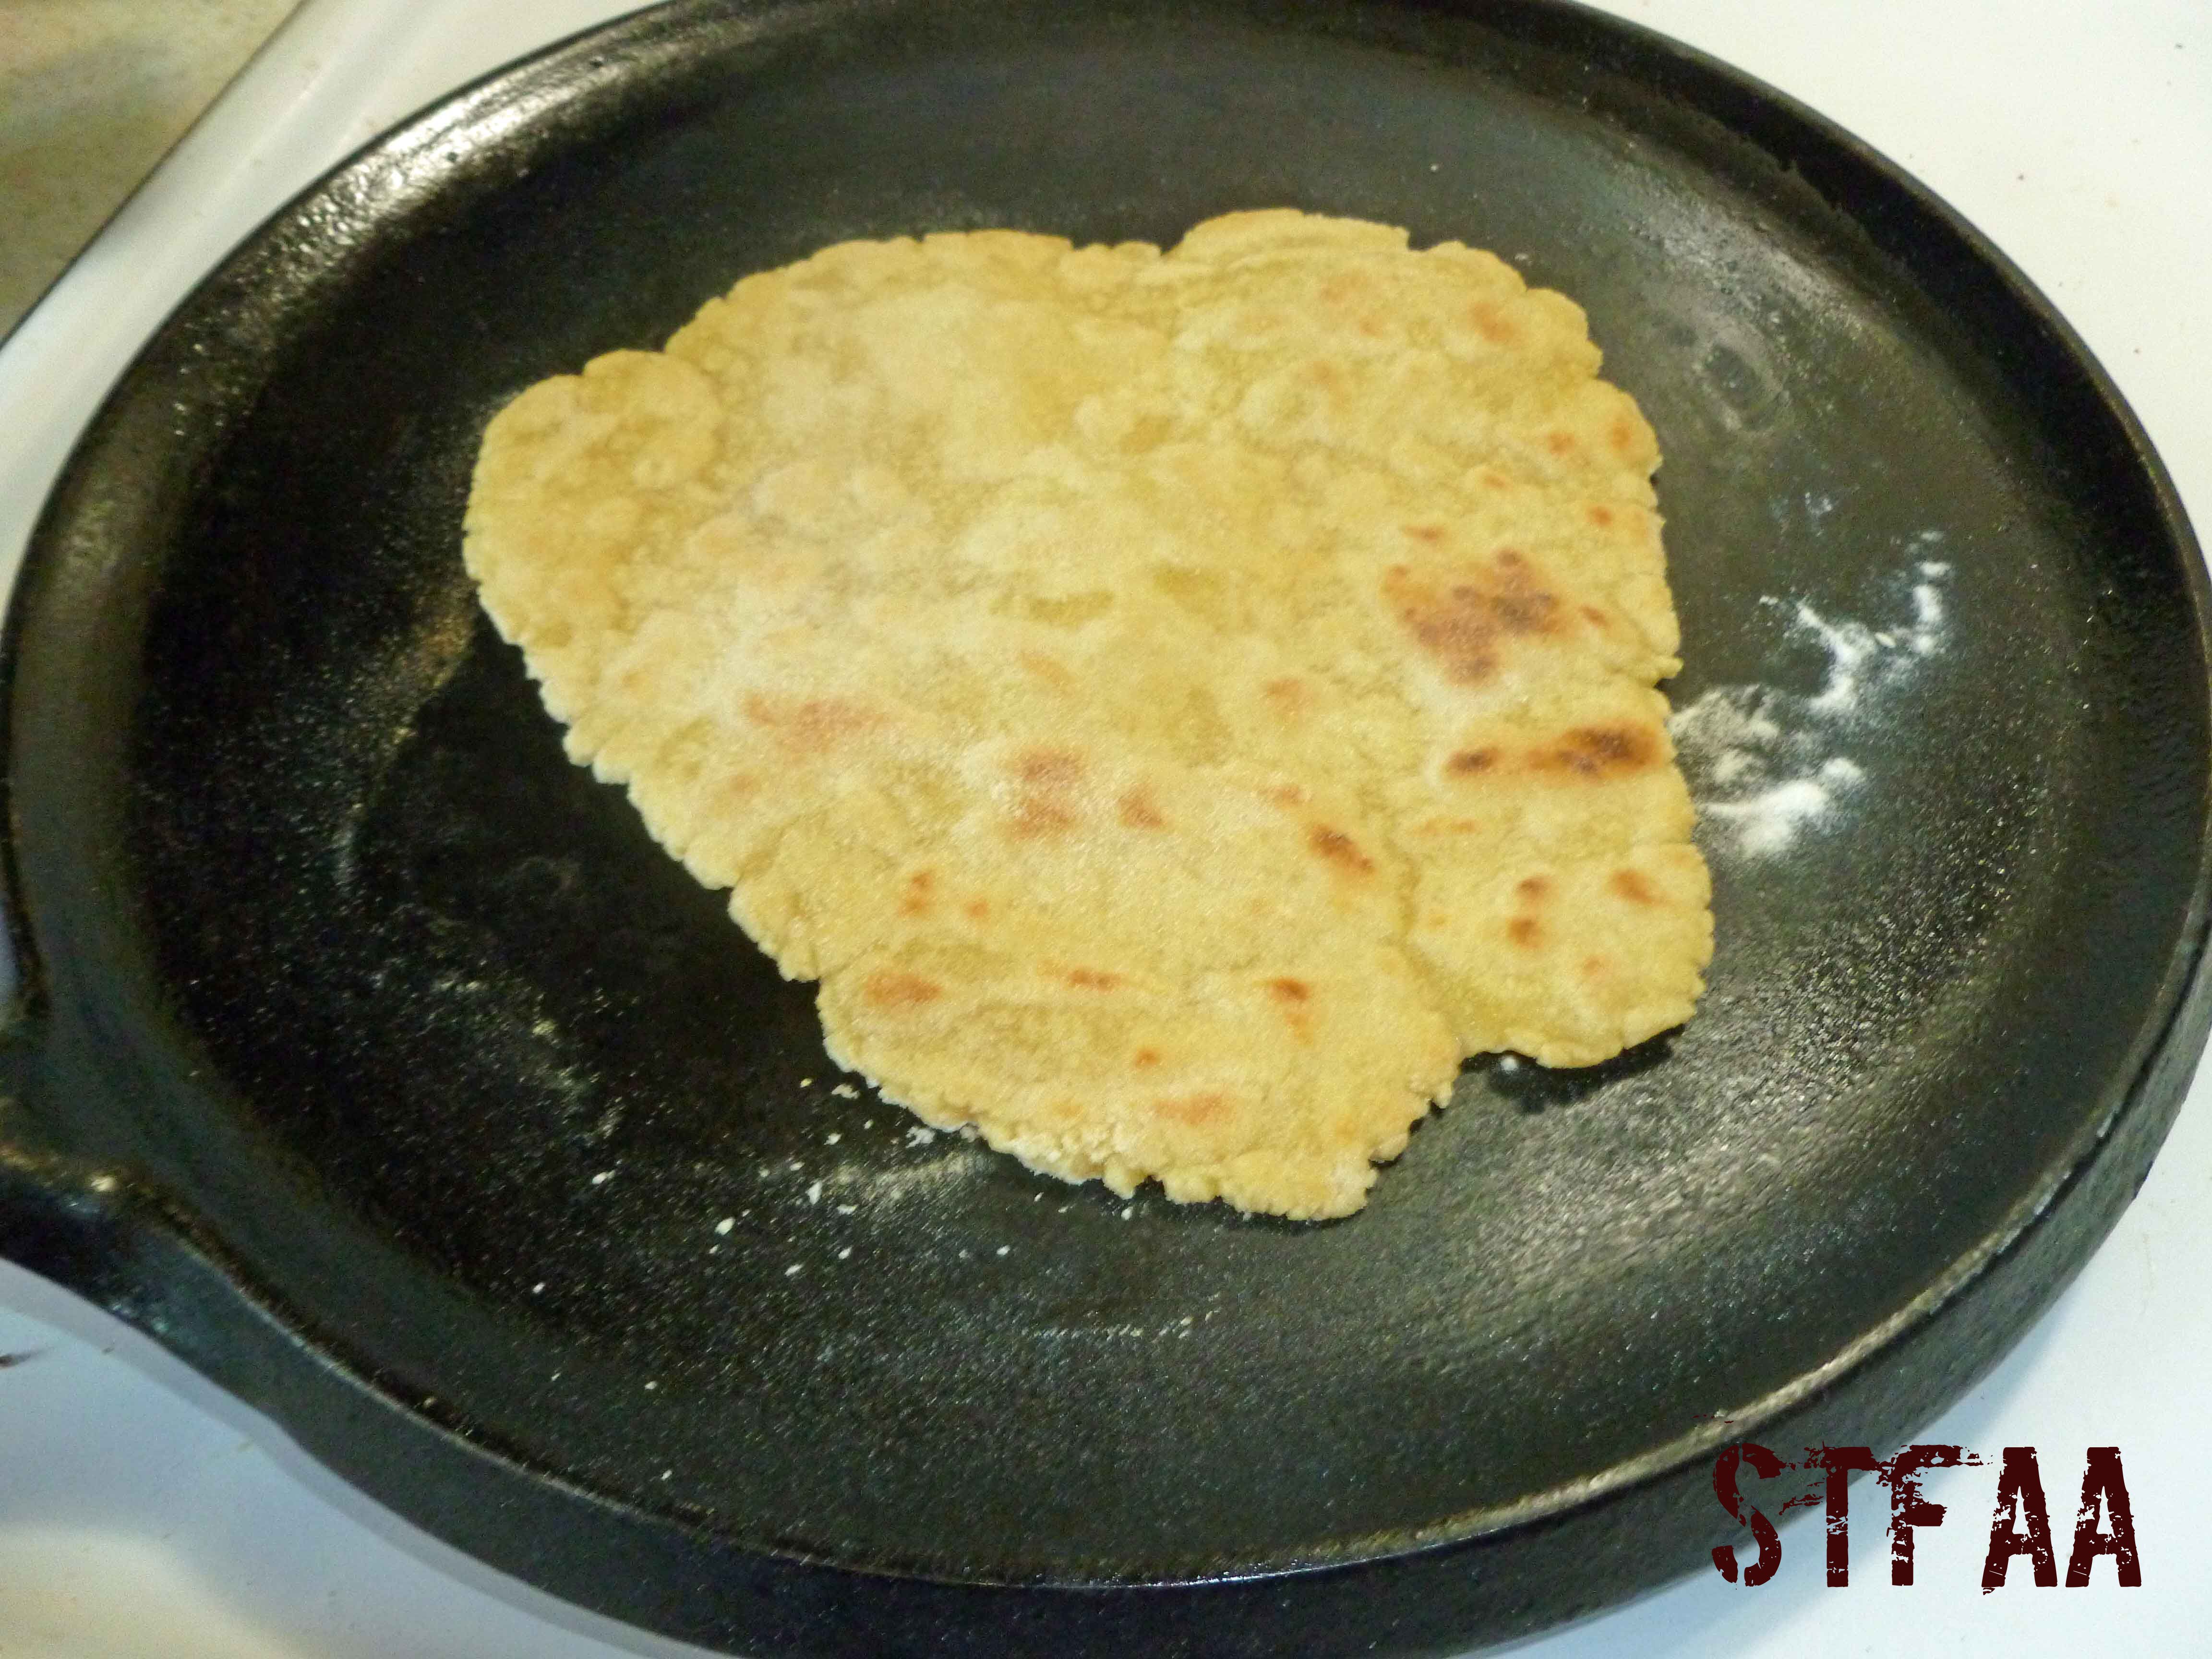
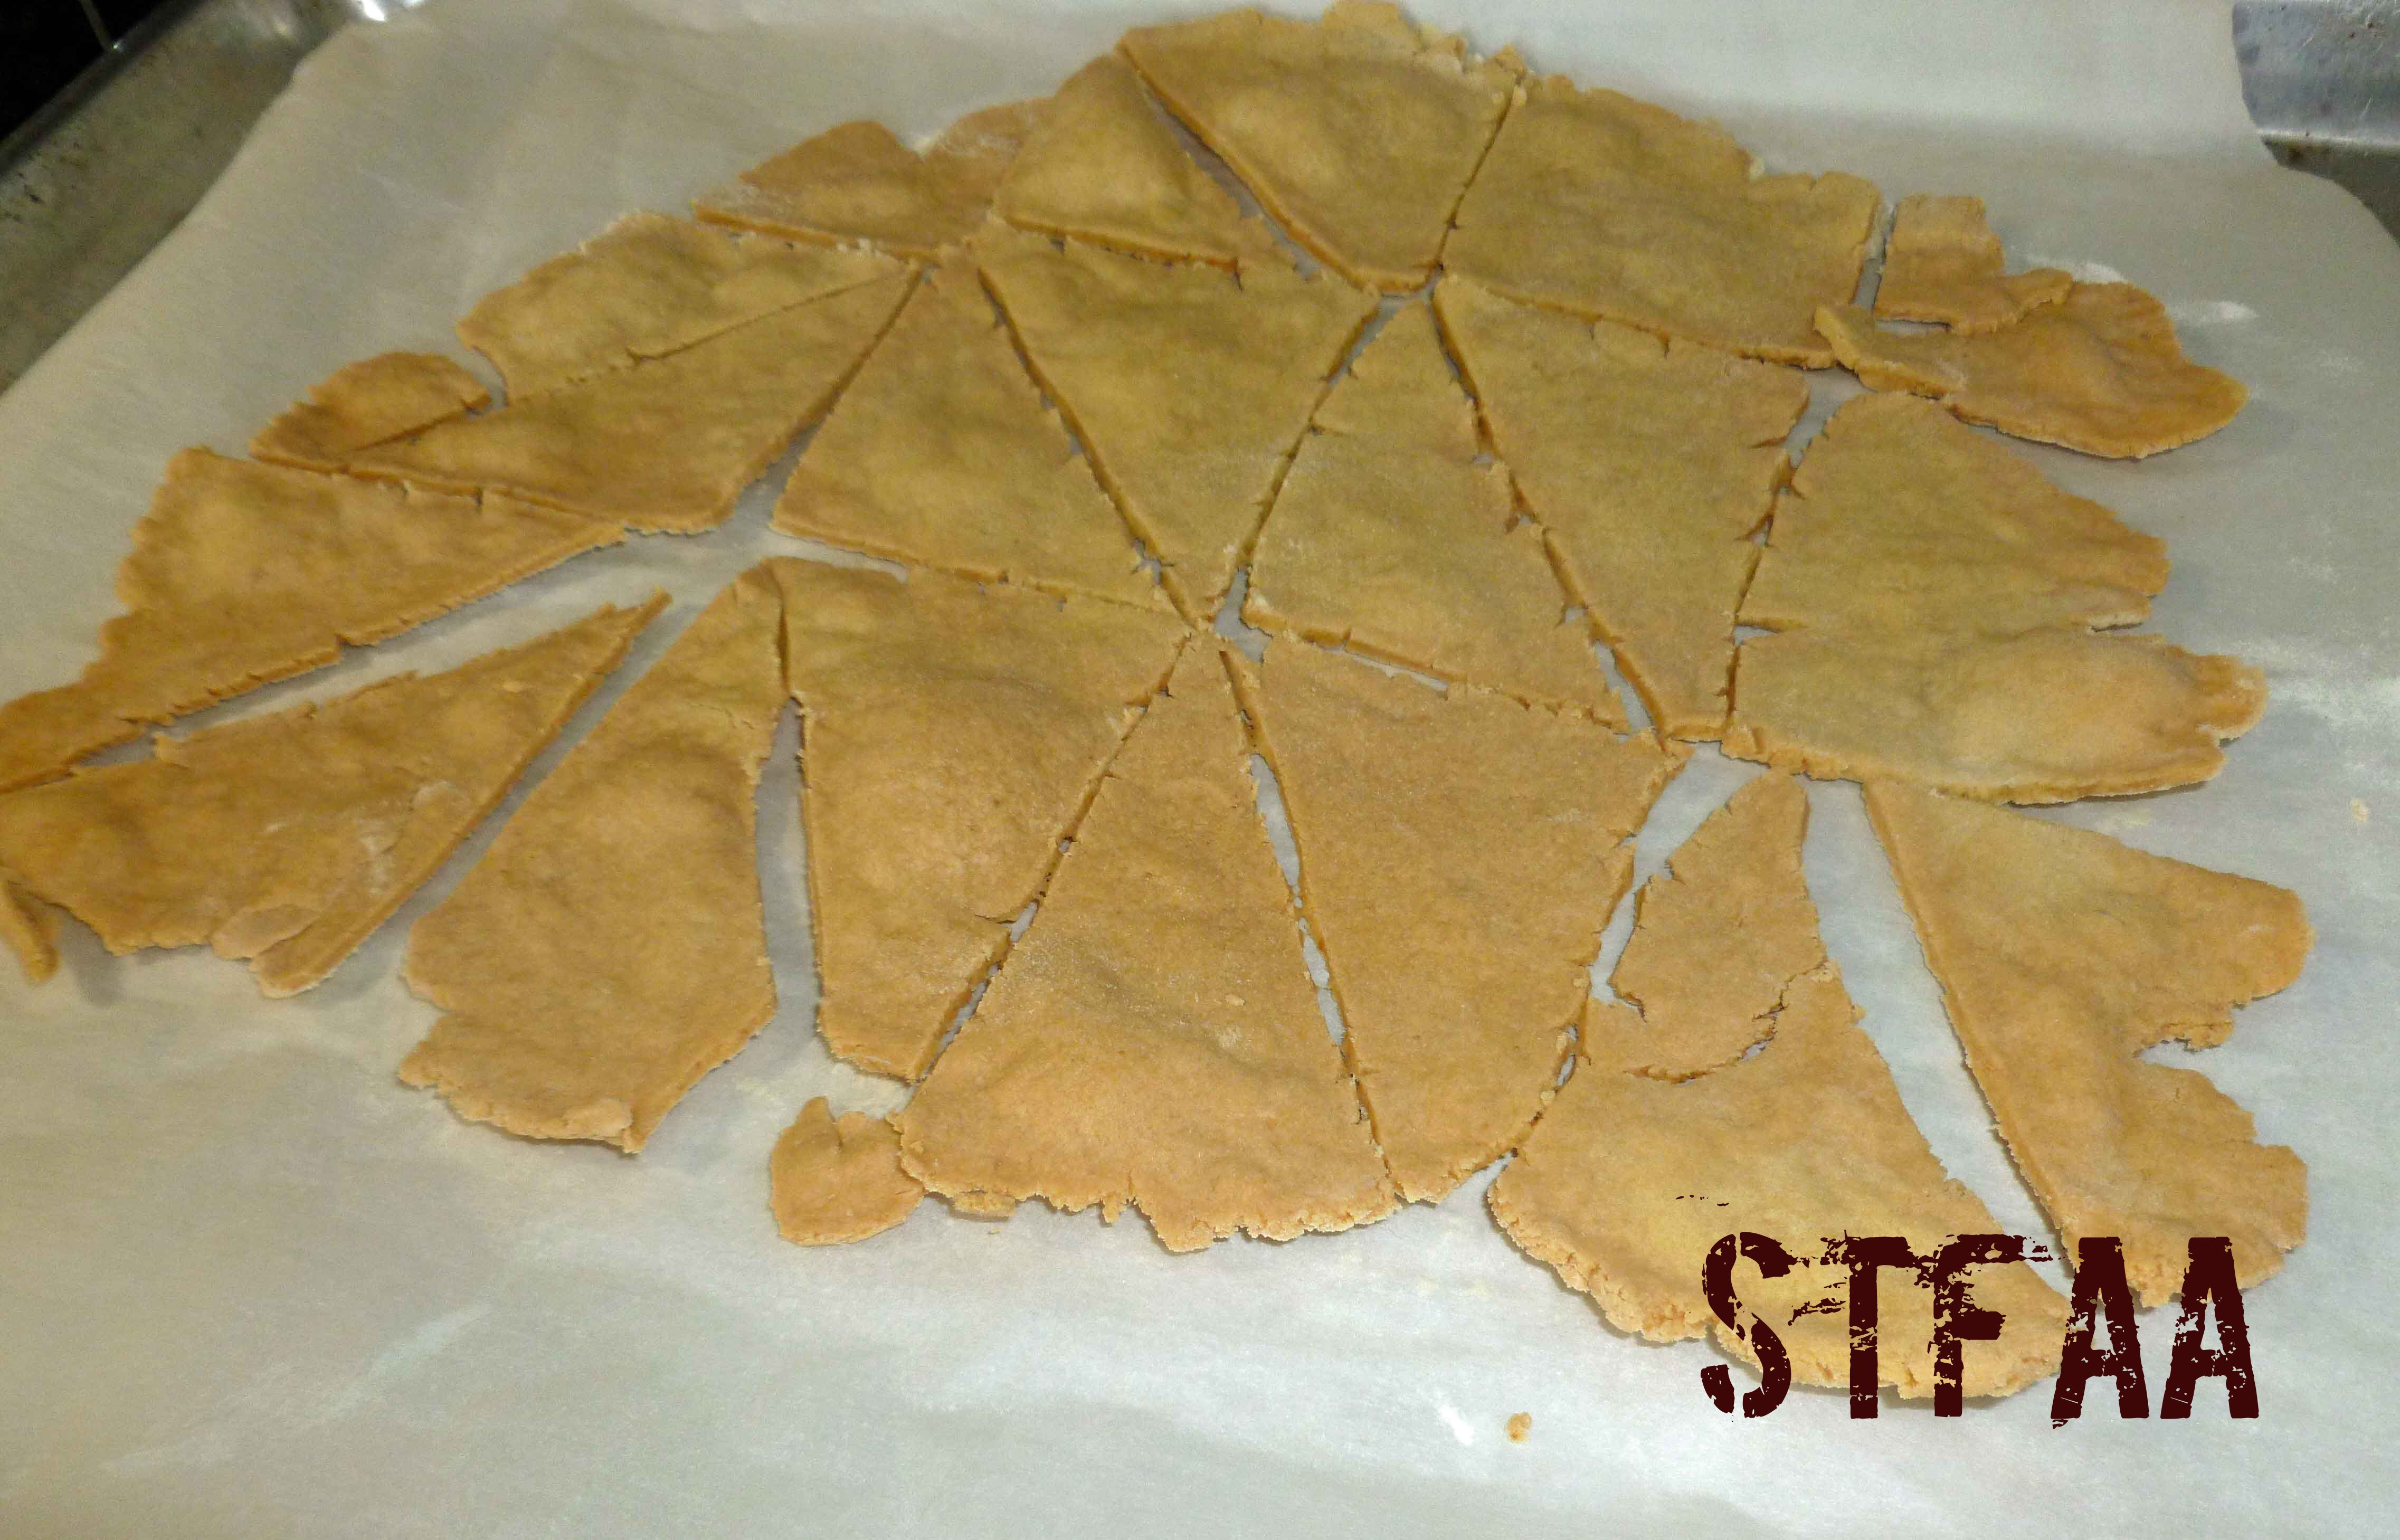
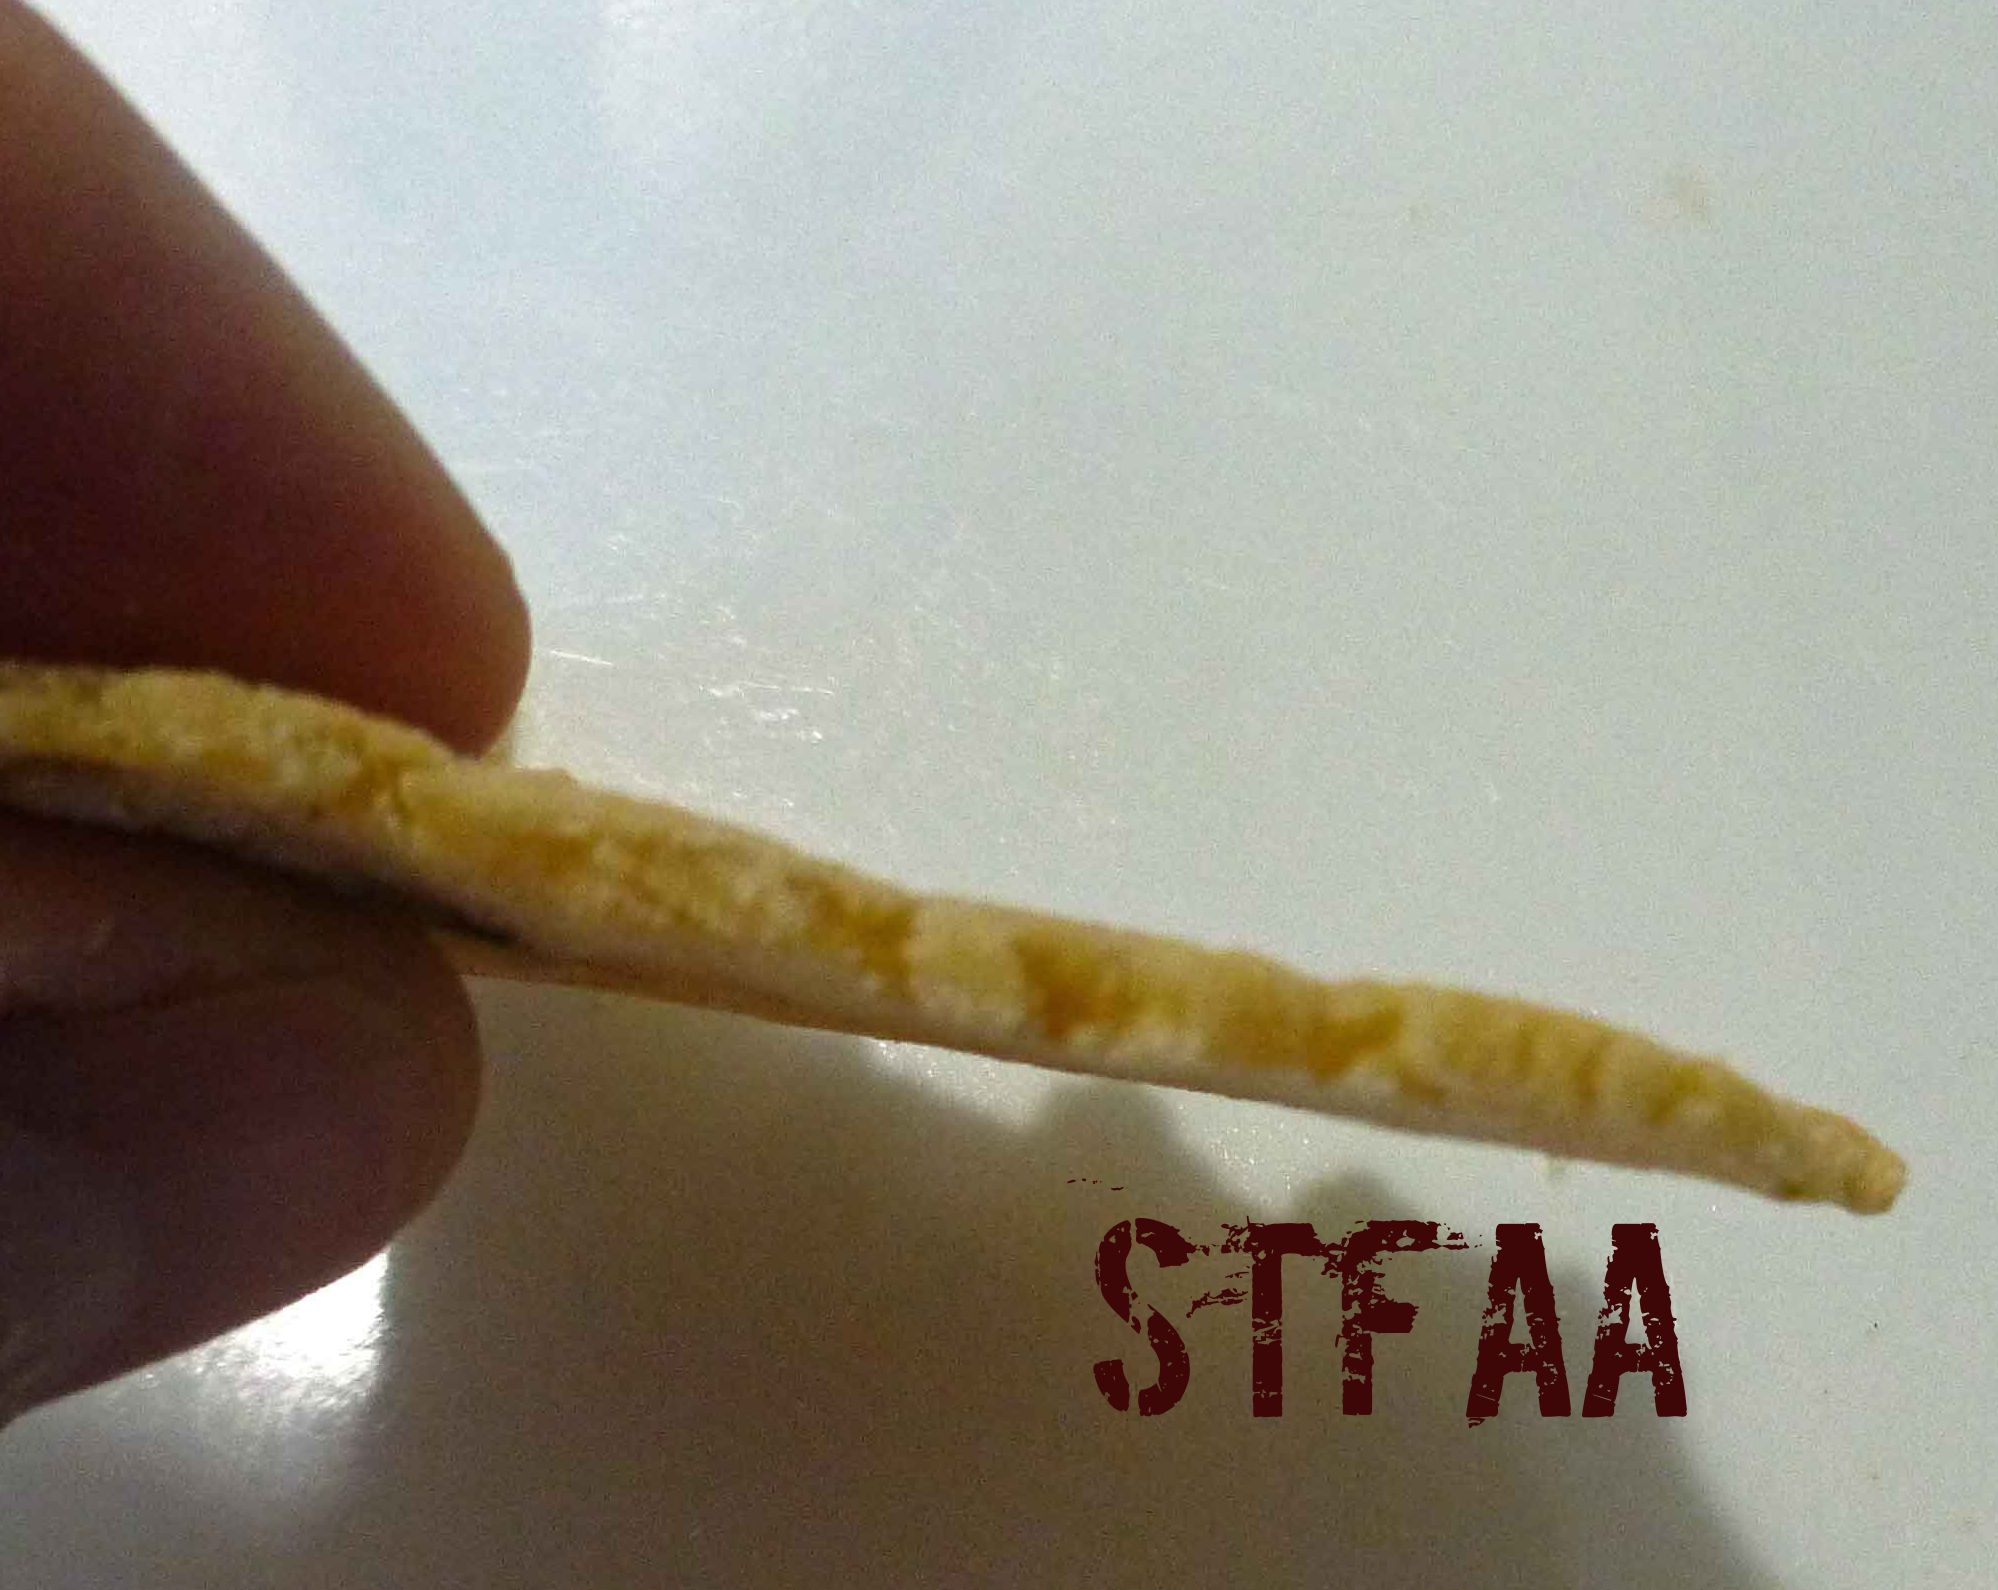
So you’re probably saying, ‘Denise, shouldn’t this be Gluten-Free Vegan Tortillas and Tortilla Chips, not Pita Chips’? And yes, that would seem to make sense, except that the dough when baked tastes more like pita chips than tortilla chips. If you baked or fried the tortillas after making them, maybe it’d be closer to tortilla chips, but I haven’t tried that yet. If you do, let us know.
This dough was originally designed to be baked to be chips, so there’s oil in it. However, I decided to just roll some out and cook it like a tortilla to see what happened. I got a pliable tortilla, which I hadn’t been able to do with other gluten-free tortilla experiments. So it’s not the most traditional tortilla, but hey, for a wheat-free, dairy-free, corn-free tortilla, that doesn’t break in half when you bend it and I might actually be able to make soft tacos, fajitas, and enchiladas again, whatever, I’m sold. Just as a note, whether you decide to make the chips or the tortillas, you’re going to need parchment paper. These need to be rolled out really, really thin.
You all know that my style is normally to give you every step with a picture and then give you the recipe card at the end. But, I was in a hurry and didn’t take as many pictures as I should have, and it’s much harder to do with two recipes in one post. So I’ll give you what I have for in-process photos, and then the recipe cards.
So first, the in-process photos of the tortillas:
Tortilla after being flipped on skillet from parchment paperTortilla cooking on cast iron skilletPliable tortilla! Yay! Notice: Trying to access array offset on value of type bool in /home/maryzahc/public_html/adultfoodallergies.com/wp-content/plugins/wp-ultimate-recipe/helpers/models/recipe.php on line 254
115 ounce candrained and rinsed garbanzo beans(I used home canned. Save the aquafaba and freeze it for when you need it.)
1teaspoonsalt
1/4cupolive or other safe-for-you oil
1cup glutinous rice flour(you’ll also need a bit extra for rolling out the dough)
cast iron skillet
blender
mixer
parchment paper
Servings: Tortillas
Instructions
Place drained and rinsed garbanzo beans, the salt, and the olive oil into a blender, and blend until smooth. Place the mixture into a mixer and using the flat beater on medium low speed, slowly add the glutinous rice flour, beating until dough comes together.
Using a piece of parchment paper dusted with some of the glutinous rice flour, roll out a portion of the dough about the size of an apple or to fit the size of your cast iron skillet, to a thickness of about an 1/8th of an inch.
Place a cast iron skillet over medium low heat. When it is hot, use the parchment paper to transfer the tortilla to the skillet. Flip it onto the skillet and peel the parchment paper off. Cook the tortilla for 3-4 minutes each side or until it is golden brown.
Pita Chips just out of the ovenPita Chip thickness after baking Notice: Trying to access array offset on value of type bool in /home/maryzahc/public_html/adultfoodallergies.com/wp-content/plugins/wp-ultimate-recipe/helpers/models/recipe.php on line 254
115 ounce candrained and rinsed garbanzo beans(I used home canned. Save the aquafaba and freeze it for when you need it.)
1teaspoonsalt
1/4 cupolive or other safe-for-you oil
1cup glutinous rice flour(you’ll also need a bit extra for rolling out the dough)
baking sheet
blender
mixer
parchment paper
Servings: chips
Instructions
Preheat your oven to 375°F.
Place drained and rinsed garbanzo beans, the salt, and the olive oil into a blender, and blend until smooth. Place the mixture into a mixer and using the flat beater on medium low speed, slowly add the glutinous rice flour, beating until dough comes together.
You will need to do a couple of batches to bake all of the chips. Cover your baking sheet with a sheet of parchment paper. Dust the parchment paper with some of the glutinous rice flour. Roll out about a third of the dough to a thickness of about an 1/8th of an inch, the thinner the better. Use a sharp knife to score lines through the dough the size you’d like your chips, being careful not to cut through the parchment paper.
Place the baking sheet in your preheated oven and bake for 25 minutes or until the chips are golden brown.
I’m a die-hard nerd, but I tend to flit about in the nerdiverse a lot. I would not have called myself a die-hard Star Trek fan (although I did in my senior high school yearbook!), but I’ve been surrounded by them most of my life. Since Netflix added them all, I’ve been binge-watching 4 of the 5 series (I have not started Enterprise yet, and I never saw any of those when they aired). I decided that watching the series finale of Star Trek: The Next Generation needed a themed dinner. Yes, I’m that kind of nerd.
This dish came out of an attempt to make a human-palatable version of Klingon gagh. This version is MUCH prettier than the original version. In the original, to simulate “serpent worms,” I cut up thin-cut pork chops, marinated them, and them sauteed them on the stovetop. This version uses boneless country-style pork ribs primarily because they were on sale, but they take to the sauce very well.
Sadly this is not a super-quick recipe, and it’s really not a “set-it-and-forget-it” meal, but the active work part is still pretty minimal. DO NOT FORGET TO LINE YOUR PAN WITH FOIL. This sauce bakes on pretty well, and I don’t want you to be scrubbing all week!
Notice: Trying to access array offset on value of type bool in /home/maryzahc/public_html/adultfoodallergies.com/wp-content/plugins/wp-ultimate-recipe/helpers/models/recipe.php on line 254
1poundboneless country-style pork ribstrim fat, if needed
1/4teaspoongarlic powder
1/4teaspoonkosher salt
1/4teaspoonpepper, freshly ground
1teaspoonolive oil(approximately)
1Tablespoonbrown sugar
2Tablespoonshoney
1Tablespoonsriracha
1/4cupred wine or apple cider vinegar
1/4cupoilI used safflower, but use what is safe for you
Servings: people
Instructions
Preheat oven to 450˚F. Line baking dish with foil.
Rub or spritz pork with oil and sprinkle with salt, pepper, and garlic powder. Bake for 30 minutes.
Make the sauce by mixing the rest of the ingredients together until the sugar and honey are fully mixed in. Taste it. If you like it hot (Denise!), add more sriracha to taste.
Reduce heat to 350˚F. Pour sauce over the pork.
Bake for an additional hour, basting every ten minutes. I don’t own a baster, but I think that the stickiness of this sauce might make a mess. A spoon works just fine. This will burn at the edges of pan (hence the foil!), but just caramelize on the pork.
Consider baking potatoes alongside the pork — it’s about the right timing, and the pork goes well with a good baked potato.
Okay we’re back from break. Not sure I’ve gotten all the garden stuff done that I need to get done, but so be it.
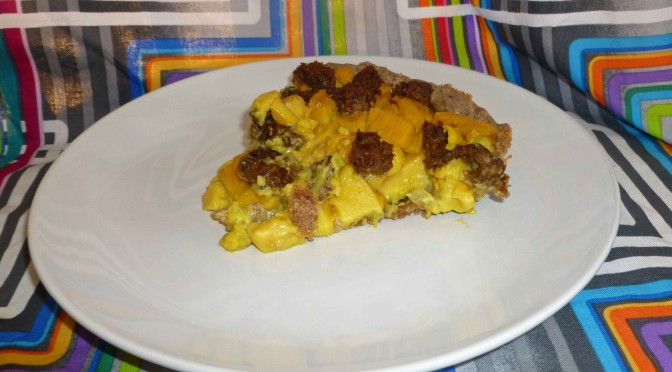
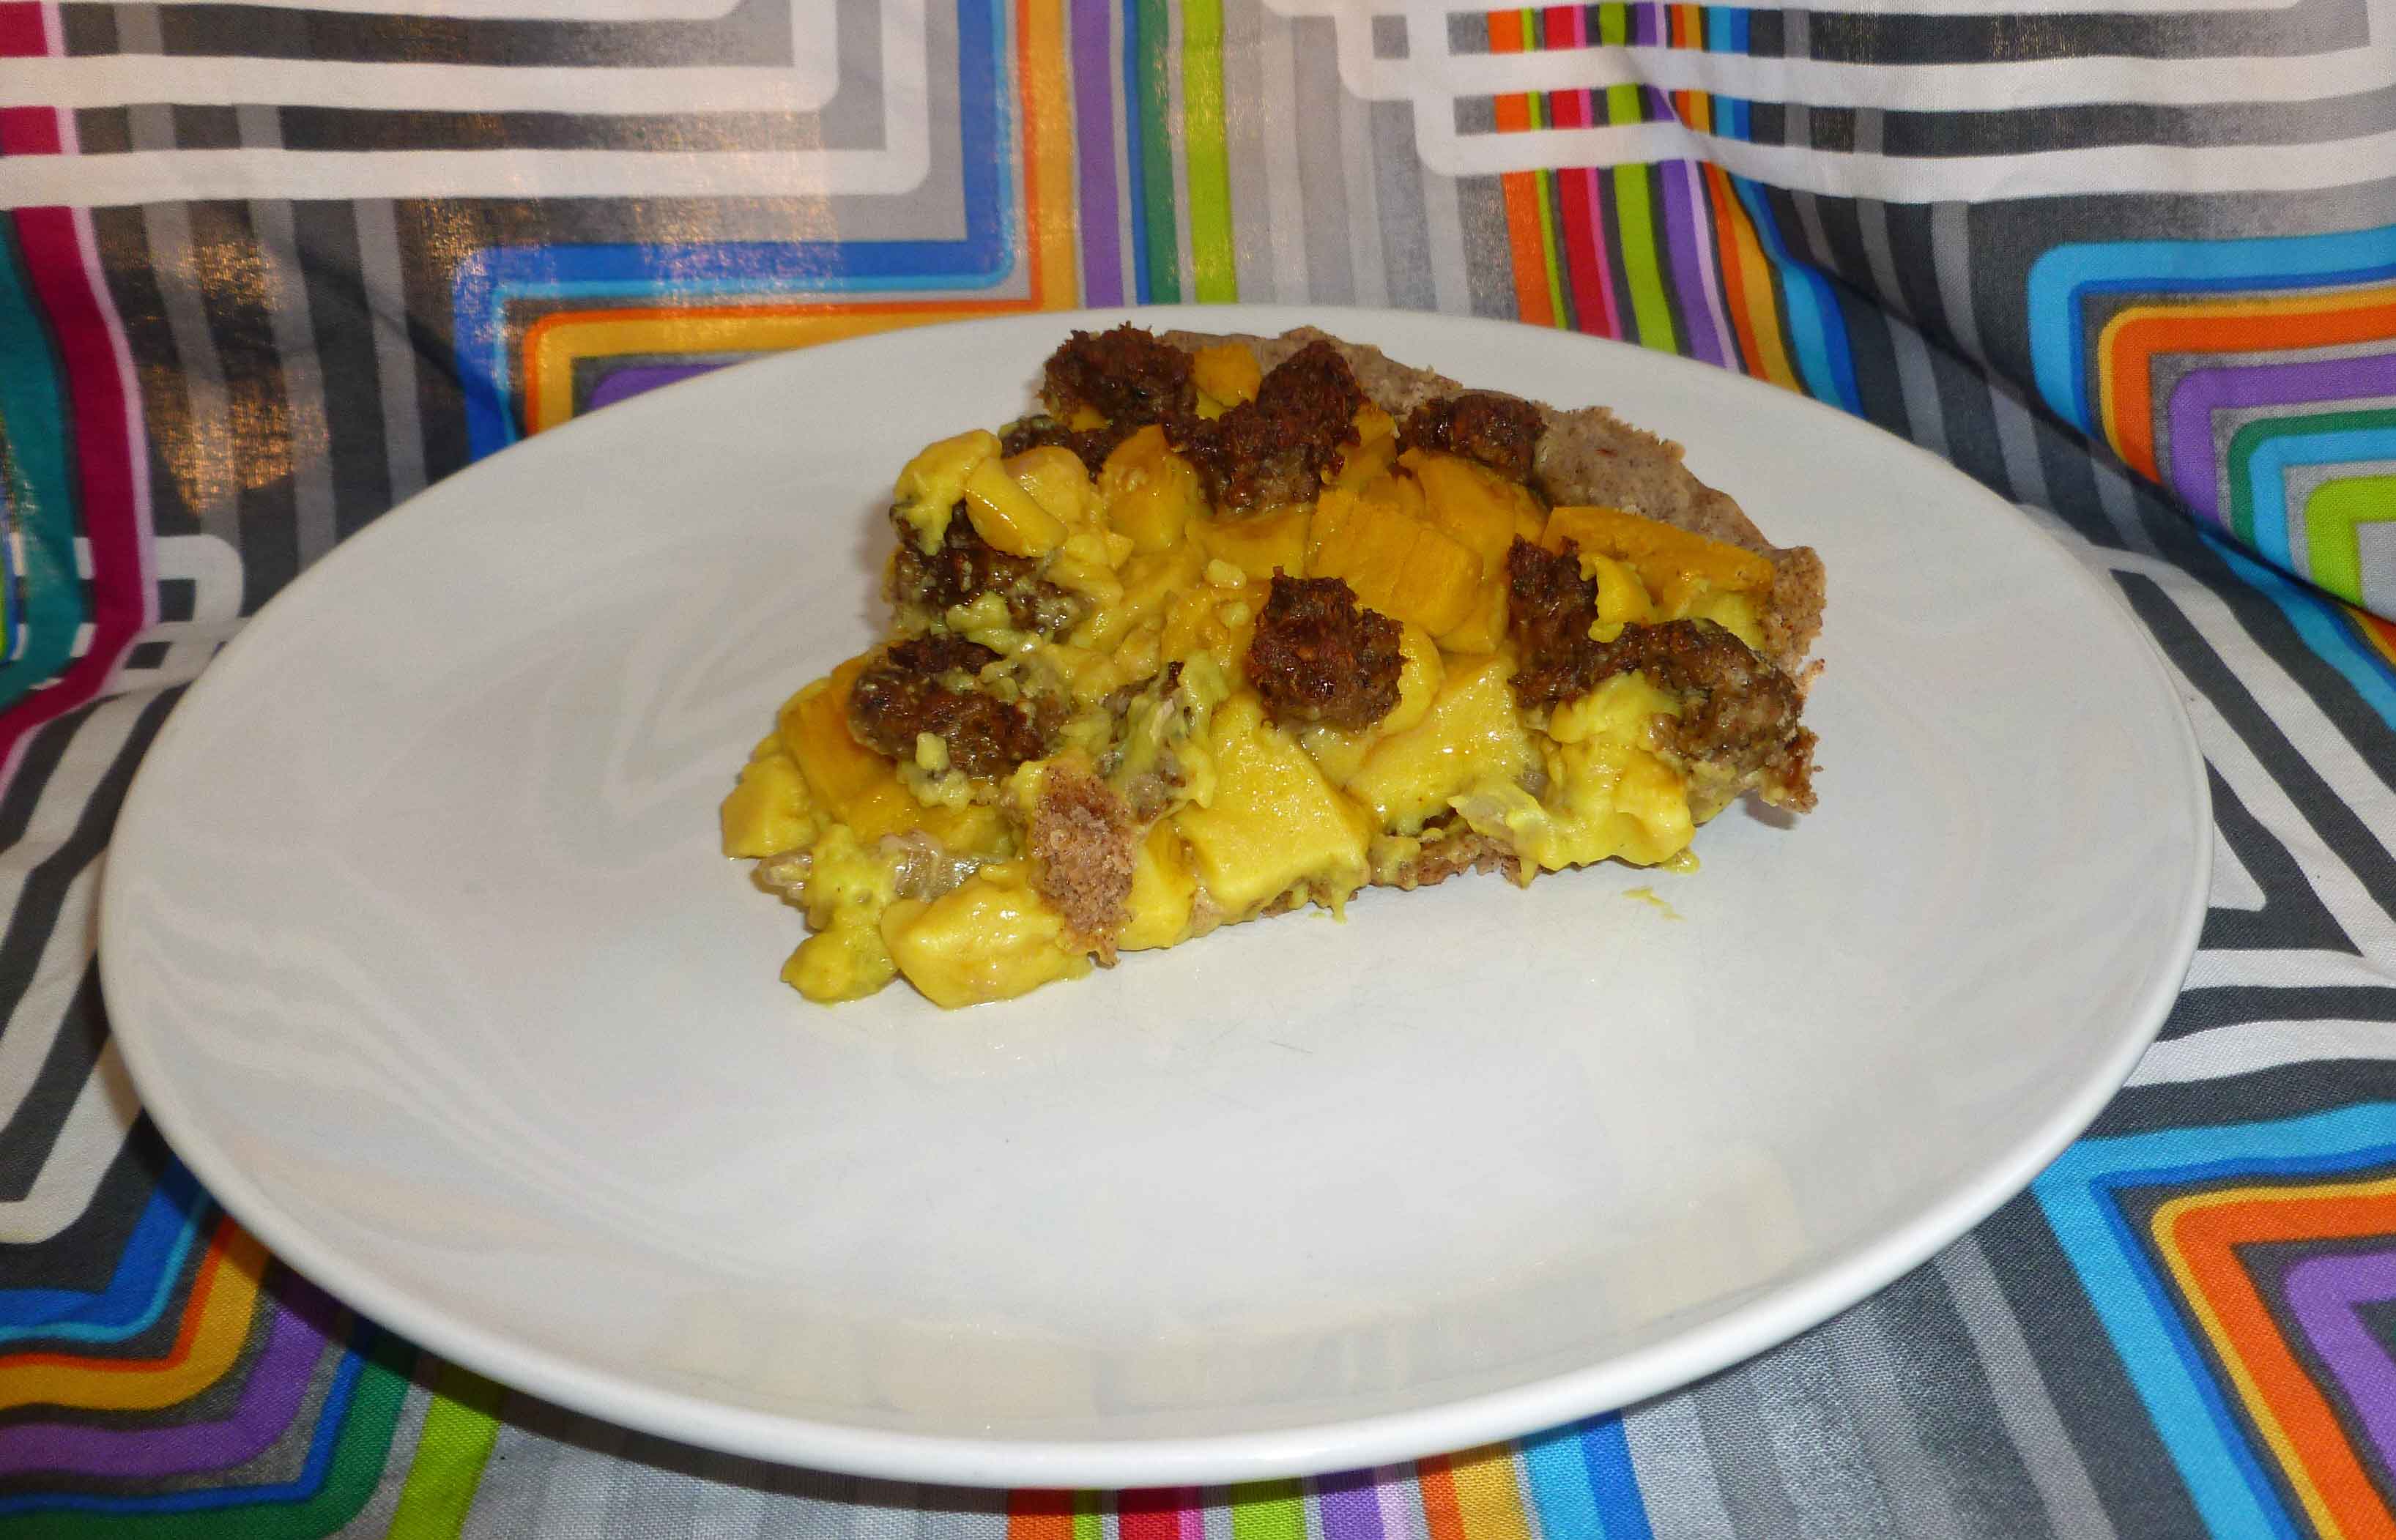
Without wheat, dairy, egg, and corn, breakfast foods are pretty hard to manage around here. I eat a lot of oatmeal. A lot. More than I ever wanted to. And I miss quiche. So when I made the Burmese Tofu, and realized I could try to modify it to make it more “egg-y”, I decided to try to use it to make a quiche-like thing. You’re going to need to make our recipe for “Eggy” Burmese Tofu about 24 to 48 hours ahead of time, so be prepared. It doesn’t have quite the same texture as quiche, but it’s a good breakfast dish, if somewhat filling.
4 cups of cubed “Eggy” Burmese Tofu (which is about half of the recipe, make half if you don’t want leftovers)
1 medium onion, peeled and diced
1 teaspoon of olive oil or other safe-for-you oil
Preheat your oven to 400°F. Grease a pie pan or round baking pan with your oil.
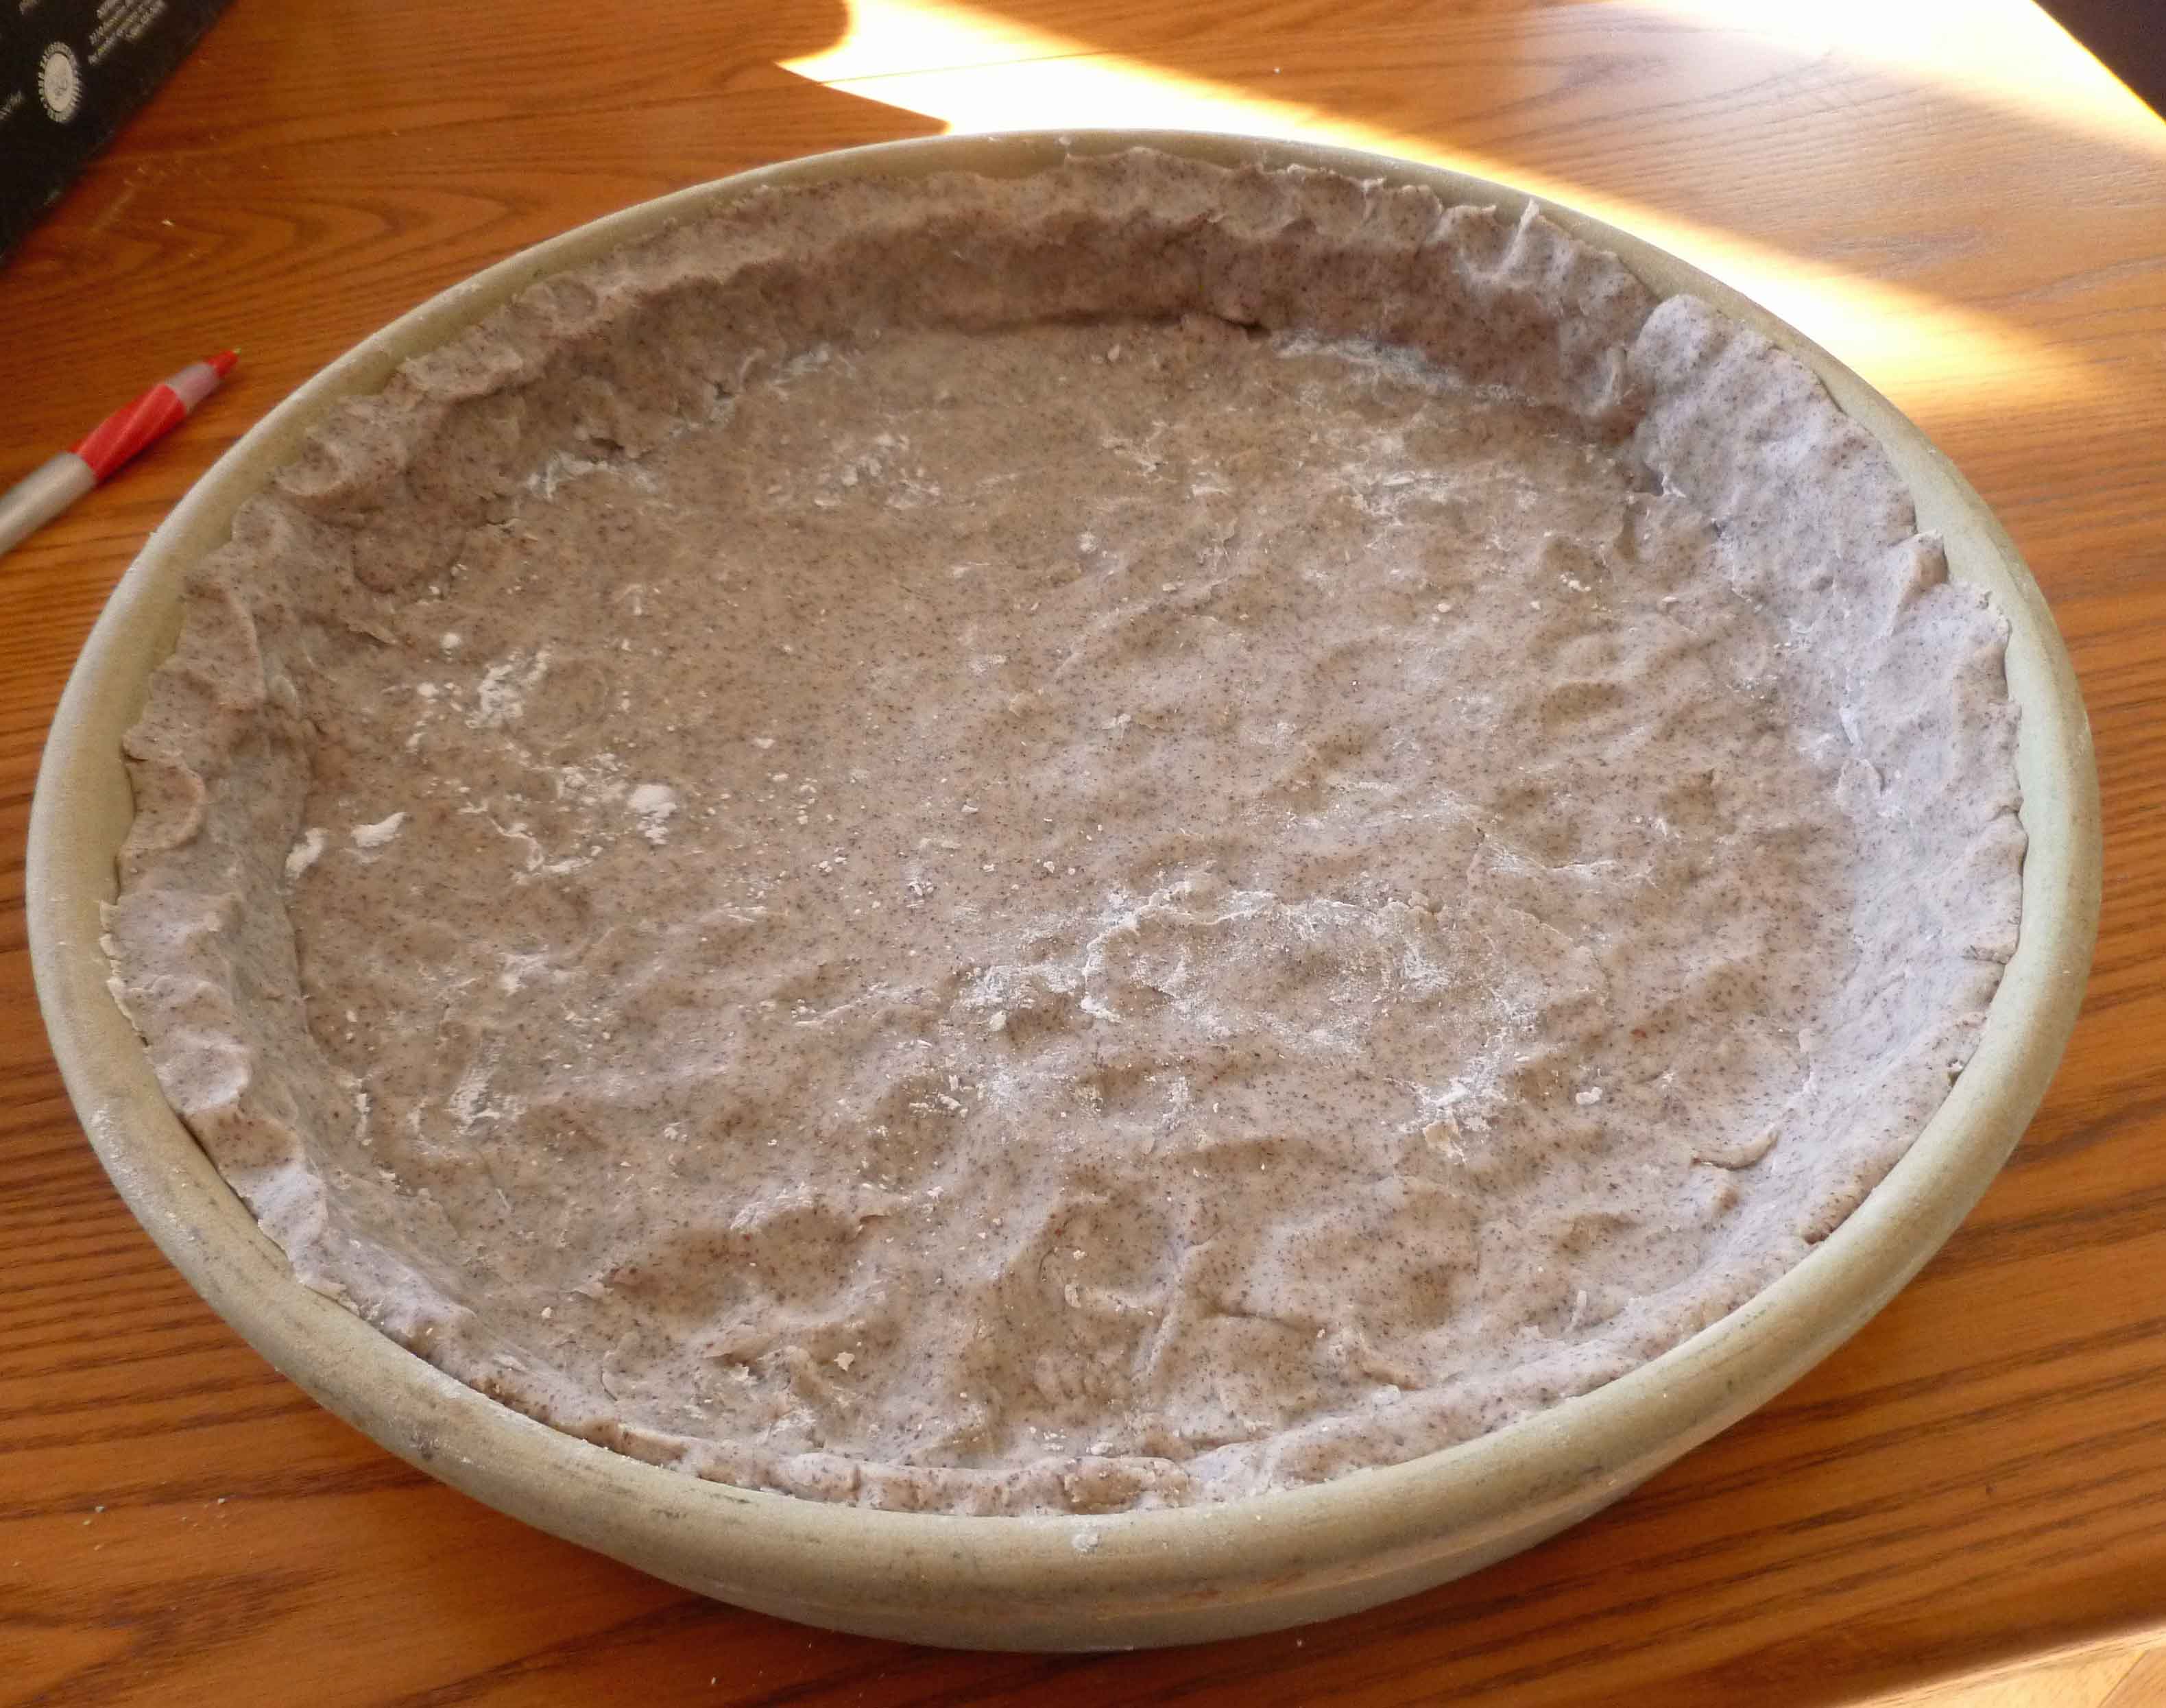
Roll out the dough and place in your pan. I had trouble rolling out my dough and was impatient, so I added it to the pan in patchwork bits, pressing the pieces together.
Crust, piecemeal style
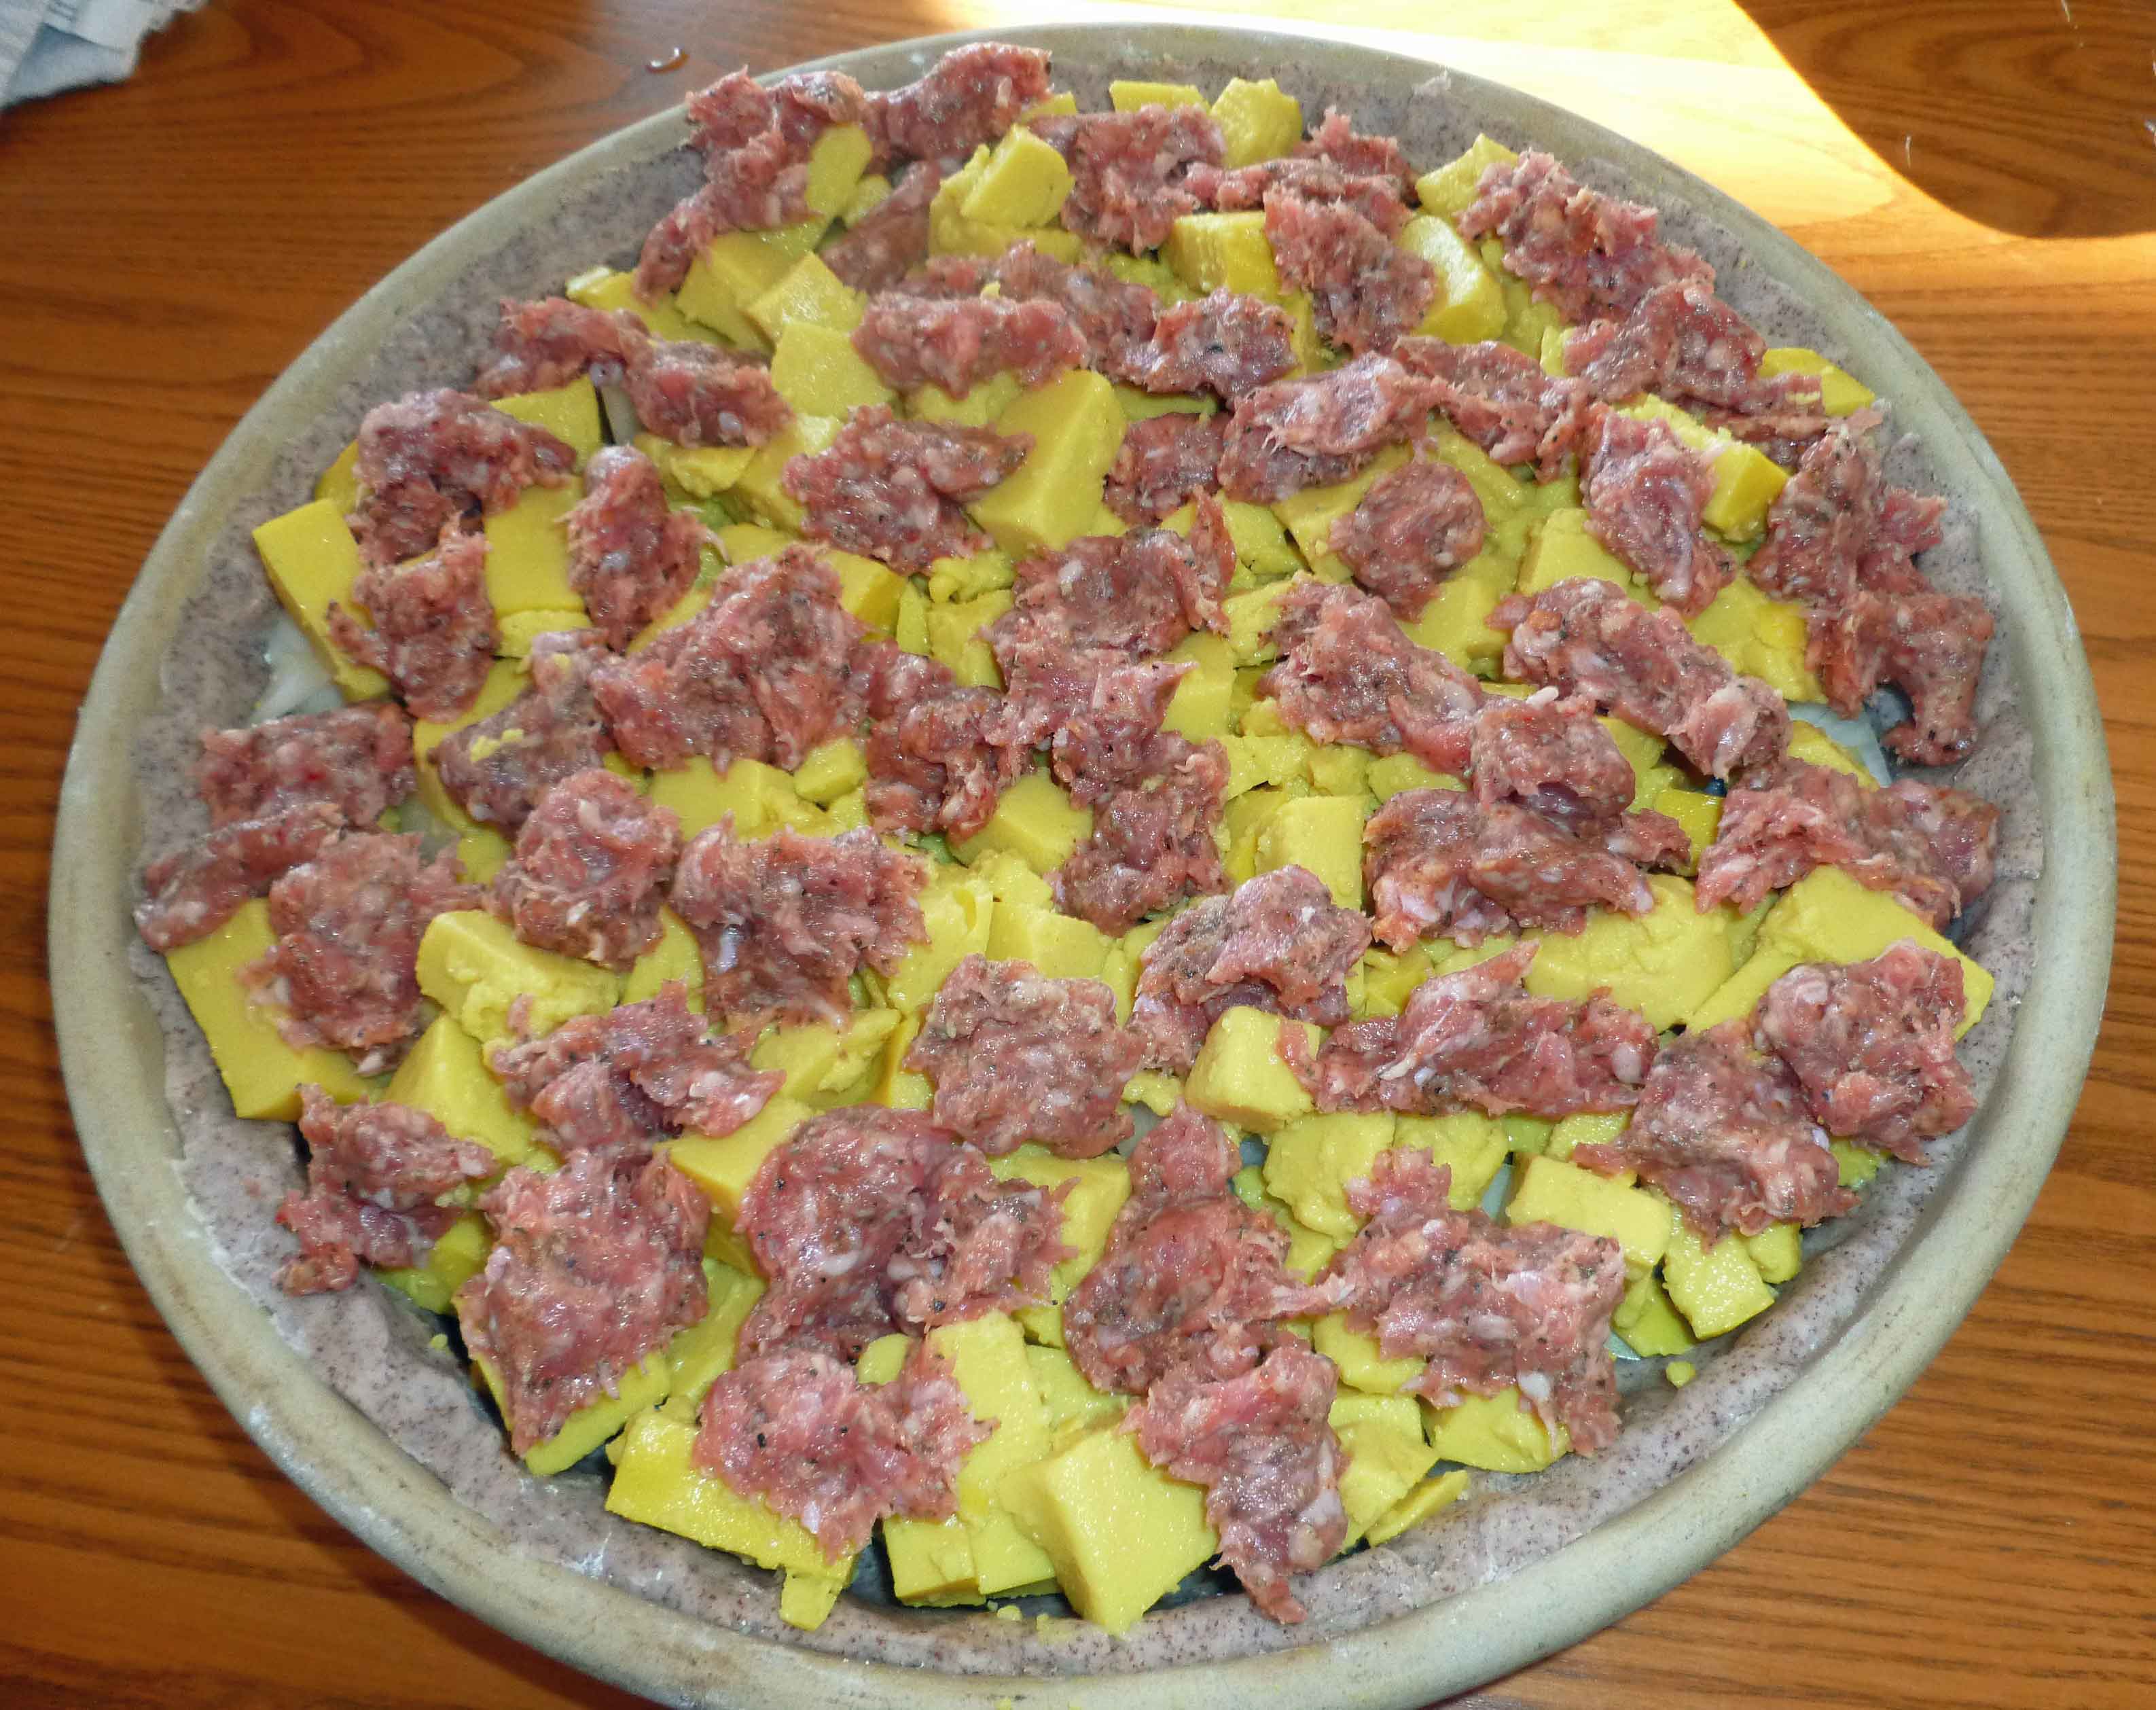
Once your crust is together, sprinkle your onions over the bottom of the crust. Pour the 4 cups of cubed “Eggy” Burmese Tofu over the top of the onions and spread evenly over the crust. Break off pieces of your sausage about the size of a grape and arrange them over the top of the casserole.
Breakfast Casserole before baking
Place your pan in the oven and bake for 1 hour.
Breakfast Casserole
Enjoy!
Notice: Trying to access array offset on value of type bool in /home/maryzahc/public_html/adultfoodallergies.com/wp-content/plugins/wp-ultimate-recipe/helpers/models/recipe.php on line 254
Preheat your oven to 400°F. Grease a pie pan or round baking pan with your oil.
Roll out the dough and place in your skillet. If you can’t roll it out smoothly, you can do it in patchwork bits, pressing the pieces together.
Once your crust is together, sprinkle your onions over the bottom of the crust. Pour the 4 cups of cubed “Eggy” Burmese Tofu over the top of the onions and spread evenly over the crust. Break off pieces of your sausage about the size of a grape and arrange them over the top of the casserole.