Notice: Function _load_textdomain_just_in_time was called incorrectly. Translation loading for the wp-ultimate-recipe domain was triggered too early. This is usually an indicator for some code in the plugin or theme running too early. Translations should be loaded at the init action or later. Please see Debugging in WordPress for more information. (This message was added in version 6.7.0.) in /home/maryzahc/public_html/adultfoodallergies.com/wp-includes/functions.php on line 6131 denisedaniel – Page 15 – surviving the food allergy apocalypse (archive)
Before the food allergy apocalypse hit, I was a sucker for those huge 9 x 12 inch gorgeously photographed 200 page cookbooks that were always on sale for 5 or 6 bucks on the clearance tables at Borders (when it still existed) or Barnes & Noble. I have about six of them. When Mary Kate and I were talking about what we should develop for the coming months, it fell to me to develop a soup from the Roasted Vegetable Stockthat Mary Kate was going to post. I tend to use more beef and pork (no more chicken for me, sigh) in my every day “normal” cooking and most of my standard soups have a protein in them. So to get ideas, I went looking through my cookbook collection and found Best Ever Soups: Over 200 Brand New Recipies for Delicious Soups, Broths, Chowders, Bisques, Consommes on the shelf. I took it out and went for a spin through it. Now, about half of the recipes in the book are now off limits to me, but I can see a lot of room for modification and de-allergizing, which is a lesson in and of itself. I don’t have to look at the cookbooks as off limits because I can’t eat that stuff anymore, I can use them to get inspiration for my new way of eating. I can look at them as a way to say, “hey, I still want to eat something like that, how do you think I can tweek it?”
So using the recipe in the book and making a few minor tweeks, I give you a soup with potatoes, Mary Kate’s Roasted Vegetable Stock, and roasted garlic. Because how can that be bad? Other than roasting the garlic, the rest of the prep is relatively simple. This would make a good weeknight dinner if you threw the garlic in the oven while you read the mail, check your email and change into your pajamas (oh wait…does everyone else do that just after you walk in the door too?). Or it’d make a nice side or appetizer for a weekend dinner. I’m serving it with a mustard and maple syrup marinated pork loin and a green salad.
Potato and Roasted Garlic Soup
Serves 4
2 bulbs of garlic with the tops trimmed off, but unpeeled (or 1/2 cup of already roasted garlic that you may have on hand, see below)
1 Tablespoon of olive oil
4 large potatoes or 5 small to medium potatoes, peeled and diced
8 cups of Roasted Vegetable Stock (I’d avoid using the dill in the stock for this soup, but any of the other herbs should work fine)
1 small onion or one half of a large onion, peeled and diced
salt and pepper to taste
a dash or two of hot sauce (a Tabasco style hot sauce would be lovely)
fresh parsley to garnish
Pre-heat your oven to 375°F. Trim the top of the garlic bulbs just so the tops of the cloves are showing.
Garlic bulb with its top trimmed
Place the bulbs on a small roasting pan or sheet pan and drizzle the olive oil over the trimmed garlic bulbs.
Garlic bulbs drizzled with olive oil
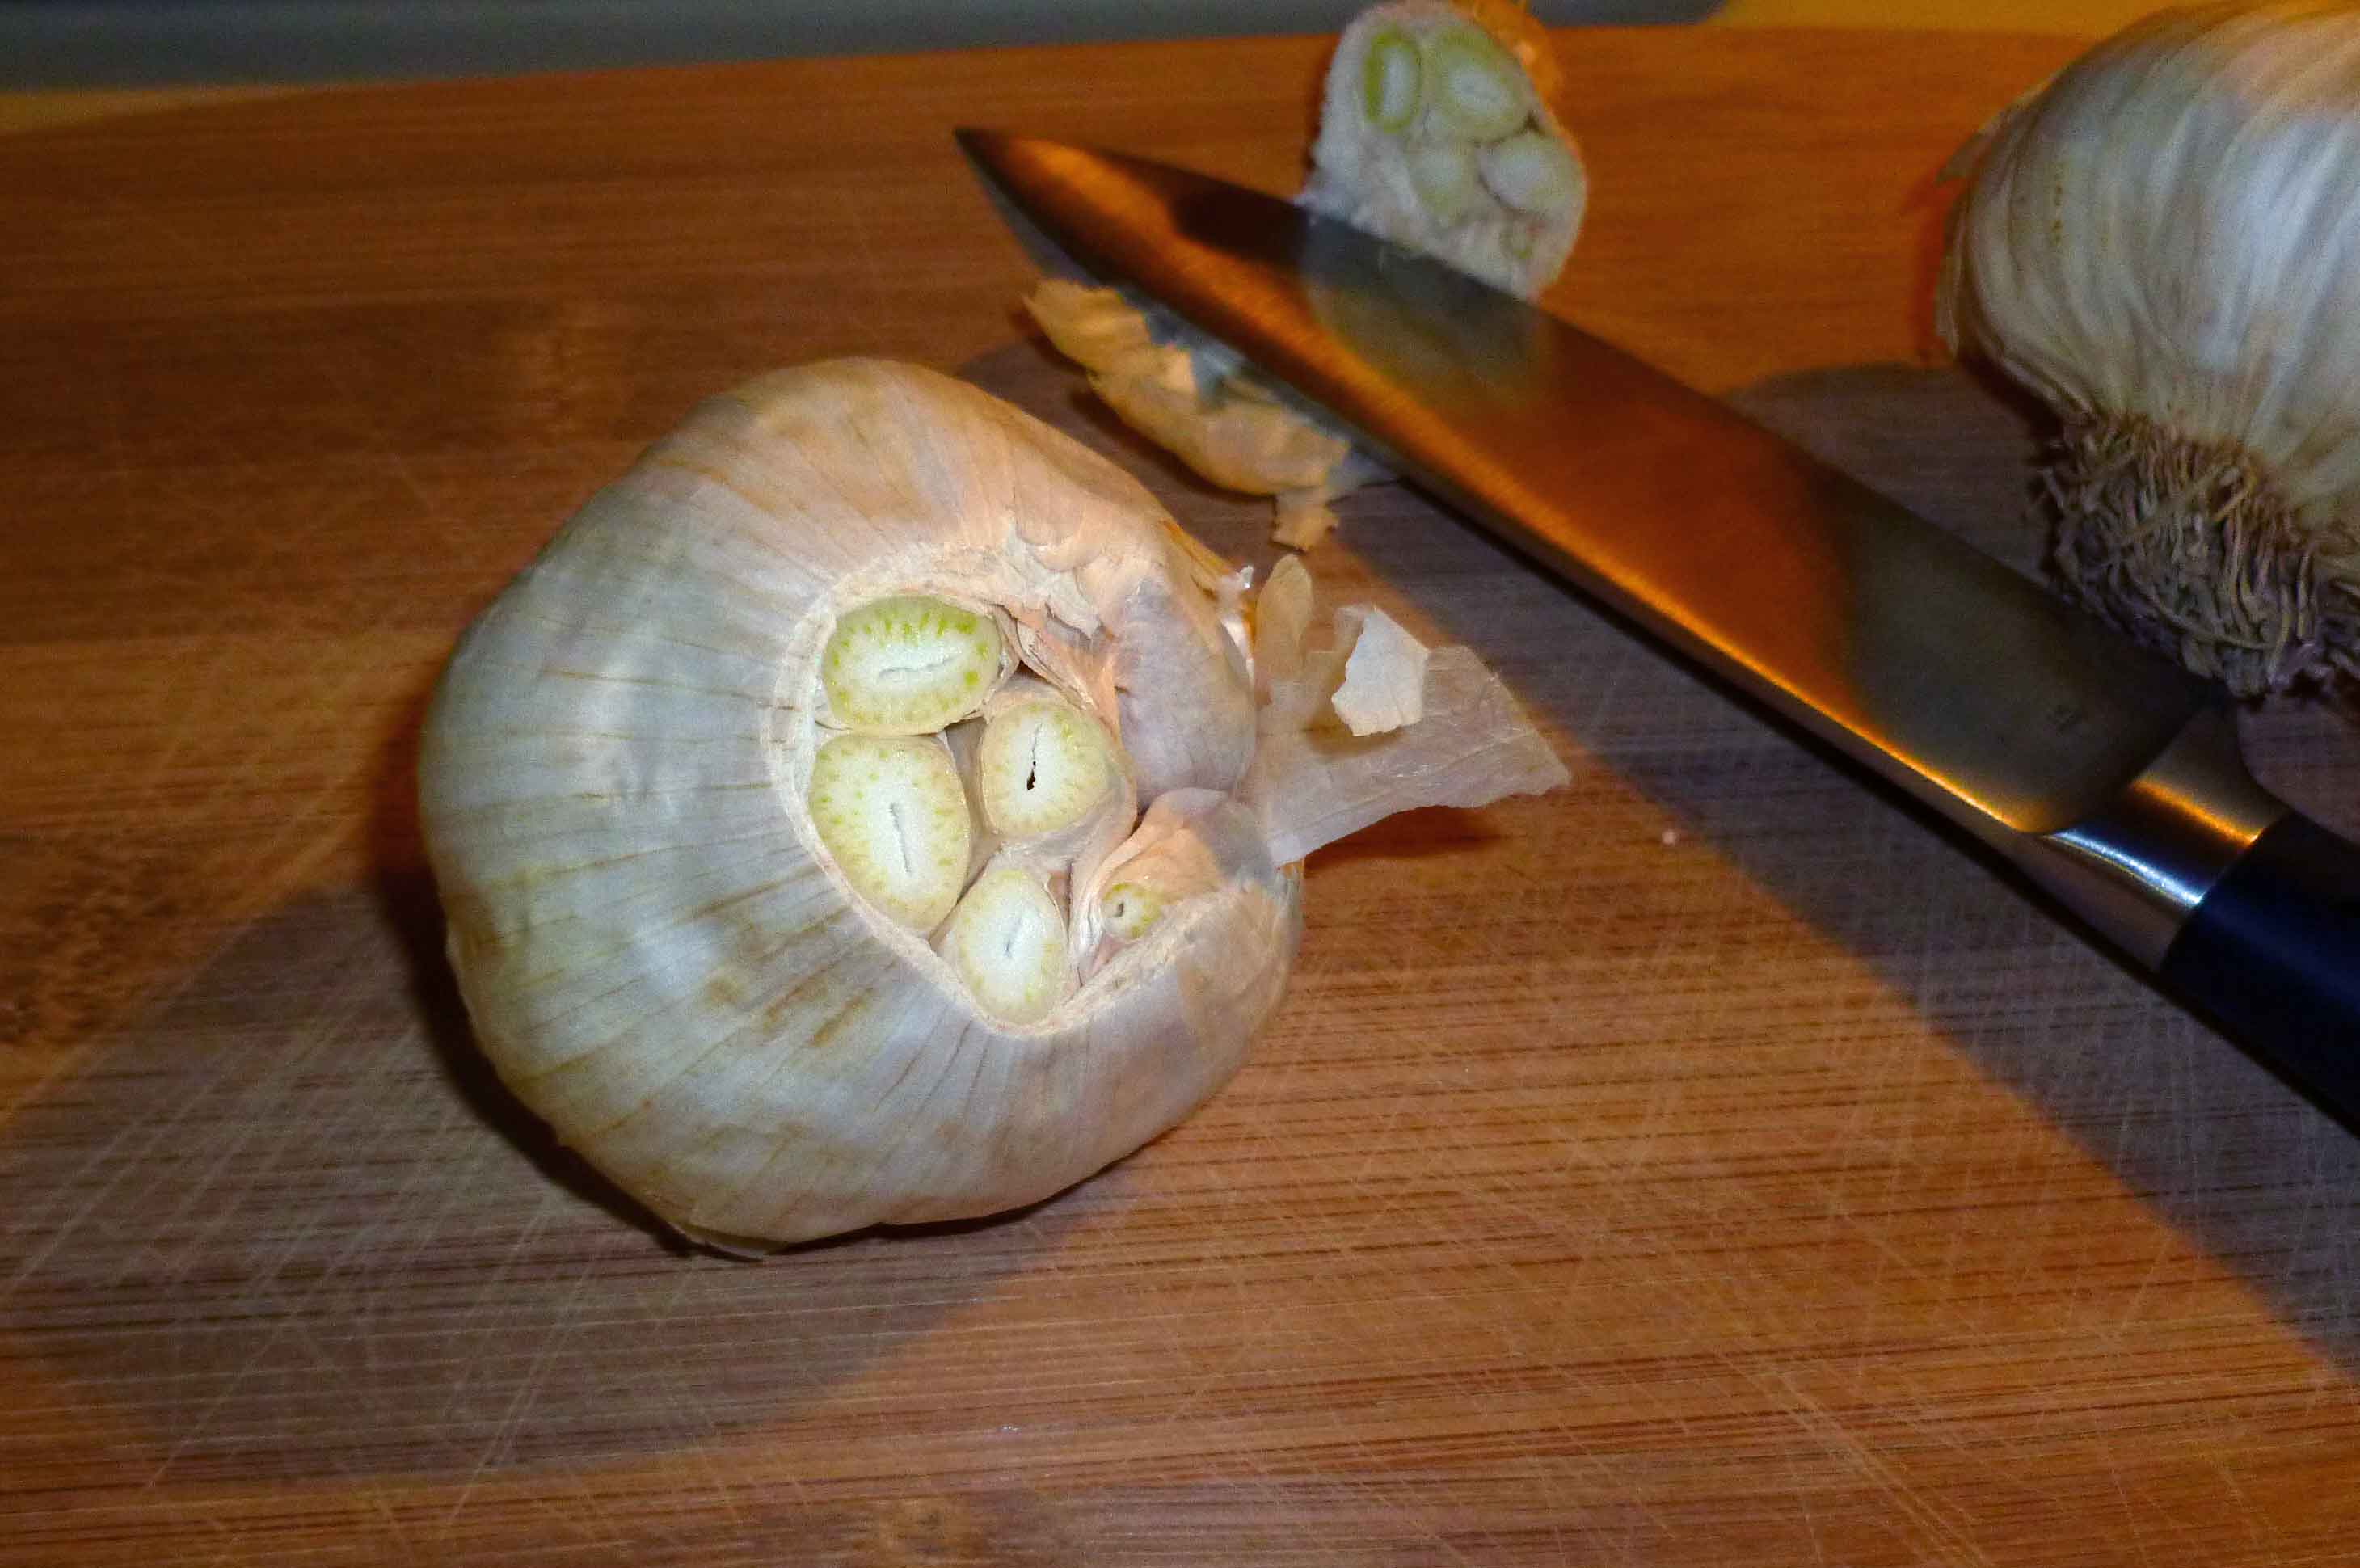
Roast the garlic until for 45 minutes or until it’s soft in the center of the cloves. (Or if you want to make your life really easy, if you have some roasted garlic already prepared {here’s how to do it, takes an hour, do a bunch ahead of time and store it in a jar in your fridge or freeze it so you can use when you want it without the aggravation}, use half a cup and mash it up before adding to the soup.) Once your bulbs have roasted, take them out of the oven and set them aside to cool a bit.
Roasted Garlic Bulbs
Add your roasted vegetable stock and the peeled and diced onion to a large stock pot, and simmer on medium high.
Stock and onions in stock pot
Then peel and dice your potatoes.
Peeled and diced potatoes
Par-boil the potatoes in another pot in salted boiling water for 10 minutes.
While the potatoes are cooking, squeeze the cooked garlic out of the bulbs (I found it easiest to do it a couple of cloves at a time) into a prep bowl.
Roasted Garlic removed from bulbs
When all the cooked garlic has been separated from the bulbs, add the cooked garlic to your roasted vegetable stock, and stir it well.
Once your potatoes have finished cooking, drain them.
Par-boiled potatoes after draining
After draining, add them to the roasted vegetable stock. Simmer for 20 minutes and then season to taste with salt, pepper and hot sauce. Serve topped with a bit of parsley to make it look pretty, and enjoy!
One of the surprising things about having food allergies is the fear of getting sick and whether the process of getting well will make you sicker. It’s much more complicated than you might imagine.
In January, I managed to get either bronchitis or pneumonia, which affected my asthma to the point that my nurse practitioner considered admitting me to the hospital because they couldn’t get a peak (air) flow at first. I did a nebulizer treatment in the office and then talked them out of admitting me. Why did I talk them out of admitting me? Well, yeah I hate the hospital, who doesn’t? But my first reaction, was “what would I eat? There’s no way they could serve me corn-free food, let alone deal with the other 12 allergies.” My second reaction was “I’ll get a rash from the sheets; there’s coconut in their detergent.” And although I’ve saved the Corn Allergy Girl’s Emergency Room Safety Doc to my phone, I was there by myself and wasn’t sure I had the air to self-advocate for what I would need at the hospital.
I didn’t have the money to pay for compounded medication, as our insurance doesn’t cover it and I didn’t know how long it would take to get it compounded. I ended up choosing the lesser of two evils and taking three regular medications, all of which had corn. Although it did help me breathe and get over the bronchitis or pneumonia, it also caused me to have a corn reaction the entire time I was on the medication. So I swelled up like I had gained 20 pounds, broke out in cystic acne, broke out in blisters on my foot so that the bottom of my foot had open wounds in a 2 inch square area, had terrible brain fog, and had insomnia during the whole time. And it took me weeks to get clear of the corn reaction, once my lungs had cleared and I could breathe again, and for my foot to heal.
This raises the question of what will happen when I really have to be admitted to the hospital. I’ve known that I really need to have a plan in place, but I still haven’t gotten myself together. I would need safely-laundered sheets, pillow cases, and bed clothes; safe toiletries; a list of the foods and derivatives to which I’m allergic; and actual safe food and drink. I keep putting it off, but one of these days I’m going to need it and then I’m going to be sorry that I didn’t get around to doing it.
One of the things I find most disturbing about seeking medical care is that the medical profession just doesn’t seem to know what’s in the stuff they prescribe. I love my nurse practitioner, but when I needed an antibiotic, she asked me which one was corn-free. I had some testing done at the time of my annual physical and I turned out to be low in Vitamin D and magnesium. The nurse called to tell me the results and to tell me to get a supplement. I laughed and said I wouldn’t be able to find one that was corn and coconut-free. The nurse, in an attempt to be helpful, called back later and left a message with several suggestions. Then I had to call her back and tell her that half of the ingredients in the ones she had suggested were corn and coconut derived.
I went to the optometrist in December. She said my eyes looked irritated and I needed drops. I said that I was allergic to milk, corn and coconut (these are the most prevalent of my allergens in medications). She handed me three sets of drops so I could look at the ingredients. None them were safe. I tried to seek alternative care through a naturopath, and she wanted me to go on supplements, and I again laughed. And sure enough, all of the ones she wanted me to take had corn and/or coconut derivatives. I got such a bad vibe from her lack of knowledge and insistence that it was a good company making the supplements that I never went back.
Before I was diagnosed with the corn allergy, I was having a lot of trouble with brain fog to the point that I was literally concerned that I was getting a brain tumor or that I had early dementia. I was forgetting the names of people I saw every day and the names for every day objects, or saying the incorrect word for an object. Some days it happened 25-30 times by noon. I went to a neurologist, an audiologist and did a sleep study. Then, being severely unhappy with the neurologist who didn’t listen to me, went to another one, and got sent to have a dementia evaluation. During this time I was told that it was sleep debt from my insomnia and mild sleep apnea. I was prescribed 3-4 different insomnia medications, none of which had the slightest effect. So I decided to discontinue treatment. Guess what? When I went off the corn, the brain fog went away, one of my two types of my insomnia went away, and I’m willing to bet if I ever went through the excruciating process of a sleep study ever again (unlikely in the extreme) that my sleep apnea will have diminished as well. I’ve dropped about 20 pounds or so, and gone down three sizes, without trying to since going off the corn, wheat and chicken after the last round of testing. Since then, every time I’ve been exposed to corn accidentally, I get insomnia that night, and for the next couple of days I lose my words. Sounds like a causal relationship to me.
The problem with all this, and which will be discussed in greater depth in a future post, is that I cannot depend on my medical professionals to know whether medical issues I’m having are related or not related to food allergies. If they are not related, I cannot depend on them to know how to treat the problem given my food allergies, what’s available under my insurance plan, and what pharmaceutical companies actually make. And with the amount of self-advocating and figuring it out myself I do now, what happens when I really get dementia or can’t communicate, and have to go to the nursing home? Skydiving, cliff diving or eating fugu in my old age sounds better all the time.
Now, my allergies aren’t quite as severe as Denise’s, and I’m not allergic to corn or coconut, which are in everything. In some respects, this is great, because I also have ongoing idiopathic (the technical term for “we have no idea why”) vitamin and mineral absorption issues, and the supplements I take are part of what keep me functioning. All the ones Denise and I have looked at together contain corn. ALL of them.
This past winter, one of my doctors did a full vitamin and mineral evaluation, and we discovered some really random deficiencies. It took three tries before we found a B-complex I could take — the first one that she recommended had an ingredient I was allergic to in it — and she’s the one who did that round of testing. I took the second one and got a cold. Or, at least, that’s what it felt like — one of those colds where, you feel fine, and then, sort of suddenly, your head is stuffed, your nose is running, your eyes are glassy and teary. That was a Thursday afternoon, and I called in sick the next day. Weirdly, though, around 5 pm, I started to feel fine. I guess there are 24-hour stomach viruses, so why not a 30-hour cold? Felt fine all weekend: I’d left the supplement on my desk. When I remembered taking it again, it was Tuesday. Same pattern, exactly, except this time I had to leave a meeting because my head was filling with snot. 30 hours later? Fine. To me, it was absolutely an easy call — allergy reaction — and one I had to convince my doctor of. We tried a third B supplement, and this one is fine, but you can bet I read the label about 200 times before taking it.
Our insurance company switched prescription providers this year, and of the three medicines I take, all of which are available in generic forms, this new company provides different generics, and at least one of the three contains milk or a milk-derivative, which is causing minor issues. Again, for clarity’s sake — I do not (probably) have a milk allergy, just severe lactose intolerance. I’ve been taking this drug for three months anyway, because being off of it causes more issues than being on it with milk, and I couldn’t get in to see my doctor until April anyway, to see if there is a way to ask for a generic without milk without getting a DAW (dispense as written) prescription for the non-generic drug which could cost me 70 times more. Yeah, that’s not a typo — it’s the difference between paying $1 and $70.
Milk and wheat are the basis for a lot of fillers used in pharmaceuticals, and there is no requirement that these be clearly labeled, anywhere, nor that pharmacists, prescribing doctors, or nurses have any knowledge of the allergens that may be present in the drugs they prescribe. So even if you think you are safe because your doctor is aware of your allergies, you are not. You need to ask the doctor to check potential allergens (if your doctor won’t or can’t or doesn’t know how, that’s really not great). Then ask the pharmacist again. And go online and check. If you’re on a name-brand drug, checking isn’t too bad; with generics, it can be kind of awful, and worse if the generics can be switched up any time the pharmacy company chooses.
Frankly the vigilance is tiring, and it’s tempting to castigate yourself for every slip. I try to remember how unhelpful that is, but stock it up as a reminder that no one else will advocate for my health the way that I do, partly because no one else has to deal with it when I get sick.
This recipe is part of my campaign to get some candy back in my life, although in all likelihood, at a much reduced rate of intake than was so prior to the corn thing. To start out with, I used a recipe for No Corn Syrup Lollipops from Snappyliving.com, but since I can’t use artificial flavoring or vegetable food coloring (problematic for people allergic to corn), I modified the recipe to use fruit juice and my homemade extracts to give the lollipops their flavor. (Most extracts use corn alcohol to make the extract. I used the zests of the citrus fruit and Luksusowa Vodka because it’s made only from potatoes, whereas some vodkas may also use grain or corn. See this post for directions.) The color is naturally occurring from the carmelization of the sugars and lime juice together. It’s best to have a candy thermometer to use to make this recipe.
Lime Lollipops
2 cups of sugar
2/3 cups of lime juice (about 3-4 limes)
1/8 teaspoon of cream of tartar
1 Tablespoon of lime extract
Put the sugar, lime juice, cream of tartar, and lime extract in a sauce pan with a candy thermometer. Over medium heat, stir until the sugar is dissolved.
Candy Mixture before boiling
Bring the heat to medium high, and continue to stir, boiling the mixture until it reaches 290°F, or until it forms a hard bead when dropped in cold water.
Candy mixture boiling
Spray silicone molds or ice cube trays with a neutral, safe for you cooking oil. I used a light olive oil in a mister. You don’t want an oil that tastes like anything. Carefully pour the mixture into your molds and add Popsicle sticks, as the mixture hardens enough to hold the sticks in position.
Candy in Silicone Muffin tray with Popsicle sticks
Let them cool overnight before taking them out of the molds. If not properly hardened, they stick to everything like cement. Ask me how much fun it was to get them off the plate below, once I was done taking the picture…Enjoy!
1/4 cup of Denise’s All Purpose Gluten Free Flour Mix (I used the Gluten Free Girl’s post on gluten-free holiday baking and modified it a bit – to make 500 grams of the mix, you’ll have a bit extra to use for other recipes, whisk together thoroughly 50 grams of oat flour, 50 grams of teff flour, 75 grams of sorghum flour, 25 grams of potato flour, 125 grams of sweet or glutinous rice flour, 75 grams of potato starch, 50 grams of arrowroot, and 50 grams of tapioca starch) or use a safe for you commercial gluten free all purpose flour.
1/4 cup of brown rice flour
1/4 teaspoon of salt
1/4 teaspoon of ground chia seed
1 teaspoon of Italian Seasoning mix or (or a bit of oregano, basil, marjoram, sage, rosemary, and thyme to add up to 1 teaspoon)
2 teaspoons of olive oil or a safe oil for you
4 Tablespoons of water.
Preheat oven to 375°F.
Put all dry ingredients in a bowl and whisk to combine.
Dry ingredients in bowl
Then add the oil and water and mix with a silicone spatula until the dough holds together in a ball.
Dough after adding wet ingredients and mixing
Flatten the ball to a frisbee-like shape, and then place it on a sheet of parchment paper.
Dough in Frisbee shape on parchment paper
Place another sheet of parchment paper over the dough and roll out the dough between the two sheets to about an eighth of an inch.
Dough being rolled between two sheets of parchment paper
Peel off top layer of parchment, and use a knife to cut lines in the dough (don’t cut through parchment). The picture shows that I used a ravioli cutter to get the squiggly lines, but at the end it started getting clogged and stopped doing the squiggly lines because it all gummed up in the wheel, which was a pain to clean. Which is why I suggest a knife.
Dough after rolling and cut up into cracker size pieces
Transfer the parchment with the dough on it to a sheet pan.
Dough and parchment paper on sheet pan
Bake for 15-20 minutes. Leave the crackers on the pan to cool. Once completely cool, transfer to an airtight container to store, or just eat them all. That’s a viable option too. Enjoy!
So I used to use Earth Balance Vegan Buttery Spread before the whole corn thing went down. But it’s got ingredients derived from corn. Supposedly the proteins are processed out of it, but I’ve heard that song and dance before and reacted, so my Earth Balance got stricken from the list things that were okay to eat. Also, most shortenings are also now out the window for me as they they have corn, flax, or palm, which is cross reactive with coconut (allergic), and for which I’ve had little sneaky reactions. Quite a while back I tried to make some vegan margarine using cocoa butter. It was a great idea, but the reality of the product left something to be desired, as it just didn’t taste like margarine. For a while I ignored the issue and just dumped olive oil on stuff, and made wine-herb-olive oil sauces for dipping things like lobster, but I missed margarine/butter.
About a month or so ago, I started thinking about baking again, or more accurately, chocolate chip cookies, and the fact that I didn’t really have a safe margarine or shortening to make them with. I started wondering about lard, since you can make pie crust from it, and started doing some Google-fu. Turns out most commercial lards have citric acid (corn) or other additives that are problematic. Sigh. So I started wondering if you could DIY it somehow, like saving your bacon fat. I found this article on rendering your own lard. I began considering whether I could use the lard to make margarine. Then in the process of making the Roasted Beef Stock and discussing the use of the beef tallow skimmed from the stock to use to caramelize the onions with Mary Kate for her French Onion Soup, we considered whether beef tallow might have a closer to dairy taste and feel. So I went searching for recipes to render beef tallow and found this article.
So then it was a matter of trying to get my hands on some pork leaf lard to render down into lard and some suet to render down into beef tallow. I found a local source, the Miles Smith Farm, where they are able to get pastured pork from another supplier and they have grass fed beef. Once I rendered down my order in separate crock pots, I had a quart and half a pint of lard and a quart, a pint, and a half pint jar of beef tallow.
Beef Tallow and Pork Leaf Lard
I used the original recipe I had tried as a starting point for my attempts. I know what you’re thinking…Denise, you’re going to hell for using a vegan recipe to make margarine out of animal fats. And you’re probably right. If I had a viable vegetable alternative, I’d take it, even though I’m not vegan. But I’m not vegan, and I don’t have a viable vegetable alternative. I used the recipe as a guide, for amounts, but I switched out almost every ingredient. I don’t like soy or hemp milk and I’m allergic to almonds. I didn’t want to use canola oil because of cross contamination with corn and sunflower oil is out because I’m allergic to sunflower. Also, I didn’t want to use the soy lecithin because if you’ve read how that’s made, you won’t want to eat it, and sunflower lecithin is out because I’m allergic to it. The cocoa butter doesn’t taste right, and I can’t use xanthan gum (corn/wheat) and I didn’t want to use guar gum. So I googled substitutions for emulsifiers and came up with the suggestion of psyllium husk as a substitute for soy lecithin. This is what I came up with for a recipe to test:
2 ounces of fat (either all lard, all beef tallow or 1 ounce of each)
one half of ⅛ tsp of turmeric (for color, you could skip it if you want, but I was hoping to fool my brain a bit)
Melt lard and beef tallow together in a double boiler. Put all the other ingredients except the olive oil in a blender or food processor.
Once the lard and beef tallow are melted, add the olive oil and remove the double boiler from the heat. Add the lard, tallow and olive oil mixture to the blender or food processor and blend until completely mixed. You will need to scrape down the sides at least once.
Once it’s completely mixed, pour into a silicone ice cube tray or other silicone mold, and place in the freezer until it sets.
The first version I did used all lard as the 2 ounces of fat. Lard is less solid at room temperature than the beef tallow. When I took a cube out of the freezer and put it on the plate (room temperature plate) to take a photo, it immediately began to melt at the contact point of the plate.
Lard only version
The second version I did used all beef tallow as the 2 ounces of fat. Beef Tallow is more solid at room temperature than the lard, and it less readily melts in your mouth. It sort of coats your mouth with a waxy feel.
Beef Tallow only version
Lastly, just for the heck of it, I decided to mix them both together, and used one ounce of lard and one ounce of beef tallow in the third version. This one ended up being the winner. The beef tallow gave it a little bit more structure and a little bit more creamy dairy flavor, and the leaf lard balanced out the waxiness of the tallow and made the product more melt-able.
Once all versions were completed and had set in the freezer, my husband (who is not dairy free) and I tested them on hot white rice, so that we could see the melting quality and evaluate the taste without too much interference from the food.
Testing Margarine samples on rice
So now I have something that’s pretty close to margarine that I can use on rice, baked potatoes and veggies. I won’t use it a lot because it’s lard and beef tallow, although I’m guessing that real fats are probably healthier than hydrogenated crap. My next set of experiments will be using plain lard in chocolate chip cookies and trying the “margarine” in a small batch as well.
Anyway, I thought I’d post this both as an illustration of what some of us have to do to get safe food, and for those of you who might have my particular combination of food allergies that makes commercial butter, shortening, and margarine impossible.
Anyone else want to share their weirdest food allergy experiments?
Denise at The Butterfly Place in Westford, Massachusetts
More Life With Food Allergies! You’ve been holding your breath in anticipation, haven’t you?
This week, we’re planning to discuss things you can do with your significant other or your friends or even your family that do not revolve around food. I know, it sounds crazy that food would be so central to socializing, and it does not seem that way until you can no longer easily eat anything anywhere.
As I said in the past post, I’ve found someone who thinks that finding things to do that don’t involve food is actually kind of a fun challenge. While our first date was a rather traditional dinner out, we’ve followed that with a rather eclectic collection of events that have, for the most part, been free. Many of them are somewhat educational, which I find interesting, and they usually provide good fodder for conversation afterwards. Stand-by — I’m going to start waving my nerd flag high and proud.
Because we’re in New Hampshire, my specifics are keyed to this area, but many of them are broadly applicable. If you can approach your own town or region like a tourist, you may discover new things.
We’ve seen only a few movies, but then popcorn, like pizza, might be one of the more evil tempting smells of foods you cannot eat. Streaming and DVDs do offer more options as far as getting your own snacks. With all of the TV series you can stream, appointment viewing of a TV series is really easy to do. But movies are a classic date night that do not need to revolve around food.
Museums are a great option — art, science, or history. Now, upfront, I love museums — I have degrees in art history. But what I think is great about going to a museum with someone is that it gives you something to do while getting to know one another. Museums can be a bit steep for entry, unless you’re near DC, but check with your local library to see if they have either membership cards you can check out or discount passes. Locally, we have the McAuliffe-Shepard Discover Center (planetarium and museum), the New Hampshire Historical Society, the Millyard Museum, a few local galleries, and the Currier Museum. Some museums offer free or discounted entry on certain days or at certain times. In fact, did you know there is a free museum day sponsored by the Smithsonian? No date has been announced yet for 2014, but stay tuned. If you’re in a major city, maybe you’re on this list of free museum days.
Author readings at a local bookstore (here in Concord, Gibson’s is one of my favorite places) are often free and usually interesting whether or not you’ve read the book (or intend to). They often have a calendar available online. The library will often have a few events as well, though my local library tends to be geared towards the younger and older crowds (school-aged, teens, and retirees).
Meetup may offer some options finding like-minded groups doing trivia nights, company tours (I met a good friend on a brewery tour, though neither of us drinks), lectures, walking tours. In fact, Denise and I met through Meetup, too. If you’re science-oriented, science cafes, going by a variety of similar titles, exist in three New Hampshire towns — Manchester, Nashua, and Portsmouth — and there are a bunch in Boston — there might be one near you.
Possibly my favorite resource is the New Hampshire Humanities Council calendar of lectures, performances, and events that we’ve taken great advantage of (so much so that they might be getting sick of our names on their participant evaluations). Last year they had a series of events on constitutional issues — Denise and Corinne and I went to the first, and I went to the last with Jack. Maybe you’re thinking that civics discussions wouldn’t be all that fun or interesting; I disagree — I thought they were pretty fascinating. But they also have history-related performances, literature recitals, and there’s an upcoming one on comics.
If you want to see a huge variety of events — theatre, arts, auctions, shows, exhibits, festivals, classes, and more — and you’re in NH, southern ME, or northern MA, you can try the NH365 website — search by region, type of event, or date.
If you’re the type, there’s also the great outdoors — plenty of local hiking or walking trails, biking or snowmobiling, whatever you’re into. Just standard caution — don’t hike off into the wilderness with someone you’ve never met before. Make common sense common again. Me, personally, I tend to prefer the outdoors when seen from the indoors for about 10 months of the year, but your mileage may vary.
With a little effort and creativity, there is plenty to do without food being at the center of everything. And hey, if you’re looking for another way to celebrate Friday, one that doesn’t involve cupids and hearts, can I suggest Ferris Wheel Day or Bulgarian Wine Day?
I grew up in rural Maine, and I’m used to driving all over hell and gone to go do things. Also, I went to school in Boston and it’s only about an hour or so from Manchester, so it’s fun for a day trip. The City of Boston site has a list of Free (and almost free) Things to Do. You might want to check your city’s website to see what they recommend. Also check out Boston.com’s Things to Do section. You can search by geographical area of the city and by category.
Since there are so many colleges in the area, you can to their websites and see what’s going on for lectures, readings, performances, concerts and events as well. Since I went to Wellesley for undergrad, I had to go check out the stuff going on atWellesley, but you can check out Harvard, MIT, Boston College, Boston University, Northeastern, etc, etc. Also locally in New Hampshire, you can check out Saint Anselm College, UNH, and Plymouth State University,
The last thing I’d suggest is seeing what community theater groups your area has and what performances they might be putting on. I just went to a local production of A Midsummer Night’s Dream that was really good in Dover, New Hampshire. You can check out this website for local theater in New England.
We hope this gives you some great ideas; go have fun!
So, here’s the thing, I pretty much can’t go out to dinner anymore with the whole corn thing. Makes it hard to go out for a romantic dinner, if all I can do is sip a glass of wine and watch my husband eat his dinner. Fun right? So that might mean finding a non-food related activity or it might mean cooking at home instead. Because some of you might want the nice dinner, and I can’t think of anything fun to do in winter in New Hampshire on Valentine’s Day, cooking at home it is. Shawn is a carnivore, so I’m doing a really nice rib eye roast (two weeks early, just for you guys), but Mary Kate will be supplying a Vegetarian/Vegan option next week. We’ll have you covered. (Also, I would totally make this for myself if I was single, leftovers are awesome!)
The rib eye roast is a bit pricey, but my thought was that it’s still cheaper than going out to dinner, having appetizers, an entree, dessert, and drinks. I’m also going to you some options for side dishes, Garlic Mashed Potatoes, and Oven Roasted Asparagus. I’m not handling dessert, I’m still having complications with respect to having safe fats to use for baking, and you should just get some chocolate if it’s safe for your allergies from the Dancing Lion (yo, anyone getting me presents for Valentine’s, hint, hint, not that my husband reads this blog).
One thing that’s really helpful is a probe meat thermometer. Seriously. Get one now, if you’re sick of your meat and poultry being overcooked. I mean it. Why waste your hard earned money on overcooked food? Isn’t making all our food hard enough? Okay, I’m off the soap box, but seriously, do it. Or at least get one of these so you can check the temp periodically. (No affiliation with Amazon whatsoever, but their site has good pictures and descriptions.)
Garlic Mashed Potatoes
1/3 cup of roasted garlic (Here’s how to do it, takes an hour, do a bunch ahead of time and store it in a jar in your fridge or freeze it so you can use when you want it without the aggravation).
Amount of Garlic I roasted, you don’t need this much, but it’s good to haveRoasted Garlic in a pint jar
5-6 large potatoes, peeled and cut into 2″-3″ inch square chunks
2-3 Tablespoons of extra virgin olive oil (if you have a safe margarine or butter, you can use that, I don’t, unfortunately.)
1/4 cup of non-dairy milk (I’m using homemade cashew milk, but use what works for you.)
Save a couple of the roasted garlic cloves to one side so you can use it as a garnish if you want to get all fancy about it. Place your peeled and chunked potatoes in a large pot.
Peeled and chunked potatoes in a pot
Cover them with enough water that the potatoes are submerged by an inch or so. Bring the potatoes to a boil on high, and then turn down to medium high (about 7-8 on my dial). Continue to cook until the potatoes are fork tender. Drain in a strainer/colander and place the cooked potatoes back in the pot.
Potatoes cooked fork tender and placed back in pot
Mash the potatoes with a potato masher. Add the garlic (with exception of the cloves for the garnish), the olive oil, and the non-dairy milk and mash the new ingredients into the potatoes until all the ingredients are thoroughly mixed. Either place the potatoes in a decorative serving dish with the garlic cloves on top, or place some on the plate with a garlic clove as a garnish.
Garlic Mashed Potatoes in a Serving Dish
Oven Roasted Asparagus
a bundle of asparagus
2 Tablespoons of extra virgin olive oil
1 teaspoon of Penzey’s Greek Seasoning (or use about an 1/8 of a teaspoon each of salt, garlic, lemon peel, black pepper, Turkish oregano, marjoram, and mix it together.)
Preheat oven to 400° F. Wash and trim the asparagus, and then cut it into 1-2″ inch pieces.
Asparagus cut in pieces
Place them in a bowl. Drizzle the asparagus with the extra virgin olive oil and the seasoning mix. Using a silicone spatula, toss the asparagus in the bowl until it is thoroughly coated with oil and seasoning mix.
Asparagus in bowl being tossed with oil and seasoning
Spread them out on a baking sheet, making sure to scrape down the bowl so that the oil and seasoning end up on the asparagus on the baking sheet. Put the baking sheet in the oven and bake for approximately 30 minutes until asparagus is tender.
Asparagus after roasting
Boneless Rib Eye Roast
3-5 pound boneless rib eye roast
about 1-2 teaspoons of Penzey’s English Prime Rib Rub (or use an 1/8 of a teaspoon each of salt, ground celery seed, sugar, ground black pepper, onion powder, garlic powder, and arrowroot and mix it together).
Based on this recipe, you need to cook the roast for about 15-18 minutes per pound after the initial 15 minutes as described below, and will need to rest for 15-20 minutes after you remove it from the oven. Calculate how long that will be based on your roast size to figure out when you need to begin cooking to have the roast be ready to serve at the time you wish to eat. An hour before you intend to begin cooking in order to have the roast cooked and rested by the time you wish to eat, take the roast out of the refrigerator and place it on the counter to bring it to room temperature.
Preheat your oven to 450° F. Take a baking pan, and place a rack in it.
Cooling Rack on a baking sheet
Season your roast with your spice mix by rubbing it all over the roast. Place the meat on the rack, with the fat side up.
Roast with spice rub and placed on rack
Place the roast in the oven for 15 minutes, then turn the oven temperature down to 325° F. Place your probe thermometer through the center of the roast, making sure it is going through the very center.
Roast after 15 minutes and placement of probe thermometer
Continue to roast for 15-18 minutes per pound or until the thermometer reaches 125°F for an internal temperature. This is fairly rare, but as the roast rests the internal temperature will continue to rise for another 5 to 10 degrees. If you like more of a medium rare, wait until the internal temperature reaches 135° F. Take the roast out of the oven.
Completed Roast after cooking
Tent it with aluminum foil and let it rest for 15-20 minutes. Do not cut the roast before it has had a chance to rest. I mean it. Seriously. Otherwise, you’ll lose all the moisture. Once the roast has rested properly, cut the strings on the roast and remove them, and then cut the roast into slices.
Cutting Roast into slices
Plate up your roast and sides and eat up while asking your husband, partner or date to say something outlandishly romantic. Mine doesn’t do it, but it’s fun to watch the facial contortions, as I make unreasonable demands. Remind me to tell you about the time I nagged him to write me a poem for almost a year and a half. Oh and the sculpture, too.
Those of us with soy, wheat and dairy allergies have a tough time finding bouillon and/or stock out there that’s safe. When you add a corn allergy to the wheat and dairy (I’m okay on soy), let me tell you, it’s all over. You’re going to be making it yourself if you want to eat it, period. So Mary Kate and I thought posting some basics for people who’ve never had to do their own soup stocks before might be helpful. There’s a lot of recipes out there that take beef bones, throw them in a pot with onions, carrots, and celery, and boil the crap out of it and call it beef stock. I mean, yeah, it is beef stock, but it doesn’t really taste as good as it could. And I think that’s because there’s no caramelized little burned bits, which you would have if you were starting from roast drippings. I like my beef stock to taste like something, and you do need some actually bits of beef to do that, and a bit more than is on the beef bones you get at the grocery store. So I use marrow bones and beef oxtail so there’s plenty of meaty bits for drippings, and I roast the marrow bones, oxtail, onions, carrots and celery first so I can use nice pan drippings in my stock.
Roasted Beef Stock
About 4 pints or 2 quarts
2-3 pounds of sliced marrow bones
2 pounds of beef oxtails
2 red onions (red will give the stock a nice deep color), chopped
2 large carrots, trimmed and chopped
4 stalks of celery, trimmed and chopped
a dash of salt
a dash of black pepper
2 bay leaves
Preheat oven to 350°F. Grease pan with oil or use a spray mister. Place marrow bones, oxtails, red onions, carrots, and celery in roasting pan.
Marrow Bones, Oxtail, and Veggies in Roasting Pan before cooking
Sprinkle with a little salt and pepper. Place roasting pan in oven and roast for an hour and half. You can roast it longer if you don’t have any caramelized bits yet.
Marrow Bones, Oxtail, and Veggies in Roasting Pan after cooking
Once you’re done roasting, transfer the contents of the roasting pan to a stock pot, making sure you deglaze the roasting pan with a bit of water to get all the good burned and caramelized dripping into the stock pot. Add 16 cups or water or 4 quart jars worth, and the bay leaves.
Cooked bones, meat and veggies in stock pot after adding water
Bring to a boil and then reduce the heat to medium-low (3-4 on my dial) and simmer for about an hour with the lid on. Then bring it down to low (1-2 on my dial) and let it simmer on low for another hour, again with the lid on. You can simmer as long as you like, but you may need to add more water to get the correct yield.
Cooked bones, meat and veggies in stock pot after simmering for hours
Now you want to strain out the bones, meat and vegetables from the stock. I used another stock pot and a strainer I got from a restaurant supply store, but a regular colander will do. Also, I picked out the really heavy bones first to make my life easier.
Straining out veggies and meat after simmering
Now you can season to taste adding a bit more salt and black pepper if needed.
Roasted Beef Stock after straining
If you want to remove some of the fat, you can skim it off, or you can put your stock pot in the fridge overnight and you can peel off the fat layer.
Roasted Beef Stock after being refrigerated overnightRemoving excess fat from Roasted Beef StockRoasted Beef Stock after removing excess fatExcess fat in a bowl, just for gross out purposes
Once you’re done removing the fat, you can warm up the stock and use it, package it up and freeze it, or can it with a pressure canner, as described here. I’m canning mine because I want to use it for a recipe we’re going to post two weeks from now and I’m not ready to make the actual recipe itself right now. I don’t want it to go bad, and we lose power a lot.
My All American 915 pressure canner getting ready to process stock
This is a really basic stock, because you want to be able to use it in all kinds of applications. Stay tuned for how we’re going to use it for the next two weeks!