Notice: Function _load_textdomain_just_in_time was called incorrectly. Translation loading for the wp-ultimate-recipe domain was triggered too early. This is usually an indicator for some code in the plugin or theme running too early. Translations should be loaded at the init action or later. Please see Debugging in WordPress for more information. (This message was added in version 6.7.0.) in /home/maryzahc/public_html/adultfoodallergies.com/wp-includes/functions.php on line 6121
Tree Nut-free – surviving the food allergy apocalypse (archive)

Tag: Tree Nut-free

Does not contain any tree nuts or coconut.

  • Dill Pickle Meatloaf

    Dill Pickle Meatloaf

    I got this great 1966 cookbook at an estate sale that is just ground beef recipes.

    Image shows a 1965 magazine-sized cookbook.

    Growing up in the 1980s in the midwest, I ate a lot of different preparations of ground beef. We never had hamburger helper out of a box, not that I remember, but there were definitely a few different preparations involving condensed soups. This cookbook just felt like childhood home. It was also the perfect way to follow up Denise’s last post about her meat grinder. As mine was my grandmother’s, I bought my meat for this recipe pre-ground.

    Image shows a platter with a green and black pattern, set on a multi-color zig-zag background. The platter holds a small meatloaf with a reddish sauce on top, surrounded by roasted fingerling potatoes.

    Now, this meatloaf omits the eggs and breadcrumbs that are common in so many recipes. I’ve used flax seed as an egg replacer and just skipped the breadcrumbs (my mom’s version was saltine crackers), and I’ve skipped the majority of seasoning in favor of a brilliant idea from this cookbook — dill pickle juice! I love pickles, but whether you make your own or buy them, you’re often left with juice. If you don’t want to drink it (and I don’t), do you just waste it? No. Make meatloaf. It’s better than using it as a marinade (I tried that, too.)

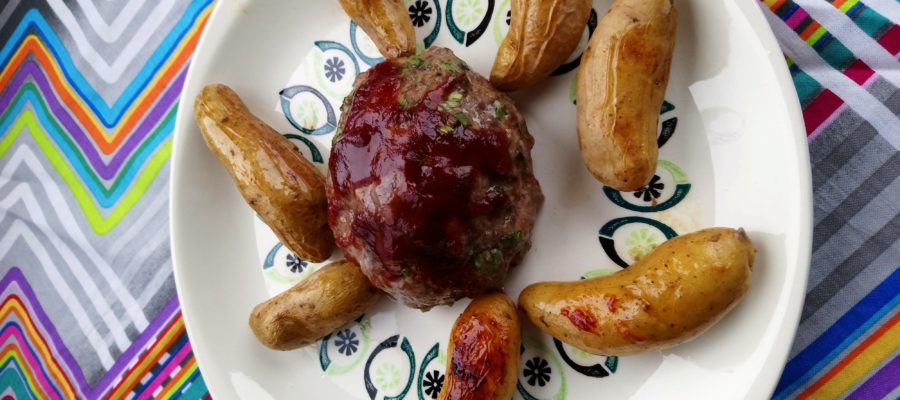
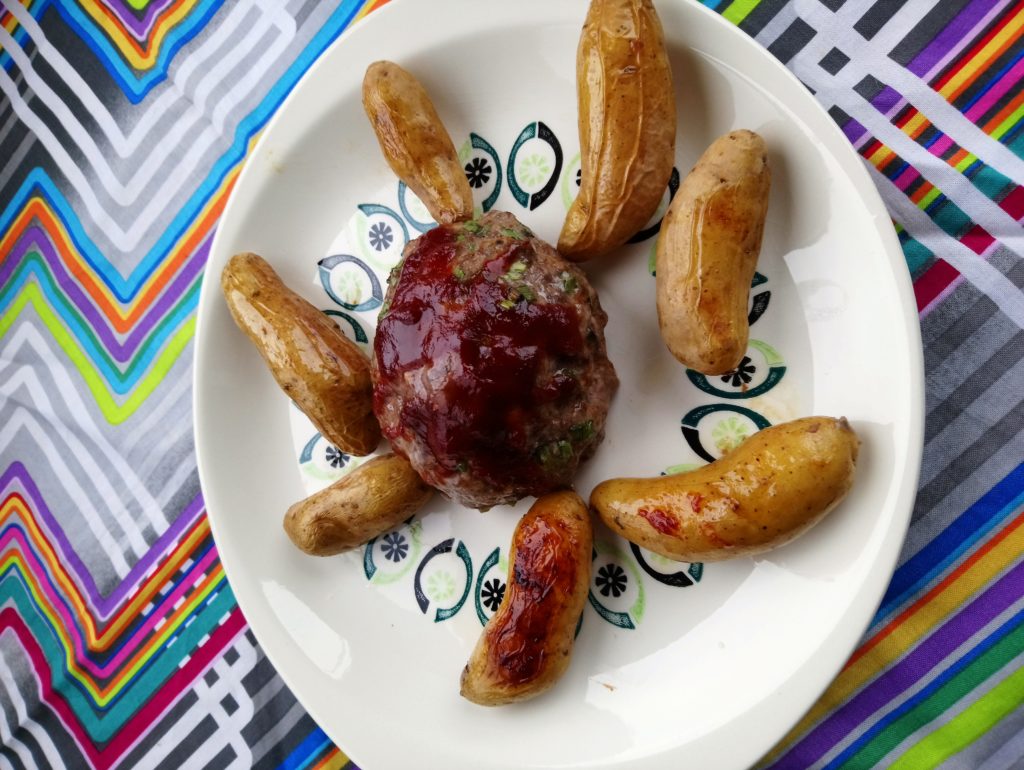
    I make my meatloaf into two smaller loaves for quicker cooking times. Arrange the potatoes around the meat — they will cook in the fat. Yum.

    Image shows a silver sheet tray pan in the oven, with two uncooked meatloaves surrounded by yellow fingerling potatoes.

    Notice: Trying to access array offset on value of type bool in /home/maryzahc/public_html/adultfoodallergies.com/wp-content/plugins/wp-ultimate-recipe/helpers/models/recipe.php on line 254
    Dill Pickle Meatloaf
    Print Recipe
    Servings Prep Time
    4 servings 10 minutes
    Cook Time Passive Time
    40 minutes 40 minutes
    Servings Prep Time
    4 servings 10 minutes
    Cook Time Passive Time
    40 minutes 40 minutes
    Dill Pickle Meatloaf
    Print Recipe
    Servings Prep Time
    4 servings 10 minutes
    Cook Time Passive Time
    40 minutes 40 minutes
    Servings Prep Time
    4 servings 10 minutes
    Cook Time Passive Time
    40 minutes 40 minutes
    Ingredients
    • 1/2 lb. ground pork
    • 1/2 cup scallion tops chopped
    • 1/3 cup dill pickle juice
    • 1/2 T garlic olive oil
    • 1 T ground flaxseed
    • 2 T ketchup or barbeque sauce
    • 1/2 lb. small potatoes washed
    Servings: servings
    Instructions
    1. Preheat the oven to 350F
    2. Add all ingredients except sauce and potaoes to a bowl and mix well. It seems to work best to use your hands, gently mixing until the mixture comes together.
    3. To reduce baking time and get more of the nice exterior of the meatloaf (my favorite part), I make two small meatloaves, which also leaves more space around them for the potatoes. Don’t grease the sheet — the meats have enough fat to cook the potatoes. I just use a half sheet pan, sturdy with sides to keep the grease contained.
    4. Bake for 30 minutes, uncovered. Then add 1 tablespoon of ketchup or barbque sauce to the top of each loaf and bake a final 10 minutes.
    5. Let it rest for 10 minutes before cutting. 1/2 a meatloaf is now about 1/4 lb, so about one serving.
    Recipe Notes

    Note: I think chia seed, ground, would likely work in this recipe, but I haven’t tested it. You can also skip the sauce on top if you wish.

    Share this Recipe
     
    Powered byWP Ultimate Recipe
  • Thai Style Green Curry Paste

    Thai Style Green Curry Paste

    Thai Style Green Curry Paste in use for a quick dinner
    Thai Style Green Curry Paste in use for a quick dinner

    This past summer, I ended up harvesting a lot of chilies. When I say a lot, I estimate that I harvested about 50 pounds of chilies based on what I canned, fermented, dehydrated whole, dehydrated and ground into powders, froze, and so on. I grew 20 different kinds of peppers. I grew half in the greenhouse and half in the garden, and I started an obscene amount of seedlings because some of them were saved seed and I didn’t know if they would grow. (They did. All of them.) The greenhouse experiment went well. I harvest probably 3 to 5 times what I harvested in the garden. At the end of the pepper harvest, I was running out of things to do, and it occurred to me while I was scouring recipes that I could make Thai style curry pastes.

    In the beginning of my corn allergy journey, the denial was strong and I decided that I was tolerating some commercial Thai curry pastes. The reality was, yeah, not so much. This summer also resulted in more freezer space as I had a new bigger chest freezer in addition to my small chest freezer, my friend Kristin’s family had given me another fridge, and so now I had room to freeze some curry pastes. So I did some research, cobbled together the things I liked from several recipes, and voila, Thai Style Green Curry Paste. You can use it this recipe for Quick Thai-Inspired Curry Noodle Stir Fry (rice is no longer safe for me, but feel free to try it with sweet potato or mung bean noodles) or just put a cube or two of curry paste in some safe non-dairy milk, add veggies and/or a protein, and go to it.

    Thai Style Green Curry Paste before cooking down to a thick paste
    Thai Style Green Curry Paste before cooking down to a thick paste
    Thai Style Green Curry Paste after cooking down and in a silicone ice cube tray for freezing
    Thai Style Green Curry Paste after cooking down and in a silicone ice cube tray for freezing
    Thai Style Green Curry Paste in silicone ice cube tray ready to freeze
    THAI STYLE GREEN CURRY PASTE
    Print Recipe
    Thai style green curry paste to use in Thai dishes calling for green curry paste.
    Servings Prep Time
    1 cup 20 minutes
    Cook Time
    20 minutes
    Servings Prep Time
    1 cup 20 minutes
    Cook Time
    20 minutes
    Ingredients
    • 1 green bell pepper chopped and seeded
    • 2 stalks lemongrass trimmed and chopped
    • 2 inch piece ginger peeled and chopped (or substitute galangal if you can find it)
    • 15 Green Bird Thai Chilies chopped and seeded (or other hot green chilies)
    • 2 shallots peeled and diced (or 1 small red onion if you can’t get shallots)
    • 6-8 cloves garlic peeled and roughly chopped
    • 1 lime, zest and juice
    • 1/2 cup cilantro chopped
    • 1 inch piece fresh turmeric peeled and chopped (or substitute 1/2 teaspoon dry ground turmeric)
    • 1 teaspoon ground white pepper
    • 1 Tablespoon ground coriander seed
    • 2 Tablespoons kosher salt
    Servings: cup
    Instructions
    1. Place all ingredients in a blender or food processor, and blend until you have a smooth paste.
    2. Place in a saucepan over medium low heat. Simmer until it has reduced to a thick paste, about 20 minutes or so.
    3. For ease of use, freeze in silicon ice cube trays, and store in a zip top bag in your freezer for up to a year.
    Share this Recipe
    Powered byWP Ultimate Recipe
  • Coffee Snobbery, a weekend coffee odyssey.

    Coffee Snobbery, a weekend coffee odyssey.

    Photo of verdant rain forest with lush green leafy trees. Not a botanist.
    This is where my coffee grows. Photo taken at Mountain Thunder Coffee, February 2018.

    Coffee. Coffee. Blog post. Coffee. Tea drinkers, go here. This post isn’t about the history or origins of coffee, but about making one great cup each weekend when mornings suck a lot less. Denise will laugh at the entire idea of ONE cup of coffee, but we do both love it in different quantities. Coffee is great because it’s not an allergen for most people — but drinking coffee out can have its pitfalls — most coffee shops serve treats (gluten, egg, dairy) and milk and nut milks. Coffee can be processed with ingredients that cause some people issues — I haven’t hit those yet, luckily. So here’s my coffee journey.

    In 2016, as regular readers of the blog know, I moved across the country to Seattle, a city well-known for its coffee culture. In part, this is climate. I learned to really drink coffee in Oregon, my first foray into the Pacific Northwest, where winters are grey and damp and only a hot beverage will get you through the days. In Eugene, you can’t go half a block without hitting coffee, at least not near the university. Seattle’s not that different, though a lot of the shops are Starbucks. I’ve seen the first espresso cart that came to the city (imported from Italy, it’s now in the collections at the Museum of History and Industry), and every time we get to try a new coffee house, I get a little excited. I’ve become a coffee snob, but that doesn’t mean I’d turn down archaeologist coffee.

    For the most part, I’m a simple coffee drinker. I learned to make mochas at my sandwich shop job last century, and while I did not like coffee much, I loved complicated coffee beverages. But I truly love the taste of coffee now, and most days, I want a cup of black drip coffee or an Americano (espresso + water). Occasionally, I like a good almond milk latte, and there’s one place that makes a great cappuccino with almond milk.

    But my home coffee game has definitely gotten more complicated. I’ve owned drip brew coffee makers (messy to clean a reusable filter & makes too much) and French presses (terrible to clean). I went through an instant espresso phase (and still keep that around for baking. I don’t drink a lot of coffee, but I need that cup.

    I tend to only make coffee on the weekends — in the past, I’d drink coffee at work no matter how terrible it was. (Fun side note, I was banned from making coffee at a former job because I made it too strong). But work now, we have excellent amazing coffee from a local roaster, Pine Drop.

    Aeropress. Star Trek mug.
    Aeropress. Star Trek mug.

    After some research, I decided that an Aeropress might be the best fit for me. This tube system would travel well, and making only one cup means that you’re almost never going to drink cold coffee. Making coffee in the Aeropress feels like a game. Cleaning it is a breeze, as the coffee just pops out into the trash or compost. And the coffee itself is good.

    Scooping coffee beans into a JavaPresse coffee grinder, which is open, the crank on the table next to the mason jar lid, a mug in the background.
    JavaPresse coffee grinder and lovely beans.

    But after I determined that Jack wasn’t suddenly going to become a coffee drinker in Seattle, I started buying whole beans because my ground coffee was getting stale. I bought a small burr hand grinder, as I hate noise in the mornings. When we went to Hawai’i, toured a Kona coffee plantation, got hyped on samples, and bought fancy coffee I adore.

    Mountain Thunder coffee, Aeropress set up on a Star Trek mug, JavaPresse grinder, stirring paddle and scoop that came with the Aeropress.
    My coffee set up, minus the electric kettle

    So this is my hipster weekend coffee routine:

    I hand-grind about 2 Tablespoons of Kona coffee from a plantation I personally toured in my burr grinder. This takes about 2 minutes. Meanwhile, I heat up water to 185 degrees in my adjustable thermostat electric kettle. I put a paper filter in my Aeropress and set it atop one of several Star Trek mugs, and I press out one shot of coffee. I then add a bit more water for an intense Americano, or occasionally I steam some almond milk for a homemade latte.

    a shot into the Aeropress tube at the ground coffee
    Ground beans = magic.

    Here’s what I use [not affiliate links]: Mountain Thunder coffee, JavaPress Manual Grinder, VonShef electric kettle, Aeropress coffee maker, and the Secura Automatic Milk Frother.

    As a “bonus” bit of fun, I made a video of using the Aeropress.

  • Mango Slaw

    Mango Slaw

    Orange mango, purple and green Thai basil, purple cabbage, and other green herbs in a slaw on a white plate, with a "tree" sprig of Thai basil in the center.
    Mango Slaw, photo by J.Andrews

    I just spent a week in Hawai’i, the Big Island, and came home to cold and dreary weather. We hit avocado season there, which was amazing, but also found lots of fresh papaya, some passion fruit, and some interesting varieties of dragon fruit. But back here on the mainland, the tropical fruit variety is less exciting. The grocery store did have some rather sad-looking papaya, but the mangoes looked pretty good. The smaller honey mangoes were ripe and ready to eat.

    Beyond that, I have a recipe on my menu plan this week that required 1/4 of a head of red cabbage. I swear, recipes either require a whole cabbage or just a bit, and I hate wasting things. So I pulled this slaw together to go with several other meals and use up a bit more of the cabbage (that still only gets me to half the head, but I’ll stir-fry the rest).

    This is a TART slaw, not creamy, and the only “dressing” is lime juice and the juice from the mangoes — this is why it needs to rest a bit. My mangoes were super sweet, and the dinner that this was a side dish for was rich enough that this made a good accompaniment as it was. You may want to adjust a bit — a pinch or two of salt or sugar or a drizzle of olive oil may be needed to perfect this crunchy tart dish. Adjust as needed, and enjoy.


    Notice: Trying to access array offset on value of type bool in /home/maryzahc/public_html/adultfoodallergies.com/wp-content/plugins/wp-ultimate-recipe/helpers/models/recipe.php on line 254

    Mango Slaw
    Print Recipe
    Servings Prep Time
    6 slaw servings 20 minutes
    Passive Time
    60 minutes
    Servings Prep Time
    6 slaw servings 20 minutes
    Passive Time
    60 minutes
    Mango Slaw
    Print Recipe
    Servings Prep Time
    6 slaw servings 20 minutes
    Passive Time
    60 minutes
    Servings Prep Time
    6 slaw servings 20 minutes
    Passive Time
    60 minutes
    Ingredients
    Proper Measurements
    • 2 cups red/purple cabbage shredded
    • 2/3 cup honey mango cubed
    • 1/4 cup cilantro thick stems removed, rough chopped
    • 2 Tablespoons Thai basil leaves chopped
    • 1 Tablespoon lime juice
    • 1/4 cup scallions thinly sliced
    Rough Measurements
    • 1/4 head cabbage shredded
    • 1 small honey mango cubed
    • 1/2 bunch cilantro thick stems removed, rough chopped
    • 2 stems Thai basil leaves only, chopped
    • 1/2 lime juiced
    • 4 small scallions thinly sliced
    Servings: slaw servings
    Instructions
    1. Prepare all ingredients and mix thoroughly. Let flavors meld for at least an hour, stirring occasionally.
    2. Before serving, taste and adjust — add a pinch of salt, sugar, or a drizzle of olive oil if needed.
    Share this Recipe
     
    Powered byWP Ultimate Recipe

  • Curry Spiced Hot Sauce

    Curry Spiced Hot Sauce

    Curry Spiced Hot Sauce
    Curry Spiced Hot Sauce

    Okay, I know I’m going to be sorry because this is my last “get out of jail free post” I had saved up in case I was in a bind, but I’m kind of in a bind.  So here we go with another hot sauce.  Plus, you can’t have too many hot sauces anyway. This is made from the Indian Jwala finger peppers that MaryKate sent me from Seattle in the fall.  I wanted to find an authentic Indian style hot sauce for these peppers, but didn’t really find much out there. So instead I made a curry inspired hot sauce. This is great for bumping up homemade curries, kormas, or dals. I used my DIY Curry Powder for this recipe, but any safe curry powder you have would be fine. If you can’t get your hands on fresh Indian Jwala finger peppers, any red chili pepper would be fine, such as red cayenne peppers or Fresno peppers.

    Hot peppers at the beginning of the fermenting process
    Hot peppers at the beginning of the fermenting process

    Peppers, garlic and apple cider vinegar in blender
    Peppers, garlic and apple cider vinegar in blender

    Peppers after blending
    Peppers after blending

    Pushing pulp through strainer to strain out skin and seeds
    Pushing pulp through strainer to strain out skin and seeds

    Strained peppers, garlic and apple cider vinegar
    Strained peppers, garlic and apple cider vinegar

    Remaining ingredients in sauce pan
    Remaining ingredients in sauce pan

    Remaining ingredients and strained pepper mix in sauce pan
    Remaining ingredients and strained pepper mix in sauce pan

    Sauce pureed after onions softened
    Sauce pureed after onions softened

    Sauce returned to sauce pan to simmer
    Sauce returned to sauce pan to simmer

    Curry Spiced Hot Sauce
    Curry Spiced Hot Sauce

    The other nice thing about making hot sauce is that you get two products for one.  When you strain out the skins and seeds during the process, you can dry them in the oven or the dehydrator and get a nice crushed pepper mix to use in other spice mixes, rubs, or other recipes. No waste!

    Strained out pepper skin and seeds before drying in the oven
    Strained out pepper skin and seeds before drying in the oven

    Indian Jwala finger pepper flakesIndian Jwala finger pepper flakes
    Indian Jwala finger pepper flakes

    Curry Spiced Hot Sauce
    Curry Spiced Hot Sauce
    Print Recipe
    Great sauce to use to bump up the spice on curries, kormas and dals.
    Servings Prep Time
    12 ounces 15 minutes
    Cook Time Passive Time
    10 minutes 2-4 weeks
    Servings Prep Time
    12 ounces 15 minutes
    Cook Time Passive Time
    10 minutes 2-4 weeks
    Curry Spiced Hot Sauce
    Curry Spiced Hot Sauce
    Print Recipe
    Great sauce to use to bump up the spice on curries, kormas and dals.
    Servings Prep Time
    12 ounces 15 minutes
    Cook Time Passive Time
    10 minutes 2-4 weeks
    Servings Prep Time
    12 ounces 15 minutes
    Cook Time Passive Time
    10 minutes 2-4 weeks
    Ingredients
    Equipment
    • 1 wide mouth pint jar
    • 1 glass fermenting weight or 4 ounce canning jar
    • 1 airlock lid for mason jar
    • 1 blender
    • 1 small sauce pan
    • 1 kitchen scale measuring ounces
    Brine for Fermenting
    • 1 quart spring water (not tap water, it will interfere with fermentation)
    • 1.8 ounces sea salt
    Hot Sauce Ingredients
    • 1 cup Indian jwala finger peppers washed and destemmed
    • 1 clove garlic peeled
    • 3/4 cup apple cider vinegar divided (Bragg’s is most tolerated for those with corn allergies)
    • 4 ounces tomato paste (I used my homemade tomato paste)
    • 1 cup onions, chopped
    • 1 Tablespoon curry powder
    • 1 teaspoon garam masala, ground
    • 1/4 teaspoon salt
    • 1 Tablespoon brown sugar
    Servings: ounces
    Instructions
    Fermenting the peppers
    1. Make brine by mixing spring water and salt in a container until salt is dissolved.
    2. lace peppers in pint jar and add glass weight or 4 ounce jar. Add brine until the weight is covered with brine by at least half an inch, or cover with brine and add 4 ounce jar full of brine to weight down peppers making sure that all peppers are submerged in brine. Place airlock on jar and add brine to airlock to seal.
    3. Let ferment for 2 to 4 weeks at room temperature, checking daily to make sure the brine levels are okay. You may need to add brine as time goes on as the peppers must stay submerged at all times. If the peppers do not stay submerged, they could develop mold and you’ll need to throw it out and start all over.
    Making the Hot Sauce
    1. Once your peppers are fermented, remove the airlock and and glass weight or glass jar. Drain brine. Place the peppers in a blender with the garlic clove and a 1/4 cup of the apple cider vinegar in the blender.
    2. Blend until the peppers are pureed, but not until the seeds have disappeared if you have a high performance blender. You want to leave the seeds whole enough to strain out.
    3. Once you have pureed your peppers, place the puree in a fine mesh strainer over a bowl and use a spatula or the back of a spoon to press the liquid in your puree into the bowl, leaving the seeds and skins of the peppers behind. (Hint: dehydrate the seeds and skins remaining in the oven at the lowest temperature you can or in a dehydrator to make pepper flakes to use in other recipes).
    4. Place the remaining ingredients (onions, tomato paste, 1/2 cup of apple cider vinegar, curry powder, garam masala, salt, brown sugar) and the strained pepper mixture into a sauce pan and simmer until the onions are soft.
    5. Rinse out your blender container, and place the contents of the sauce pan into the blender and blend until completely pureed. Once pureed, return the mixture to the sauce pan and bring to a gentle boil for 2 to 3 minutes.
    6. Remove the sauce from heat and let cool before placing it a container to store in the refrigerator. Use it on everything.
    Share this Recipe
    Powered byWP Ultimate Recipe

  • Warm Bacon & Kale Salad

    Warm Bacon & Kale Salad

    warm kale & bacon salad
    warm kale & bacon salad

    This will be a quick post. This salad is really loosely based on some paleo salad recipe that I found and Jack made a while back. We really liked it, but this time it’s edited to use up whatever we had in the house this time around. The basis for that salad was sauteing the kale in bacon fat and then crumbling that bacon over the top. This is an excellent side dish, assuming you like bacon and kale. I’ve brightened up this salad with apples, onions, and carrots, cooked along with the kale, and cherry tomatoes added at the end. I like the little yellow ones, as they are sweet, and they are hot house-grown, so they are still decent in January.

    If you don’t like some of these ingredients, leave them out! Well, not the kale or bacon. If you don’t like those, find a different recipe. If you can’t eat commercial bacon, consider making your own bacon. But the joy of salads is that they are malleable. Make them your own.


    Notice: Trying to access array offset on value of type bool in /home/maryzahc/public_html/adultfoodallergies.com/wp-content/plugins/wp-ultimate-recipe/helpers/models/recipe.php on line 254

    Warm Kale & Bacon Salad
    Print Recipe
    Servings
    3 servings
    Servings
    3 servings
    Warm Kale & Bacon Salad
    Print Recipe
    Servings
    3 servings
    Servings
    3 servings
    Ingredients
    • 5 strips bacon
    • 1 bunch kale about 6 cups when torn
    • 1 small red onion about a cup, slivered
    • 2 small carrots about a cup, shredded
    • 1 cup grape tomatoes
    • 3 small apples chopped, about 1.5 cups
    Servings: servings
    Instructions
    1. Cook bacon in a skillet, I use cast iron, over medium heat, until crispy. Drain on paper towels.
    2. Drain off all but 2 Tablespoons of bacon fat. Don’t clean the pan.
    3. Wash and tear the kale into bite-sized pieces. I like to use a salad spinner to dry it, but shaking it in a towel will work.
    4. Shred your carrots and slice your tomatoes in half.
    5. Then reheat the bacon fat over medium low. When hot, add the onion and carrot and cook until softened, 5-7 minutes.
    6. Add the kale and stir well, in handsful if needed to not overflow your pan.
    7. Chop and core the apples. I like the skin on for texture. Once the kale is wilted, add in the apples and stir well. Cook just until the apples are warmed.
    8. Add the tomatoes and crumbled the bacon on top. Serve warm.
    Share this Recipe
     
    Powered byWP Ultimate Recipe

  • Cilantro Lime Green Cayenne Hot Sauce

    Cilantro Lime Green Cayenne Hot Sauce

    Cilantro Lime Green Cayenne Hot Sauce
    Cilantro Lime Green Cayenne Hot Sauce

    Here’s the thing: It’s been crazed here, and I’ve been flaking a bit on blog-related recipe development. So I’m giving you another hot sauce recipe I developed in the fall. These peppers came from a mix of peppers that Mary S and I grew this summer, green cayennes (they hadn’t ripened to red before being picked to avoid the frost) and poblanos. This one is a bit milder than my normal hot sauces as the poblanos are fairly mild, but it’s really flavorful and great on all kinds of things, whether as a dipping sauce for pork chops, Mexican inspired dishes, or Thai inspired dishes.

    Peppers after fermenting
    Peppers after fermenting

    Peppers, garlic, and juice of 2 limes in blender
    Peppers, garlic, and juice of 2 limes in blender

    Pushing pulp through strainer to strain out skin and seeds
    Pushing pulp through strainer to strain out skin and seeds

    Strained peppers, garlic, and lime juice
    Strained peppers, garlic, and lime juice

    Onions, salt and juice of 3 limes in small sauce pan
    Onions, salt and juice of 3 limes in small sauce pan

    Cilantro, chopped and tightly packed
    Cilantro, chopped and tightly packed

    Cilantro and onion mixture after blending
    Cilantro and onion mixture after blending

    Cilantro and onion mixture and strained pepper mixture with sugar simmering
    Cilantro and onion mixture and strained pepper mixture with sugar simmering

    Cilantro Lime Green Cayenne Hot Sauce
    Cilantro Lime Green Cayenne Hot Sauce

    The other nice thing about making hot sauce is that you get two products for one.  When you strain out the skins and seeds during the process, you can dry them in the oven or the dehydrator and get a nice crushed pepper mix to use in other spice mixes, rubs, or other recipes. No waste!

    Strained out pepper skin and seeds before drying in the oven
    Strained out pepper skin and seeds before drying in the oven

    Pepper skins and seeds after drying
    Pepper skins and seeds after drying

    Green Cayenne and Poblano Pepper Flakes
    Green Cayenne and Poblano Pepper Flakes

    Cilantro Lime Green Cayenne Hot Sauce
    Cilantro Lime Green Cayenne Hot Sauce
    Print Recipe
    A milder hot sauce with a lot of flavor you can use in a lot cuisines and dishes.
    Servings Prep Time
    14 ounces 15 minutes
    Cook Time Passive Time
    10 minutes 2-4 weeks
    Servings Prep Time
    14 ounces 15 minutes
    Cook Time Passive Time
    10 minutes 2-4 weeks
    Cilantro Lime Green Cayenne Hot Sauce
    Cilantro Lime Green Cayenne Hot Sauce
    Print Recipe
    A milder hot sauce with a lot of flavor you can use in a lot cuisines and dishes.
    Servings Prep Time
    14 ounces 15 minutes
    Cook Time Passive Time
    10 minutes 2-4 weeks
    Servings Prep Time
    14 ounces 15 minutes
    Cook Time Passive Time
    10 minutes 2-4 weeks
    Ingredients
    Equipment
    • 1 wide mouth pint jar
    • 1 glass fermenting weight or 4 ounce canning jar
    • 1 airlock lid for mason jar
    • 1 blender
    • 1 small sauce pan
    • 1 kitchen scale measuring ounces
    Brine for fermenting
    • 1 quart spring water (not tap water, it will interfere with fermentation)
    • 1.8 ounces sea salt
    Hot Sauce Ingredients
    • 1 cup green cayennes washed, destemmed and sliced into half inch pieces
    • 1 cup poblanos washed, destemmed, de-seeded, and chopped
    • 1 clove garlic peeled
    • 5 limes juiced (divided)
    • 1 cup onions, chopped
    • 1/4 teaspoon sea salt
    • 1 cup cilantro washed, chopped, and tightly packed
    • 2 Tablespoons brown sugar
    Servings: ounces
    Instructions
    Fermenting the peppers
    1. Make brine by mixing spring water and salt in a container until salt is dissolved.
    2. Place peppers in pint jar and add glass weight or 4 ounce jar. Add brine until the weight is covered with brine by at least half an inch, or cover with brine and add 4 ounce jar full of brine to weight down peppers making sure that all peppers are submerged in brine. Place airlock on jar and add brine to airlock to seal.
    3. Let ferment for 2 to 4 weeks at room temperature, checking daily to make sure the brine levels are okay. You may need to add brine as time goes on as the peppers must stay submerged at all times. If the peppers do not stay submerged, they could develop mold and you’ll need to throw it out and start all over.
    Making the Hot Sauce
    1. Once your peppers are fermented, remove the airlock and and glass weight or glass jar. Drain brine. Place the peppers in a blender with the garlic clove and the juice of two of the limes.
    2. Blend until the peppers are pureed, but not until the seeds have disappeared if you have a high performance blender. You want to leave the seeds whole enough to strain out.
    3. Once you have pureed your peppers, place the puree in a fine mesh strainer over a bowl and use a spatula or the back of a spoon to press the liquid in your puree into the bowl, leaving the seeds and skins of the peppers behind. (Hint: dehydrate the seeds and skins remaining in the oven at the lowest temperature you can or in a dehydrator to make pepper flakes to use in other recipes).
    4. Place the onions, juice of 3 limes, and 1/4 teaspoon of salt in a small sauce pan and cook over medium heat until the onions are soft. Once the onions are soft, place the contents of the sauce pan into the blender with the chopped cilantro and blend until smooth.
    5. Place the onion puree mixture back into a sauce pan, and add the strained pepper mixture and bring to a gentle boil for 2-3 minutes.
    6. Remove the sauce from heat and let cool before placing it a container to store in the refrigerator. Use it on everything.
    Share this Recipe
    Powered byWP Ultimate Recipe

  • Corn & Black Bean Casserole (vegan & gluten-free)

    Corn & Black Bean Casserole (vegan & gluten-free)

    Casserole dish holding a cheese-topped meal with black beans
    Corn & Black Bean Casserole

    So this post needs to be quick, as I’ve spent the past two weeks moving and I’m exhausted. But this dinner was also quick — and hot and comforting. Well, the prep work is quick. It does take about an hour to bake. Keep that in mind. This is the first thing I made in the oven of our new apartment, in the midst of trying to figure out where everything goes.

    This casserole is based on a vegan corn casserole I made for Thanksgiving this year. Jack’s family makes some interesting corn dish for Thanksgiving based on ingredients that we don’t get out here on the west coast, but frozen corn is easy enough to find. I tweaked the original recipe only to use almond milk instead of soy. For a non-holiday, I’m too lazy to make a fancy side dish (by “fancy,” I mean something that takes an hour to bake and still requires a main course). But I thought it might be easy enough to turn this into a main dish with a few tweaks. Corn goes well with black beans, and that combination sort of screams chili powder to me, so that’s what I’ve added, along with a black bean, lime juice, and vegan cheese shred “topping” added at the end.

    So this is a casserole approved for weeknight making, but not for nights you get home late or starving. Plan on maybe 15 minutes prep and an hour ten minutes baking. But your whole meal is done (feel free to add a salad on the side, of course).

    (I hope I don’t need to say it, but this one is obviously not appropriate for the corn-allergic.)

    A white plate holds a browned casserole serving with black beans, corn, and cheese


    Notice: Trying to access array offset on value of type bool in /home/maryzahc/public_html/adultfoodallergies.com/wp-content/plugins/wp-ultimate-recipe/helpers/models/recipe.php on line 254

    Corn & Black Bean Casserole (vegan & gluten-free)
    Print Recipe
    Servings Prep Time
    4 people 15 minutes
    Cook Time Passive Time
    75 minutes 55 minutes
    Servings Prep Time
    4 people 15 minutes
    Cook Time Passive Time
    75 minutes 55 minutes
    Corn & Black Bean Casserole (vegan & gluten-free)
    Print Recipe
    Servings Prep Time
    4 people 15 minutes
    Cook Time Passive Time
    75 minutes 55 minutes
    Servings Prep Time
    4 people 15 minutes
    Cook Time Passive Time
    75 minutes 55 minutes
    Ingredients
    • 1 Tablespoon arrowroot powder
    • 1/4 cup non-dairy milk (I usually use almond)
    • 3 cups frozen corn (I will divide this below into 2 cups defrosted, one cup left frozen)
    • 1 Tablespoon chili powder
    • 1 Tablespoon neutral oil (I use safflower — just not olive or coconut here)
    • 2 teaspoons baking powder
    • 2 Tablespoons corn meal
    • 2-3 Tablespoons non-dairy milk (yes, this will be used separately later)
    • 1 can black beans drained and rinsed
    • 1-2 teaspoons lime juice
    • 1/4-1/3 cup shredded vegan cheese (I used Daiya brand cheddar style shreds)
    Servings: people
    Instructions
    1. First, PREPARE: Preheat oven to 350ºF. Grease a 1.5 quart baking dish (you do not need a lid for this recipe). Get out your blender. Defrost 2 cups of your corn. I do this by rinsing it with hot water for a minute in a colander — I’m going to use the colander to drain black beans as well, and this is quicker than the microwave.
    2. Add to the blender the arrowroot and non-dairy milk. Pulse this until mixed. I find adding the arrowroot first keeps it IN the milk.
    3. Add the chili powder and 2 cups of defrosted corn. Pulse this down into a rough puree.
    4. Then add the oil, baking powder, and corn meal. Blend well. Add the extra few tablespoons of non-dairy milk to get a pourable consistency. I want to say “like pudding,” but that’s wrong, as you want pudding to be smooth and you want this to be “sandy,” which sounds unappetizing until it’s baked.
    5. Pour this into your prepared dish. Take 1/2 cup of the black beans and set them aside. Add the rest of them, along with the last cup of corn, and mix that into your corn mush. Now into the oven, uncovered.
    6. Bake 60 minutes.
    7. Meanwhile, mix that last half cup of black beans with the lime juice. Let it sit, but you will pour out any extra lime juice before adding.
    8. At 60 minutes, you should have a nicely baked top (and probably still need a few minutes in the center, which is fine). Drain the lime juice (the beans needn’t be dry, just don’t pour lime juice on your casserole) and spread the beans out on top. Then add a good sprinkle of the vegan cheese shreds — the range is because you want cheese everywhere, but not too thick, and the size of the casserole makes a difference here. Back into the oven for another 10-15 minutes, until the cheese is nice and melted. Then serve and enjoy!
    Share this Recipe
     
    Powered byWP Ultimate Recipe