Notice: Function _load_textdomain_just_in_time was called incorrectly. Translation loading for the wp-ultimate-recipe domain was triggered too early. This is usually an indicator for some code in the plugin or theme running too early. Translations should be loaded at the init action or later. Please see Debugging in WordPress for more information. (This message was added in version 6.7.0.) in /home/maryzahc/public_html/adultfoodallergies.com/wp-includes/functions.php on line 6121
pork – surviving the food allergy apocalypse (archive)

Tag: pork

  • Quick Pumpkin Sausage Sauce

    Quick Pumpkin Sausage Sauce

    Quick Pumpkin Sausage Sauce
    Quick Pumpkin Sausage Sauce

    So, for me, the key to quick weeknight meals lies in advance prep, whether it be making basic ingredients ahead of time (like soup stocks) or finding staples that are safe for me. Because my allergies are pretty basic and don’t include corn (and soy is something I’m mildly reactive to), I can use most canned ingredients. Not canned foods, but ingredients like beans and tomatoes and pumpkin are safe for me. This makes weeknight meals a little easier for me. Denise has to can everything from scratch.

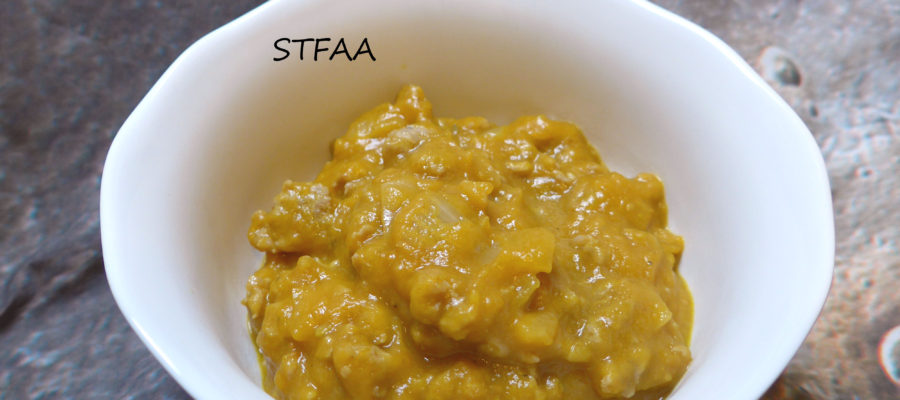
    For this quick meal, I used 5 ingredients I almost always have on hand: onion (often pre-chopped and frozen for quick use later), olive oil, sausage from a local market that makes a great flavorful one (I try to keep one pound in the freezer), canned pumpkin, and chicken or veggie stock — I always have one of these on hand.

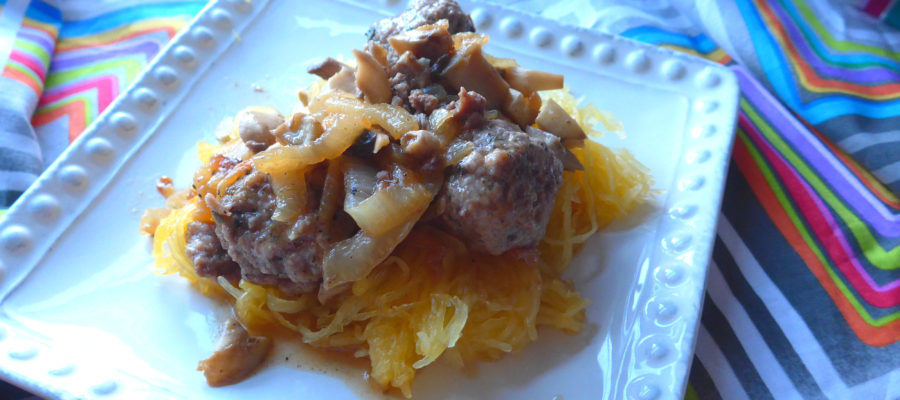
    I’ve sauteed the onion and sausage, left the bit of fat in the pan (it is about a tablespoon or so for this brand — if it’s really greasy, maybe drain it — and then used the pumpkin and stock to make thick creamy sauce with no cream. This would be great on pasta, grains, or over veggie noodles of whatever sort tickle your fancy. Plus, it’s 5 ingredients and only 15-20 minutes to cook. I really like the pumpkin in this because it gives the sauce a rich texture, creamy and filling.


    Notice: Trying to access array offset on value of type bool in /home/maryzahc/public_html/adultfoodallergies.com/wp-content/plugins/wp-ultimate-recipe/helpers/models/recipe.php on line 254
    Quick Pumpkin Sausage Sauce
    Print Recipe
    Servings Prep Time
    4 servings 5 minutes
    Cook Time
    20 minutes
    Servings Prep Time
    4 servings 5 minutes
    Cook Time
    20 minutes
    Quick Pumpkin Sausage Sauce
    Print Recipe
    Servings Prep Time
    4 servings 5 minutes
    Cook Time
    20 minutes
    Servings Prep Time
    4 servings 5 minutes
    Cook Time
    20 minutes
    Ingredients
    • 1-2 teaspoons olive oil (or whatever your favorite oil is)
    • 1/2 cup chopped onion
    • 1 lb sausage We use a local pork sausage that is safe for me, but choose your favorite safe brand or your own recipe
    • 1 can pumpkin puree NOT pie filling. This should just be pumpkin, 15 oz of it.
    • 1 cup chicken or vegetable stock
    • 4 servings cooked grains or pasta
    Servings: servings
    Instructions
    1. In a cast iron skillet over medium-low heat, add the onions and 1 teaspoon of olive oil. Stir. If the onions are not all coated with olive oil, add up to another teaspoon. Because the sausage will have its own fat, you want to use the minimum amount of oil here.
    2. Add the sausage and stir as it cooks until it breaks up. Cook until there is no more pink to it.
    3. Add the pumpkin and smash it in a little. Then start adding the chicken or vegetable stock and stirring until you have a good consistency. If you need to add more or less than called for, do it. Get a good thick sauce, and then simmer it for about five minutes. Taste and add seasoning if needed.
    4. Serve over cooked pasta or grains. Or spaghetti squash, zucchini noodles, whatever floats your boat.
    Share this Recipe
     
    Powered byWP Ultimate Recipe
  • Meatballs with Mushrooms, Onions and Spaghetti Squash

    Meatballs with Mushrooms, Onions and Spaghetti Squash

    Meatballs and Squash
    Meatballs and Squash

    I’m not sure if you’re ready for hot food, but I really am. In order to get ready for work after a week of vacation, I needed something hearty but not heavy. Spaghetti squash seemed to fit the bill with some meatballs and mushrooms and onions. It seems I reach over and over again for mushrooms and caramelized onions every time I need comfort food or hearty food — do you have go-to ingredients that help you face the world? Because mine are apparently mushrooms (which Denise hates) and onions. They’re so earthy and grounded.

    Spaghetti squash is weird, and while I don’t think it’s actually a substitute for pasta, it is a good vehicle for some thinner sauces. Putting the squash in the pan to soak up the meatball fats and the onion oil means you lose none of the flavors. It’s possible that this dish is even paleo-friendly, but I won’t claim to know the rules behind that diet. If you want a little less fat in the sauce, drain the pan after sauteing the meatballs or scoop up the onions, mushrooms, and meatballs with a slotted spoon and put them on the squash.

    This dish will fortify you and make you ready to face the rest of summer.


    Notice: Trying to access array offset on value of type bool in /home/maryzahc/public_html/adultfoodallergies.com/wp-content/plugins/wp-ultimate-recipe/helpers/models/recipe.php on line 254
    Meatballs with Mushrooms, Onions, and Spaghetti Squash
    Print Recipe
    An earthy but not too heavy dish to make you ready to face anything.
    Servings Prep Time
    4 people 15 minutes
    Cook Time
    90 minutes
    Servings Prep Time
    4 people 15 minutes
    Cook Time
    90 minutes
    Ingredients
    • 1 medium spaghetti squash football-sized
    • 2 Tablespoons olive oil
    • 1 large sweet onion quartered and sliced thin
    • 1/2 teaspoon kosher salt divided into two 1/4t servings
    • 1 8 oz. package mushrooms broken into pieces
    • 1/2 pound ground beef (I prefer 85/15 mix)
    • 1/2 pound ground pork
    • 1 teaspoon oregano
    • 1 1/2 teaspoon basil
    • 2 Tablespoons fine bread crumbs or starch-based gluten-free flour
    • fresh ground pepper, to taste
    • 1 Tablespoon water
    Servings: people
    Instructions
    1. Pre-heat oven to 400°F. Poke a hole in a spaghetti squash and throw it in the oven, on the rack. Bake for an hour. (You can also slice it in half and bake it for 30-45 minutes. I prefer the lazier approach. Learn more from the link in the notes.)
    2. Heat the olive oil in a skillet over medium-low heat (cast iron is best for making great caramelized onion). When it’s hot, add the onions and 1/4 teaspoon salt. Stir well, to coat all the onion with oil, and then cook, stirring occasionally, for about 45 minutes.
    3. Meanwhile, make the meatballs by mixing the beef, pork, oregano, basil, and bread crumbs or starchy gluten-free flour. Because they will be more tender if you work the meat less, I break up the meats first, sprinkle the seasonings over, and then lightly mix before forming ping-pong ball-sized meatballs. I get about 14 meatballs from a pound of meat.
    4. Your squash is likely done now. Take it out and let it cool. As soon as you can, slice it in half to let it cool more.
    5. When the onions are beginning to get a pretty caramel brown, push them all to the sides and add the meatballs. You might need to do this in two batches to have enough room to stir.
    6. When the meatballs are browned on most sides, add the mushrooms, the second 1/4 teaspoon of salt, pepper, and the water. Stir well (but gently — the meatballs are still delicate) and cover for about 5 minutes. When the mushrooms have started to cook, stir again, and cover for another 5 minutes.
    7. Taste and adjust seasonings if necessary.
    8. Scoop out the seeds and pulp. Then scoop out the squash and stir it in to the skillet. You will be able to see when it’s soaked up the sauce, and then it’s ready to serve.
    Recipe Notes

    If you’ve never cooked spaghetti squash before, check out this lesson from The Kitchn.  You can also check out Denise’s Meatball Sub Meatballs recipe, if you like a more substantial meatball. Mine is a streamlined version for a quick meal.

    Share this Recipe
     
    Powered byWP Ultimate Recipe
  • Chai-Spice Brined Pork Chops

    Chai-Spice Brined Pork Chops
    Chai-Spice Brined Pork Chops

    I don’t know if we’ve ever mentioned it, but Denise and I do have a plan for the blog. We have a calendar and recipes we’re working on, and sometimes what is on the calendar finds its way on to the blog on the day we scheduled it. Often, though, we’re working on things and they just aren’t ready to go when the calendar says. We have some exciting things in the works right now, but this week, you’re getting a quick, simple, but amazing weeknight dinner.

    I mentioned a few weeks ago that I had found, tried, and loved this stovetop-to-oven method of cooking pork chops.  I have messed with it a few times, and want to share my version of the recipe as I think it’s turned out great. These pork chops are juicy and flavorful, with an unusual (to me, at least) but subtle spice flavor to them. They are, even with the brining, a meal quick enough to make on a weeknight for dinner. And the meat is so juicy that they reheat well OR make a great sandwich the next day.

    The spice blend in here is inspired by what I remember of a homemade chai recipe I made a few times years ago. It’s the reason I bought star anise in the first place. I never made chai with actual peppercorns, but this is a savory dish, so it suits — I’ve done this with regular and Sichuan peppercorns, and both work well.

    Chai-spice brined pork chops

    For brine:

    • 1 cup boiling water
    • 2 Tablespoons salt (I used kosher salt here)
    • 2 whole star anise (or pieces to make up about 2 whole)
    • 3 whole cardamom pods, smashed to open the pod (but not crush the seeds)
    • 1 2-inch cinnamon stick
    • 2 pinches whole cloves (about 6-8)
    • 1 pinch whole peppercorns (about 4-6)
    • 2 cups cold water
    • 2 bone-in pork chops, about 3/4″ thick (I used center cut, as that’s what looked good)

    Take the pork chops out of the fridge and let them rest at room temp while you make the brine. You will need a baking dish or something comparable to brine the chops. Lay them out in a single layer in the pan.

    Put all the spices (salt through peppercorns) into a heat-safe container. I use a Pyrex measuring cup. Bring your water to a boil and pour 1 cup over all the spices and salt. Stir to dissolve the salt, and let it steep for 5 minutes. Add the two cups of cold water.

    Pour the spice “tea” over the chops. You are aiming for room temperature brine, and your chops should be covered completely. Add more water to make this happen, if needed. Leave all the spices floating.

    Let the chops brine for 30 minutes to an hour. According to the original recipe, you can brine them for up to four hours (in the fridge), but I’ve not tried this.

    When your chops are brined, turn the oven up to 400ºF, with a cast iron skillet on the middle rack. When the oven is up to temperature, carefully remove the skillet and put it over medium-high heat on the stovetop.

    Remove the chops from the brine and pat them dry. Season with salt and pepper — but remember the brine was salty, so don’t go overboard with the salt.

    Carefully add the chops. Brown 3-5 minutes on one side, getting good browning, but not burning the chops. This may cause smoke, so be ready, but it’s worth the hassle.

    Flip the chops and immediately put them in the pre-heated oven. Bake for 6-8 minutes, aiming for an internal temperature of about 142ºF. Remove them to rest for 5 minutes. You want your final temperature to be 145ºF, but remember that they keep cooking while resting, so don’t overshoot.

    I served mine with simple boiled broccoli and sweet potatoes I’d thrown in the oven earlier to roast. If you want to do a side dish in the oven, consider turning it on and starting the side(s) while the pork chops brown. This is an excellent use of the brining time.

    Enjoy the subtle spice flavors in your perfectly cooked pork chops.

  • Autumn Spiced Pork Loin

    Autumn Spiced Pork Loin
    Autumn Spiced Pork Loin

    As I said a couple of weeks ago, I’m drowning in apples. In addition to all the apple canning projects I’ve been doing, I’m trying to cook with them too.  So I came up with doing a pork loin with a rub using apple pie/mulled cider spices on a bed of onions and apples.

    Autumn Spiced Pork Loin

    • 4 pound whole pork loin
    • 2 large or 3 medium onions, peeled and diced into 1/2 inch pieces
    • 2 large or 3 medium apples, peeled, cored and diced into 1/2 inch pieces.
    • Small amount of safe for you oil to grease a 9 inch by 13 inch roasting pan with.

    Rub for pork loin:

    • 3 Tablespoons of brown sugar
    • 1/2 teaspoon of sea salt
    • 1/2 teaspoon of ground black pepper
    • 1/2 teaspoon of ground cinnamon
    • 1/4 teaspoon of ground nutmeg
    • 1/4 teaspoon of ground allspice

    Preheat oven to 375°F.  Use your safe oil to grease a roasting pan.  Place ingredients for the rub (brown sugar, sea salt, black pepper, cinnamon, nutmeg and allspice) in a small bowl and mix thoroughly with a fork.

    Place diced onions and apples in the bottom of the roasting pan.

    Apples and onions in roasting pan
    Apples and onions in roasting pan

    Place pork loin on top of diced onions and apples.

    Pork loin in roasting pan on apples and onions
    Pork loin in roasting pan on apples and onions

    Cover top of pork loin with spice rub.  It’s okay if you get a bit on the apples and onions.

    Pork loin with rub
    Pork loin with rub

    Place the roasting pan in oven and cook until the internal temperature is at least 161°F.  In order to get the correct internal temperature in my oven with a four pound pork loin, it took 1 hour and 45 minutes. If you have a much smaller pork loin, like the one to two pound pork loins you generally find at the grocery store, I’d start with 45 minutes and check the temperature at that time.

    Once you’ve reached the correct internal temperature, remove the pork loin from the oven and let it rest for a few minutes.

    Pork loin after roasting
    Pork loin after roasting

    Slice the pork loin and serve with some of the roasted apples and onions.

    Autumn Spiced Pork Loin
    Autumn Spiced Pork Loin

    Enjoy!


  • Slow Cooker Pork Roast

    Slow Cooker Pork Roast with roasted broccoli and mashed sweet potatoes
    Slow Cooker Pork Roast with roasted broccoli and mashed sweet potatoes

    It’s set-it-and-forget-it season! Actually, the crock pot is good all year, but because it makes pots of lovely hot food, I think people associate it more with winter than summer. I know I do. The first thing I thought when I saw pork roasts on sale was “slow cooker.” But I didn’t really want barbeque. Nothing wrong with it, but it’s a flavor I’m bored of before the leftovers are gone. Molasses is a fall obsession of mine — while the world goes crazy for “pumpkin spice” everything, I want to drown in molasses (not literally. That stuff kills. Science!). So I started with molasses and went from there. Balsamic vinegar and some spices add up to earthy and hearty.

    This pork roast will make a lot of leftovers, if it’s just one or two of you, or it’ll feed a crowd. And it is quick enough to be made first thing in the morning. I served this with some roasted broccoli and sweet potatoes — I hope to share the sweet potatoes as soon as I work out some kinks with that recipe. Pork and sweet potatoes are great together, and broccoli goes with everything.

    Slow Cooker Pork Roast with roasted broccoli and mashed sweet potatoes on Surviving the Food Allergy Apocalypse
    Slow Cooker Pork Roast with roasted broccoli and mashed sweet potatoes

    Slow Cooker Pork Roast

    • oil to grease the crock
    • 1 sweet onion, halved and sliced thin
    • 1/2 teaspoon of oil
    • 1/4 teaspoon salt
    • 2-2.5 lb center cut boneless pork roast, fat side up
    • 1 Tablespoon molasses
    • 2 Tablespoons balsamic vinegar
    • 1/2 teaspoon garlic powder
    • 1/2 teaspoon celery salt
    • 1/2 teaspoon turmeric
    • 1/4 teaspoon mustard
    • 1/2 cup broth or stock, whatever you have on hand
    • 1/4 cup hot water
    • fresh ground pepper, to your taste (I used about 1/2 a teaspoon, not that I measured)

    Grease the crock of your slow cooker. Add the sliced onion to the bottom, and drizzle on the 1/2 teaspoon of oil and the 1/4 teaspoon of salt.

    Place the pork roast on top of the onions, with the fat side up (I do not trim this for the slow cooker — it’s good flavor).

    In a small dish or right in a measuring cup, whisk or stir with a fork the next 7 ingredients (molasses through the broth/stock). Pour this over the roast. Use the last 1/4 cup of water to rinse all the seasoning out of the measuring cup, and pour this along the side (don’t rinse off the seasoning that landed atop the pork roast!). Grind the pepper right on top.

    Cover and cook all day. Or, you know, 4-6 hours on high, 6-8 hours on low.

    When this is done, take just the meat out. Attempt to slice it, and find out that it will shred instead. After breaking it up, put it back in the liquid you cooked it in, and stir well. This lets the meat soak up a little more of the cooking liquid to serve.

    Alternately, you could also make a starch slurry (starch of your choice mixed with water, 1:2 ratio) and add that to the liquid for the last 30 minutes or so of cooking — this will give you more of a gravy consistency.

    Serve with side dishes of your choice — roasted veg would be great, but go wild. You’re coming home to dinner almost done.


  • Grilled Chimichurri Pork Chops

    Grilled Chimichurri Pork Chops. Photo by J. Andrews
    Grilled Chimichurri Pork Chops. Photo by J. Andrews

    A few years ago my friend Liz was up in the Boston area and we went out to dinner somewhere north of Boston. I think it was an Argentinian restaurant, but I’m not 100% sure. This was pre food allergy apocalypse, but I was in a phase of not eating much beef. For whatever reason I ordered pork chops, which, I think, is an odd choice for me — I can’t recall ordering them out before or since. But these were amazing. They were marinated in chimichurri sauce and then grilled. This recipe is my attempt to recreate that meal, but also just to make chimichurri.

    Chimichurri sauce, as the internet has well-educated me, is a traditional Argentinian condiment that the non-South American internet has fallen in love with, and, as the internet is wont to do, bastardized. Yes, you can add all sorts of ingredients to all sorts of recipes, but then they are no longer that thing, right? So far as I can tell, this is a reasonably traditional chimichurri. From what I can tell, it doesn’t really need anything else — it’s really good as it is.

    The other thing that internet writers rail against is the claim that, in Argentina, chimichurri is used “like ketchup” or “on everything.” Now, I do have one friend who does use ketchup on everything, but overall, ketchup is not all that universal in my opinion. But I do think that the reason writers may say these things about chimichurri is that it really is amazing and, if you make it, YOU might want to use it on everything. And because I’m me, I’m frying my breakfast potatoes in it now. I may need chimichurri in my life forever. See, internet, that’s just projection.

    I pulled the parsley apart, measured it, and scaled the recipe to the amount of parsley I had. I’d suggest you consider doing the same unless you are way better at using up leftover parsley than I am. I’m pretty sure that traditionally, fresh oregano would be used. I couldn’t find any. I used dried. I also used a food processor. Tradition only goes so far. This recipe does make way more than you need for a recipe of pork chops, unless you’re cooking for a mob, so make plans for the leftovers. (Breakfast potatoes.)

    Chimichurri Sauce Grilled Pork Chops

    • 4 cups flat leaf parsley, leaves removed from stems (one bunch of parsley)
    • 2 Tablespoons dried oregano
    • 6 cloves of garlic, or about 1/4 of the head
    • 2 pinches red pepper flakes
    • 2 teaspoons salt
    • 1/2 teaspoon freshly ground black pepper (or you know, “enough.” Do people measure freshly ground pepper, really? I never do.)
    • 1/2 cup red wine vinegar
    • 1.5 cups olive oil
    This is what herbs look like when "ground" in a food processor
    This is what herbs look like when “ground” in a food processor

    With your S-blade in your food processor, pulse the parsley down a bit.

    Add the oregano, garlic, salt, and red and black peppers. Pulse until ground.

    Scrape the ground herbs and spices into a bowl. Stir in the vinegar, and then the oil — use a fork to get the best mixing.

    Let this sit at room temperature for 2 hours to let the flavors meld, and then bottle up and store in the fridge. I’m assuming this will last a few weeks. To use, spoon herbs up from the bottom and use as a marinade, condiment, or anything else you can think up.

    For the pork chops:

    • thick, bone-in pork chops, however many you need.

    In a glass dish, spoon a layer of chimichurri into the bottom of a glass dish. Place pork chops on top of this layer, and top with thick spoonsful of chimichurri. Cover and refrigerate overnight or up to 12 hours or so.

    Marinated pork chops. Photo by J. Andrews
    Marinated pork chops. Photo by J. Andrews

    Grill by the “piled” method — put all your charcoal to one side (or turn on half the burners). Place the meat over the hot side of the grill to sear the outside, both sides, and then move to the cool side of the grill (which really isn’t cool) and cook until done. For pork, that’s 145°F, remembering to rest the meat for at least three minutes after cooking before cutting into.

    Add some extra chimichurri before serving. Then proceed to prove the internet right and use chimichurri on all the things.

    (P.S. to my friend Cathy, yes, this is just like when I discovered lefse and put “inappropriate” things on it.)

  • Quick Thai-Inspired Curry Noodle Stir Fry


    Quick Thai-Inspired Curry Noodle Stir Fry
    Quick Thai-Inspired Curry Noodle Stir Fry

    Thai food was one of the biggest losses for me.  My husband and I had our first date at a Thai restaurant, and I used to get delivery there so often that the staff knew it was me just from my voice on the telephone. It was not uncommon for us to have Thai once or twice a week, especially when I was still in private practice. But Thai’s kind of hard without coconut.

    This recipe’s kind of concept more than a recipe, because there are so many variables and and you can make so many curries, i.e. green, red, yellow, Massaman, etc. I used a commercial curry paste because it looked relatively safe for me, although we’ll see in the next few days whether I got corned or not (corned is like being gluten-ed but obviously with corn). However, there are tons of curry paste recipes on the internet that people can modify for their own diets, if the suggestions are not safe for you. Or you can use use a curry powder spice mix you like. I’ve also used the DIY Singapore Seasoning from our DIY Spice Mix Day post. Also, if you make curry paste, freeze it in an ice cube tray so you can grab a chunk when you want. You can use any meat you want, or not. You can also use whatever vegetables strike your fancy.

    Quick Thai-Inspired Curry Noodle Stir Fry

    Makes about 3-4 servings, depending on serving size.

    • 1/2 of a 1 pound package of rice noodles (I used the kind that I would use for pho, but you can pick the width of rice noodle you like)
    • 2 Tablespoons of olive oil, grape seed oil, or an oil that’s safe for you
    • 1 cup of cashew milk or other non-dairy milk (If you can have coconut milk, by all means use it. I can’t use commercial cashew milk so I make my own, soaking 1 cup of cashews in hot water for a couple of hours, draining the water, and putting them in the blender with two cups of new water. It’ll make more than you need, but it freezes well.)
    • 1/2 cup of water
    • 1 package of Kanokwan Green Curry Paste (they have other flavors too, make sure you read labels); or 1 or 2 Tablespoons of Thai Kitchen Green Curry Paste (they have other flavors as well, read labels); or 1 or 2 Tablespoons of Mae Ploy Thai Green Curry Paste (ditto, other flavors, read labels) or 1 or 2 Tablespoons of a curry spice mix you like, similar to those available from Penzey’s.
    • 1/2 pound of beef, pork or chicken cut into stir fry sized strips (Chicken’s out for me, but if you can eat it go for it.)
    • 3 scallions, sliced into quarter inch pieces
    • 1/2 cup of snow peas
    • 10-12 asparagus stalks, trimmed and cut into 1″ pieces
    • 2 carrots, julienned
    • 1 small onion or half a medium onion, cut in half and sliced thinly crosswise to form slices in a curved shape
    • 1 medium bok choy (about 6-8 inches long), sliced crosswise to form small bite size pieces
    • 2 Thai chilies, de-stemmed and sliced (optional, leave out if really spicy is not your thing)
    • 5-6 Thai basil leaves

    First up, prepare all your vegetables. Keep the bok choy or any other greens separated from the rest of the vegetables because they will cook quicker and need to be added at end. To do the carrots, I cheat and use a peeler that juliennes.

    Julienne Peeler
    Julienne Peeler


    Fill a large stock pot with water and bring to a boil. Add your rice noodles, boil for 6-8 minutes and then drain. If you’re using smaller rice noodles, you might not need as much cooking time, so check your package’s instructions. Place the noodles aside until the curry is finished.

    Prepared Rice Noodles
    Prepared Rice Noodles

    In a large skillet, add the oil, the cashew milk, water, and curry paste or spice mix.  Stir to combine over medium heat.

    Curry Paste and Cashew Milk Mixture
    Curry Paste and Cashew Milk Mixture

    Add your meat if you’re using it, and cook until the meat is cooked through. Then add your vegetables with the exception of the bok choy (or other green of choice).

    Curry before adding greens
    Curry before adding greens

    Cover your skillet with its lid and let it simmer for a few minutes to let the asparagus and carrots cook. Then add your bok choy and simmer until the bok choy is ready. When the bok choy is ready, mix in your Thai basil leaves.

    Completed Curry/Stir Fry Thing
    Completed Curry/Stir Fry Thing

    Place a bed of rice noodles on a plate and spoon your curry over it. If you have extra Thai basil leaves and want to be fancy, garnish your dish with them.

    Quick Thai-Inspired Curry Noodle Stir Fry
    Quick Thai-Inspired Curry Noodle Stir Fry

    Hope you enjoy it!


  • Cure Your Own Salt Pork

    Two of three ingredients needed to cure salt pork - because uncooked salt pork isn't that attractive
    Two of three ingredients needed to cure salt pork – because uncooked salt pork isn’t that attractive

    Since the corn allergy apocalypse, I’ve been making my own baked beans and pressure canning them so they will be relatively free of corn ingredients. Except I’ve been cheating a bit *hangs head in shame* — I’ve been using salt pork from the grocery store which has dextrose and sodium erythorbate, which are corn ingredients. I figured it was only a little bit in each jar (dumb, dumb, please don’t follow my example). But after learning how to cure bacon, I thought, hey, salt pork can’t be that hard right? And then I did some Google-fu and found out that, in fact, making some salt pork would be easier than making the bacon. So I had to do it, because the cleaner I eat, the less full my allergy bucket is, and the better off I am when I have a bigger exposure to something, and the healthier I feel.

    Salt Pork

    • 1 pound boneless pork belly cut into half inch thick slices, between 1-2 inches long (I removed the skin, but it’s up to you)
    • 1/2 cup kosher or non-iodized salt (the stuff they use to iodize the salt is dextrose, a.k.a. corn, get stuff with no other ingredients but salt.)
    • 2 Tablespoons cane sugar

    Mix the salt and the sugar in a bowl.

    Pork belly sliced into half inch thick pieces
    Pork belly sliced into half inch thick pieces

    Use some of the salt and sugar mixture to rub or dredge the pork belly slices.

    Pork belly slices dredged in salt and sugar mixture
    Pork belly slices dredged in salt and sugar mixture

    In a glass, ceramic, or stainless steel container (I used Pyrex), spread a layer of the salt and sugar mixture. Place a layer of the sugar and salt coated pork belly sliced on top of the layer of the salt and sugar mixture.

    Dredged pork belly slices on salt and sugar mixture layer
    Dredged pork belly slices on salt and sugar mixture layer

    Sprinkle more of the salt and sugar mixture on top and add another layer of pork belly slices. Continue alternating the pork and salt and sugar mixture until you don’t have any pork belly slices left. Sprinkle the remaining salt and sugar mixture over the top of the pork belly slices.

    Completed layers of pork belly slices and salt and sugar mixture
    Completed layers of pork belly slices and salt and sugar mixture

    Cover the container with a lid or some plastic wrap and refrigerate it. The pork belly slices will be cured and ready to use in 2-3 days.

    Pork belly slices after curing for 2 days in fridge
    Pork belly slices after curing for 2 days in fridge

    Rinse the salt and sugar mixture off of the salt pork slices. Pat them dry with a paper towel.

    Salt pork rinsed and patted dry on paper towels
    Salt pork rinsed and patted dry on paper towels

    They are now ready to use in your beans, chowders (non-dairy of course) or stews, or you can store them in a resealable plastic bag in your freezer.

    Salt pork in a resealable plastic bag ready to go into the freezer
    Salt pork in a resealable plastic bag ready to go into the freezer

    Enjoy!