Notice: Function _load_textdomain_just_in_time was called incorrectly. Translation loading for the wp-ultimate-recipe domain was triggered too early. This is usually an indicator for some code in the plugin or theme running too early. Translations should be loaded at the init action or later. Please see Debugging in WordPress for more information. (This message was added in version 6.7.0.) in /home/maryzahc/public_html/adultfoodallergies.com/wp-includes/functions.php on line 6121
Peanut-Free – Page 31 – surviving the food allergy apocalypse (archive)

Tag: Peanut-Free

  • Whatever Wednesday: Bacon with Brown Sugar and Sriracha

    Bacon with Brown Sugar and Sriracha
    Bacon with Brown Sugar and Sriracha

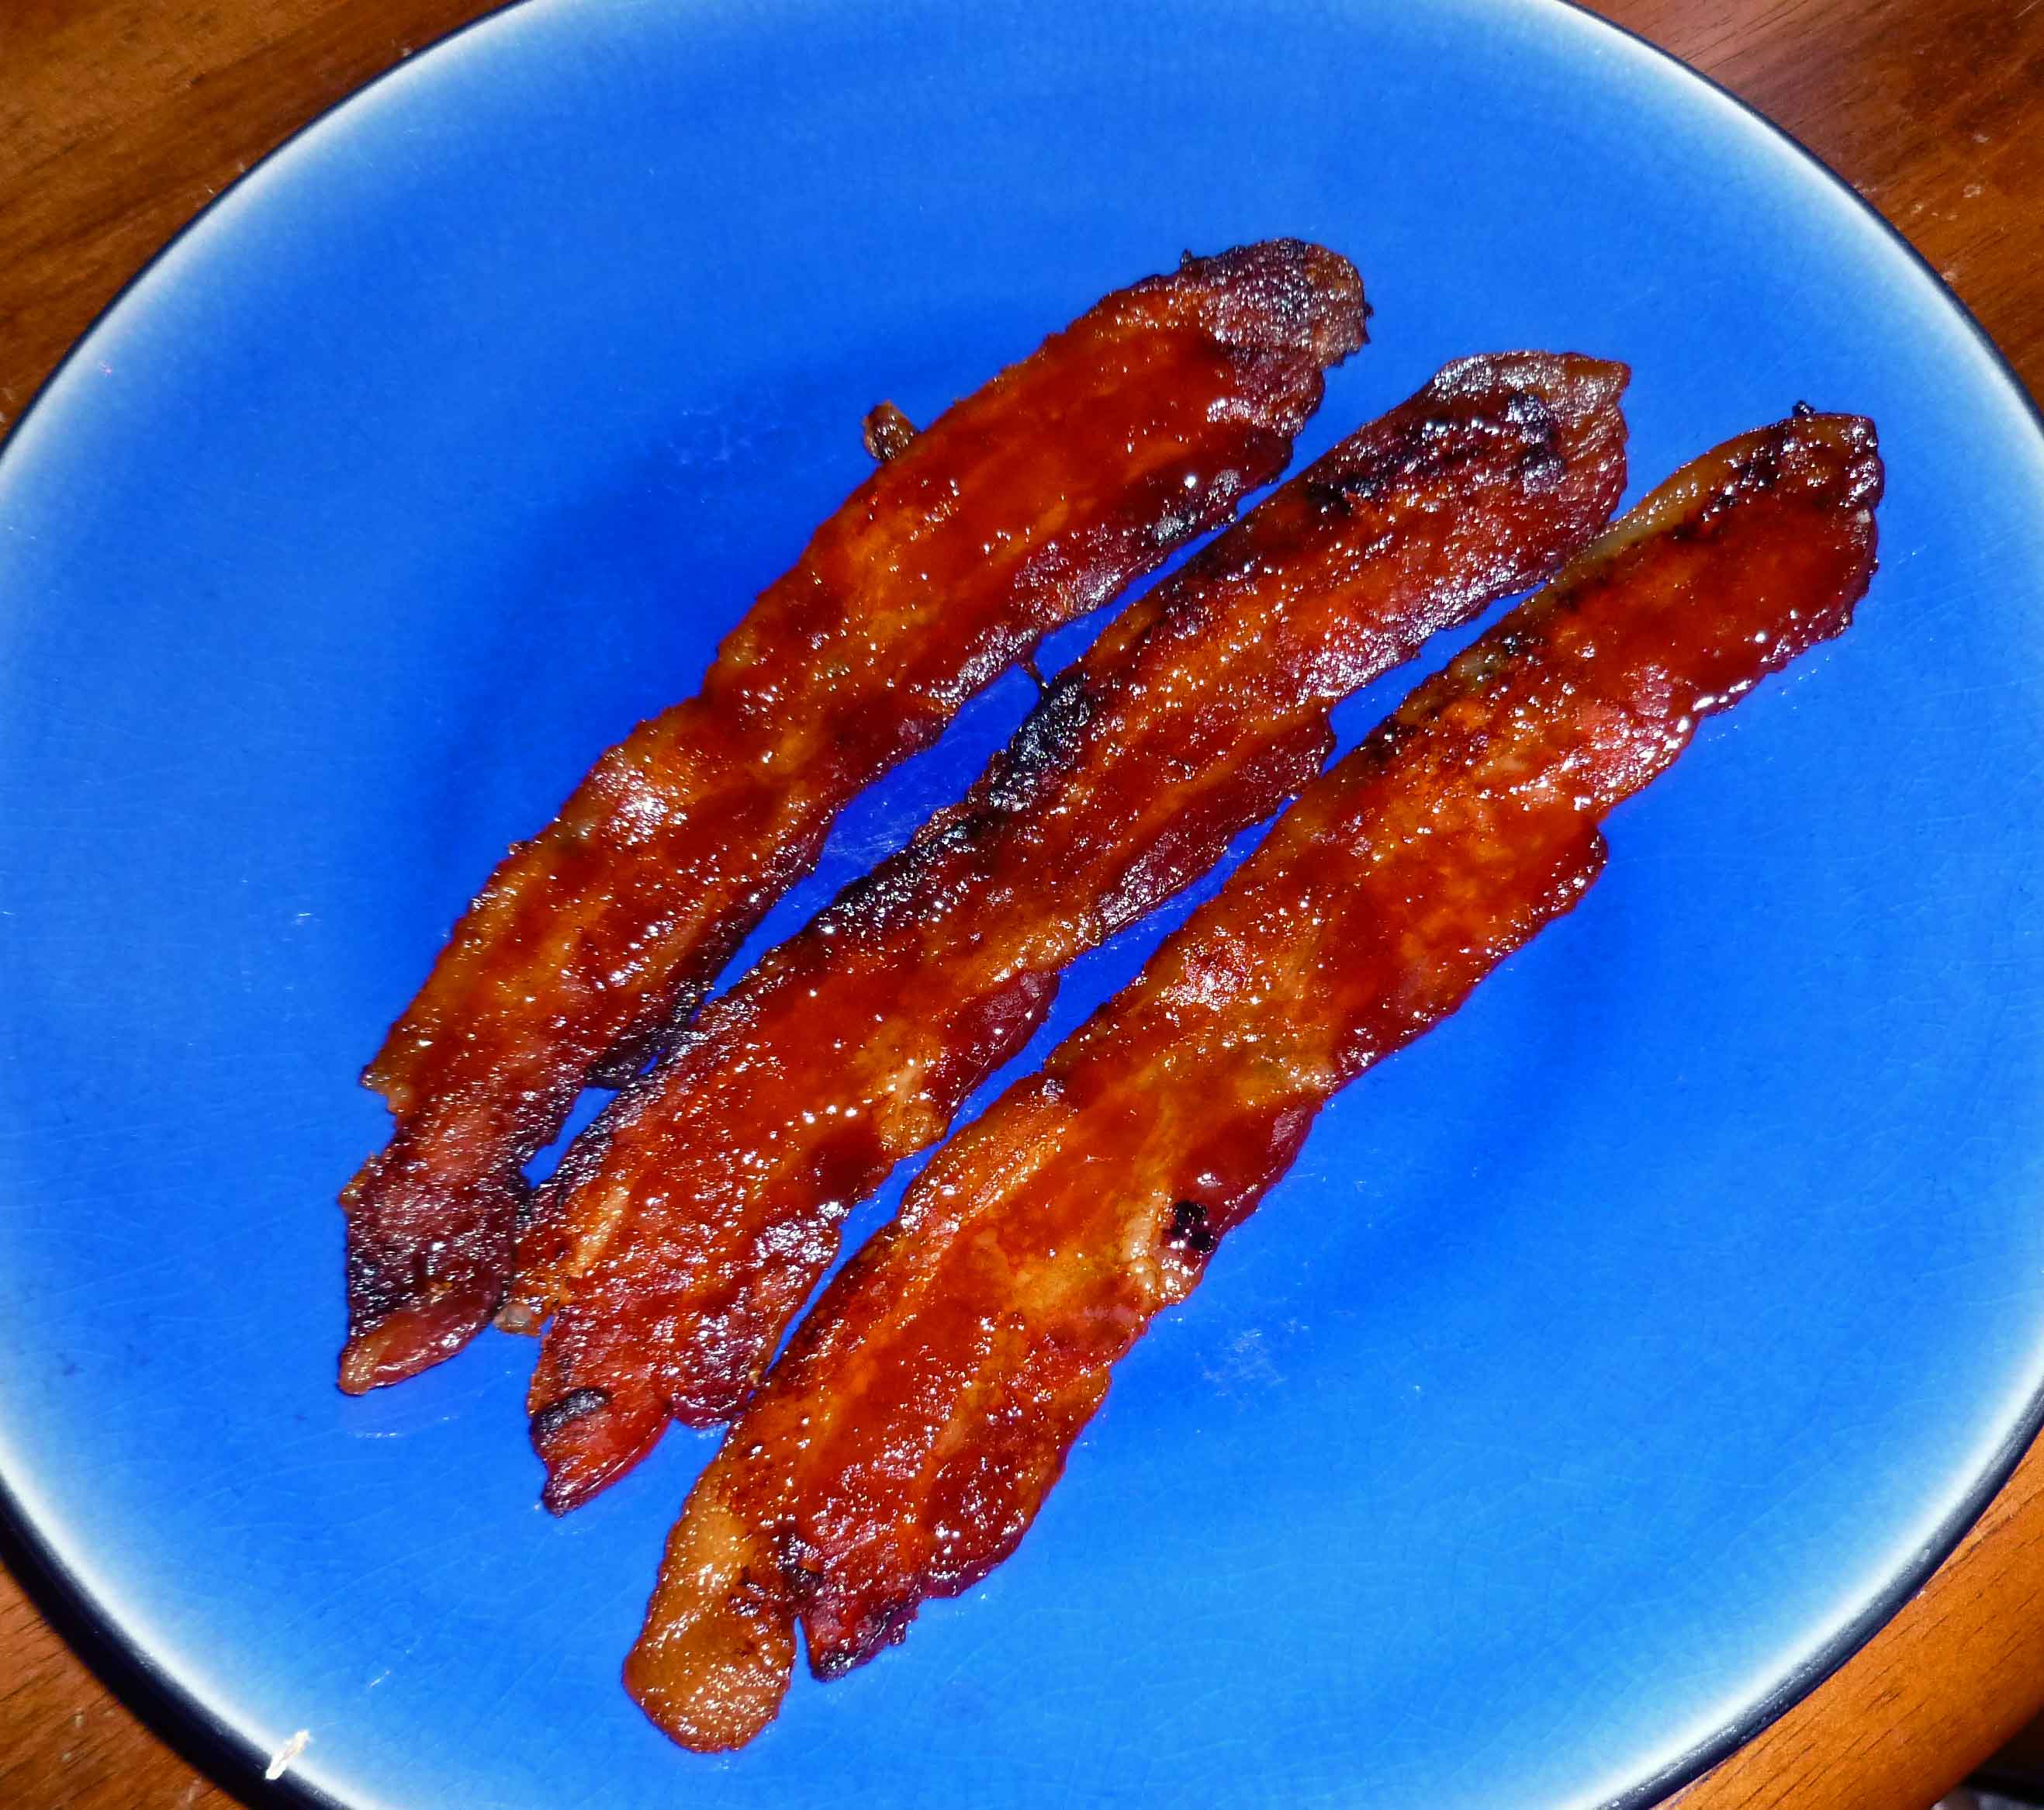
    Before I start my rhapsody on the glories of bacon and Sriracha, let me just confess that this wasn’t my idea and isn’t my recipe, which is why we’re posting it on Whatever Wednesday.  For that we can thank Scott Hutcheson, whose recipe was provided in his blog, and then was picked up and discussed by another blog, True Laurel, where one of my friends saw it and pinned it on Pinterest. I had to try this. I’ve made some minor modifications, because I’m used to cooking my bacon in oven, I like it really crispy, and I’m way too lazy to use a baking rack and then have to wash it afterwards.  It works perfectly fine just on the baking sheet or piece of stoneware (but it does work best on the stoneware between the two), but you will want to use some tongs to remove the bacon from the baking sheet and place them on a sheet lined with paper towels to drain after baking.

    Okay, I’m beginning the rhapsody.  Two of my favorite foods in the whole world, together at last.  (Sounds like an ad for an duet album on TV when they still had ads like that right?) In any case, the guy who thought this up was a culinary genus.  It’s beyond awesome.

    Bacon with Brown Sugar and Sriracha

    • a package of Hormel’s Black Label Applewood Smoked Thick Cut Bacon
    • a bottle of Sriracha (you squeeze it onto the bacon from the bottle, using probably no more than 3 Tablespoons or so)
    • 3-4 Tablespoons of brown sugar

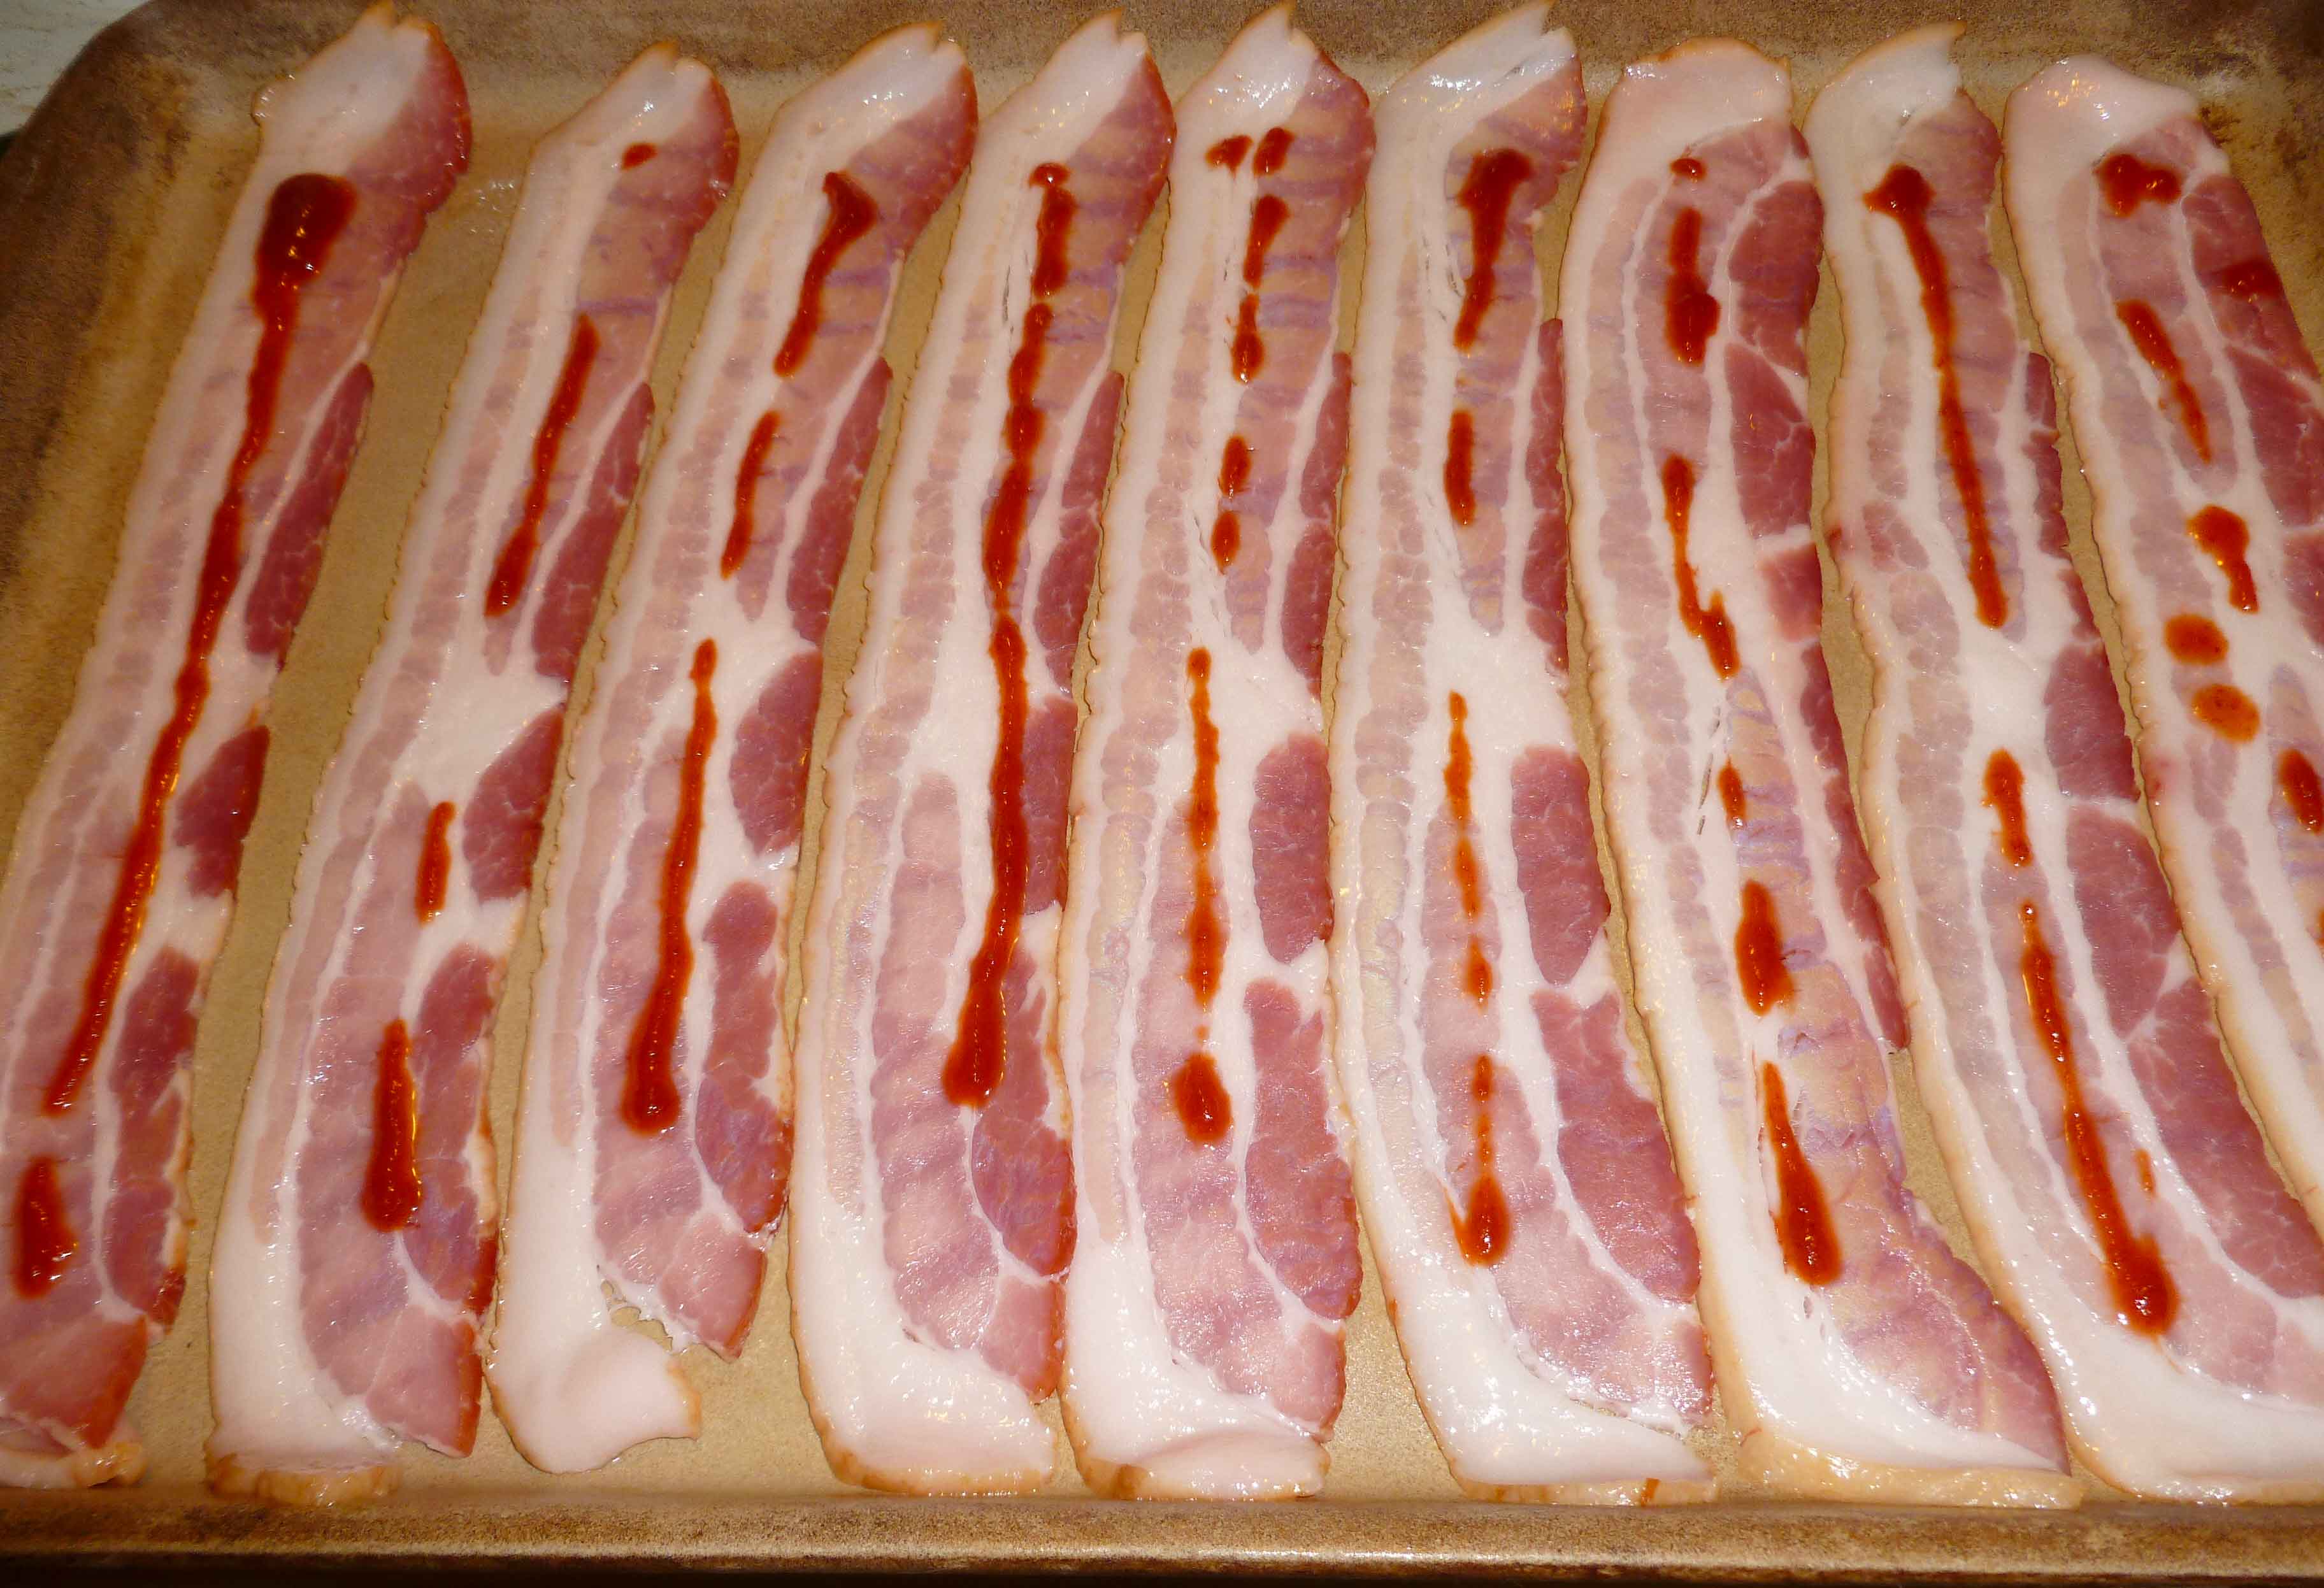
    Preheat your oven to 375°F.  Lay your bacon strips out carefully so they do not overlap on your baking sheet or stoneware. (I’m using the Pampered Chef large bar pan stone.

    Bacon laid out on stoneware
    Bacon laid out on stoneware

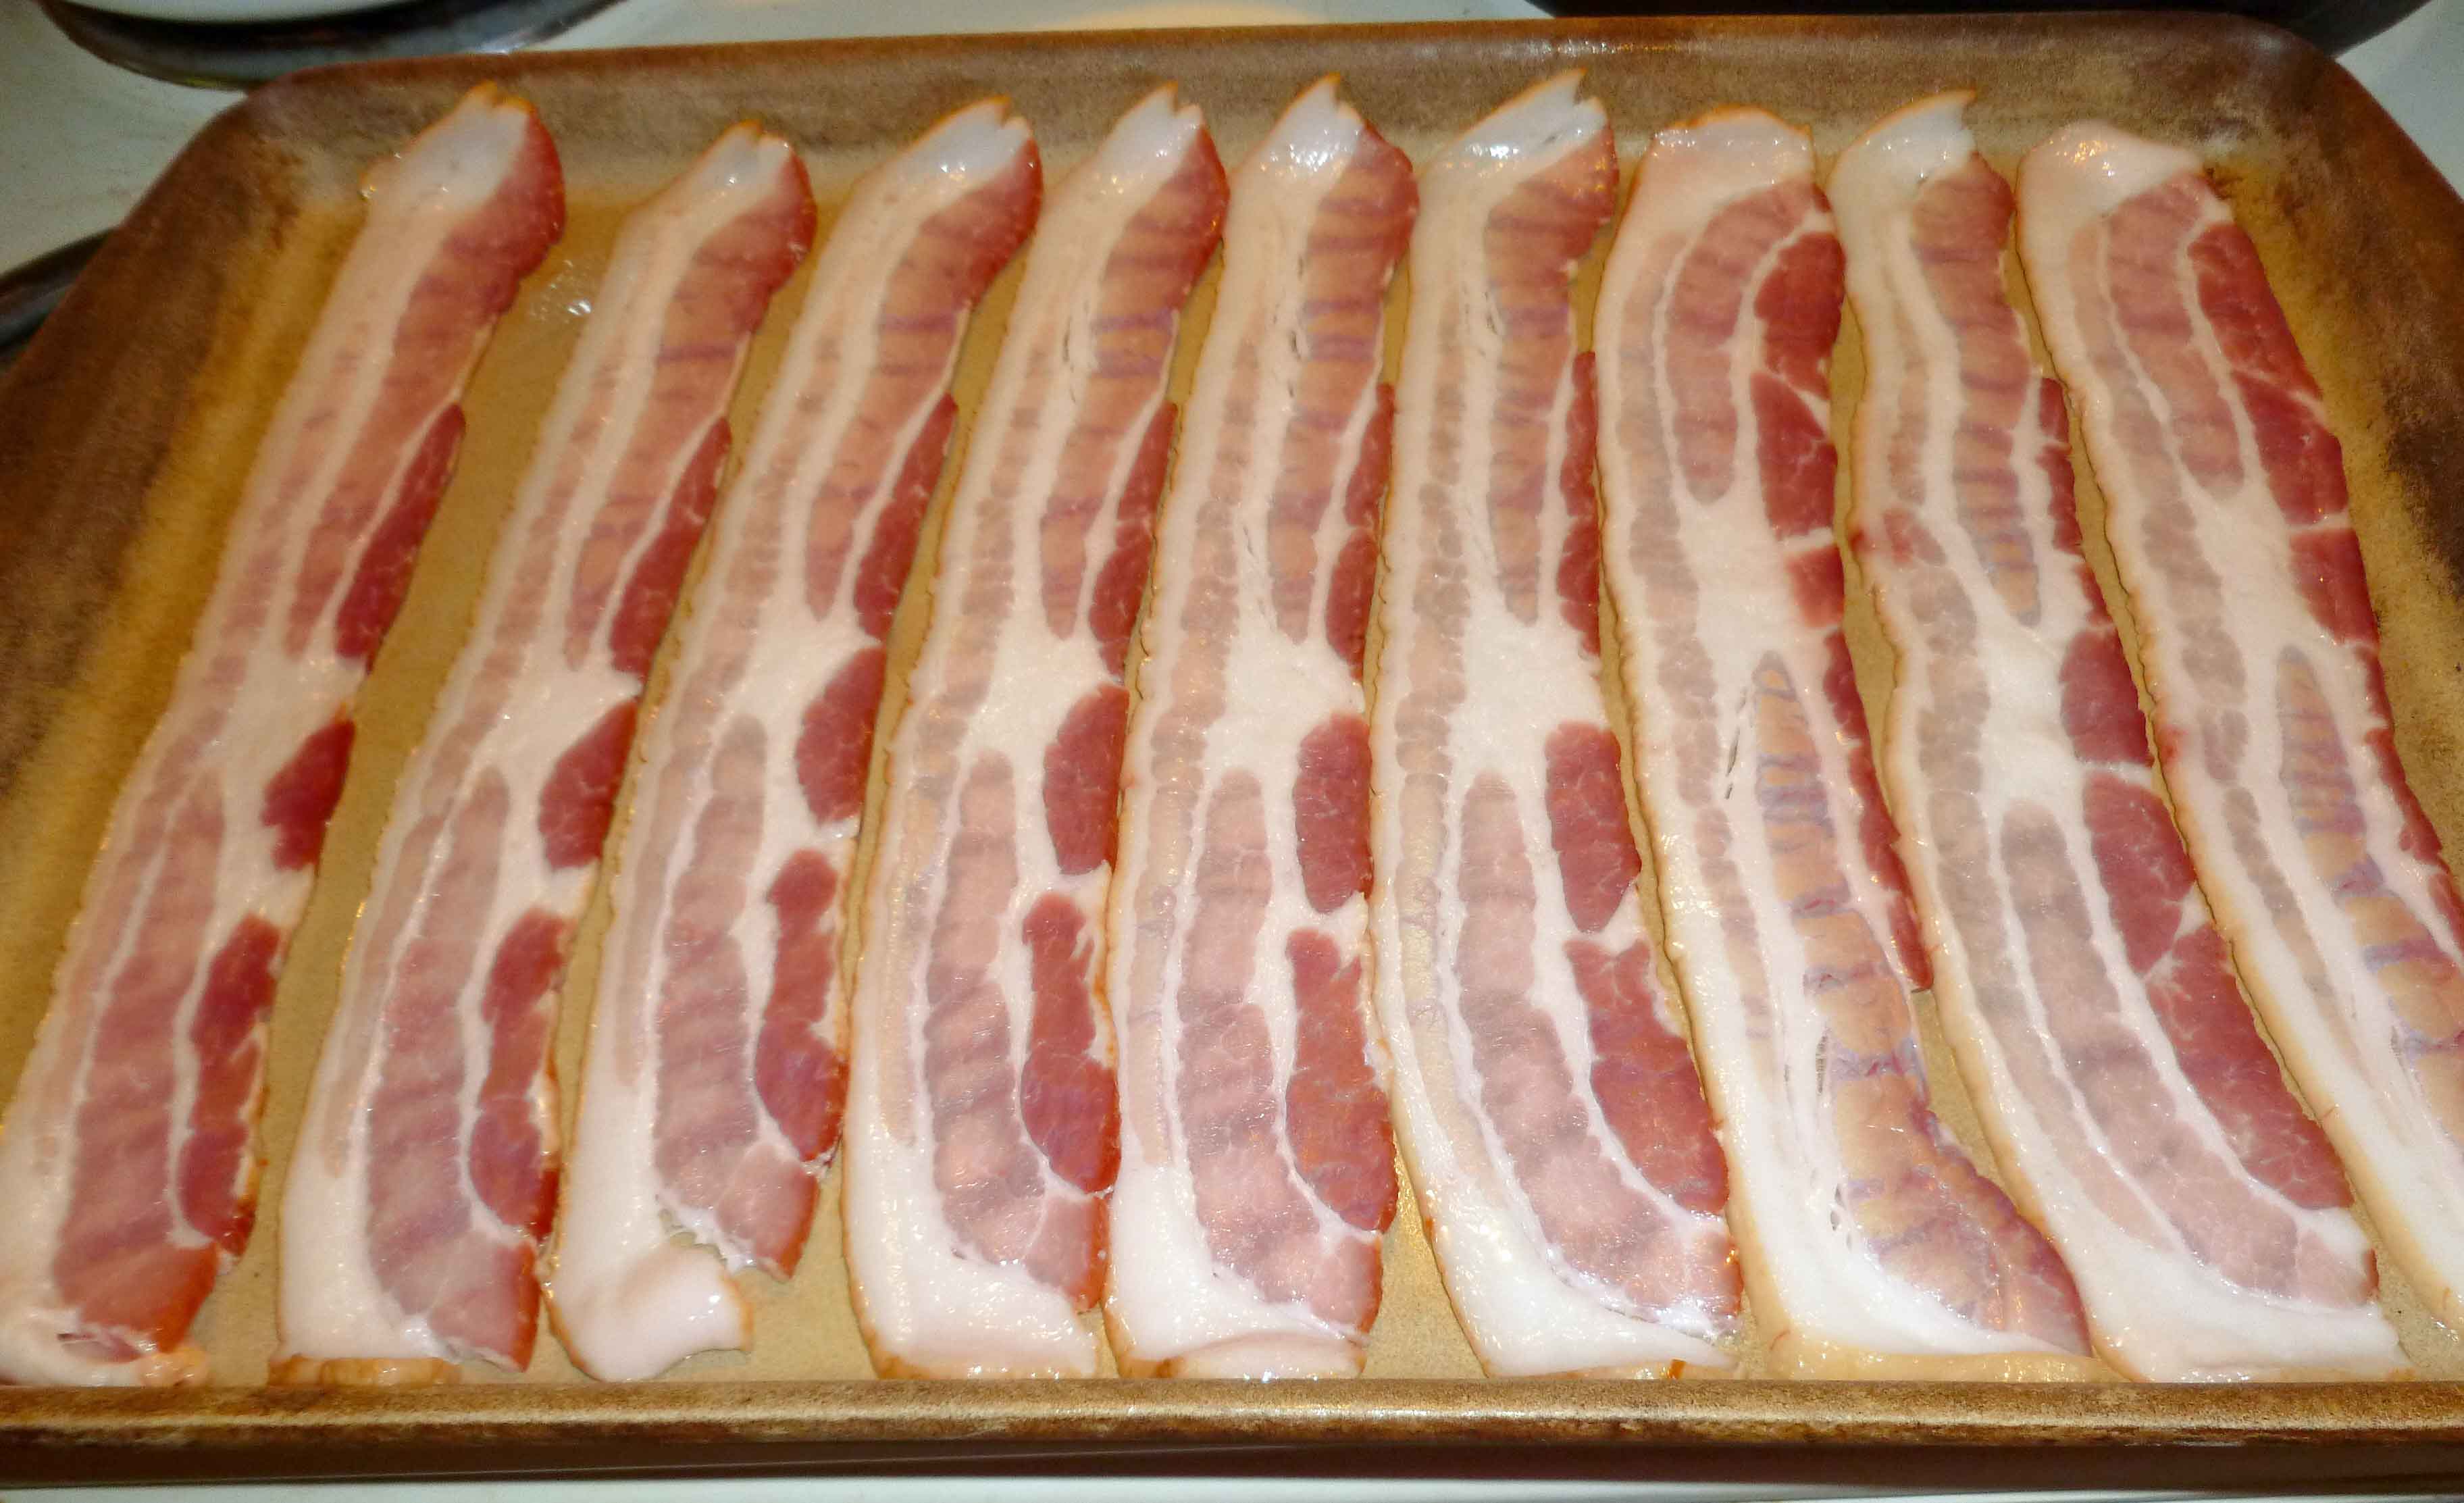
    Take your Sriracha bottle and run a line of Sriracha down each strip of bacon.

    Sriracha lines on bacon
    Sriracha lines on bacon

    Once you have the Sriracha on the bacon, take a basting brush and spread the Sriracha evenly over each strip of bacon.

    Spreading Sriracha evenly over bacon strips
    Spreading Sriracha evenly over bacon strips

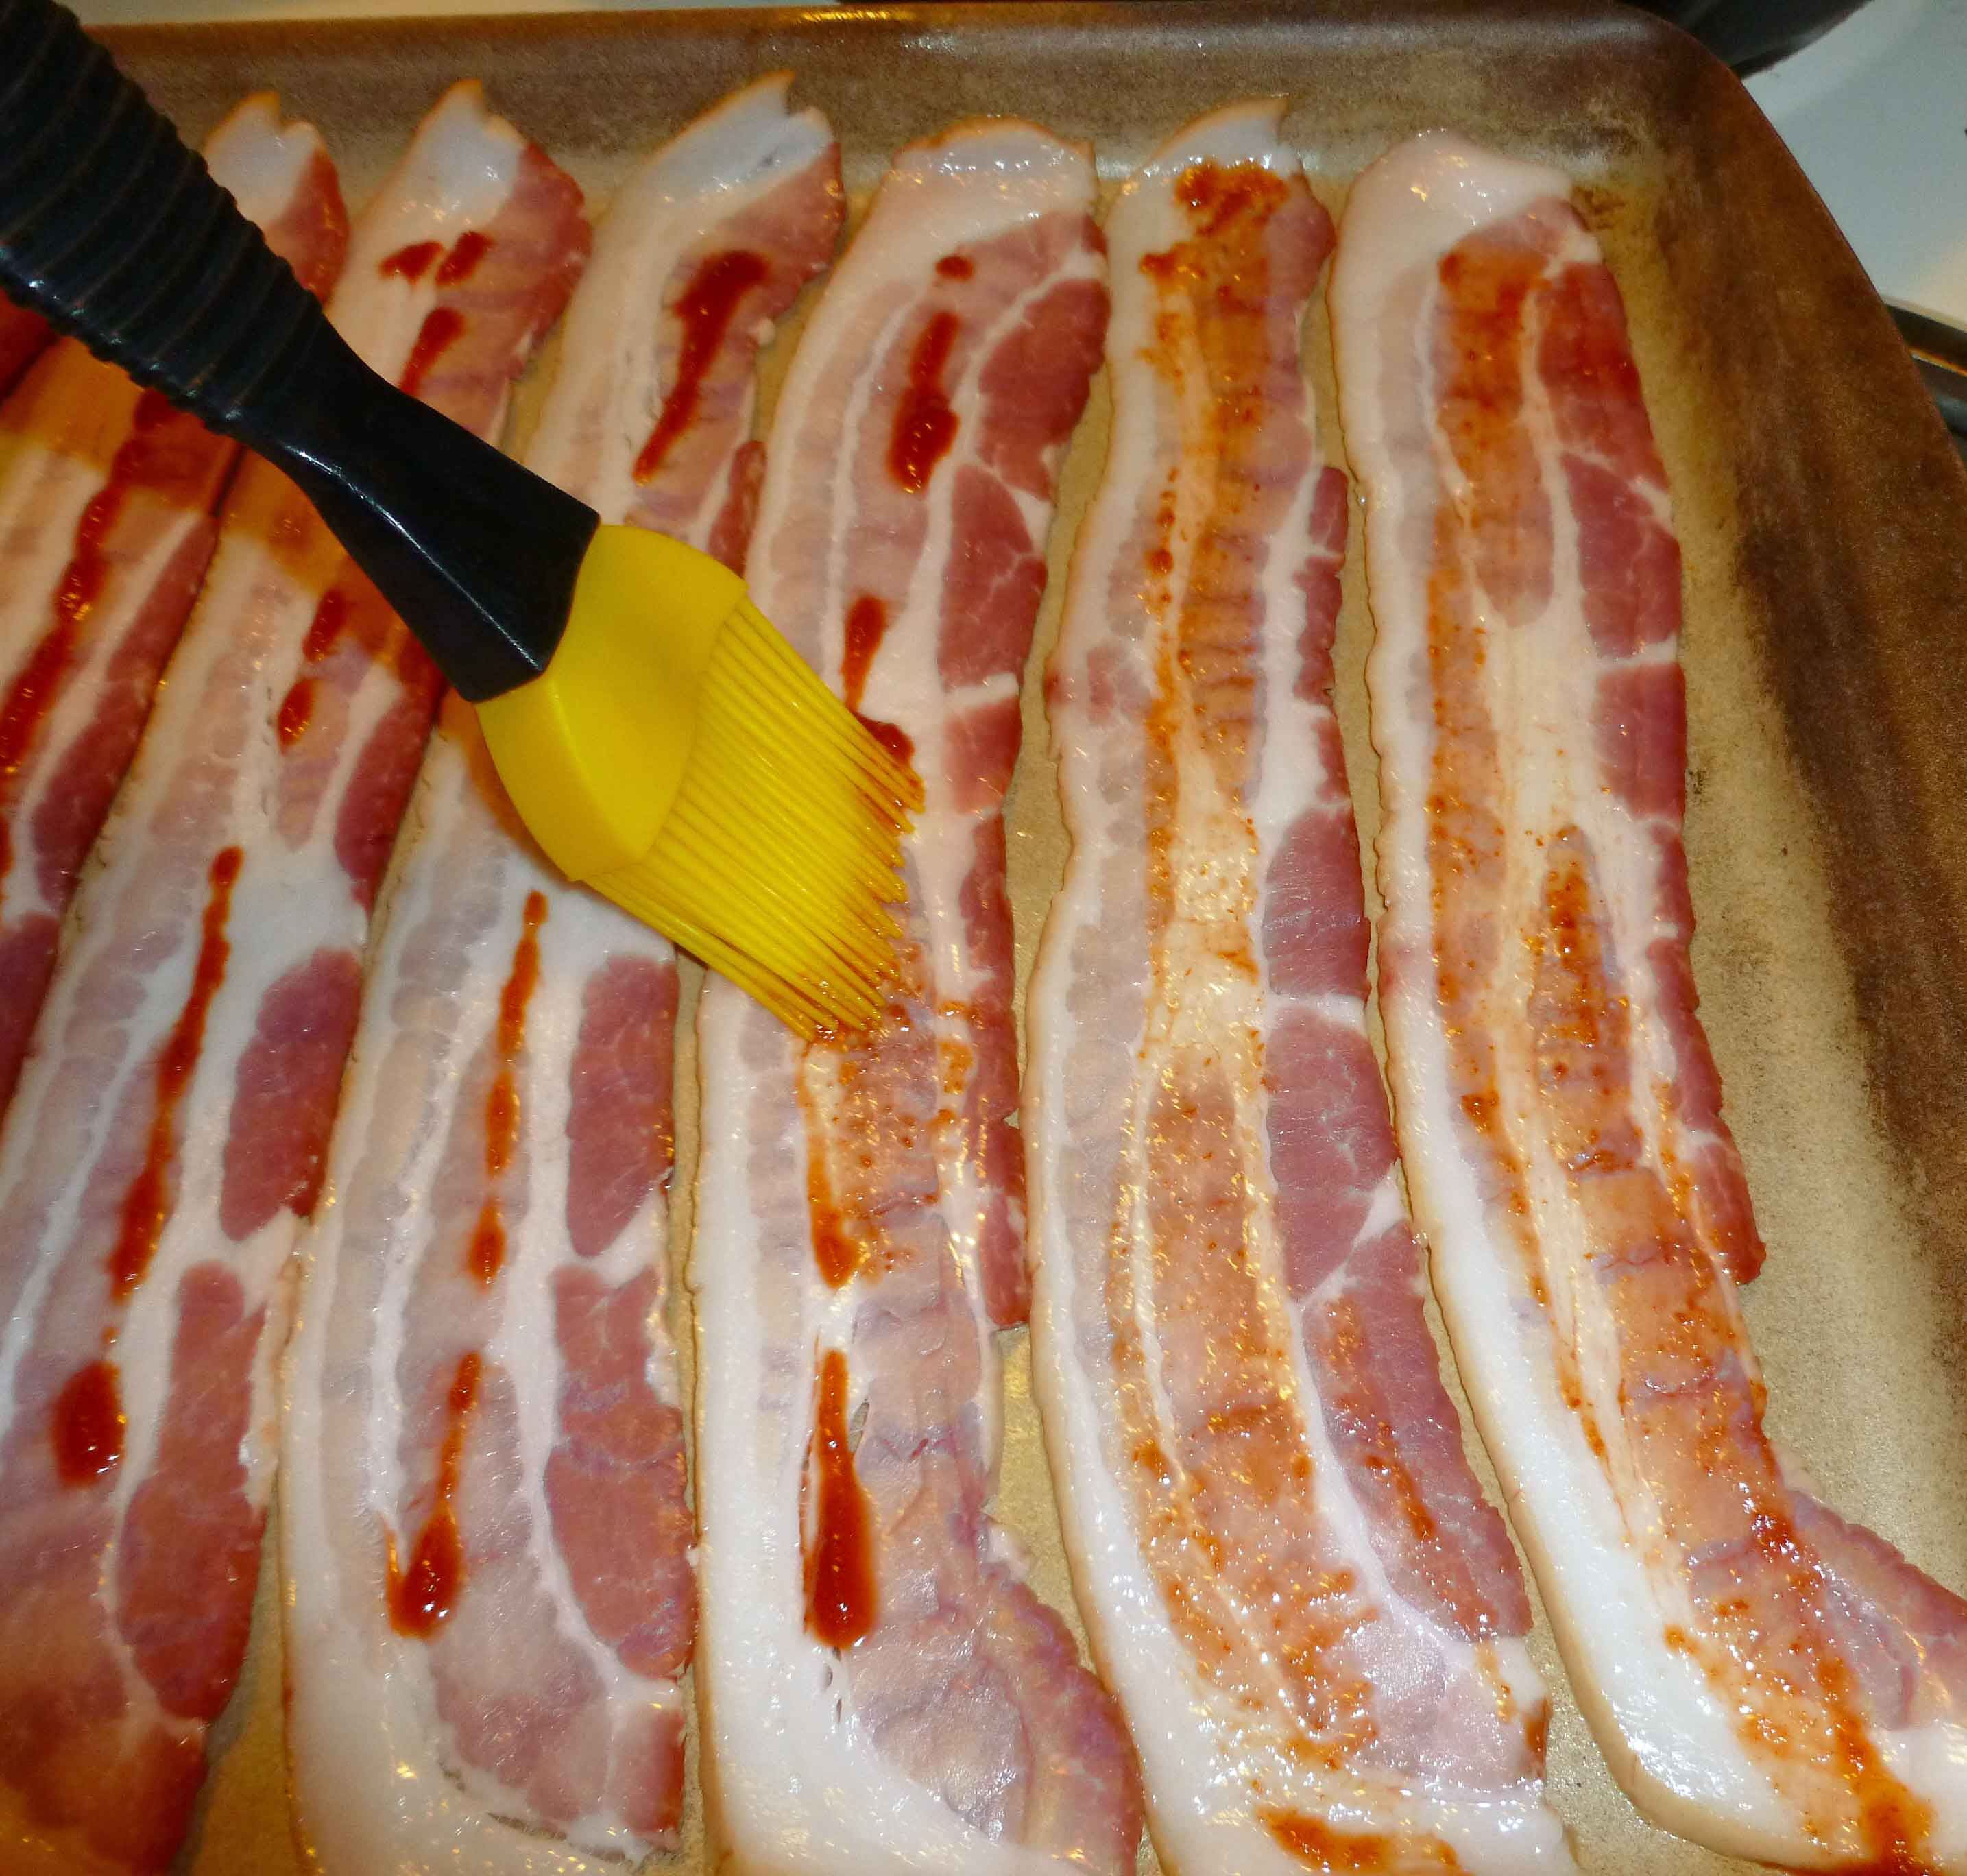
    Now sprinkle the brown sugar evenly over the bacon strips.  I found it was easiest just to use my fingers to do it.

    Brown sugar sprinkled over Sriracha covered bacon
    Brown sugar sprinkled over Sriracha covered bacon

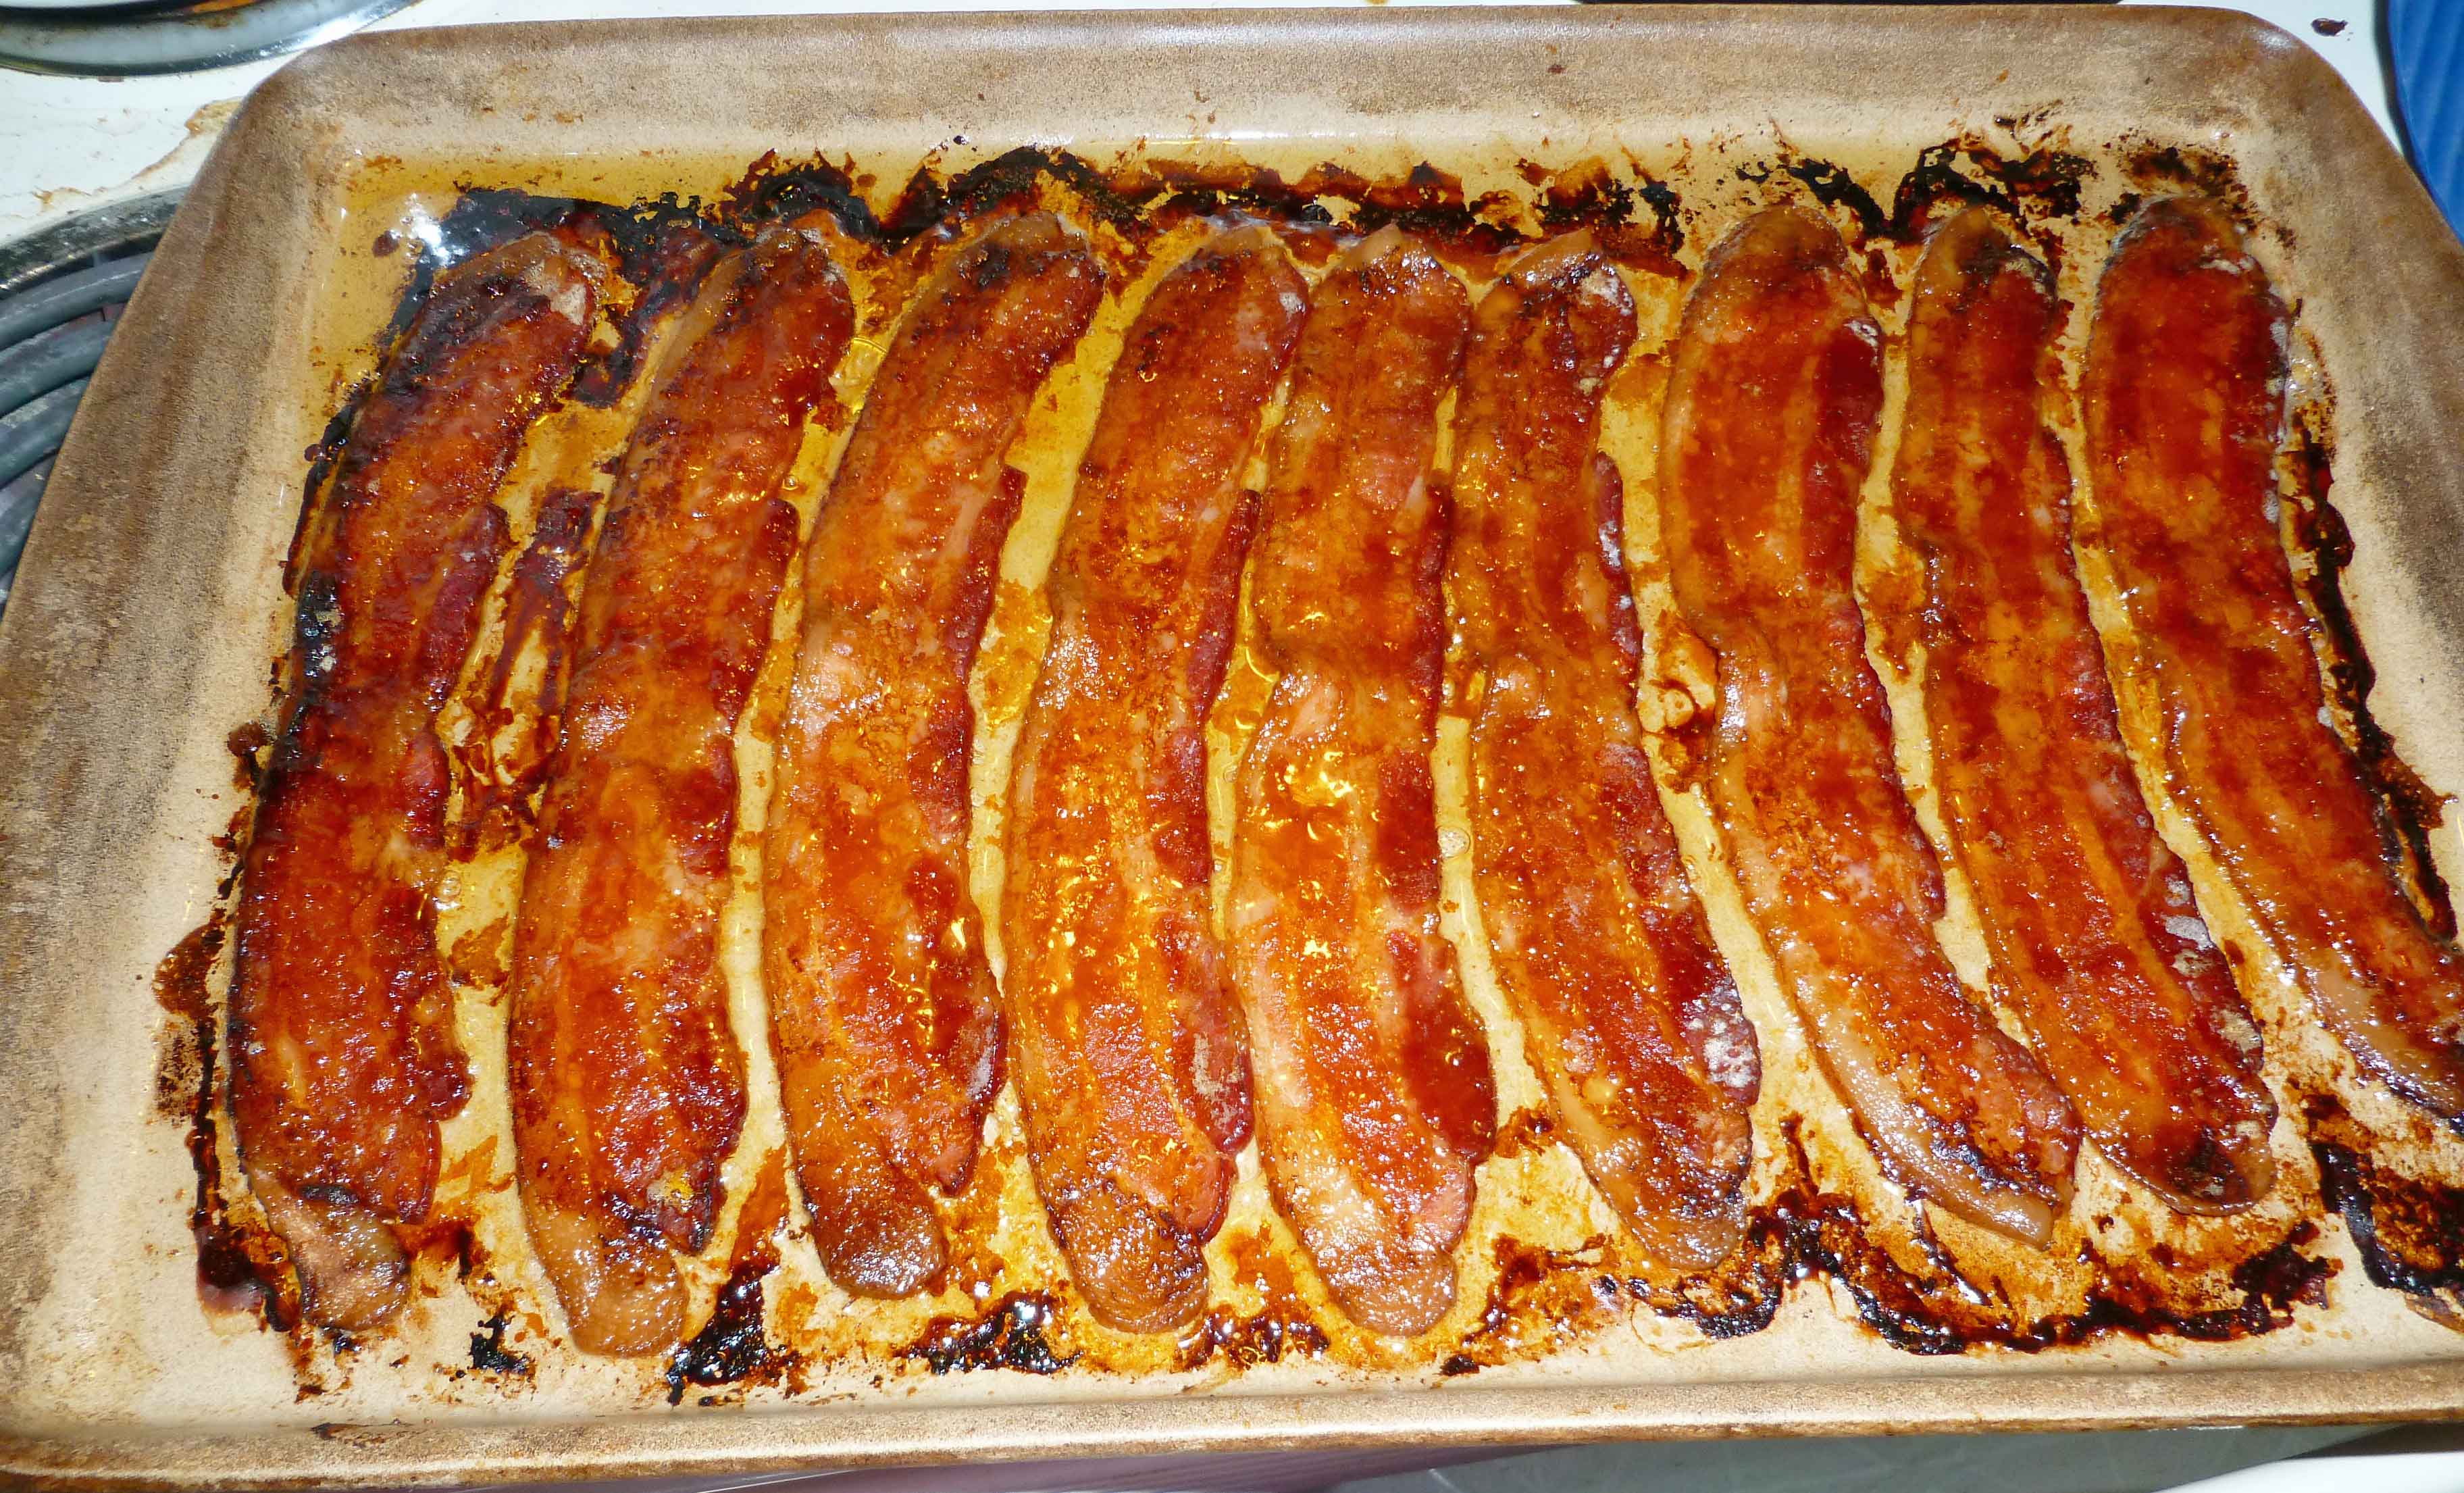
    Bake for 15-20 minutes.  Check on your bacon at about 15 minutes so it gets to the proper level of “done-ness” for you.  Again I like mine really crispy, so I’ll let mine go longer until it’s where I want it.

    Bacon just out of the oven
    Bacon just out of the oven

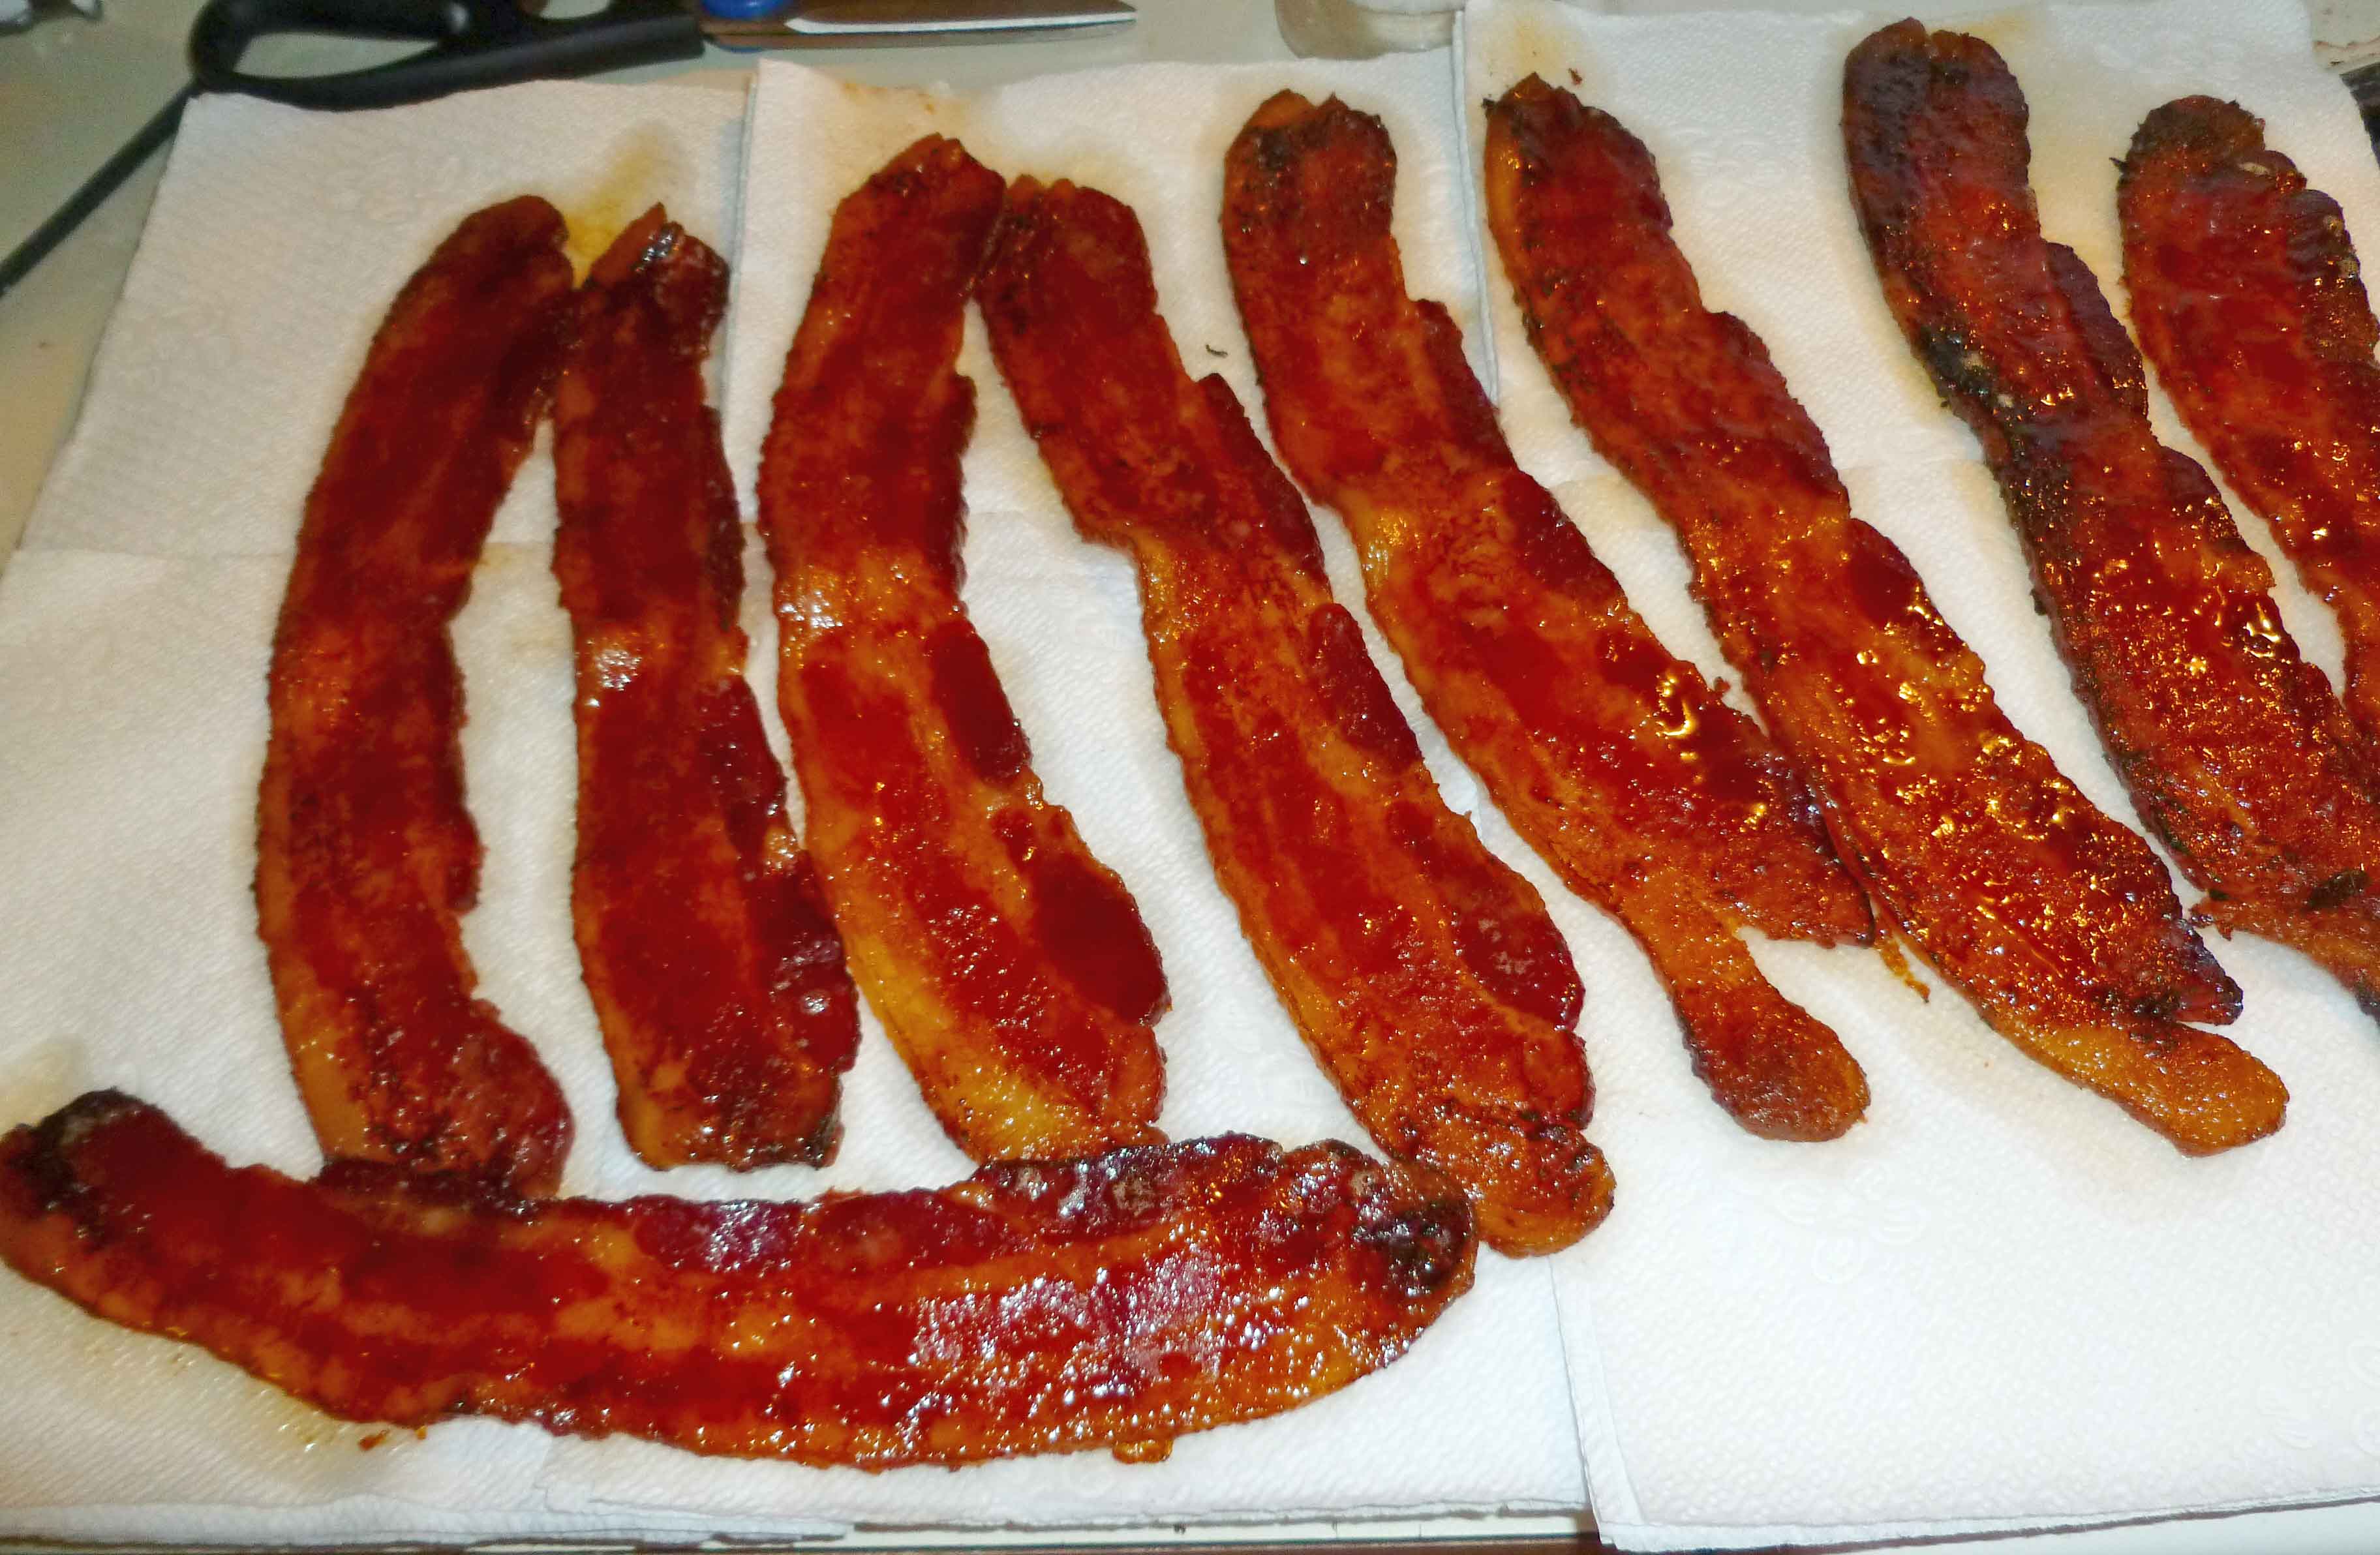
    Once it’s out of the oven, use a fork or a pair of tongs to lay them on some paper towels to drain away the excess bacon fat.

    Bacon on paper towels
    Bacon on paper towels

    Enjoy, it’s really, really good!

  • Gluten-Free and Dairy-Free Pancakes

    Gluten Free and Dairy Free Pancakes
    Gluten Free and Dairy Free Pancakes

    Welcome to another segment of our Hangover Breakfast series!  Again, I used the method that the Gluten Free Girl and the Chef have provided on their blog to make an all-purpose flour mix, to choose flours with waffles and pancakes in mind, which I posted previously (see link below).  Waffles are great, but then you have to clean the waffle maker, which you might not want to do on the morning after, or if it’s just an every day sort of breakfast.  So then, hey, pancakes!  You can also dress these up anyway you want, add blueberries, chocolate chips, apples and cinnamon, etc.  You can also make up a batch, let them cool, put wax paper in between them and put them in a container in the freezer and toast them when you want some too.

    Gluten Free and Dairy Free Pancakes

    Makes about 10 – 4 inch pancakes.

    • 210 grams of Gluten Free Flour Mix for Waffles & Pancakes (or you can try your normal gluten free flour mix)
    • 1 teaspoon salt
    • 3 Tablespoons brown sugar
    • 1 3/4 teaspoons of baking powder
    • 1 1/2 Tablespoons of ground chia seed meal
    • 4 1/2 Tablespoons of water
    • 3 Tablespoons of canola oil
    • 1 teaspoon of vanilla
    • 1 1/4 cups of rice milk (or other alternative milk of your choice)
    • some Earth Balance Soy Free Natural Buttery spread to grease your skillet with.

    Measure out flour, salt, baking powder and brown sugar and place in a bowl. Whisk ingredients together until they are well incorporated into each other.

    Dry pancake ingredients in a bowl
    Dry pancake ingredients in a bowl

    Mix ground chia seed meal and water in a container to form a chia egg, setting it aside to let it gel.

    Chia and Water to form chia egg
    Chia and Water to form chia egg

    Measure out rice milk, oil and vanilla into a container large enough to add the chia egg.  Add the chia egg and whisk it together so that chia is well incorporated into the rice milk.

    Rice milk mixture and chia egg whisked together
    Rice milk mixture and chia egg whisked together

    Pour chia and rice milk mixture into the flour mixture and whisk them together until most of the lumps are gone.

    Pancake batter after mixing dry and wet ingredients together
    Pancake batter after mixing dry and wet ingredients together

    Melt a bit of the Earth Balance, maybe half a teaspoon or so in a skillet over medium to medium high heat, depending on your burner strength.  When your skillet is hot, scoop some of the pancake batter into the skillet.  I used a Pampered Chef large scoop that holds about 3 Tablespoons of batter to portion out the pancakes into the skillet.

    Portioning out batter into skillet
    Portioning out batter into skillet

    Cook until the edges of the pancake look dry and there are bubbles in the batter.  You can use a spatula to gently lift up an edge to see how brown the pancakes are underneath.

    Pancakes just about ready to be flipped
    Pancakes just about ready to be flipped

    When they are a nice deep golden brown, flip them and cook until the other side is a nice deep golden brown. I found that I needed to cook them a bit longer than I normally would cook wheat flour pancakes, which I understand is fairly common for gluten free cooking.

    Pancakes after flipping
    Pancakes after flipping

    Enjoy them with some maple syrup and Earth Balance Soy Free buttery spread!

    Gluten Free and Dairy Free Pancakes
    Gluten Free and Dairy Free Pancakes
  • Gluten-Free and Dairy-Free Buttermilk Waffles

    Gluten Free and Dairy Free Buttermilk Waffles
    Gluten Free and Dairy Free Buttermilk Waffles

    Welcome to another segment of our Hangover Breakfast series!  Again, I used the method that the Gluten Free Girl and the Chef have provided on their blog to make an all-purpose flour mix, to choose flours with waffles and pancakes in mind, which I posted previously (see link below).  Waffles  were one of my favorite go to breakfasts after a night where I knocked a few too many back. So it seemed natural to try to recreate a waffle worthy of a morning after, or one of those lazy Sundays where you go to the diner and luxuriate in crispy waffles and way too much coffee.

    Just word to the wise, the pictures show me doing a half recipe than the one written out here.  There’s only two of us, and I was testing several other recipes at the same time, and we just couldn’t eat that much by ourselves.  So if you’re concerned that your attempt doesn’t look like mine, that’s why.  Also, you can let the waffles cool room temperature, put wax paper in between them and put them in a container in the freezer and toast them when you want some.  They’re a lot cheaper than store bought instant waffles and taste better too!

    Gluten Free and Dairy Free Buttermilk Waffles

    Makes about 6 waffles.

    • 280 grams of Gluten Free Flour Mix for Waffles & Pancakes (or you can try your normal gluten free flour mix)
    • 1 teaspoon salt
    • 3 teaspoons of baking powder
    • 2 Tablespoons brown sugar
    • 2 Tablespoons of ground chia seed meal
    • 6 Tablespoons of water
    • 2 teaspoons of vanilla
    • 1 1/2 cups of rice milk (or other alternative milk of your choice)
    • 2 Tablespoons apple cider vinegar
    • some canola oil to grease the waffle maker (I use an oil spray bottle like these, but I use the Pampered Chef version.  Any spray bottle would be much better for the environment and you don’t have to try to find a soy or dairy free version of Pam, etc.)

    Plug in waffle maker and set to highest temperature setting. Measure out flour, salt, baking powder and brown sugar and place in a bowl.  Whisk ingredients together until they are well incorporated into each other.

    Dry ingredients in a bowl
    Dry ingredients in a bowl

    Mix ground chia seed meal and water in a container to form a chia egg, setting it aside to let it gel.

    Chia and Water to form chia egg
    Chia and Water to form chia egg

    (Okay here’s where I forgot to take pictures of the next several steps.  You’d be amazed how hard it is to remember to stop to take pictures.)  Mix rice milk, vanilla, and vinegar together in a container large enough to add the chia egg.  Once the rice milk, vanilla and vinegar are well mixed, add the chia egg and whisk it together so that chia is well incorporated into the rice milk and vinegar.

    Pour chia and rice milk mixture into the flour mixture and whisk them together until most of the lumps are gone.  If your waffle maker has reached the correct heat, spray some oil on the top and bottom waffle plates, and pour some of the batter on your waffle maker.  You know your waffle maker and you’re the best judge of how much to use, but go ahead and start with half a cup and see how that goes.  Even on the highest setting, I found that these waffles still needed a little extra time to cook.  If the top and the bottom of the waffle started to separate as I very slowly tried to pull  the waffle maker lid up, I closed it back up and let them cook a little more, and then I had no problem and no mess.

    Enjoy with some maple syrup and Earth Balance Soy Free buttery spread!

  • Gluten Free Flour Mix for Waffles and Pancakes

    Gluten Free Flour Mix for Waffles and Pancakes
    Gluten Free Flour Mix for Waffles and Pancakes

    Using method that the Gluten Free Girl and the Chef have provided on their blog to make an all-purpose flour mix, I made up the following flour mix to make the waffles and pancake recipes that will be posted for our Hangover Breakfast series.  (These recipes will be posted on April 1st, keep your eyes out for them!) I used a kitchen scale and I used a glass measuring cup zeroed out on the scale thinking that I could give you the cup equivalents. The thing is, it worked out that all the amounts were not a full measurement of anything and were really weird amounts. If you’re going to do any serious gluten free baking, you probably need to get a kitchen scale. This can be used as an all purpose mix, but I chose these flours with waffles and pancakes in mind. To use a regular recipe with this mix, exchange 140 grams of this mix to every 1 cup of regular flour.

    Gluten Free Flour Mix for Waffles and Pancakes

    Makes about 3 1/2 cups of flour mix.

    • 50 grams of Oat flour
    • 50 grams of Sorghum flour
    • 50 grams of Millet flour
    • 50 grams of Masa Harina flour (a type of corn flour)
    • 150 grams of Sweet Rice flour
    • 150 grams of Potato Starch

    Measure out each of the flours carefully, and place into a large mixing bowl.  Using a whisk, mix the flours and starches together until they are very well mixed.  Store in an airtight container until you are ready to use it.  Enjoy!

  • Sriracha Oven Roasted Potatoes

    Sriracha Oven Roasted Potatoes
    Sriracha Oven Roasted Potatoes

    For the second post in our Hangover Breakfast series, what breakfast is complete without home fries?  But on the morning after (or pretty much all the time if I’m honest about it), I’m going to be pretty lazy about what I actually cook on the stove top that requires constant attention.  Therefore, I like my home fries oven roasted.

    Sriracha Oven Roasted Potatoes

    • 1/8 c. of olive oil
    • 1 Tablespoon of fresh minced garlic (3-4 cloves or go nuts)
    • 1 teaspoon of Italian Seasoning (it’s a mix of the usual suspects, marjoram, thyme, rosemary, savory, sage, oregano and basil, if you don’t have it, just use a dash of each.)
    • 1/2 teaspoon of Penzey’s Forward (if you don’t have this, use 1 teaspoon of Lawry’s Seasoning Salt or any other brand of season salt, and omit the salt below)
    • 1/2 teaspoon of salt
    • 1 teaspoon of Sriracha  (if you don’t have Sriracha, BUY SOME, or substitute any hot sauce, or if you don’t like spicy, omit it altogether)
    • 4-5 potatoes, washed and scrubbed and trimmed of any scars or bad spots, but otherwise unpeeled.

    Preheat oven to 475º degrees. Place all the ingredients except the potatoes into a bowl.

    Olive Oil and Spices in Bowl
    Olive Oil and Spices in Bowl

    Whisk oil and spices together so they are well incorporated.

    Well mixed olive oil and spices
    Well mixed olive oil and spices

    Wash, scrub and trim potatoes if you haven’t already.

    Washed, Scrubbed and Trimmed Potatoes
    Washed, Scrubbed and Trimmed Potatoes

    Cut potatoes into 3/4 inch pieces and place into the bowl with the olive oil and spices.

    Potatoes cut into 3/4 inch pieces
    Potatoes cut into 3/4 inch pieces

    Once you have finished cutting up all the potatoes, mix the potatoes with the oil and spice mixture until they are well coated.

    Potatoes coated with spice mixture
    Potatoes coated with spice mixture

    Place coated potatoes on a baking sheet in a single layer. Scrape the bowl and drizzle any of the remaining spice mixture on top of the potatoes.

    Coated Potatoes on baking sheet in single layer
    Coated Potatoes on baking sheet in single layer

    Put potatoes in preheated oven and roast for 20-30 minutes, turning occasionally to brown on all sides.

    Sriracha Oven Roasted Potatoes just out of the oven!
    Sriracha Oven Roasted Potatoes just out of the oven!

    Serve them with some sausage (see our Maple Glazed Homemade Breakfast Sausage Patties recipe), bacon, and some fresh fruit.  Enjoy!

  • Maple-Glazed Homemade Breakfast Sausage Patties

    Maple Glazed Homemade Breakfast Sausage Patties
    Maple Glazed Homemade Breakfast Sausage Patties

    St. Patrick’s Day makes some of us think about dealing with the results of the excessive consumption of alcohol. When I was in college, one of my morning after cures was to head to the local IHOP (International House of Pancakes for those of you not familiar with this restaurant chain) on Storrow Drive in Boston or to a local diner, either the Grecian Yearning in Allston or Johnny’s in Newton (neither exist anymore sadly) and eat a huge greasy breakfast to neutralize all the acid in my stomach. But going to an IHOP or any other diner for that matter, is damn near impossible when you can’t have eggs or milk. So we needed recipes for the morning after, or just when you want a really huge breakfast because you really, really love breakfast.

    I was going to do one huge breakfast post, but it would be too long, too hard for you all to search for the recipes after, and posting five or so recipes in one day might be a bit much even for my Type A slightly manic personality. So I’m going to break it up into several posts for this Monday and on Monday the 25th. (You may have noticed that Mary Kate and I switch off weeks on the Monday recipe posts.)

    So without further ado, I give you the first recipe of our Hangover Breakfast series:

    Maple Glazed Homemade Breakfast Sausage Patties

    • 1 pound of ground pork (do not get anything leaner than 80%/20% or they will be dry as dust)
    • 1 teaspoon of rubbed sage
    • 1 teaspoon of Lawry’s Seasoning Salt (or any other brand of seasoning salt)
    • 1 teaspoon of Sriracha  (if you don’t have Sriracha, substitute any hot sauce, or a 1/2 teaspoon of crushed red pepper flakes)
    • 1/2 teaspoon of ground black pepper
    • a pinch of ground cloves
    • a pinch of nutmeg
    • a dash of marjoram
    • 4 Tablespoons of maple pancake syrup (You can use real maple syrup, but the fake stuff works too.  Just make sure you check labels, as many brands contain milk.)

    Place pork and all ingredients except maple pancake syrup in a bowl.  Using your hands, mix all ingredients until the spices are evenly incorporated throughout the pork. (Think making a meatloaf or meatballs). Again using your hands, form ground pork into patties.  I was able to make six patties with the amount of ground pork called for in this recipe.

    Pork Mixture formed into patties
    Pork Mixture formed into patties

    In a large skillet, fry the patties over medium heat so that they have a nice sear on them, about 3-5 minutes per side depending on the heat of your burner.  (Pork should be cooked until the temperature reaches 160°F for food safety.)

    Patties frying in skillet
    Patties frying in skillet

    Once the patties are cooked, add the maple pancake syrup to the skillet and heat it through, flipping patties to coat them in the syrup. Place the patties on a plate and serve. The following picture isn’t the greatest, but I think it shows the maple glaze better than the main picture above:

    Completed Glazed Patties
    Completed Glazed Patties

    Pair these with some waffles, pancakes or home fries (see our Sriracha Oven Roasted Potatoes recipe) , and enjoy!

  • Whatever Wednesday: Farmer’s Almanac Cough Syrup

    Tea & Cat
    Tea & Cat

    So my mother discovered the Farmer’s Almanac a few years ago (or possibly re-discovered, I’ve never asked — I just assumed that city kids didn’t read the Farmer’s Almanac), and this year has a page-a-day calendar version.  Despite living many states away from my mother, I always know what page-a-day she has because she mails me the ones she thinks I’ll find interesting.  So I thought I’d share this one with you all, even though it won’t work for Denise (I am somewhat sure that flax seed allergies aren’t incredibly common, but if you have one, don’t make this).

    To treat a nagging cough:

    • Boil 3T whole flax seed in 1 pint water
    • Strain
    • Stir in 3T sugar [I’d use honey]
    • Add juice of two lemons
    • Cool the mixture
    • Sip as needed

    This sounds to me as though it would work well.

    My own make at home cough syrup is a little different.  A lot of the time, I just swig a spoonful of honey.  If I’m feeling fancy or have a real cough, I will dissolve a few tablespoons of honey in a bit of boiling water, add a half shot of whiskey or brandy and a spare pinch of cayenne.  There are no real measurements, as I’ve never made this while not sick.  This works pretty well for me.

    Here’s hoping you don’t need either recipe, but if you do, they’re here for you.

  • Sizemore Family Mac n’ Cheez

    Sizemore Family Mac n’ Cheez

    Gluten and Dairy Free Mac and Cheese
    Gluten and Dairy Free Mac and Cheese

    Is there anything better than good solid comfort food?  In this dreary mid-winter, I’m drawn again to this casserole that my friend Corianne gave me back when I needed just to go dairy-free.  The recipe is her mother’s, but it seems like food is a family affair — Corianne and her sister now run the vegan Treehouse Bakery in Phoenix (ask nicely — they do gluten-free!  And if you’re in Phoenix or just a glutton for punishment, like them on Facebook to hear the list of flavors every day.  Can I highly recommend the spicy chocolate cupcakes?).

    Anyway, I’ve tweaked very few things over the years I’ve had this recipe, as it’s pretty much perfect.  It was easy to make gluten-free with quinoa pasta.

    Casserole of Awesome
    Casserole of Awesome

    Gluten-free, Soy-free, Vegan Cashew Mac and Cheese, courtesy of the Sizemore family

    • 2 quarts water
    • 1 teaspoon salt
    • 2 cups gluten-free macaroni (I recommend quinoa pasta)

    Cook mac according to package directions, to the shorter end of the cooking time.  Do not overcook!  Drain.  Pour into greased casserole dish.

    • 1 cup raw cashew pieces
    • 2 cups water

    Add to food processor and process until smooth.

    • 2 oz jar of pimentos
    • 2 Tablespoons lemon juice
    • 2 teaspoons onion powder
    • 2 teaspoons salt
    • 1 teaspoon garlic powder
    • 1/2 teaspoon dry mustard (optional — adds a tiny bit of kick)

    Add these to the cashews, and process until smooth.

    Pour sauce over mac.

    Cover and bake for 30 minutes at 350F.

    Uncover.  Top with gluten-free bread crumbs, if desired (I prefer it without, personally) and bake another 15 minutes uncovered.

    Close up Mmmmmm
    Close up Mmmmmm

    Enjoy.  I think this is best served cold, in the morning, for breakfast, with coffee.  But your mileage may vary.  I think plenty of people like their mac n’ cheez hot.


    Notice: Trying to access array offset on value of type bool in /home/maryzahc/public_html/adultfoodallergies.com/wp-content/plugins/wp-ultimate-recipe/helpers/models/recipe.php on line 254
    Sizemore Family Mac ‘n’ Cheez
    Print Recipe
    Sizemore Family Mac ‘n’ Cheez
    Print Recipe
    Ingredients
    • 2 cups gluten-free pasta (I prefer quinoa macaroni for this)
    • 4 cups water
    • 2 teaspoons kosher salt
    • 1 cup cashew pieces soaked overnight
    • 1 3/4 cups water
    • 2 Tablespoons lemon juice
    • 2 teaspoons onion powder
    • 1 1/4 teaspoons salt
    • 1 teaspoon garlic powder
    • 1/2 teaspoon dry mustard optional — adds a tiny bit of kick
    Servings:
    Share this Recipe
     
    Powered byWP Ultimate Recipe