Notice: Function _load_textdomain_just_in_time was called incorrectly. Translation loading for the wp-ultimate-recipe domain was triggered too early. This is usually an indicator for some code in the plugin or theme running too early. Translations should be loaded at the init action or later. Please see Debugging in WordPress for more information. (This message was added in version 6.7.0.) in /home/maryzahc/public_html/adultfoodallergies.com/wp-includes/functions.php on line 6121
Gluten-free – Page 23 – surviving the food allergy apocalypse (archive)

Tag: Gluten-free

Contains no wheat or gluten.

  • Berry Poke Cake (vegan, gluten-free)

    Vaguely Patriotic Poke Cake
    Vaguely Patriotic Poke Cake

    So this week is the both the classic summer holiday of Independence Day in the US. I know maybe cake isn’t the first thing one thinks of when you think of summer holiday picnics, but this week is also my birthday, so cake is important. So your theme is: BERRIES. Hah. Actually, berries are one of the more awesome things about summer, and cake is the one truly awesome thing about birthdays, so here’s a berry-themed cake that also just happens to be color-appropriate for a few upcoming holidays — nicely, this works as well for Bastille Day as it does for Independence Day. It’s multi-purpose. This is good, because every day is better with cake.

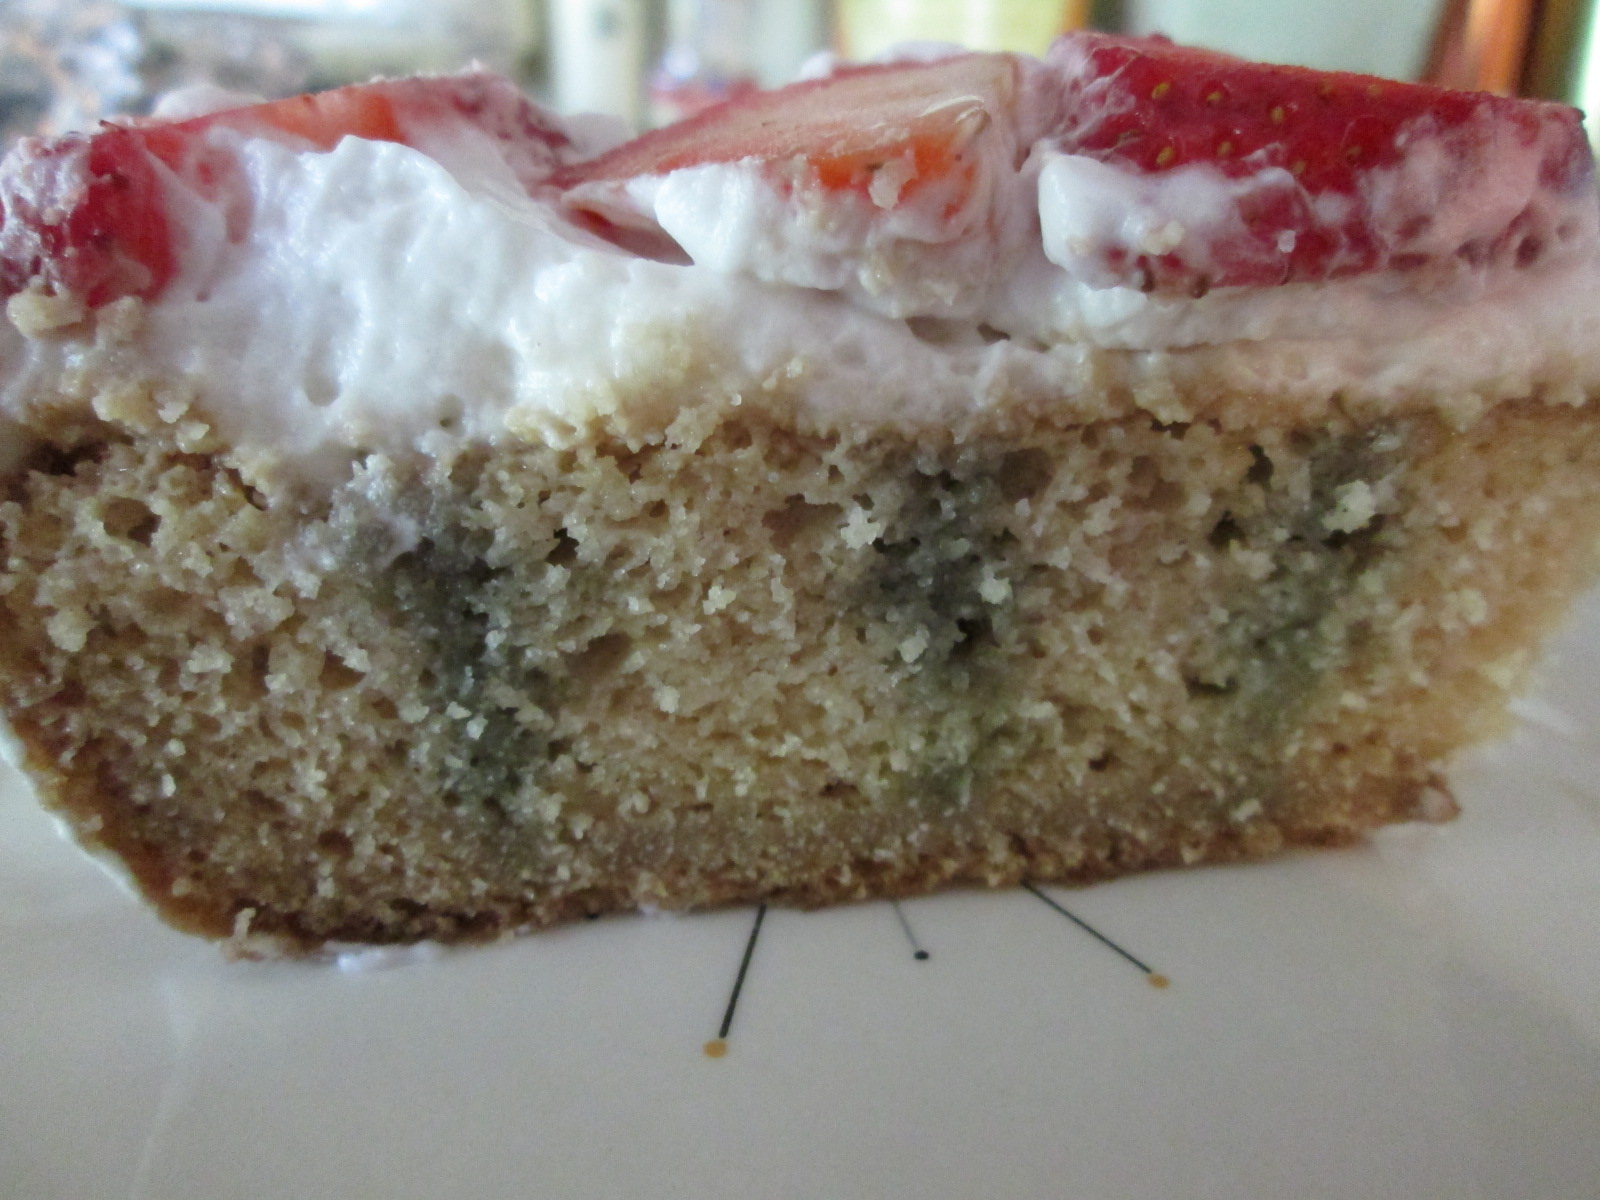
    This is a riff on a cake my mother used to make — a poke cake, where you soak your cake with gelatin. Her “recipe” came from a magazine recipe (I’m going to guess Better Homes and Gardens, but it might have been the Parade magazine section from the Sunday paper) and involved box cake mix, a box of Jell-O, Cool Whip (which I absolutely adored for all of my formative years) and berries on top. My FrankenCake version involves other people’s recipes instead of boxes, but combined to make “classic” poke cake that is gluten-free, vegan, and completely without preservatives or weird flavorings. This is a dense, moist cake, flavored by the gel, topped with a whipped cream and berries. Served cold, this is great for summer. I mean, it’s berries. What is there not to love?

    You’ll make the cake, cool it, poke holes in it, make a fruit gel, pour it on, cool it, and the “frost” and decorate it. Because it needs to cool completely, twice, this is a good make-ahead recipe. The day before is a good idea, adding the “frosting” and berries not long before serving.

    Cake Assembly
    Cake Assembly

    IMPORTANT NOTE: In case you skipped reading to go straight to the recipe, this is not a “day of” recipe. You need to cool this twice, and the coconut milk for the topping must be refrigerated overnight.


    Patriotic Berry Poke Cake

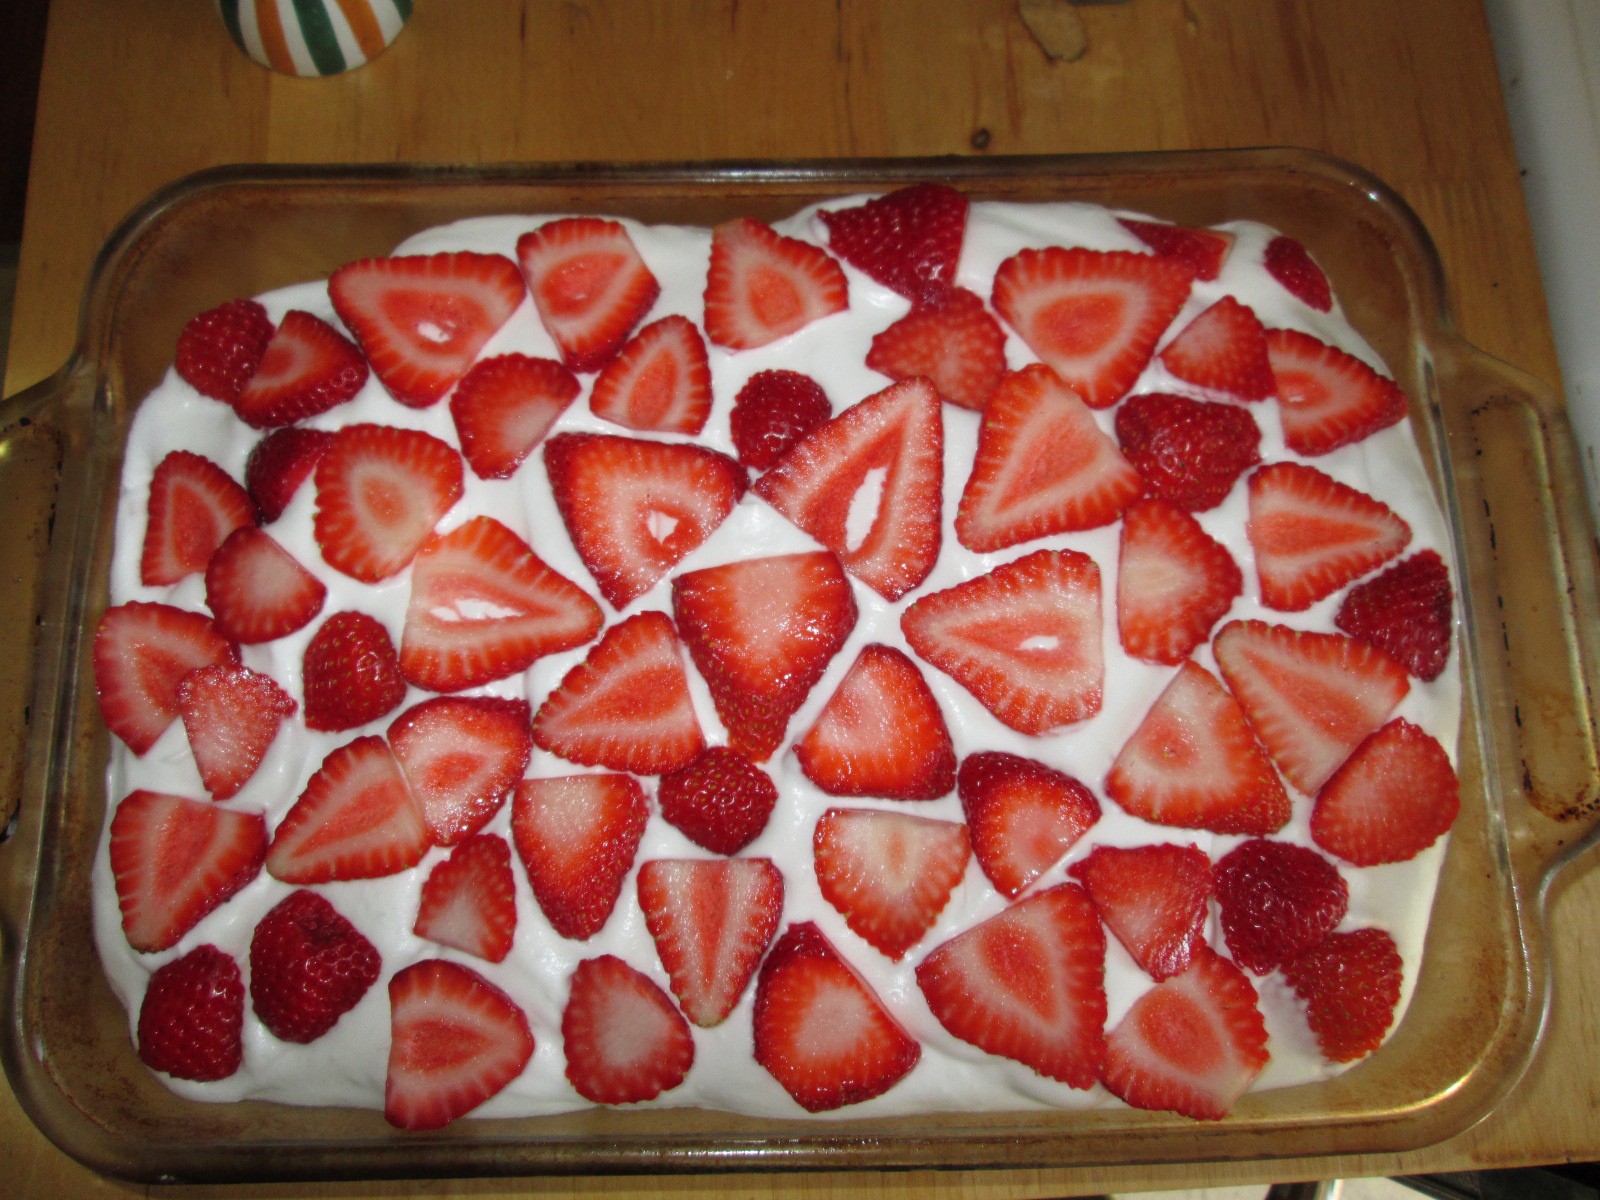
    1 carton of strawberries or other fresh berries is also needed to decorate the top of the cake.

    Cake (very lightly adapted from Gluten Mama’s GF Vegan Vanilla Cake)

    • ¾ cup sorghum flour
    • ¾ cup tapioca starch
    • ½ cup coconut flour
    • 1 cup sugar
    • ½ teaspoon salt
    • 1 teaspoon baking powder
    • 1 teaspoon baking soda
    • 1 teaspoon xanthan gum
    • ½ cup plain almond milk (or other non-dairy milk)
    • 1 teaspoon lemon juice
    • 1 cup warm water
    • 3 Tablespoons coconut oil
    • 1 Tablespoon vanilla
    • 4 oz (1/2 cup) unsweetened applesauce (I use the snack pack sizes)

    Preheat oven to 375ºF. Lightly grease an 8″x11.5″ pan, or a 9″ square pan.

    Add lemon juice to almond milk and set aside.

    Mix dry ingredients. Then add wet ingredients and mix thoroughly.

    Pour into prepared pan and bake 35 minutes or so — cake is done when lightly browned on top.

    Cool completely, and then poke holes all over the cake with a fork. The more holes, the more your fruit gel will penetrate, so I’d suggest holes no more than 1/2 inch apart, all over the cake.


    Vegan Fruit Gel (I used this recipe from Manjula’s Kitchen)

    Poke and Gel the Cake
    Poke and Gel the Cake


    • 1/2 cup blueberry juice
    • 1/2 cup water
    • 2 Tablespoons sugar
    • 1/4 teaspoon agar agar powder


    If you need to, juice and strain blueberries to get blueberry juice. I just had a bag of frozen berries I picked last summer, so I defrosted them and ran them through a food mill and then a strainer. This made more juice than I needed, but this also makes more gel than you need for the cake.

    Mix the agar agar into your water. Add all the ingredients to a saucepan and bring to a boil over medium heat, stirring occasionally. Boil for three minutes.

    Pour very slowly over the top of your hole-poked cake (this is easier to do if you aren’t taking photos while pouring), letting it soak in, and stop when the gel stops soaking in. You may have a little leftover, so just make a serving of gel for later.

    Put the gel-soaked cake in the fridge and chill for 3-4 hours or overnight.


    Coconut Whipped Cream (see recipe here at Oh She Glows)


    • 1 can full-fat coconut milk without guar gum, refrigerated over night
    • 3 teaspoons sugar
    • 1/2 teaspoon vanilla
    • OR 3 teaspoons of vanilla sugar
    • A chilled metal bowl and electric mixer, with whisk attachment if you have it.


    Flip your can upside down in the fridge. To open it, flip it back upright and open it. Pour off the watery part (you can use this for things, but I don’t like it much, personally.)

    Put JUST the solid part in your chilled bowl and whip it with your whisk attachment or mixer.

    Add the sugar and vanilla (or vanilla sugar) and whip again. Taste it. It’s amazing. Add sugar or vanilla if needed.

    Use the coconut whipped cream to frost the cake, being generous in your application. Top the cake with berries and keep refrigerated until ready to serve.

    This cake is ready for its close-up
    This cake is ready for its close-up
  • Quick Thai-Inspired Curry Noodle Stir Fry


    Quick Thai-Inspired Curry Noodle Stir Fry
    Quick Thai-Inspired Curry Noodle Stir Fry

    Thai food was one of the biggest losses for me.  My husband and I had our first date at a Thai restaurant, and I used to get delivery there so often that the staff knew it was me just from my voice on the telephone. It was not uncommon for us to have Thai once or twice a week, especially when I was still in private practice. But Thai’s kind of hard without coconut.

    This recipe’s kind of concept more than a recipe, because there are so many variables and and you can make so many curries, i.e. green, red, yellow, Massaman, etc. I used a commercial curry paste because it looked relatively safe for me, although we’ll see in the next few days whether I got corned or not (corned is like being gluten-ed but obviously with corn). However, there are tons of curry paste recipes on the internet that people can modify for their own diets, if the suggestions are not safe for you. Or you can use use a curry powder spice mix you like. I’ve also used the DIY Singapore Seasoning from our DIY Spice Mix Day post. Also, if you make curry paste, freeze it in an ice cube tray so you can grab a chunk when you want. You can use any meat you want, or not. You can also use whatever vegetables strike your fancy.

    Quick Thai-Inspired Curry Noodle Stir Fry

    Makes about 3-4 servings, depending on serving size.

    • 1/2 of a 1 pound package of rice noodles (I used the kind that I would use for pho, but you can pick the width of rice noodle you like)
    • 2 Tablespoons of olive oil, grape seed oil, or an oil that’s safe for you
    • 1 cup of cashew milk or other non-dairy milk (If you can have coconut milk, by all means use it. I can’t use commercial cashew milk so I make my own, soaking 1 cup of cashews in hot water for a couple of hours, draining the water, and putting them in the blender with two cups of new water. It’ll make more than you need, but it freezes well.)
    • 1/2 cup of water
    • 1 package of Kanokwan Green Curry Paste (they have other flavors too, make sure you read labels); or 1 or 2 Tablespoons of Thai Kitchen Green Curry Paste (they have other flavors as well, read labels); or 1 or 2 Tablespoons of Mae Ploy Thai Green Curry Paste (ditto, other flavors, read labels) or 1 or 2 Tablespoons of a curry spice mix you like, similar to those available from Penzey’s.
    • 1/2 pound of beef, pork or chicken cut into stir fry sized strips (Chicken’s out for me, but if you can eat it go for it.)
    • 3 scallions, sliced into quarter inch pieces
    • 1/2 cup of snow peas
    • 10-12 asparagus stalks, trimmed and cut into 1″ pieces
    • 2 carrots, julienned
    • 1 small onion or half a medium onion, cut in half and sliced thinly crosswise to form slices in a curved shape
    • 1 medium bok choy (about 6-8 inches long), sliced crosswise to form small bite size pieces
    • 2 Thai chilies, de-stemmed and sliced (optional, leave out if really spicy is not your thing)
    • 5-6 Thai basil leaves

    First up, prepare all your vegetables. Keep the bok choy or any other greens separated from the rest of the vegetables because they will cook quicker and need to be added at end. To do the carrots, I cheat and use a peeler that juliennes.

    Julienne Peeler
    Julienne Peeler


    Fill a large stock pot with water and bring to a boil. Add your rice noodles, boil for 6-8 minutes and then drain. If you’re using smaller rice noodles, you might not need as much cooking time, so check your package’s instructions. Place the noodles aside until the curry is finished.

    Prepared Rice Noodles
    Prepared Rice Noodles

    In a large skillet, add the oil, the cashew milk, water, and curry paste or spice mix.  Stir to combine over medium heat.

    Curry Paste and Cashew Milk Mixture
    Curry Paste and Cashew Milk Mixture

    Add your meat if you’re using it, and cook until the meat is cooked through. Then add your vegetables with the exception of the bok choy (or other green of choice).

    Curry before adding greens
    Curry before adding greens

    Cover your skillet with its lid and let it simmer for a few minutes to let the asparagus and carrots cook. Then add your bok choy and simmer until the bok choy is ready. When the bok choy is ready, mix in your Thai basil leaves.

    Completed Curry/Stir Fry Thing
    Completed Curry/Stir Fry Thing

    Place a bed of rice noodles on a plate and spoon your curry over it. If you have extra Thai basil leaves and want to be fancy, garnish your dish with them.

    Quick Thai-Inspired Curry Noodle Stir Fry
    Quick Thai-Inspired Curry Noodle Stir Fry

    Hope you enjoy it!


  • Homemade Beef Jerky

    Beef Jerky. Photo by J. Andrews
    Beef Jerky. Photo by J. Andrews

    I don’t know that I was aware that beef jerky was a commercial product until college. It pretty much showed up in the Westerns I was forced to watch as a kid, in pioneer books, and about once a year out of the oven, right before the oven got cleaned. Homemade beef jerky was a tradition. Once, my mother tried to send me some in grad school. As far as I can tell, the delivery person literally kicked the package into my tiny mailbox, shattering the protective jar into a whole batch of fantastic jerky. I still mourn that poor jar of wasted tasty goodness (that was, I think, about 15 years ago).

    Thinking about food for road trips and vacations, hikes or picnics, jerky is a pretty good staple. If it got people out to the Plains or the west coast by wagon train, it can probably get you through a long drive or a weekend at a remote cottage, and it’s definitely an airport security-safe food. I will say I have no idea how long this is shelf-stable, but I’m pretty sure that the last jar was hidden for a few months at home. So at least a few months?

    Jerky is pretty easy to make. It’s a bit time-consuming, but most of that is just waiting around and doing nothing. My plan usually starts with throwing a frozen flank steak in the fridge to thaw all day while I’m at work. That night I make the marinade and slice the meat. The next morning, I stir/flip the meat in the marinade. When I get home from work, I throw it in the oven. So, yeah, it’s a two-day process, but maybe 45 minutes of that 48 hours is active work. One pound takes up about one oven rack, so if you like this, it’s easily doubled without overloading your oven. Know that you will likely need to and want to clean your oven afterward.

    This is a variation on our family recipe, altered to removed the soy and a few other ingredients that can be problematic with allergies. If you can have soy, you can use it here — remove all other salt in the recipe; if you need to be gluten-free, use GF tamari, but to me it tastes quite a bit saltier than regular soy sauce. Adjust accordingly. I have not tried this with coconut aminos, but let me know how it works if you do. You will want to make the faux soy sauce (linked below) beforehand if you’re using it, but it does not take long.


    Jerky in process. It isn't pretty, but it tastes good.
    Jerky in process. It isn’t pretty, but it tastes good.

    Homemade Beef Jerky

    • 1 lb. flank steak
    • 1/2 cup dry sherry or dry wine
    • 1/2 cup faux soy sauce (I used this recipe without the fish sauce and with a bit more salt, closer to 1/2 teaspoon, but I was doing it by taste at that point)
    • 1 Tablespoon natural sugar (regular table sugar will work, but unprocessed sugarcane adds better flavor, likely from the natural molasses content)
    • 2 teaspoons garlic powder
    • 1 teaspoon onion powder
    • 1 teaspoon dry mustard powder
    • 1/2 teaspoon celery salt (use crushed celery seed if you are using soy sauce or tamari)
    • 1 teaspoon lime juice (lemon is probably okay, I just have a lot of limes right now)
    • 1/2 teaspoon hot sauce of your choice (absolutely optional)
    • salt to taste

    Freeze your meat for at least an hour. Alternately, take meat from the freezer and let thaw about 8 hours in the fridge. Having partially frozen flank steak will allow you to cut it more thinly and evenly.

    Trim the fat from the flank steak. Then slice into approximately 1/8-inch slices, with the grain of the meat. Or, you know, do your best to slice it thinly, period, and call it “hand-cut” and “artisinal.” This is what I do.

    In a glass baking dish, combine the ingredients for the marinade and whisk or stir with a fork until the sugar is dissolved thoroughly. Taste it and adjust the salt. You want this marinade to be salty, but not overly so. Your jerky will be less salty than the marinade.

    Add the meat strips and stir to fully coat and mostly submerge. Cover and refrigerate at least overnight (again, I usually do overnight, stir, and most of the next day — that’s just how it works in my schedule).

    Lay your meat out directly on the oven rack.

    Turn your oven down to the lowest setting (mine goes down to 170°F), and leave the oven cracked. Let the jerky dry out for 5-7 hours — you probably know what jerky should look and feel like, so test it at 5 hours. 6 usually works for how I cut the meat and how my oven works. After one or two batches, you’ll know where this stands for you, too.

    Remove jerky to an airtight container, glass if you have it, and travel on.

    Beef Jerky is ready for its close up. Photo by J. Andrews
    Beef Jerky is ready for its close up. Photo by J. Andrews
  • Watermelon White Wine Sorbet or Ice Pops


    Watermelon White Wine Sorbet or Ice Pops
    Watermelon White Wine Sorbet or Ice Pops

    Sorbet is one of the things I miss terribly because almost all of the commercial versions have corn in some form in them. This is a fairly easy recipe, making it perfect for this weekend, when I was going away for my 20th college reunion. Also, just as a side note, you could also sub out the watermelon for a quart of strawberries or a quart of peeled sliced peaches. I bet they’d be awesome too.

    Warning:  Before you make sorbet, you need an ice cream maker and if it’s like mine, you need to have frozen the insert ahead of time.  Also, it helps to make the simple syrup the day before and let it cool in the fridge overnight.  If you’re just making ice pops, just cool the simple syrup to room temperature before mixing it with the watermelon juice. 

    Watermelon White Wine Sorbet

    Makes about 10 or so half cup servings (who ever eats just half a cup though??)

    • 1 1/4 cups sugar
    • 1 1/4 cups water
    • 1/2 cup of chilled white wine (anything will do, but a nice bright citrus-y Sauvignon Blanc or Pinot Grigio would work well. Also, don’t spend a ton of money on this wine, you’re mixing it with watermelon and sugar. Or if you don’t want to use wine because you’re unsure of the wheat or corn ingredients in your wine, you could use a vodka made only from potatoes, but I’d cut it down to a quarter cup. Or not, if you’re not driving. Also, if you don’t want to use alcohol, substitute the wine with some safe-for-you lime or lemon or other fruit juice.)
    • 1 quart of watermelon, peeled and cubed

    Again, make sure that your ice cream maker is ready to go according to the manufacturer’s instructions, whether that means your insert is frozen or whatever else you might have to do.

    The day before you are going to do your sorbet, make the simple syrup. Place the sugar and water in a sauce pan and bring it to a boil without stirring. Turn it down to a low simmer and simmer until all the sugar has dissolved to make a simple syrup. Pour the simple syrup into a heat resistant bowl and put it into the fridge to cool.

    Place watermelon in a food processor or blender (in batches if necessary) and blend until smooth. Pour the liquid through a strainer to remove any seeds making sure that you press any large fruit bits remaining through the strainer. You don’t want to waste any of the watermelon.  Add the wine and the simple syrup to the watermelon mixture and mix until combined thoroughly.

    Follow your ice cream maker’s instructions to make the sorbet, or make ice pops with the mixture by using paper or plastic cups or ice pop molds and placing them in the freezer until frozen.

    Hope you enjoy it!

    atermelon White Wine Sorbet or Ice Pops
    Watermelon White Wine Sorbet or Ice Pops


  • Macadamia-Pistachio-Cherry Raw Balls

    Macadamia-Pistachio-Cherry Raw Balls
    Macadamia-Pistachio-Cherry Raw Balls. Photo by J. Andrews

    Apologies to the nut-allergic. These are not for you. Come back next week for a nut-free recipe? For those of you who can have nuts, these are for you.

    I rely on a few travel snacks to get me through times when emergency rations are necessary. Lärabars are one of those snacks, and I usually have one in my bag (as well as a few at the office). But because they are “emergency” food that I eat several times a month, I frankly get a bit bored of the few flavors I like. I wanted to see if I could make something along the same lines, using things I had in the house, and have some snacks for this week at work. Dried fruit and nut things have a good combination of sugar, protein and fat that, for me, at least, makes for a good snack that knocks down hunger for an appropriate amount of time. You know, until your next snack. I eat on the hobbit schedule.

    Between occasional trips to Trader Joe’s and our local natural foods store, I have a great selection of seeds, nuts, and dried fruits. Sometimes they get used for cookies or oatmeal toppings or an attempt at trail mix (which I always think I’m going to like more than I actually do), but mostly, buying them sounds like a good idea. I pulled everything out of the cabinet for taste-testing before deciding on this combo of macadamia nuts, pistachios, and cherries, with some dates and cacao nibs thrown in. The macadamias and pistachios are pretty creamy, and the cherries are tart, and the combination works out well.

    My version might not be fully raw — I don’t know how the cherries or dates were dried — but if that’s important for you, find raw versions.

    Macadamia-Pistachio-Cherry Raw Balls
    Macadamia-Pistachio-Cherry Raw Balls. Photo by J. Andrews

    Macadamia-Pistachio-Cherry Raw Balls 

    makes 16

    • 1/4 cup raw pistachios, shelled
    • 1/2 cup raw macadamia nuts
    • 2 pitted Medjool dates
    • 1/4 cup dried Montmorency cherries (pretty sure any dried cherries will work, but I like the tartness of these)
    • 2 Tablespoons raw cacao nibs

    Rough chop the pistachios in the food processor, and set aside.

    Add the macadamia nuts and the Medjool dates to the food processor, and process until you’ve made a nut butter. Add the cherries, and pulse them into the mixture. Add the pistachios back in, and the cacao nibs. Pulse to mix.

    Dump the mixture out onto a sheet of parchment paper and knead it together. Chill at least 10 -15 minutes in the fridge, wrapped tightly in the parchment. Roll into balls, about 1/2 a Tablespoon each. Store tightly covered in the fridge.


    Macadamia-Pistachio-Cherry Raw Balls
    Macadamia-Pistachio-Cherry Raw Balls
  • Sourdough Waffles (Gluten-free & Vegan)

    Sourdough Waffles (Gluten-free & Vegan)
    Sourdough Waffles (Gluten-free & Vegan)

    As some of you know, I’ve been experimenting with gluten-free sourdough breads. And since I have gluten-free sourdough starter that I now need to use because you have to keep feeding it to keep it alive, and there’s only so much bread one person can eat as my husband is diabetic and gluten-free bread is not particularly helpful to his blood sugar, I need to find other ways to use it up. Someone in one of the fermenting groups on Facebook recently mentioned sourdough starter waffles, and I was off and running. I found a couple of recipes, but many of them had things I can’t have, so I’ve played around and substituted until I’ve gotten something I’m pretty happy with. Also, as a side note, these freeze great. You can make up a batch and when they cool, put a layer of parchment paper or plastic wrap in between them, put them in a gallon size zip top freezer bag, and put them in the freezer. You can warm them up in a toaster or in the oven on a baking rack when you’re ready to eat them.

    You do have to make the starter ahead of time. I used this post from Art of Gluten-Free Baking to begin my starter. I started using sorghum flour when I was making the bread, but I had moved over to feeding it oat flour before making these waffles (I was running out of sorghum). Also, I cheated and didn’t do the cabbage leaf thing to get wild yeast, I just used a pinch of a safe for me commercial yeast. It worked fine, but do what makes you happy.

    If you don’t have safe oat flour, you can take gluten-free certified oats and grind them in a blender or food processor.

    Sourdough Waffles (Gluten-free & Vegan)

    Makes 6-7 waffles.

    • 1 cup of gluten-free sourdough starter
    • 1 cup of non-dairy milk (I used homemade brown rice milk)
    • 2 Tablespoons of grape seed or olive oil
    • 1/4 cup of applesauce
    • 1/2 teaspoon of vanilla extract (Here’s a bunch of recipes for vanilla extract, make sure to use safe alcohol if corn or wheat are an issue for you. I used Luksusowa Vodka because it’s made only from potatoes, where some vodkas may also use grain or corn.)
    • 1/2 cup of oat flour
    • 1/2 cup of glutinous rice flour
    • 1/4 cup of tapioca starch
    • 1/2 teaspoon of baking soda
    • 1 teaspoon of baking powder (For corn free baking powder you can use this recipe)
    • 1/2 teaspoon of salt
    • 2 Tablespoons of brown sugar
    • 1/8 teaspoon of cinnamon
    • 1/8 teaspoon of nutmeg

    Plug in your waffle iron and pre-heat it.  If it has a temperature setting, I find that the highest temperature works best for gluten-free.

    Add oat flour, glutinous rice flour, tapioca starch, baking soda, baking powder, salt, brown sugar, cinnamon and nutmeg to a mixing bowl and whisk it until thoroughly mixed. Now add your wet ingredients, the sourdough starter, non-dairy milk, grape seed oil, applesauce and vanilla extract to the bowl and mix until well combined, but there will be a few lumps.

    Batter, mixed but not too mixed.
    Batter, mixed but not too mixed.

    Pour the appropriate amount batter on your waffle iron, for mine it’s between a 1/3 and a 1/2 cup of batter, and cook according to your waffle iron’s directions. But I do find that I like to let it go a little longer after the indicator light has gone out until the steam stops to get nice really crispy waffles.

    Hope you enjoy them!

    Sourdough Waffles (Gluten-free & Vegan)
    Sourdough Waffles (Gluten-free & Vegan)


  • Bacon "Cheddar" Muffins (Gluten-free, Egg-free, Dairy-free)

    Allergy-friendly bacon "cheddar" muffins. Photo by J. Andrews
    Allergy-friendly bacon “cheddar” muffins. Photo by J. Andrews

    I started baking with cakes; it was my first form of cooking. I worked my way through the fancy cakes in my mother’s Southern Living cookbooks from age 10 until the end of college, so as a housewarming present for my first apartment, she bought me the newest version of the cookbook — it’s pretty good for basics, with some cook-to-impress recipes, and it’s chock full of desserts. However, as much as I love cake, as an adult who was suddenly in charge of feeding myself three meals a day, I pretty quickly discovered muffins. They’re pretty much breakfast cupcakes, right? Our college snack bar had really good biscuits, with every possible permutation of the classic breakfast ingredients — eggs, bacon, cheese, sausage. Between the SL cookbook and the biscuits, I can definitely forgive the southern version of green beans (which, in my totally untrained culinary opinion, are just boiled beyond death). Anyway, a savory breakfast muffin is almost the best of all breakfast worlds — like a breakfast biscuit, but in portable, make-ahead for the week form. All it needs for absolute perfection is some way to incorporate hash browns.

    Geez. All that rambling to say that, basically, this is an awesome breakfast that, once I remembered it existed, I really needed to reform the recipe in order to make it safe for me to eat today. In order to make this one, you need to have safe-for-you versions of bacon, cheddar cheese, and non-dairy milk. I have never used Bac-Os, and I could not find an ingredient list on that page, but I seem to recall them featured in an “Accidentally Vegan” column in Veg News a few years ago, and they are soy-based. In a quick glance at the website, it appears you can bake with them. I think they might work in this recipe, and that would make these muffins vegan, but not soy-free. If anyone tries that, will you please let me know?


    All the magic is in the crumbs. Photo by J. Andrews
    All the magic is in the crumbs. Photo by J. Andrews

    Allergy-Friendly Bacon “Cheddar” Muffins

    Makes 10 muffins and probably a bit more than double the amount of flour mix you need for this recipe.

    First, make a flour mix by weight. This one is based on the Gluten-Free Girl’s Whole Grain Flour Mix formula (and just in case you think it might also be the magic muffin solution, it doesn’t work well for blueberry muffins. I tried it and was disappointed. It is perfect for these savory muffins, though.):

    • 110 g sorghum flour
    • 115 g quinoa flour
    • 125 g brown rice flour
    • 75 g tapioca starch
    • 75 g potato starch

    Cook about 10 strips of bacon (or, if you’re me, fill your cast iron skillet, and call it good. That’s between 5 and 8 strips of bacon, depending on how wide they are and how creative I can arrange them).

    Mix the dry ingredients:

    • 1 3/4 cups flour mix
    • 2 1/2 teaspoons baking powder
    • 1/2 teaspoon salt
    • 2 Tablespoons sugar
    • 1/2 cup Daiya cheddar cheese shreds
    • 10 slices of bacon, cooked and crumbled

    Mix thoroughly and make a well in the center of the dry mix. Then, separately, mix the wet ingredients:

    • 1 chia egg (1Tablespoon of ground chia seeds and 3 Tablespoons of water — mix these first)
    • 3/4 cup non-dairy milk (I generally use almond)
    • 1/3 cup oil (I used canola)

    Add the wet ingredients to the dry, and mix until well-combined.

    Scoop into lined muffin tins, and bake 25 minutes, or until a toothpick comes out of the center of a muffin clean. Goes well with coffee. Store loosely covered for up to 3 days, or freeze to keep longer.

    I'm just putting this photo out there because I kind of love it. Photo by J. Andrews
    I’m just putting this photo out there because I kind of love it. Photo by J. Andrews
  • Cure Your Own Salt Pork

    Two of three ingredients needed to cure salt pork - because uncooked salt pork isn't that attractive
    Two of three ingredients needed to cure salt pork – because uncooked salt pork isn’t that attractive

    Since the corn allergy apocalypse, I’ve been making my own baked beans and pressure canning them so they will be relatively free of corn ingredients. Except I’ve been cheating a bit *hangs head in shame* — I’ve been using salt pork from the grocery store which has dextrose and sodium erythorbate, which are corn ingredients. I figured it was only a little bit in each jar (dumb, dumb, please don’t follow my example). But after learning how to cure bacon, I thought, hey, salt pork can’t be that hard right? And then I did some Google-fu and found out that, in fact, making some salt pork would be easier than making the bacon. So I had to do it, because the cleaner I eat, the less full my allergy bucket is, and the better off I am when I have a bigger exposure to something, and the healthier I feel.

    Salt Pork

    • 1 pound boneless pork belly cut into half inch thick slices, between 1-2 inches long (I removed the skin, but it’s up to you)
    • 1/2 cup kosher or non-iodized salt (the stuff they use to iodize the salt is dextrose, a.k.a. corn, get stuff with no other ingredients but salt.)
    • 2 Tablespoons cane sugar

    Mix the salt and the sugar in a bowl.

    Pork belly sliced into half inch thick pieces
    Pork belly sliced into half inch thick pieces

    Use some of the salt and sugar mixture to rub or dredge the pork belly slices.

    Pork belly slices dredged in salt and sugar mixture
    Pork belly slices dredged in salt and sugar mixture

    In a glass, ceramic, or stainless steel container (I used Pyrex), spread a layer of the salt and sugar mixture. Place a layer of the sugar and salt coated pork belly sliced on top of the layer of the salt and sugar mixture.

    Dredged pork belly slices on salt and sugar mixture layer
    Dredged pork belly slices on salt and sugar mixture layer

    Sprinkle more of the salt and sugar mixture on top and add another layer of pork belly slices. Continue alternating the pork and salt and sugar mixture until you don’t have any pork belly slices left. Sprinkle the remaining salt and sugar mixture over the top of the pork belly slices.

    Completed layers of pork belly slices and salt and sugar mixture
    Completed layers of pork belly slices and salt and sugar mixture

    Cover the container with a lid or some plastic wrap and refrigerate it. The pork belly slices will be cured and ready to use in 2-3 days.

    Pork belly slices after curing for 2 days in fridge
    Pork belly slices after curing for 2 days in fridge

    Rinse the salt and sugar mixture off of the salt pork slices. Pat them dry with a paper towel.

    Salt pork rinsed and patted dry on paper towels
    Salt pork rinsed and patted dry on paper towels

    They are now ready to use in your beans, chowders (non-dairy of course) or stews, or you can store them in a resealable plastic bag in your freezer.

    Salt pork in a resealable plastic bag ready to go into the freezer
    Salt pork in a resealable plastic bag ready to go into the freezer

    Enjoy!