Notice: Function _load_textdomain_just_in_time was called incorrectly. Translation loading for the wp-ultimate-recipe domain was triggered too early. This is usually an indicator for some code in the plugin or theme running too early. Translations should be loaded at the init action or later. Please see Debugging in WordPress for more information. (This message was added in version 6.7.0.) in /home/maryzahc/public_html/adultfoodallergies.com/wp-includes/functions.php on line 6121
beef – surviving the food allergy apocalypse (archive)

Tag: beef

  • Ox Tail Noodle Soup

    Ox Tail Noodle Soup

    It’s Elements Month! Yeah, you read right. Elements. Earth, Fire, Air, and Water. Four Mondays in November, four elements to be inspired by. Why not?

    This year, we made a plan via Skype — monthly themes to inspire us. We used to get together more often to plan our editorial calendar, but now we do it via Skype, bi-coastally. It is distinctly possible that we were a little loopy by the time we got to November, so here you have ELEMENTS MONTH.

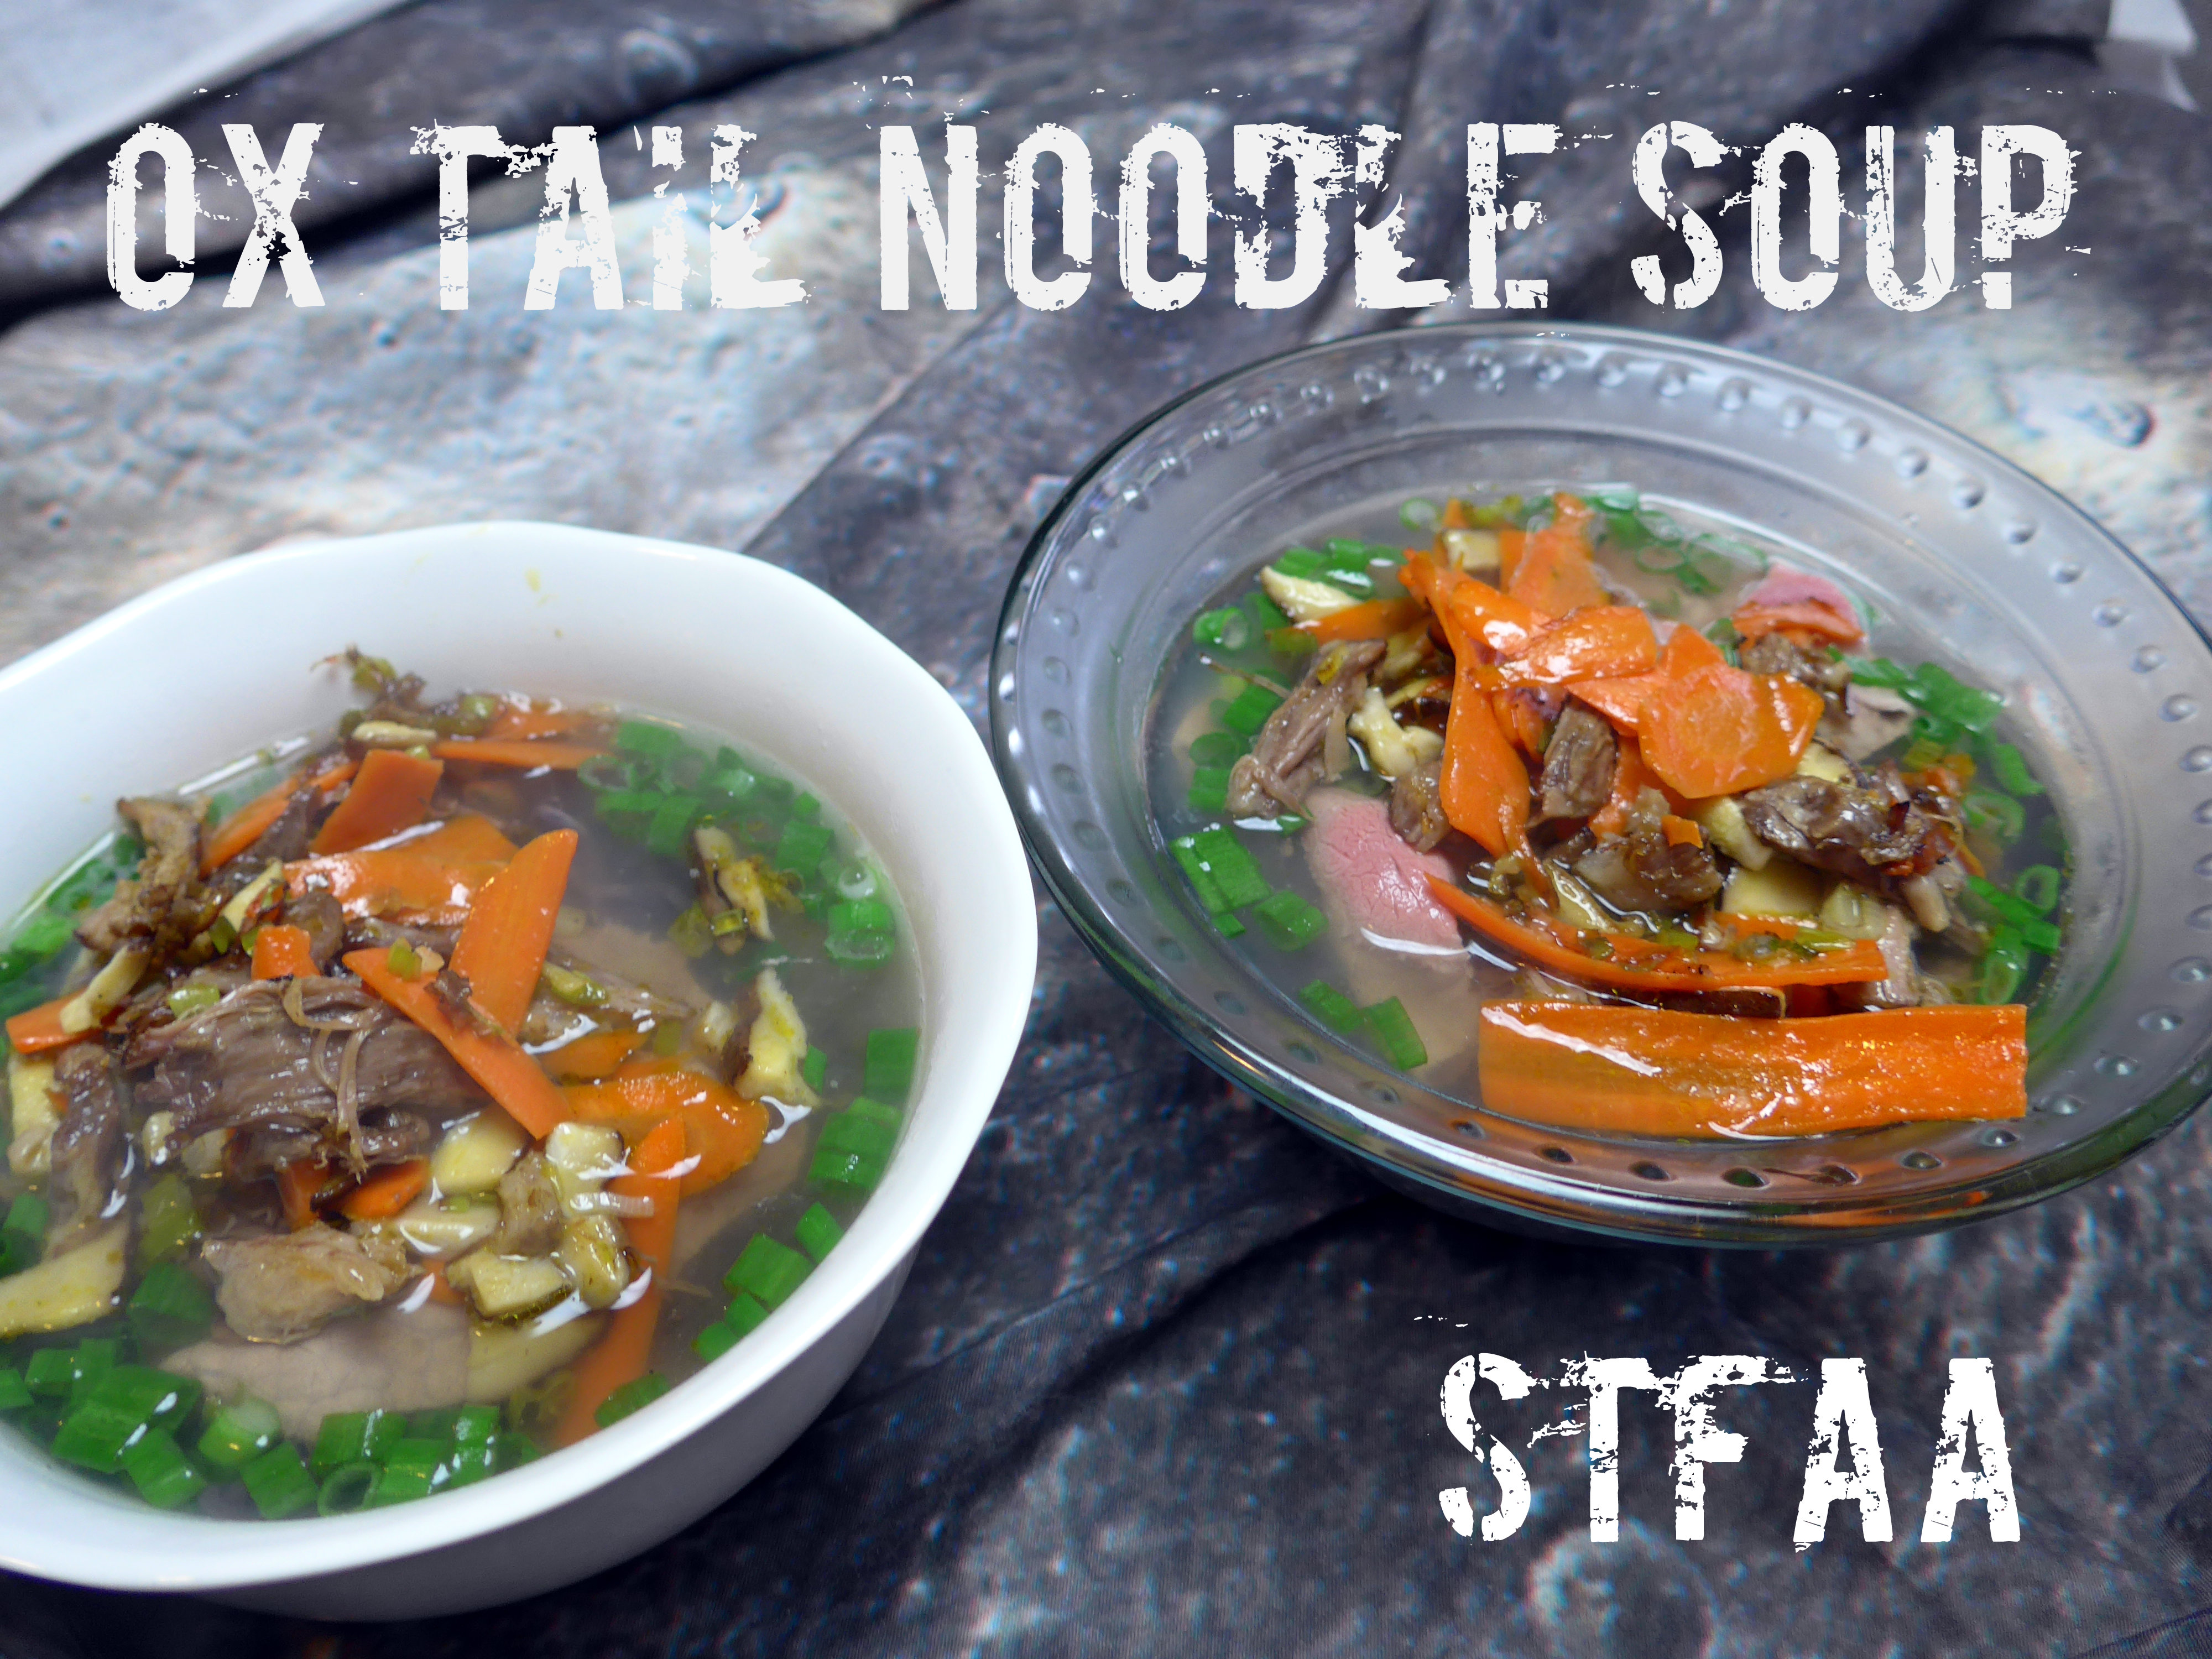
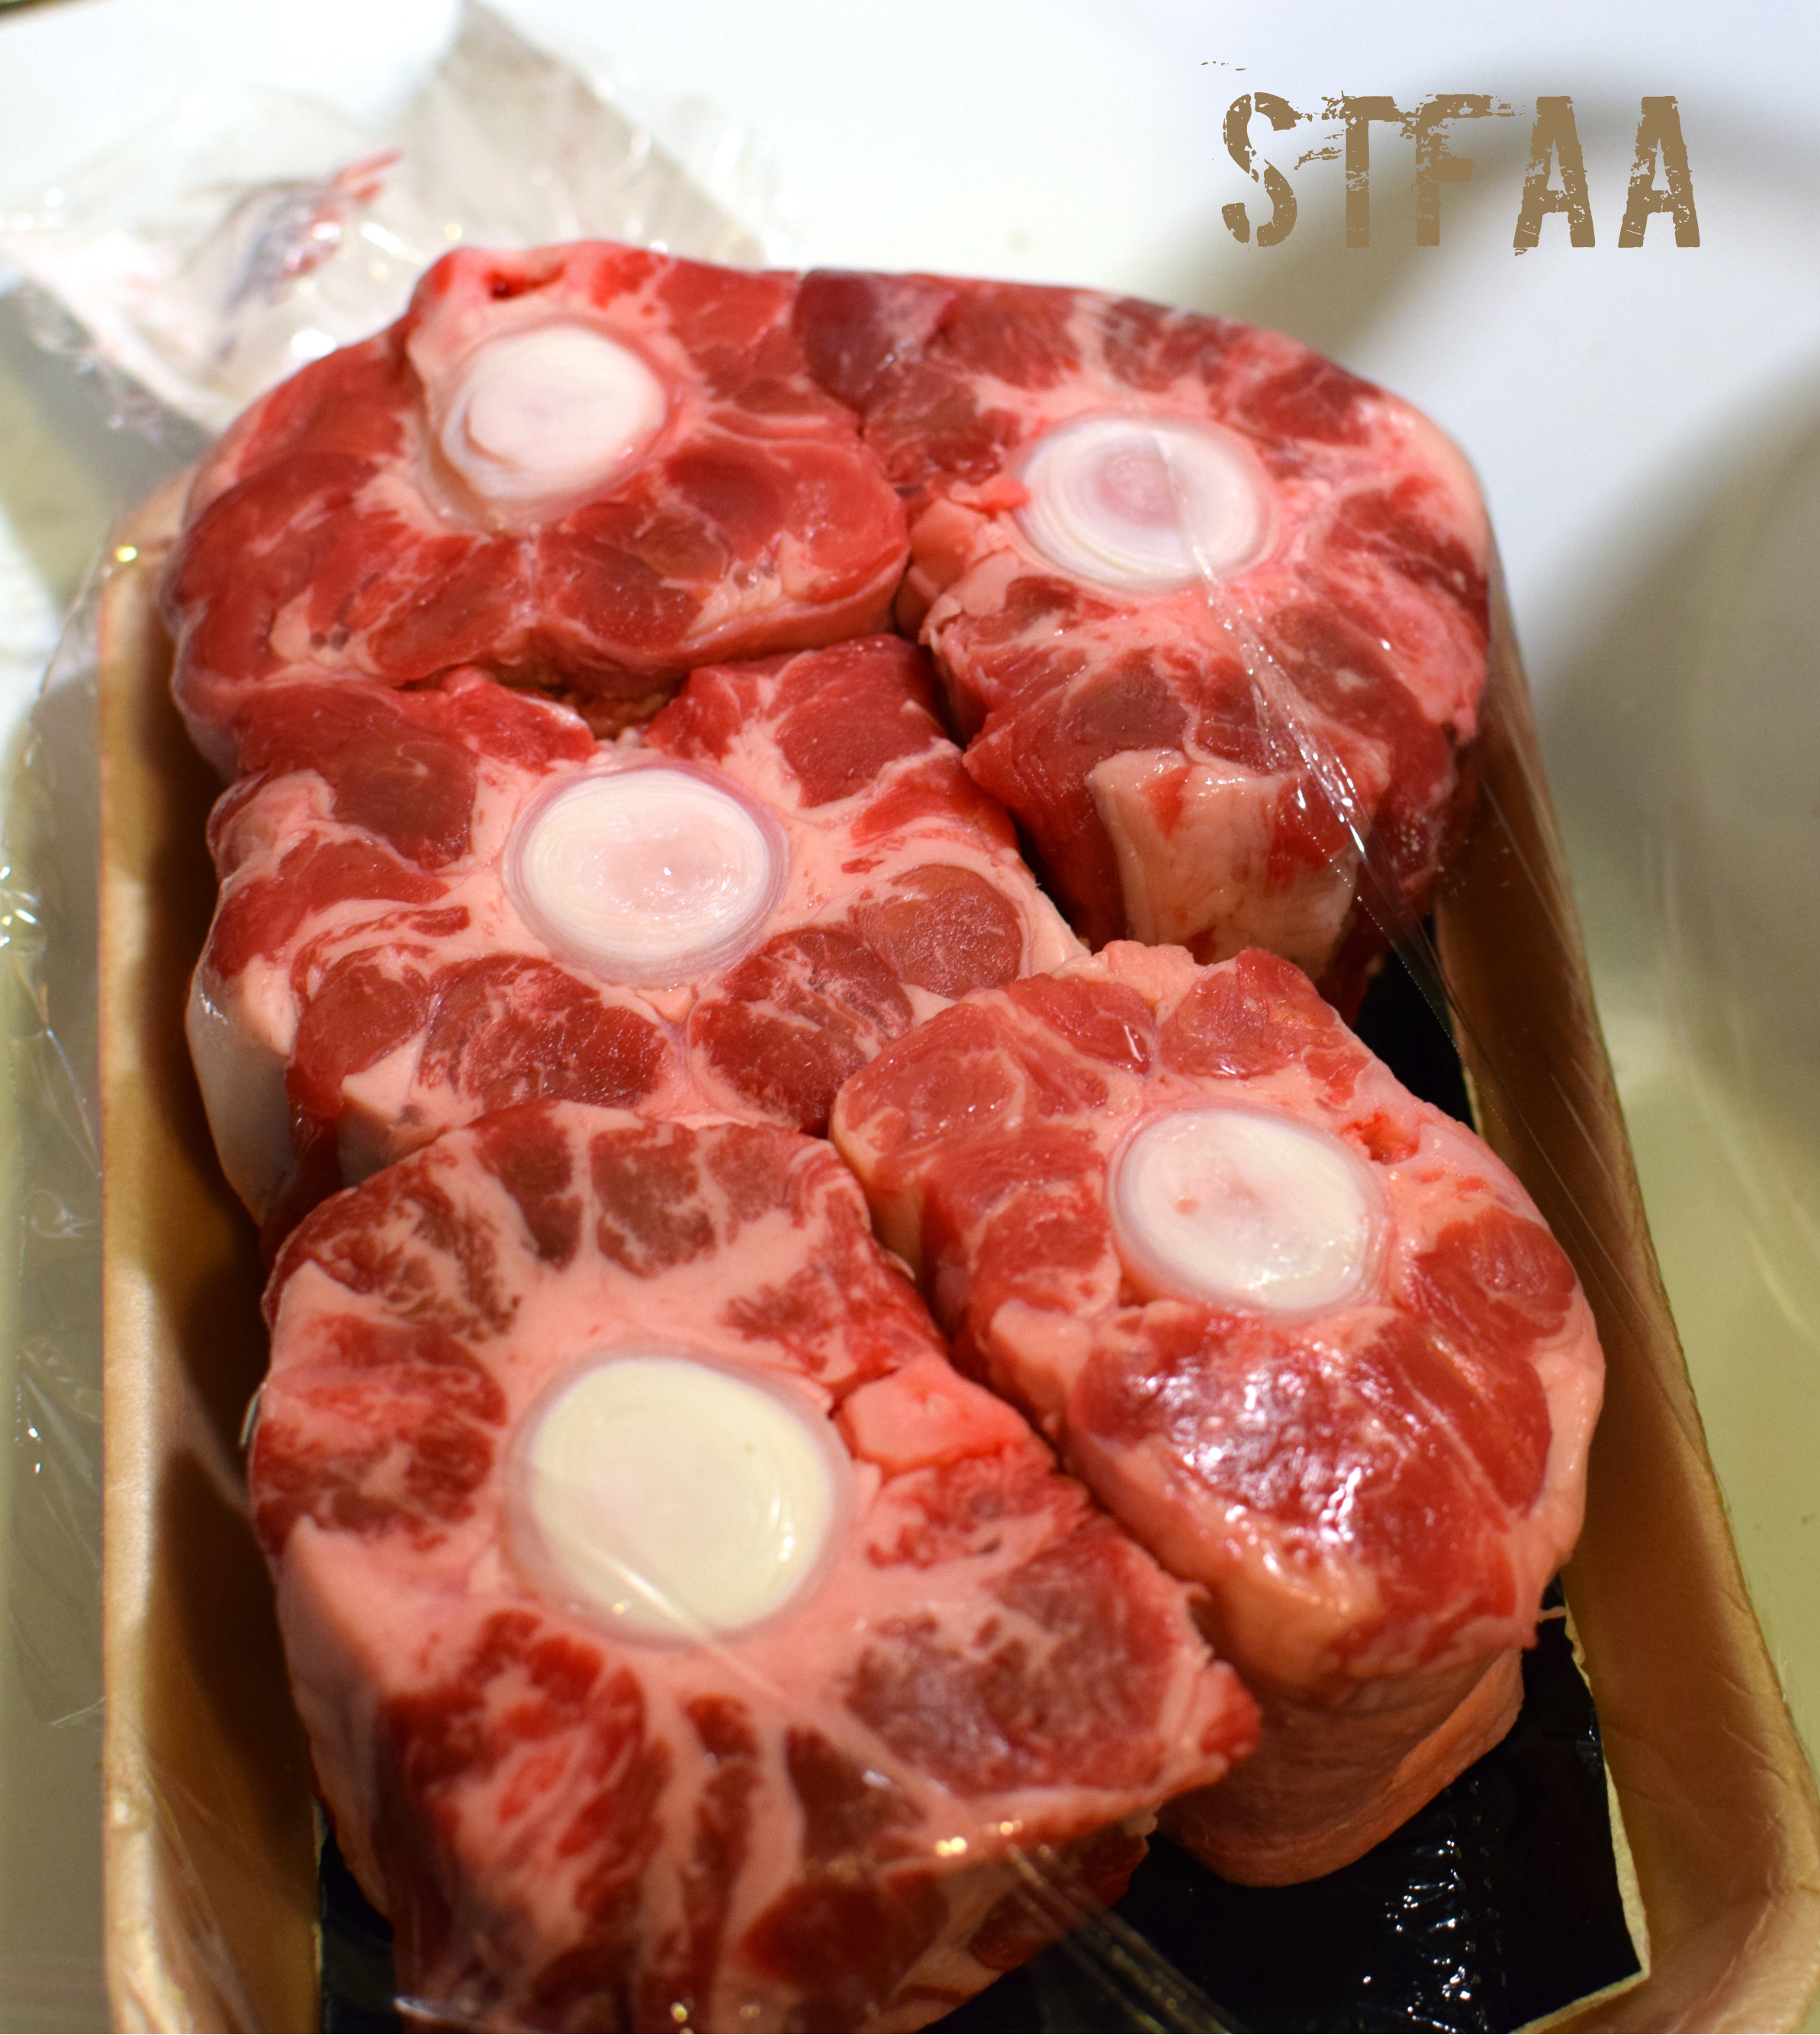
    I’m kicking it off with water. After all, Cancer is a water sign, right? Plus it’s November and it snowed all weekend and we are ready for soup. I was inspired by a broth my friend Ann told me about which basically used time to extract maximum flavor from ox tails, an excellent flavoring bone that has some good tender meat on it as a bonus, and a few simple vegetables. This broth is easy, but it takes time. You should definitely make it ahead of when you want to use it. Ox tails should be available from most butchers and many grocery stores can get them or have them in the back. Ask.

    5 Oxtails on a Styrofoam tray
    Oxtails

    The only other “special” ingredient would be the thinly sliced beef, something I’ve gotten used to being able to get — raw meat sliced as thinly as cold cuts wasn’t something I’d seen on the east coast, but it means that the broth’s heat will cook it as part of your soup and it adds a whole other dimension to the soup. If you can’t get it, skip it, but it is worth trying to find or cut on your own.

    Ramen, Thinly-sliced Beef, Toppings

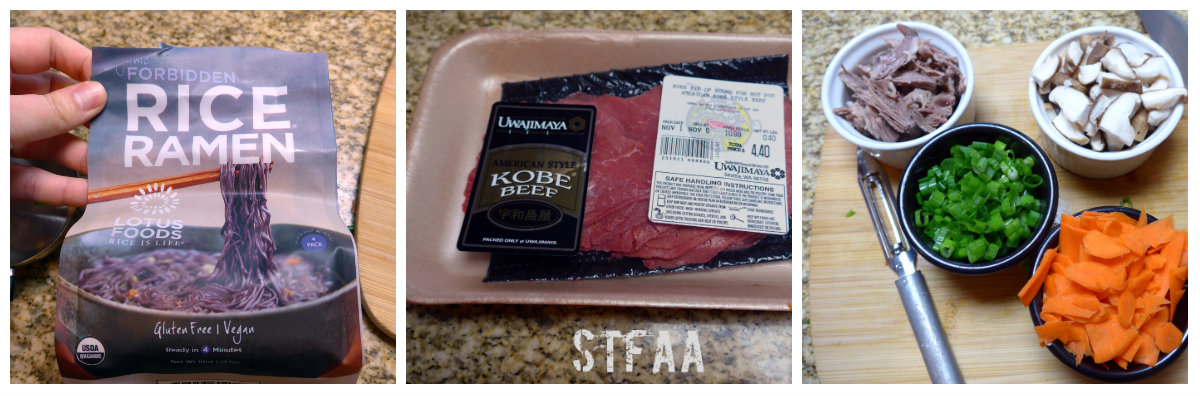
    Oh! The noodles! I’ve found gluten-free ramen noodles at a few places in Seattle, including Whole Foods, the Capitol Co-op, and a few natural food stores. The ones in this dish are forbidden rice noodles. If you can’t find gluten-free ramen, I’d suggest using rice noodles of some sort, but not gluten-free spaghetti. Most grocery stores carry pad thai rice noodles in their “Asian foods” section, and those will work okay.

    This recipe is two parts — first, you make the broth, which should be done at least the day before. Then you use the broth to make soup. The broth is incredibly simple, but takes about 4 hours to make just because you simmer everything forever. The soup is actually kind of complicated, as I spent a lot of last month learning about ramen, and I’ve used that knowledge here. For traditional ramen, the broth, noodles, and soup toppings are all cooked separately. I’ve used that here to make a soup with a great variety of textures — but know that this is a soup that you might want to just take your time and enjoy making as well as eating. Don’t try it on a work night or when you’re rushed.

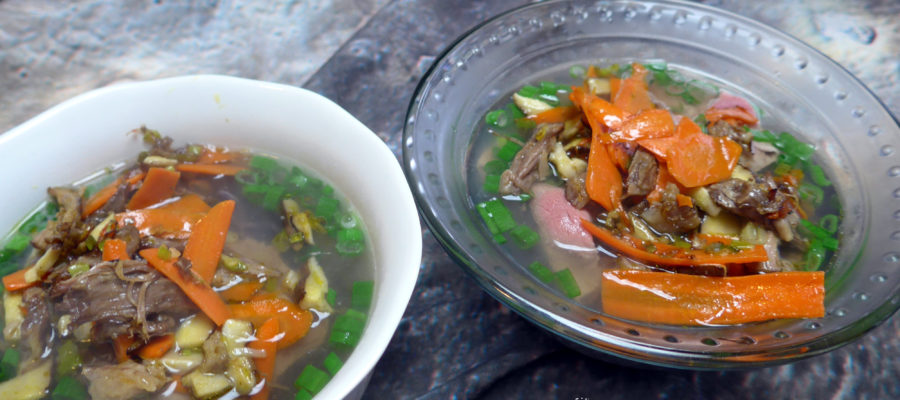
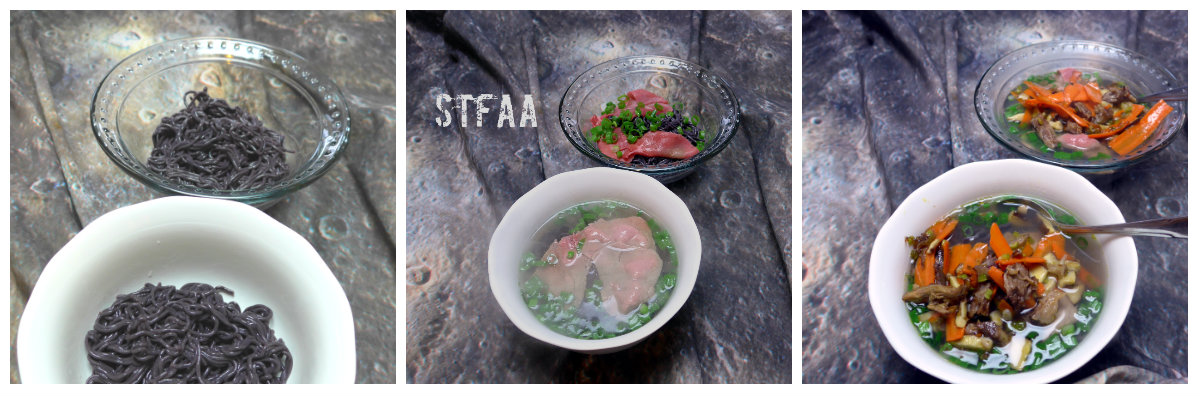
    As I’ve said in the recipe, this soup will be made in two pots and a skillet, all at once, and I’ve tried to give you good instructions to get through that if you’re not used to 3 things going at once. The soup comes together in layers, as shown below, and that gives you a variety of textures.

    Soup steps: first, noodles. Second, raw beef and scallions. Third, broth. Fourth, skillet of toppings.

    Notice: Trying to access array offset on value of type bool in /home/maryzahc/public_html/adultfoodallergies.com/wp-content/plugins/wp-ultimate-recipe/helpers/models/recipe.php on line 254
    Ox Tail Noodle Soup
    Print Recipe
    Broth recipe probably makes about 5 servings, but this soup less than half. Use the rest for drinking, cooking grains, or more soup.
    Servings
    2 bowlsn
    Servings
    2 bowlsn
    Ox Tail Noodle Soup
    Print Recipe
    Broth recipe probably makes about 5 servings, but this soup less than half. Use the rest for drinking, cooking grains, or more soup.
    Servings
    2 bowlsn
    Servings
    2 bowlsn
    Ingredients
    Ox Tail Broth
    • 2 lbs ox tails
    • cold water to cover the ox tails by about an inch
    • pinch salt
    • 1 whole roma tomato washed
    • 1 celery stalk
    • 1 carrot
    • 1 onion quartered
    • 5 sprigs parsley, leaves only
    Ox Tail Noodle Soup
    • 2 cups ox tail broth fat skimmed off top
    • water enough to cook your noodles
    • 2 cakes gluten-free ramen noodles
    • 1 Tablespoon fat (I used the fat from the broth)
    • 4 scallions thinly sliced, whites and greens separated
    • 2 carrots sliced as thinly as possible
    • 5 shitake mushrooms chopped
    • pinch salt
    • 1/2 cup ox tail meat pulled from bone, excess fat and cartilege removed
    • 3 slices steak thinly sliced for hot pot – optional but awesome.
    • 1 lemon cut into quarters
    Servings: bowlsn
    Instructions
    Ox Tail Broth
    1. Put the ox tails in a large stock pot and cover with cold water by about 1 inch. Add a generous pinch of salt. Put over low heat, about 2 on my electric stove. NOTE — it will take more than half an hour for the water to simmer. Low and slow is how the flavor comes out.
    2. Meanwhile, prep the vegetables. Wash the tomato, carrot, and celery. Chop the carrot and celery really roughly — about 2 inch segments. Leave the tomato whole. Pull all the parsley leaves off the stalks and discard the stems. Peel and quarter the onion.
    3. When the water has reached a steady simmer, add all the veg. Simmer for three hours. If it gets foamy, skim it.
    4. Cool and remove the ox tails to store separately. Remove the vegetables and discard. Store the broth in the fridge overnight.
    Ox Tail Noodle Soup
    1. You will need three cooking pots for this. One for boiling enough water to cook the noodles. One for heating your broth. One skillet for cooking your soup toppings. Figure out which burners will work best for this setup before you start, as you’ll be using all of them at once.
    2. Get the broth started. You want to reheat this on low until it’s about boiling, so it will take a while.
    3. First, do all your veggie prep. Chop the scallions and separate the green and white parts (light green goes with the white). Chop the mushrooms, slice the carrots as thinly as possible. Remove the meat from the ox tails — you will likely need to cut the fat off the outside, and watch out for the cartilage on the inside — remove that.
    4. Add about half of the green parts of the scallions to the broth. Measuring here is really not important. Eyeball it.
    5. You can either skim the fat off the soup and use that to fry up the veg, or use a fat of your choice. Put this in your skillet over medium heat.
    6. Next, start the noodle water. Use however much water your package directions show.
    7. When you skillet and fat are hot, add the onions and stir for several minutes until translucent.
    8. Next add the carrots and mushrooms and stir well. Add a generous pinch of salt. Wait until the mushrooms have wilted and given off their liquid before you start the noodles.
    9. Cook your noodles according to the package directions.
    10. Right before the noodles are done, add the ox tail meat to the skillet and stir well.
    11. Drain your noodles and set up your bowls.
    12. Here’s how your bowls go: Add noodles at the bottom. Add a thin layer of your raw beef. This will be cooked by the broth. Add your broth. Add the toppings from the skillet. Add a squeeze of lemon over everything. Enjoy.
    Share this Recipe
     
    Powered byWP Ultimate Recipe
  • Meatballs with Mushrooms, Onions and Spaghetti Squash

    Meatballs with Mushrooms, Onions and Spaghetti Squash

    Meatballs and Squash
    Meatballs and Squash

    I’m not sure if you’re ready for hot food, but I really am. In order to get ready for work after a week of vacation, I needed something hearty but not heavy. Spaghetti squash seemed to fit the bill with some meatballs and mushrooms and onions. It seems I reach over and over again for mushrooms and caramelized onions every time I need comfort food or hearty food — do you have go-to ingredients that help you face the world? Because mine are apparently mushrooms (which Denise hates) and onions. They’re so earthy and grounded.

    Spaghetti squash is weird, and while I don’t think it’s actually a substitute for pasta, it is a good vehicle for some thinner sauces. Putting the squash in the pan to soak up the meatball fats and the onion oil means you lose none of the flavors. It’s possible that this dish is even paleo-friendly, but I won’t claim to know the rules behind that diet. If you want a little less fat in the sauce, drain the pan after sauteing the meatballs or scoop up the onions, mushrooms, and meatballs with a slotted spoon and put them on the squash.

    This dish will fortify you and make you ready to face the rest of summer.


    Notice: Trying to access array offset on value of type bool in /home/maryzahc/public_html/adultfoodallergies.com/wp-content/plugins/wp-ultimate-recipe/helpers/models/recipe.php on line 254
    Meatballs with Mushrooms, Onions, and Spaghetti Squash
    Print Recipe
    An earthy but not too heavy dish to make you ready to face anything.
    Servings Prep Time
    4 people 15 minutes
    Cook Time
    90 minutes
    Servings Prep Time
    4 people 15 minutes
    Cook Time
    90 minutes
    Ingredients
    • 1 medium spaghetti squash football-sized
    • 2 Tablespoons olive oil
    • 1 large sweet onion quartered and sliced thin
    • 1/2 teaspoon kosher salt divided into two 1/4t servings
    • 1 8 oz. package mushrooms broken into pieces
    • 1/2 pound ground beef (I prefer 85/15 mix)
    • 1/2 pound ground pork
    • 1 teaspoon oregano
    • 1 1/2 teaspoon basil
    • 2 Tablespoons fine bread crumbs or starch-based gluten-free flour
    • fresh ground pepper, to taste
    • 1 Tablespoon water
    Servings: people
    Instructions
    1. Pre-heat oven to 400°F. Poke a hole in a spaghetti squash and throw it in the oven, on the rack. Bake for an hour. (You can also slice it in half and bake it for 30-45 minutes. I prefer the lazier approach. Learn more from the link in the notes.)
    2. Heat the olive oil in a skillet over medium-low heat (cast iron is best for making great caramelized onion). When it’s hot, add the onions and 1/4 teaspoon salt. Stir well, to coat all the onion with oil, and then cook, stirring occasionally, for about 45 minutes.
    3. Meanwhile, make the meatballs by mixing the beef, pork, oregano, basil, and bread crumbs or starchy gluten-free flour. Because they will be more tender if you work the meat less, I break up the meats first, sprinkle the seasonings over, and then lightly mix before forming ping-pong ball-sized meatballs. I get about 14 meatballs from a pound of meat.
    4. Your squash is likely done now. Take it out and let it cool. As soon as you can, slice it in half to let it cool more.
    5. When the onions are beginning to get a pretty caramel brown, push them all to the sides and add the meatballs. You might need to do this in two batches to have enough room to stir.
    6. When the meatballs are browned on most sides, add the mushrooms, the second 1/4 teaspoon of salt, pepper, and the water. Stir well (but gently — the meatballs are still delicate) and cover for about 5 minutes. When the mushrooms have started to cook, stir again, and cover for another 5 minutes.
    7. Taste and adjust seasonings if necessary.
    8. Scoop out the seeds and pulp. Then scoop out the squash and stir it in to the skillet. You will be able to see when it’s soaked up the sauce, and then it’s ready to serve.
    Recipe Notes

    If you’ve never cooked spaghetti squash before, check out this lesson from The Kitchn.  You can also check out Denise’s Meatball Sub Meatballs recipe, if you like a more substantial meatball. Mine is a streamlined version for a quick meal.

    Share this Recipe
     
    Powered byWP Ultimate Recipe
  • Cider Pot Roast

    Cider Pot Roast

    Cider Pot Roast plated with carrots, onions, and mashed potatoes
    Cider Pot Roast

    While I know there are people out there who dream of steak dinners, prime rib, or some other fancy cut of cow, my all-time favorite beef dinner is a good pot roast. I’ve been wanting to post a pot roast dinner to the blog for years now, but I hadn’t figured out how to get the right flavor and texture.

    Pot roast should be falling apart, fork-tender meat. The onions and carrots should be flavorful, and the braising liquid should be able to be a gravy with no added flavor, only thickening (and I almost never bother).  I have made countless pot roasts that have not met this bar. I’ve tried gluten-free beer, wines, beef and chicken broth, and seasoned water. Eh.  Everything was edible, but nothing was great.

    This time, I tried hard apple cider, Farnum Hill Dooryard Cider, in fact, which is local to New Hampshire. I’m not sure how easy it might be to find elsewhere, but it is gluten-free and safe for me. This cider tends towards dryness, rather than sweetness, which is ideal for this application. See what you can find, and make sure you taste it before cooking with it.

    When I tasted this, I ended up going in a slightly different direction with herbs. I did try this with the more traditional thyme, and it was good, but oregano and apple cider was the winning combination for me. Another good reason to taste your ingredients!

    Cider pot roast prep
    Preparing pot roast for baking. Keen eyes may pick up that this is the thyme-covered roast, not the oregano in the recipe. You’d be correct — this photo just turned out much better.

    The beef is browned before baking, and it’s cooked with browned onions and carrots, and served over simple smashed potatoes. The recipe lists 3 carrots, but honestly, add as many as your casserole or Dutch oven will hold, as they are amazing. If you prefer to enrich your potatoes with safe margarine and non-dairy milk, feel free — I think they soak up more pan juices without those, though. Anyway, I hope you enjoy this recipe as much as I do.


    Notice: Trying to access array offset on value of type bool in /home/maryzahc/public_html/adultfoodallergies.com/wp-content/plugins/wp-ultimate-recipe/helpers/models/recipe.php on line 254
    Cider Pot Roast
    Print Recipe
    This is the pot roast of my childhood — tender meat that you don’t need a knife to eat, slathered in onions, best served over mashed potatoes. In this recipe, I found that hard cider made a good gluten-free substitution for beer.
    Servings Prep Time
    4 people 3 hours
    Cook Time Passive Time
    2.5 hours 2.5 hours
    Servings Prep Time
    4 people 3 hours
    Cook Time Passive Time
    2.5 hours 2.5 hours
    Ingredients
    • 1 medium (baseball) onion
    • 1 Tablespoon fat olive oil, bacon fat, whatever you want to use is good here
    • 1.5 lbs. boneless chuck roast
    • salt and pepper to taste, but be generous
    • 3 carrots (actually,I’d add as many as your pot will hold, cut into large chunks)
    • 1 teaspoon oregano
    • 1 cup hard apple cider make sure your brand is safe for you
    • 1/4 cup water
    • 1 lb. potatoes, mashed make them however you like them
    Servings: people
    Instructions
    1. Turn your oven on at 325 degrees Fahrenheit.
    2. If you have a stove-top to oven-safe dutch oven or other casserole, this is a good recipe to use it. I do not, so I start out in a skillet, and then transfer to a lidded casserole dish. Either way, heat your pan over medium heat, and add the oil or fat.
    3. When the oil is hot, add the onions, frying until they start to brown. When they are all translucent and/or browning (15-20 minutes, stir regularly), remove from the pan. If you’re using a casserole for the baking, transfer them directly there (I advise you lightly grease the dish AND lid).
    4. Turn up the heat just a bit (medium-high). Salt and pepper all sides of your roast liberally, and use freshly ground pepper if you can. Then brown each side. You don’t have to brown the short sides, but it tastes better if you do. Plan on 3-5 minutes per side.
    5. Now either add the browned beef to your greased casserole dish that has onions at the bottom, or add the onions back to the pot (but not on top of the beef). Add your carrots around the sides of the beef.
    6. Sprinkle the oregano over the top of the dish. Then add the cider and water along the side. I like to have the herbs bake to the top of the meat, so don’t wash them off with the cider.
    7. Cover and bake the pot roast for 2-3 hours. Two and a half is a good estimate, as it gives the meat time to braise and for all the fibers in the meat to break apart. Check on it at 2 hours for two things — using a meat thermometer, see if it’s done (170F/77C for well done, and this is pot roast), and then see if the meat is tender. Cook longer if needed. You can definitely turn off the oven and let the casserole continue in the pre-heated oven for the last 30 minutes, provided that the meat has reached its internal temperature.
    8. For the potatoes, I prefer the simplest preparation — cook whole potatoes in salted water until a knife stuck through the center shows they are done. Then drain and smash, adding nothing. These are the perfect potatoes for absorbing other flavors, as the texture is a bit fluffier than traditional mashed potatoes. But make the potatoes you love.
    9. Serve meat and onions and carrots over potatoes, with plenty of the juice from the pan.
    Share this Recipe
     
    Powered byWP Ultimate Recipe
  • Rice Vermicelli Salad Bowls with Beef

    Steamed Rice Vermicelli Salad Bowls with Beef
    Rice Vermicelli Salad Bowls with Beef

    I love Vietnamese food. Seriously, I love it. Before the corn allergy, our local Vietnamese joint could recognize my voice before I even finished stating that I wanted to order takeout. The owner knew my name and my husband’s name, and what we generally ordered. If Shawn forgot what I wanted when stopping in to pick up dinner on his way home from work, the owner could reel off my five or so favorite dishes until Shawn heard the one that jogged his memory.  I used to get #23 with Beef, i.e. Steamed Vermicelli Patties or Banh Hoi, that you wrap up in rice paper yourself, probably more than fifty percent of the time. So it was inevitable that I figure out how to make it myself in a way that’s safe for me. However, I didn’t actually do the rice paper and make my own fresh/salad rolls, because it’s winter (yes, I know it’s technically spring, but that’s not what’s outside and it snowed yesterday), I just moved, and I’m really tired. It’s all the good stuff without the rice paper wrapper, that’s all.

    Rice Vermicelli Salad Bowls with Beef

    Serves 4 or 2 really hungry people with maybe enough for a bit of lunch the next day.

    Beef and Marinade:

    • 1 and 1/2 pounds of beef sirloin beef tips, sliced across the grain into pieces about 1 1/2 to 2 inches long and 1/4 inch wide
    • 1 garlic clove, minced and crushed to a paste (if you don’t have a garlic crusher, just mince it and smoosh it with a metal spoon)
    • 1 shallot, finely minced, or 1/4 of a small onion, finely minced
    • 1 Tablespoon of brown sugar
    • 2 Tablespoons of oil (make sure it’s safe for you, I used grape seed oil)
    • 1 Tablespoon of soy sauce (I do well with San-J Tamari Gluten Free Soy Sauce, the alcohol is from cane sugar not corn), but if you can’t use soy, try Mary Kate’s recipe for a Soy-Free, gluten-free “Tamari Sauce”
    • 1 Tablespoon of Sriracha (I use my own homemade from this recipe, but I use rice vinegar instead of distilled)
    • a bit of oil for frying

    Salad Fixings:

    • 1 – 8 ounce package of fine rice vermicelli (for reference, this is what I used, no affiliation with Amazon, just ease of linking)
    • Scallion Oil Garnish (here’s the recipe, although I used grape seed oil)
    • fresh mint or fresh thai basil or both
    • Spring Mix lettuce
    • tomatoes, sliced
    • cucumbers, sliced
    • bean sprouts (I didn’t use them, but just because the grocery store didn’t have them today)

    Condiments of your Choice:

    Slice your beef to the correct thinness and length if you haven’t already.

    Sirloin beef tips, sliced into smaller pieces, cut across the grain
    Sirloin beef tips, sliced into smaller pieces, cut across the grain

    Place garlic, shallot (or onion), brown sugar, oil, soy sauce and Sriracha in a bowl large enough to place the sirloin tips.  Mix the ingredients well so that the sugar dissolves.

    Marinade, well combined.
    Marinade, well combined.

    Add the beef and stir well.  Set the beef aside let it marinate while you work on the rest of the dish.

    Beef combined with marinade.
    Beef combined with marinade.

    Fill a large pot with 3 quarts of water and bring to a boil. Once boiling, add your rice vermicelli and let boil for 3 minutes. Drain and place in a bowl to cool.

    Rice vermicelli cooling.
    Rice vermicelli cooling.

    In a skillet (I used a cast iron wok, because it’s new and I wanted to play with it, but you can use a cast iron skillet or other skillet), heat a bit of oil over medium heat. When the oil is hot, place the beef in the skillet, making sure not to crowd, or have more than one layer.

    Beef cooking in cast iron wok
    Beef cooking in cast iron wok

    You may (will) need to do it in batches. When you have a nice sear on one side, flip the beef over and sear the other side. Tongs really help for this. Depending on your skillet and your stove, it’ll take 2-4 minutes a side to sear (this make take some experimentation on your part). You might want to put the beef on a plate as you do batches.

    Beef on a plate after being cooked in batches
    Beef on a plate after being cooked in batches

    Once you have finished cooking the beef, it’s time to assemble your salad bowl.  Place some of the vermicelli in the bowl (you may need to cut it, as the noodles are long). Add the other salad fixings of your choice, and some of the beef.  Then add the condiments of your choice and voila!

    Steamed Rice Vermicelli Salad Bowls with Beef
    Rice Vermicelli Salad Bowls with Beef


    Almost like the old days!

  • Citrus-spiced Beef Short Ribs

    Citrus-spiced Beef Short Ribs with mashed potatoes and green beans
    Citrus-spiced Beef Short Ribs with mashed potatoes and green beans

    There are two times of the year when I want to eat like the midwesterner I am — dead of winter, and height of summer. And by that, I mean there are two times of the year when I think of meat, first, and then figure out what goes with it. In the summer, I just want to grill things. But in the dead of winter, I want hearty meat and potatoes and veg meals. When I was at the grocery store browsing the meat section, I found some beef short ribs that just looked good — I’d never cooked beef ribs before, nor short ribs of any sort, but trying new things is sort of the point of this blog. So I bought them.

    I looked up some things online — a few recipes for beef short ribs in particular, as well as some technique-focused posts on braising. I followed this post for the cooking technique, more or less. And I decided to go with a sort of sweet-and-spicy, braised in the oven beef dish. It was definitely a winner, and this is a perfect mid-winter dinner — it’s hearty and warm and sort of comforting. I highly suggest serving with mashed potatoes, and I added green beans for the vegetable. I’m thinking that bok choy might taste great with the sauce, though.

    A note on the sauce — the beef gets just a hint of the spice of the red pepper flakes. The sauce itself, which still contains the actual flakes, is a good deal spicier. Adjust the measurement according to your tastes.

    Ideally, use one covered pot or pan that you can do the stove top searing and then the oven braising in — fewer dishes is good for sanity and the environment, plus all the flavor stays together. If you have a Dutch oven, this is the time to use it. As soon as I sort out enough stuff in my storage area to create space to store one, I am buying one. I used my cast iron skillet and covered it tightly with foil as it doesn’t have a lid. This worked great, although I do need to re-season after cooking with an acidic citrus juice for a few hours. It was worth it.

    Citrus-spiced Beef Short Ribs
    Citrus-spiced Beef Short Ribs

    Citrus-spiced Beef Short Ribs

    • 1.5 lbs beef short ribs, bone in, separated into individual bones
    • salt and pepper to season the ribs
    • 1/2 of a medium (baseball-sized) onion, halved and sliced thin (I prefer sweet onions)
    • large pinch of salt (probably about 1/8 teaspoon)
    • 1 Tablespoon of minced garlic
    • 1/2t – 2t crushed red pepper flakes, adjusted to taste
    • 1 teaspoon sugar (optional)
    • 1 large grapefruit, juiced, with pulp in OR 1 cup of grapefruit juice
    • 1.5 inches of ginger, peeled and sliced into rounds
    • 2 Tablespoons coconut amino acids, gluten-free tamari, or faux soy sauce
    • 1/2 cup warm water

    Preheat the oven to 325ºF.

    Heat your chosen cooking vessel over medium high heat. If you’re not using a seasoned cast iron pan, brush or spray just a light coat of oil on the pan’s surface.

    Season your short ribs with salt and pepper, both sides. When the pan is hot, add the ribs. Sear well on both sides, and I also seared the edges of the few really thick ones. More flavor is always worth the effort. Remove the seared ribs to a plate.

    Add the onions with a pinch of salt, and cook until translucent. Then add the garlic and cook, stirring, until starting to turn golden. Add the pepper flakes and stir (but also, stand back and don’t breathe the steam right away!). Scooping all of this to one side of the pan, add the ribs back and then spread the onion-garlic-pepper mix over them.

    If using, sprinkle the sugar on the ribs. Scatter the ginger slices, add the coconut aminos, and then add the grapefruit juice and water. Cover your pot or pan, and slide it into the oven. Cook for 2.5 hours.

    After removing from the oven, let the dish sit for at least 15 minutes. I then sliced through the thin membrane holding the meat to the bones so I could just serve the meat. Serve topped with the pan sauce, but leave the ginger rounds out.

    As the post from The Kitchn suggested, if you find beef ribs to be fatty, you can either trim the fat (not all that highly suggested for this cooking method) OR cook them ahead of time and scoop the fat off the cooled sauce. I didn’t find them to be too greasy or fatty this time around, and enjoyed the richer sauce over mashed potatoes. Your tastes may vary, so know that this is an option.

    Enjoy with mashed potatoes and the vegetable of your choice.


  • Cottage Pie

    Cottage Pie
    Cottage Pie

    This recipe comes out of a birthday request. In my family, tradition was that on your birthday, you pick what we have for dinner. This weekend was a birthday, and the request was a cottage pie. I’ve never made cottage pie, so I did a bit of searching.

    So, here in New England, a meat pie topped with potatoes is called Shepherd’s Pie no matter what type of meat goes into it. As far as I learned, Shepherd’s Pie is lamb and gravy topped with mashed potatoes and baked. You know, shepherds? Sheep? Cottage Pie is the same basic idea but using beef as the meat. The internet has a variety of ideas about what cottage pie should be, from a basic lamb-based shepherd’s pie to a tomato sauced ground beef topped with potatoes and cheese. The former is poorly named, and the latter just sounds like casserole to me.

    What I wanted for this was a ground beef, gravy, and vegetable pie topped with lovely browned mashed potatoes. Anything topped with potatoes is bound to be good, right? To add a bit of extra flavor, browned the onions quite well, and used mushrooms, arrowroot starch, and balsamic vinegar in the gravy. For veg, I’ve added corn, carrots, and celery. I think this recipe is pretty versatile — change up the veg for what you think you’ll like best, and make it your way — just let us know how it turned out.

    Cottage Pie is served, with garnish
    Cottage Pie is served, with garnish

    Cottage Pie

    • 1 lb. ground beef
    •  salt and pepper, to taste
    • 1 Tablespoon olive oil or reserved beef fat
    • 3/4 – 1 cup medium onion, sliced thinly
    • salt, to taste
    • 1 cup carrots, finely chopped (about 3)
    • I cup celery, finely chopped (about 3 outer stalks)
    • 1 cup corn, frozen (optional)
    • 2 Tablespoons fat of your choice*
    • 1/4 to 1/2 cup baby bella mushrooms, finely chopped (optional)
    • 2 Tablespoons arrowroot starch
    • 1 1/2 teaspoons fresh thyme leaves
    • 1 to 1 1/2 cups beef broth
    • 1 Tablespoon balsamic vinegar (check to be sure this is “safe”)
    • 2 lbs potatoes, peeled and roughly chopped
    • 2 Tablespoons Earth Balance or other margarine or fat
    • 1/2 cup non-dairy milk of your choosing, heated to at least room temp, if not a little warmer
    • salt and pepper, to taste
    • fresh parsley, chopped (optional)

    Heat a large skillet over medium heat. If you have a skillet that you can use a whisk in (i.e. not non-stick), use it. Brown ground beef, breaking it up. Add salt and pepper to the cooking beef, adjusted to your taste. Remove beef, leaving any fat in the pan — I used a lean beef, so there was almost none, but if there is some, you can either use it to cook the onions or to make the gravy. If you want it for gravy, set it aside. Put the beef in a greased casserole that will hold all your ingredients.

    In the remaining drippings or in 2 T of olive oil, add the onion and brown to the point of caramelization. This takes some time! Probably close to 40 minutes. Be patient, stir occasionally, and know that this pays off in flavor. When the onion is almost done, add the carrots, stir and let cook a few minutes. Then add the celery, do the same, and finally, add the corn and just let it thaw. Add the cooked veg  to the beef, and stir it up.

    In the pot or pan you’ve been using, add the reserved grease OR 2 tablespoons of fat — margarine, oil, whatever — and heat. If you’re using the mushrooms, add them to the hot fat.Whisk in the arrowroot starch and cook this paste for a few minutes, and then gradually add 1 cup of the beef broth or stock, whisking continually. When you have a slightly liquid-y gravy, add the balsamic and cook until the vinegar smell dissipates. Add thyme, and cook a few more minutes, adding a little more beef stock if you need to thin the gravy. Taste, and add salt and pepper if needed. Pour the gravy over your meat and veg, stir and set aside.

    Make potatoes! Boil the potatoes in salted water until soft when pierced with a fork. Drain and mash with your margarine and non-dairy milk, adding the non-dairy milk gradually. You want a consistency that you can pipe, if you’re going to do that, so aim that direction while mashing. Taste, add salt and pepper if needed.

    If you are piping the potatoes, let the cool to just above room temperature, and then load your piping bag and make pretty designs on top of your casserole. Bake 25 minutes if you’ve just finished making everything, 30-40 minutes if you refrigerated the casserole, at 350ºF.

    Top with more of the optional chopped parsley, because it’s pretty, and serve.

  • Cure your own Corned Beef

    Cure your own Corned Beef
    Cure your own Corned Beef

    You may remember that we posted a Stout Braised Corned Beef and Cabbage recipe way back in the depths of time. Well, that was in the time before my wheat and corn allergies were diagnosed.  At the time, since Mary Kate had issues with gluten, and a lot of our readers are gluten-free, I had put in the modifications needed to make it gluten-free. But once my corn allergy hit, I couldn’t find a safe brand of corned beef that I could buy, because of the dextrose, sodium erythorbate, and other corn ingredients that tend to show up in commercial versions. A while ago, I came across a beef brisket while shopping, and it occurred to me that maybe I could research how to make corned beef, just like I had for learning to cure bacon. Worst case scenario, I’d cook it as brisket if it didn’t work. So I bought it, but I didn’t have time to deal, so I threw it in the freezer. During my most recent “vacation” otherwise known as “food prep week”, I finally decided that it was time. So I looked at recipes from Alton Brown on the Food Network and the Wellness Mama, and modified and added things based on my other research.

    I prepared the brine, then I brined the brisket for 10 days, and cooked it according to my original recipe, but using the gluten free tweaks, and without cabbage, because I forgot to buy any. And it was corned beef, and it was good. Even my husband (no food allergies) said it was good. So I’m sharing.

    Just a note, this takes a long time. And it’s probably best to do the brine the day before you’re actually going to start marinating, because it has to be completely chilled. Also, be aware that it’s not the right color because we’re not adding curing salt or saltpeter, but it still tastes right.

    Cure your own Corned Beef after curing and cooking
    Cure your own Corned Beef after curing and cooking
    Cure your own Corned Beef after cooking and slicing
    Cure your own Corned Beef after cooking and slicing

    Cure your own Corned Beef

    • 2 quarts of water
    • 1 cup of kosher salt
    • 1/2 cup of brown sugar
    • 1 cinnamon stick, broken into pieces (I used a zip top bag and a rolling pin and smacked it a couple of times)
    • 1/2 Tablespoon of brown mustard seeds
    • 1/2 Tablespoon of yellow mustard seeds
    • 1 Tablespoon of whole black peppercorns
    • 8 whole cloves
    • 8 whole allspice berries
    • 2 bay leaves, broken into bits
    • 1/2 teaspoon of ground ginger or 1/2 Tablespoon of crystallized ginger (whichever you have on hand)
    • 2 pounds of ice
    • 1 cup of fresh celery puree (Take 5-7 stalks of celery and put them through a food processor or blender until they are pureed)
    • 1/4 cup of juice from sauerkraut made from red cabbage (optional – just an attempt to get the correct color since I’m not using curing salt)
    • 1 – 2 1/2 gallon zip top plastic bag (They have these now! They are brilliant for marinating and knitting projects!) 
    • 1 – 4 to 5 pound beef brisket

    In a large stockpot, add the water, salt, sugar, cinnamon, both kinds of mustard seeds, black peppercorns, cloves, allspice berries, bay leaves, and ginger, and mix to combine. Bring to a boil over high heat until salt and the sugar have dissolved completely. Remove the stockpot from the heat, and add the ice. Stir the mixture until the ice has melted. Put the brine in the fridge until it has completely chilled. And I mean it, completely chilled, so that could take several hours or it might even be the next day.

    Once the brine is completely chilled, mix in the celery puree and the sauerkraut juice.  Place the brisket in the 2 1/2 gallon zip top plastic bag and add the brine mixture to the bag.  Push as much of the air out of the bag as you can and seal it.  Place the zip top bag in a container that allows it to lay flat and put it in the fridge for 10 days. You want to check it daily to make sure that the brisket is completely submerged and to flip the bag to stir the brine. After 10 days, remove the brisket from the brine and rinse it off using cold water. Discard your brine, it can’t be used again.  Now you have corned beef brisket to cook as described in our original Stout Braised Corned Beef and Cabbage recipe, or to cook it how you normally cook corned beef.

    Enjoy!


  • Homemade Hot Dogs

    Hot Dog with Ketchup, Mustard, Relish, and Red Cabbage Sauerkraut, and a bad attempt food styling using the sauerkraut juice - Photo by J. Andrews.
    Hot Dog with Ketchup, Mustard, Relish, and Red Cabbage Sauerkraut, and a bad attempt food styling using the sauerkraut juice – Photo by J. Andrews.

    When I was diagnosed with the dairy allergy, I could still have Pearl and Boars Head hot dogs. And then came the corn allergy, and wiped out both of those choices too. So I was left with trying to make my own. The thing is you really need a KitchenAid Mixer with the Food Grinder attachment and the Sausage Stuffer accessory or a sausage stuffing machine (they have those, seriously, who knew?) to make this.  Or you can just make them into patties and fry them. We did that with a bit of the leftover filling and it tasted hot dog-like.

    You can get a beef collagen casing from LEM Products, which is what I did (I’m not saying it’s not corn contaminated, it probably is, but I seemed to tolerate them okay, and I only plan to do this once in a great while) or you can get some DeWied Natural Sheep Casings.

    By the way, we have no affiliation with Amazon, the above links are just so that you can see the product and look at the information.

    I didn’t grind my own meat but you could. I decided to cheat and get some ground beef because this was going to be a big enough process all on its own without getting all Denise crazy. You may also want to use a food processor, as discussed below to get a better texture in the filling. This recipe does take two days, so please read the whole thing. 

    Also before anyone asks, the hot dog bun pictured is not gluten-free or otherwise safe. I don’t have a safe hot dog bun yet, but I thought the pictures would look stupid if it was just a hot dog on a plate with condiments. Don’t worry, we fed it to my husband who has no food allergies.

    Homemade Hot Dogs:

    Again, this recipe does take two days, so please read the whole thing. 

    • 2 1/2 pounds of ground beef (don’t get any leaner than 80% or you’ll have really dry icky hot dogs)
    • 1 Tablespoon and 1 teaspoon of kosher salt
    • 1 cup of ice water
    • 1 Tablespoon of ground mustard
    • 1 Tablespoon of paprika
    • 1 teaspoon of ground coriander
    • 1/4 teaspoon of ground black pepper
    • 1 1/2 teaspoons of garlic powder
    • 2 Tablespoons of cane sugar syrup (You will need to make it ahead of time – there are two good recipes and I’ve used both before. The one from thekitchn.com makes about a quart, and the one from justapinch.com makes about two cups.) 
    • hot dog casings (see notes above for your choices)

    On the first day, take the ground beef, the kosher salt and the ice water and put it in a bowl. Knead the ingredients together with your hands until everything is well incorporated.  Cover it with plastic wrap and let it sit in the fridge overnight.

    Ground Beef Mixture
    Ground Beef Mixture

    On the second day when you’re ready to start stuffing, place the mustard, paprika, coriander, black pepper and garlic power in a small bowl and mix well.

    Spices before mixing
    Spices before mixing

    Take the ground beef out of the fridge and pour the spice mixture and the cane sugar syrup over the ground meat. Knead the spices and cane sugar syrup into the meat until everything is well incorporated.

    Knead spices and cane sugar syrup into ground beef mixture
    Knead spices and cane sugar syrup into ground beef mixture

    If you do not have a food processor, place the ground beef mixture into your KitchenAid mixer bowl, use the flat beater attachment and turn the mixer to high and beat for several several minutes. Just understand that the texture may be a bit more rustic than if you used a food processor. If you do have a food processor, in batches, process the ground beef mixture with the regular chopping blade and process into a fine paste.

    Ground beef mixture in mixer
    Ground beef mixture in mixer

    When you have finished processing the ground beef mixture either in the food processor or the mixture, spread a piece of parchment paper, or cling wrap out on a cookie sheet. I like to lay a sheet of parchment paper down first, just for ease of cleaning and it makes it easier to remove the paste later to put in the food grinder to stuff the casings. Spread the paste out on the cookie sheet so that it is a even layer across the cookie sheet. Place it in the freezer for 30 minutes.

    Ground beef mixture spread out on cookie sheet
    Ground beef mixture spread out on cookie sheet

    While you are waiting for the ground beef mixture to chill, set up your KitchenAid Mixer with the Food Grinder attachment and the Sausage Stuffer accessory. Depending on the size your casing you’ll need to choose the larger or smaller nozzle. I needed to use the smaller nozzle with the casing I chose, and I used very little of it.  I probably have enough casings left to do 5 or 6 more batches. Slide the casing on the nozzle.

    KitchenAid mixer set up with Food Grinder, Sausage Stuffer and with casing on nozzle
    KitchenAid mixer set up with Food Grinder, Sausage Stuffer and with casing on nozzle

    When the ground beef mixture has chillled, take it out, and place small-ish meat ball sized blobs of ground beef mixture in the food grinder. Slide a bit of the casing forward and tie the end closed before you start the mixer. Put the mixer on speed 4, and as meat comes out, hold the casing on the nozzle so that more casing does not slide out until the casing has been filled by the meat coming out. It’s easier said that done, and I found that it was helpful to have my husband assist me at this point, as I needed the two extra hands. Make sure you shut off the mixer just before the last bit of casing is filled as you’re going to want to have room to tie it off. Add more casing if you have more ground beef mixture and repeat this process to fill the casing. I will say that is easier if you have one person run the Food Grinder and one person deal with the casing.

    Holding casing while mixture fills it
    Holding casing while mixture fills it

    Once you have filled the casing, you are going to want to portion off your hotdogs by twisting the casing. Be careful, I broke one strand open trying to portion them off.

    Twisting filled casing to portion hotdogs
    Twisting filled casing to portion hotdogs
    Hot dogs after portioning
    Hot dogs after portioning

    Preheat your oven to 225ºF and place your hotdogs on a rack on another sheet pan.

    Hotdogs before cooking in oven
    Hotdogs before cooking in oven

    Place the hot dogs in the oven and cook until their internal temperature is 150ºF. This could take 40 minutes to an hour. Check them with a meat thermometer occasionally.

    Hotdogs after coming out of the oven
    Hotdogs after coming out of the oven

    Transfer them to a bowl of ice water, and when cool you can store them in the fridge or freezer to use later.

    Cooked hotdogs cooling in ice water bath
    Cooked hotdogs cooling in ice water bath

    We saved out a couple from the ice water bath, and fried them up immediately.  After all, all that hard work had to be rewarded right?

    Homemade Hotdogs fried in a skillet
    Homemade Hotdogs fried in a skillet

    We froze the remainder and took them to a cook out and grilled them.

    Hot Dogs on the Grill
    Hot Dogs on the Grill – Photo by J. Andrews


    Hot dog with ketchup, relish and mustard
    Hot dog with ketchup, relish and mustard – Photo by J. Andrews

    Enjoy!